Making a Custom Offline Weather Station with WeeWX
Last Updated: 12/02/2023
Taking a smart weather station off-the-grid, with WeeWX and custom software

Matthew Piercey

Part of a Series:
Matthew's MachinationsA series chronicling my hijinks, across a bunch of random side-projects

I think many people’s preconception of a technical person is someone who fully embraces “smart” technology. But in my experience, the more someone knows about computers and networking, the less likely they are to want to send their precious data to “the cloud”.
After all, “the cloud” is “someone else’s computer” as the saying goes. And once your data’s no longer in your hands, all bets are off. Even if the organization running a service promises they “won’t be evil”, what happens if they have a data breach, or a new CEO who doesn’t care so much for little things like “privacy” or “freedom”?
Worse still, what happens when the service eventually goes offline for good? (And that’s a when, not an if, by the way. It’s only a matter of time.) Your “smart device” might be reduced to a shell of its former self - if you’re lucky. Or it might turn into a dumb, expensive, useless brick of e-waste.
Maybe it sounds like I’m making a mountain out of a molehill here, but I think this problem is a bigger deal than most people would like to admit. The fact is, far too many of us are incredibly reliant on third-party services in our daily lives. Services that can (and someday probably will) pull the rug out from under us in some way. So call me paranoid all you want, but I’m more than happy to stay out of this rat race at every chance I get.
To that end, I’d like to share a story of how I was able to reclaim a “smart” device from the gaping maw of the cloud. IBM’s cloud, in particular. Fair warning, it involves some pretty involved reverse-engineering, networking nonsense, software experimentation, and setting up a home server. Unfortunately this whole reclamation process is far from straightforward. But believe it or not, I got fairly lucky with this device.
So, I have a weather station with an outdoor sensor unit and an indoor display unit. The indoor unit connects to the outdoor unit through some kind of RF connection. I’m no radio engineer, so I’ll stay out of that discussion. But anyway, the indoor unit reads and processes the data from the outdoor unit, displays it on its screen, and periodically sends the data - over WiFi - to a remote server.
In this case, the remote server is Weather Underground (or Wunderground, or WU, or whatever they call themselves). This apparently used to be a pretty decent service, but once IBM bought it, it got dumbed down pretty quickly. For instance, they got rid of their free weather reporting API (just like Apple did when they bought the DarkSky weather site). Worse still, they now quite heavily restrict the amount of data that’s available to view. For instance, my weather station records indoor temperature and humidity (and I know for a fact WU is receiving it) but I couldn’t find a way to access it. And you can only export the latest year’s worth of data, even if your station has been reporting the weather for many years. Boo!
My weather station was also reporting to Weathercloud, which I will admit is a better service in general. For instance, it allows me to view the indoor temperature and humidity, at least when I’m logged in. But still, it’s a proprietary service. And I wanted to take this station fully off the grid (well, other than the electrical grid, although that’s technically possible now).
It’s a pretty unknown brand. A Raddy WF-100SE. I think it’s alright, but I wanted to make it better.
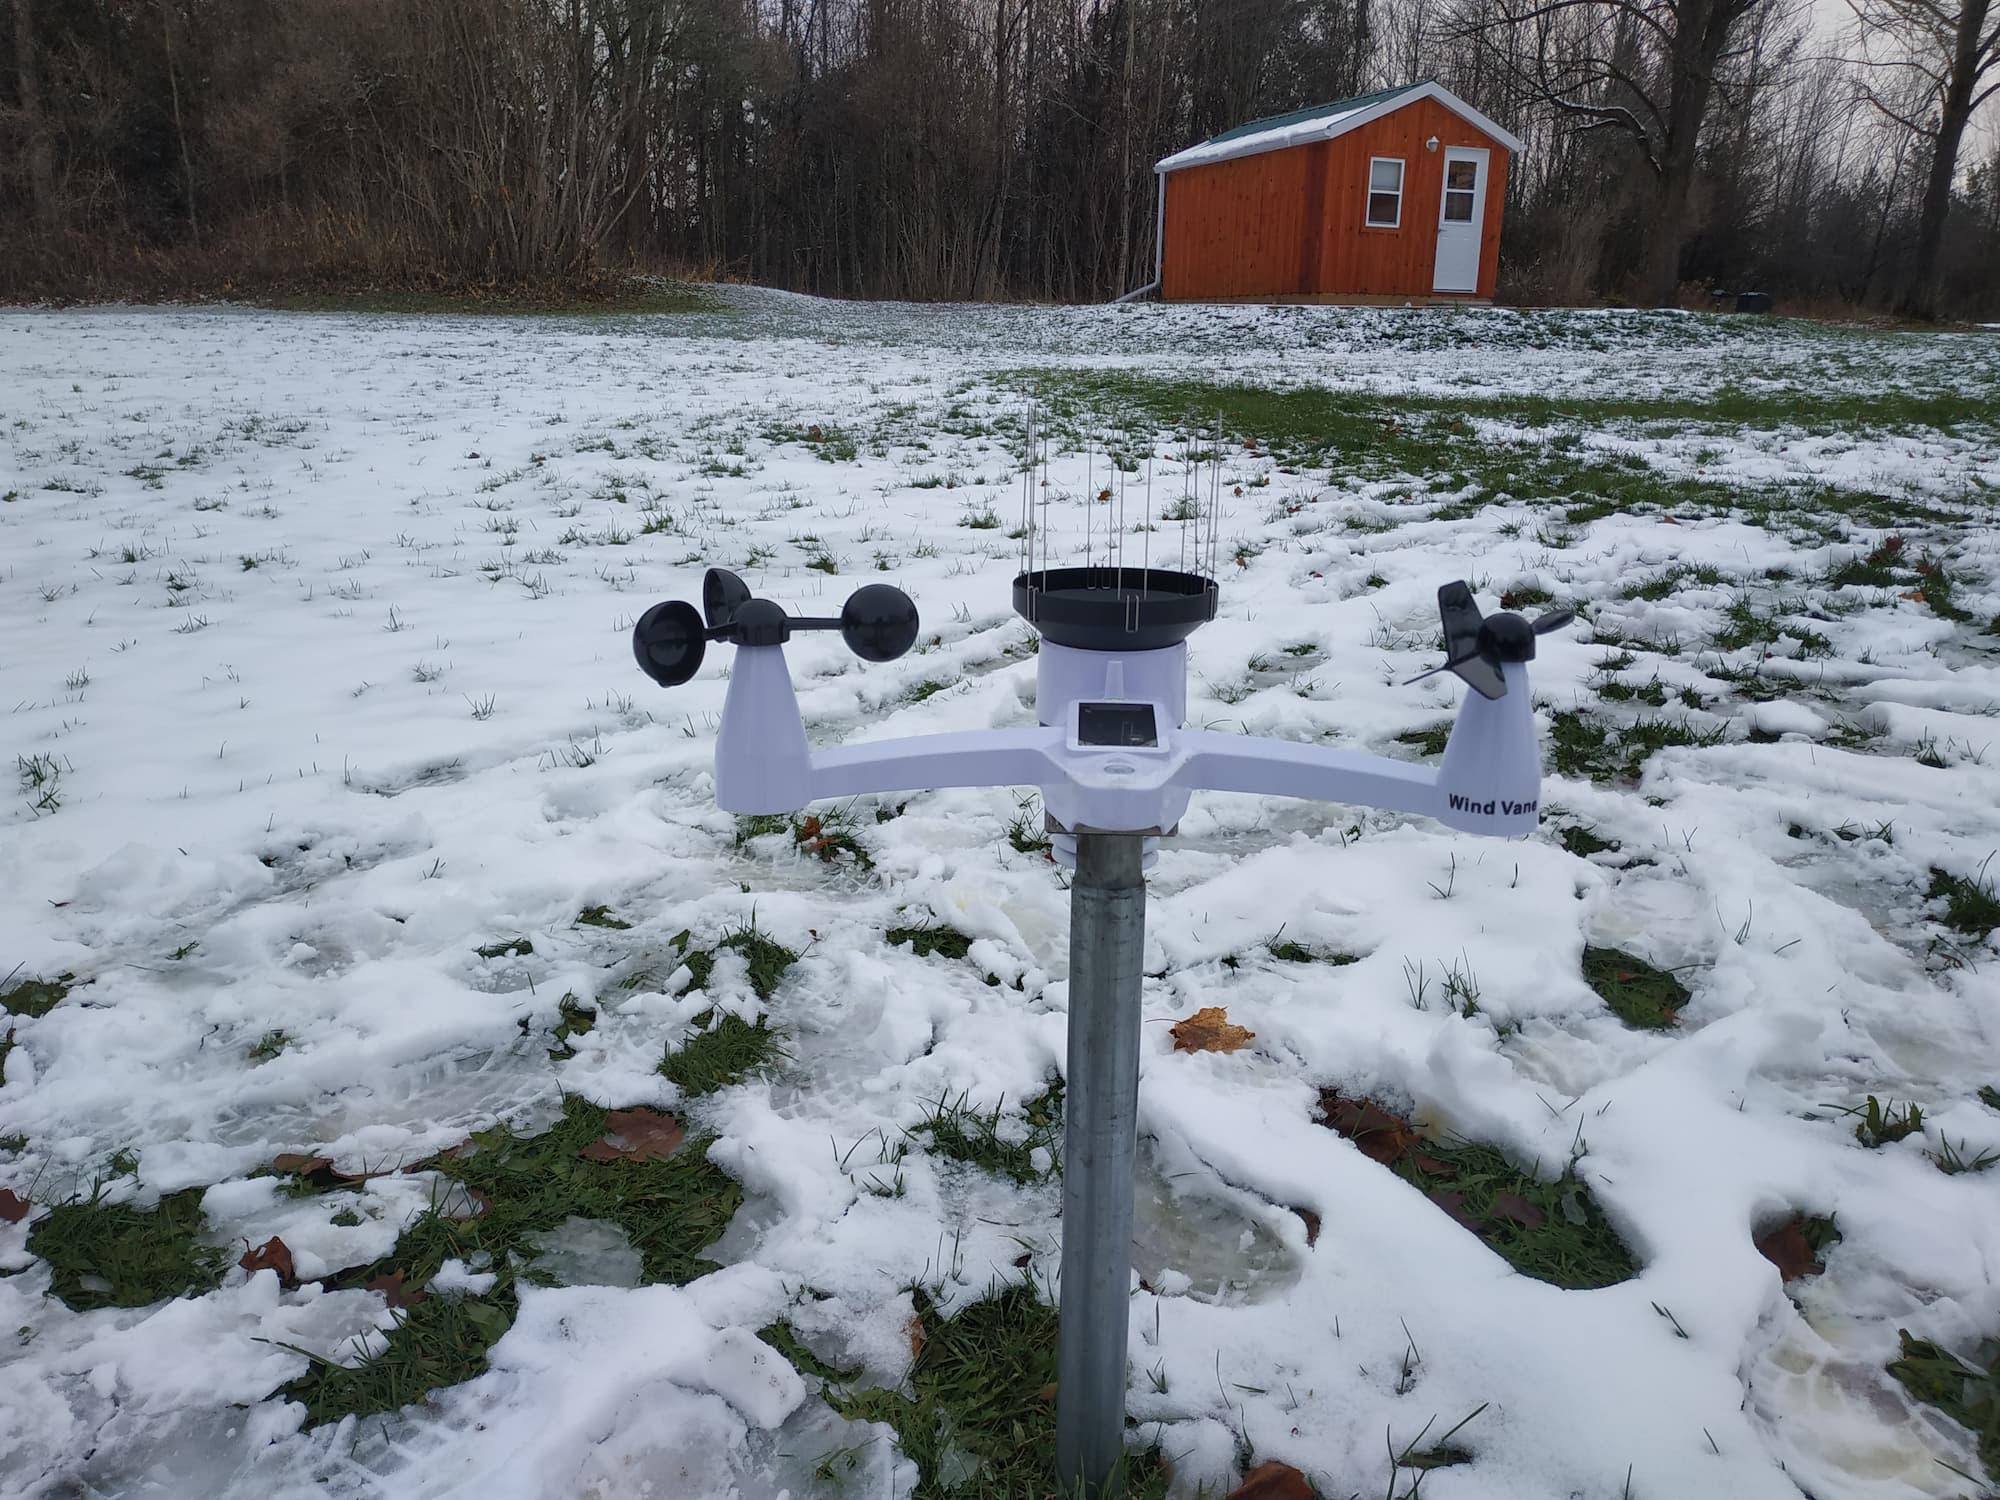
My weather station
I had read of some people having success with taking their PWS (personal weather station) offline, and one Reddit post was of particular interest. So, armed with the knowledge that it should technically be possible, I attempted to formulate a plan. Of course, this plan wasn’t without its issues…
The first major issue I faced was with NAT (Network Address Translation). A layperson’s explanation (Would I be considered a layperson in this field? Probably.) is that NAT is the protocol that converts IP addresses. Without getting too deep into the weeds here, and without saying anything too incorrect, every device that’s connected to a router gets an IP (internet protocol) address.
These addresses (called “private addresses” when you’re inside the network) are like unique identifiers for each device on the network. Now, on the Internet, all the websites you visit have IP addresses. And you have one too (just search for “what is my public IP address”). But these “public addresses” are different from the private addresses that routers give out.
For instance, your computer’s private address might look something like this: 192.168.10.105 (your mileage may vary, but it almost certainly starts with 192.168). But here’s what a public IP address might look like: 209.85.128.0 (I think this address is owned by Google, but don’t quote me on that).
Anyway, NAT is the process of converting a private IP into a public IP (and vice versa). So why is that a problem? Well, it’s not. Until you have more than one router between you and the Internet. And wouldn’t you know it, that’s the situation I found myself in.
See, when I moved into my new office cabin earlier this year, I set up a second router in the cabin, because the WiFi from the house didn’t reach. And I wanted a hard-wired Ethernet connection between my main router and my computer out in the office, so a simple WiFi extender wasn’t going to cut it. Luckily, when I upgraded my main router to a Mikrotik hap ax3, that freed up the little MoFi-4500 V2 router I was previously using. So I brought that in the office, set it up, and all was fine.
I plugged the hard-wired Ethernet cable running from the house into the WAN port of the router, and I plugged my computer into one of the LAN ports. And the router broadcasted its own WiFi network, for any wireless devices in the cabin. Like my phone, or my 3D printer. And it worked pretty well. So, what was the problem?
Put simply, the problem was that my main router was seeing all traffic from my office (regardless of what device it was coming from) as having come from the office router. That meant that my computer had an IP address of something like “192.168.10.123”, on the subnet of the secondary router. By the way, a subnet is a portion of an IP address that’s shared between multiple addresses. For instance, all addresses from 192.168.10.1 to 192.168.10.255 are part of the 192.168.10.x subnet. But I digress. Point is, my main router’s subnet wasn’t 192.168.10.x. So while I could access the main router’s control panel, I couldn’t access any other devices on that subnet. For instance, I couldn’t print something from my computer in the office on my printer back in the house.
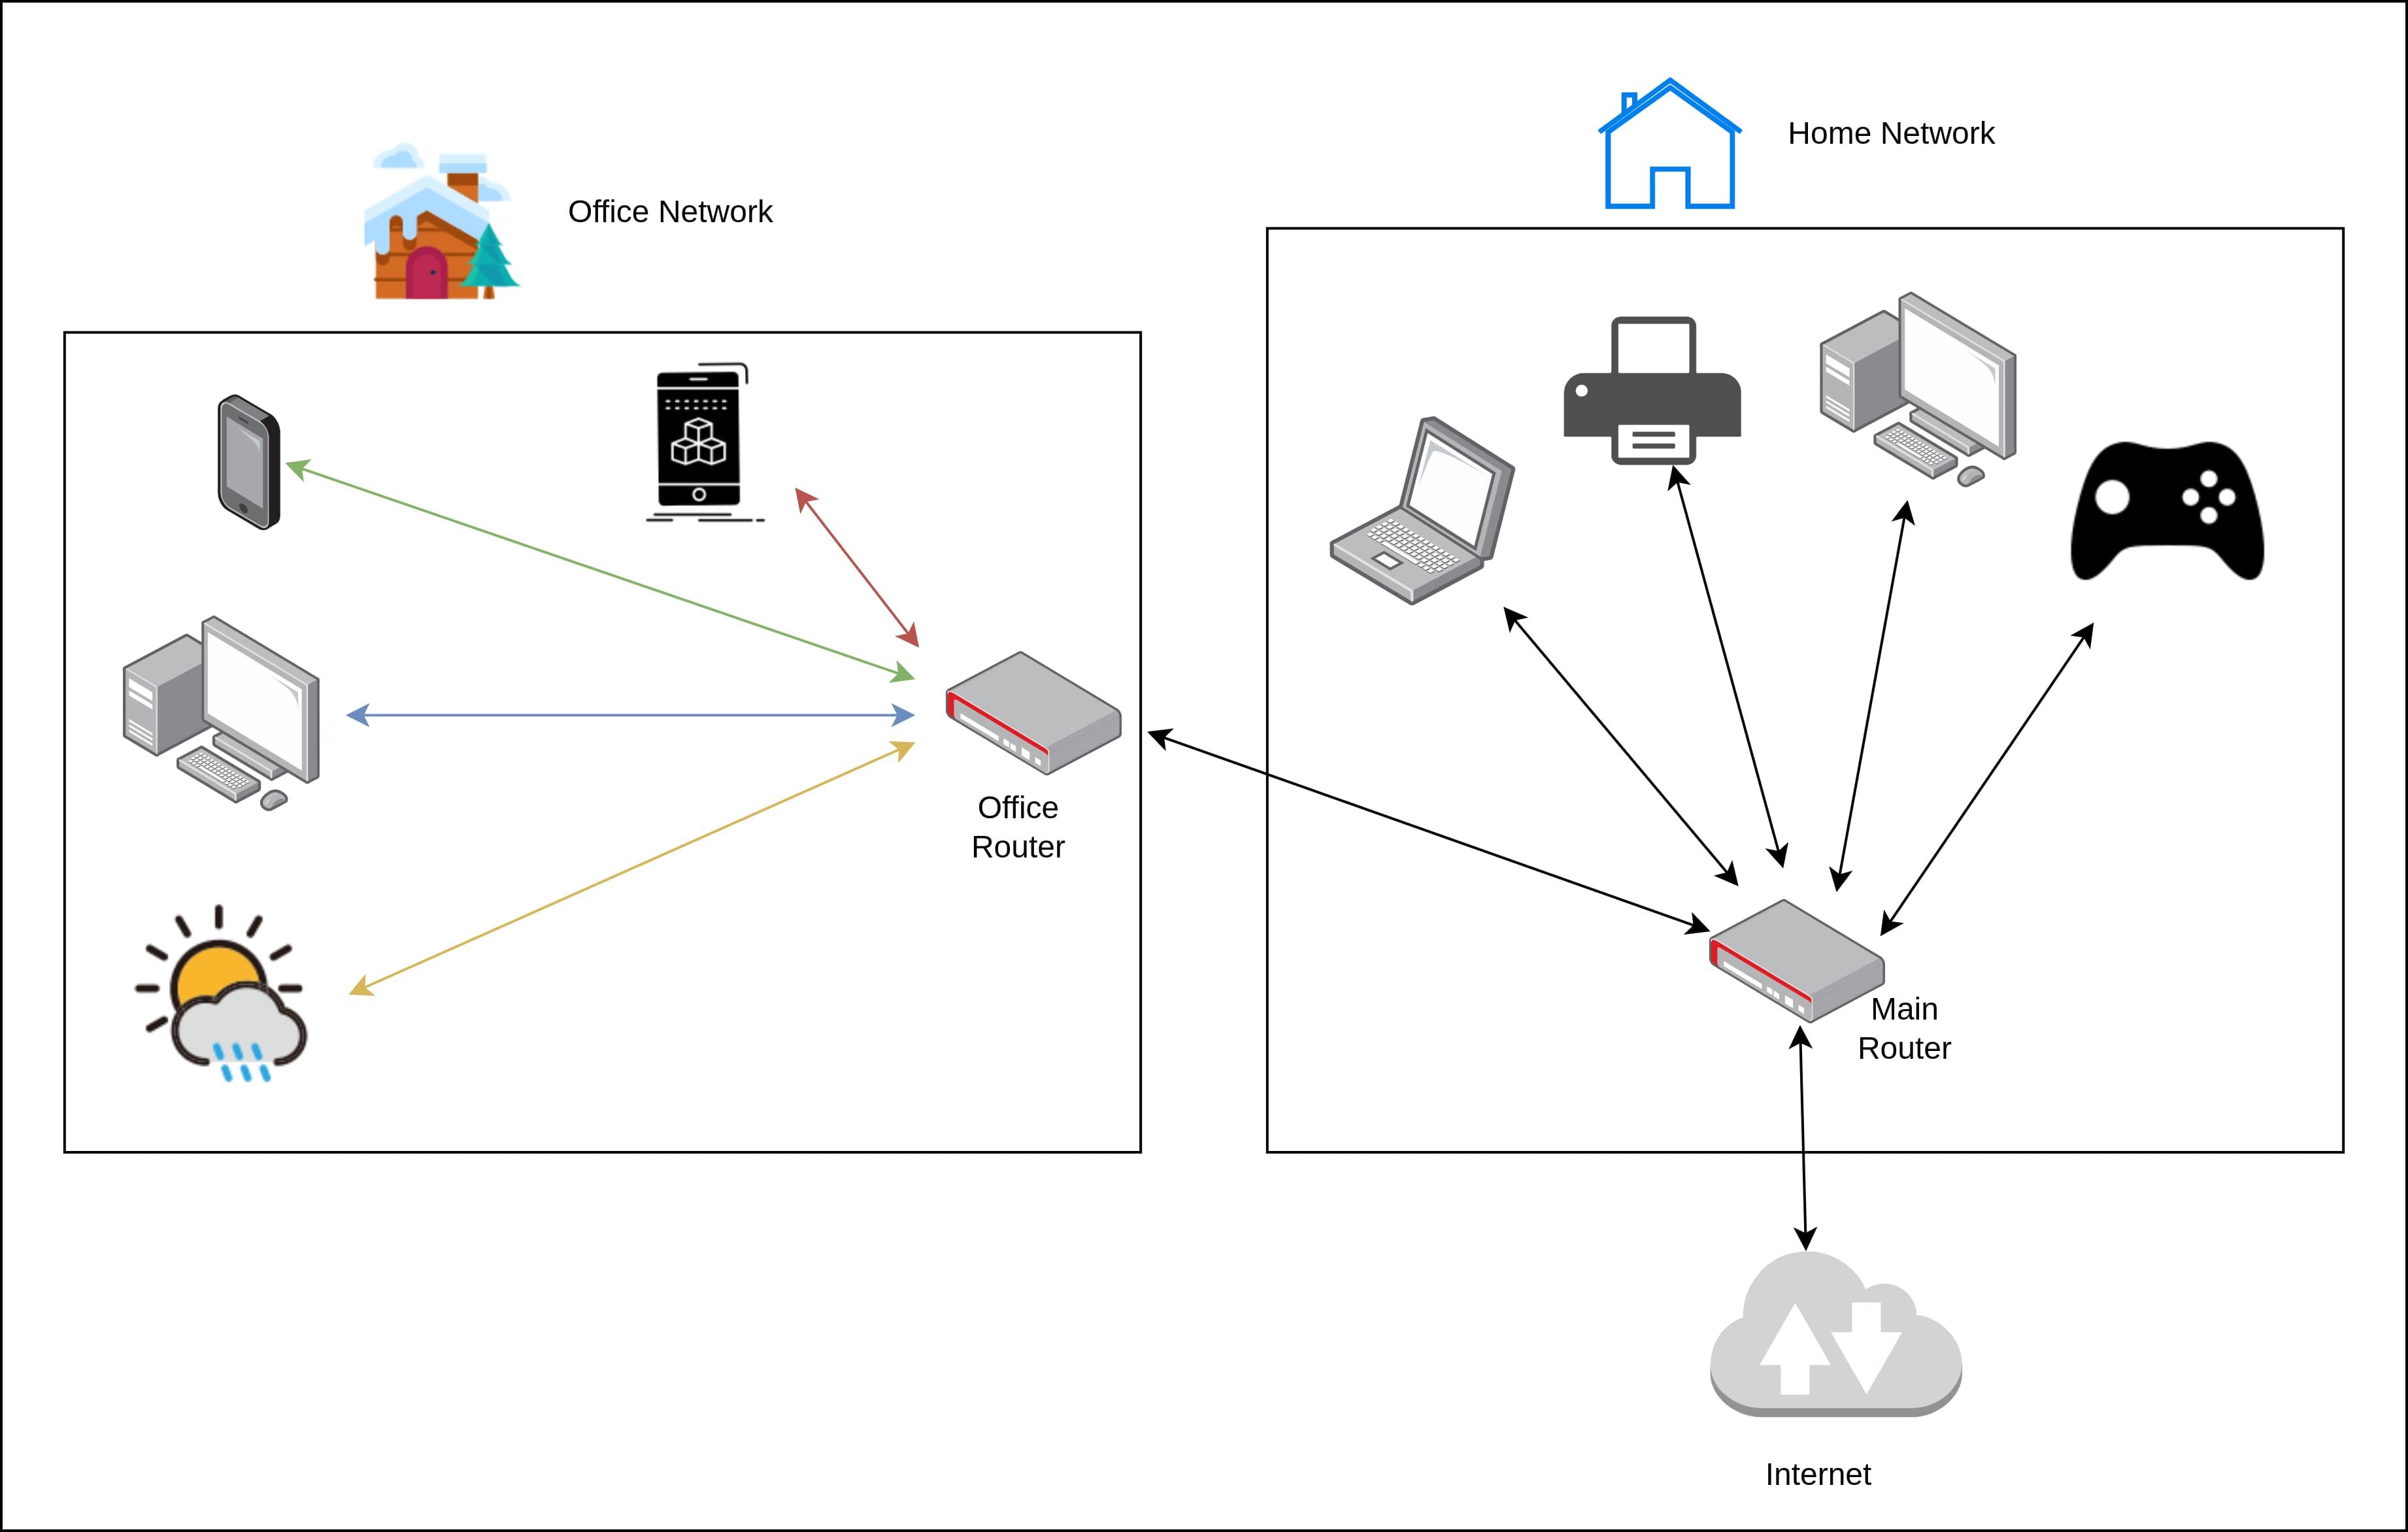
When the office router isn't being bypassed, the whole office network only looks like one device to the main router
Anyway, long story short, I knew I had to find a way to put the secondary router into bridge mode. So it wouldn’t assign private IP addresses to devices itself, in its own subnet range. But rather, that it would defer the process of IP assignment (such as through DHCP), NAT, and DNS to the main router. I wish I had a less-dense, more-concise way of explaining that, but that was the crux of the first issue. In technical terms, this is known as “flattening the network topology”. In a flat network, it is as if all devices are connected to the same router (in this case my Mikrotik) - even if they’re physically behind other devices like routers, hubs, or switches.
Luckily, it turns out that my MoFi-4500 V2 is running some form of OpenWrt. A weird, outdated, vendor-modified version of it, but more or less OpenWrt nonetheless. OpenWrt, by the way, is an operating system for routers. It’s a form of Linux, actually, and it’s an excellent open-source project. Why was this good news? Well, it meant I could use OpenWrt tutorials to achieve my desired objective. More or less - there was still a bit of experimentation I had to do on my end.
But these articles helped me quite a bit, in turning my secondary router into a “Dumb Access Point”.
https://openwrt.org/docs/guide-user/network/wifi/dumbap
https://lowtek.ca/roo/2022/openwrt-dumb-access-point/
Although I took this a step further, by bridging both VLAN interfaces, “eth0.1” and “eth0.2”, along with the WiFi network, and deleting the “WAN” interface. This basically allowed me to still put the hard-wire cable from the house into the WAN port of the router, keep the four LAN ports freely-available for devices like my computer, and have the secondary router project its own WiFi network. This was more complicated than I wish I was, but at least I learned a thing or two in the process.
But back to the weather station. Why was this necessary? Well, maybe I could have done it without it. But I think it was a helpful upgrade for my home and office networking setup, since having another router in the way made some things more difficult. (As an aside, this is also why I recommended putting the Starlink router in bypass mode, in the blog post about my recent Starlink installation). Because now, my weather station could be given an IP address directly from my main router, which will become important in a little bit.
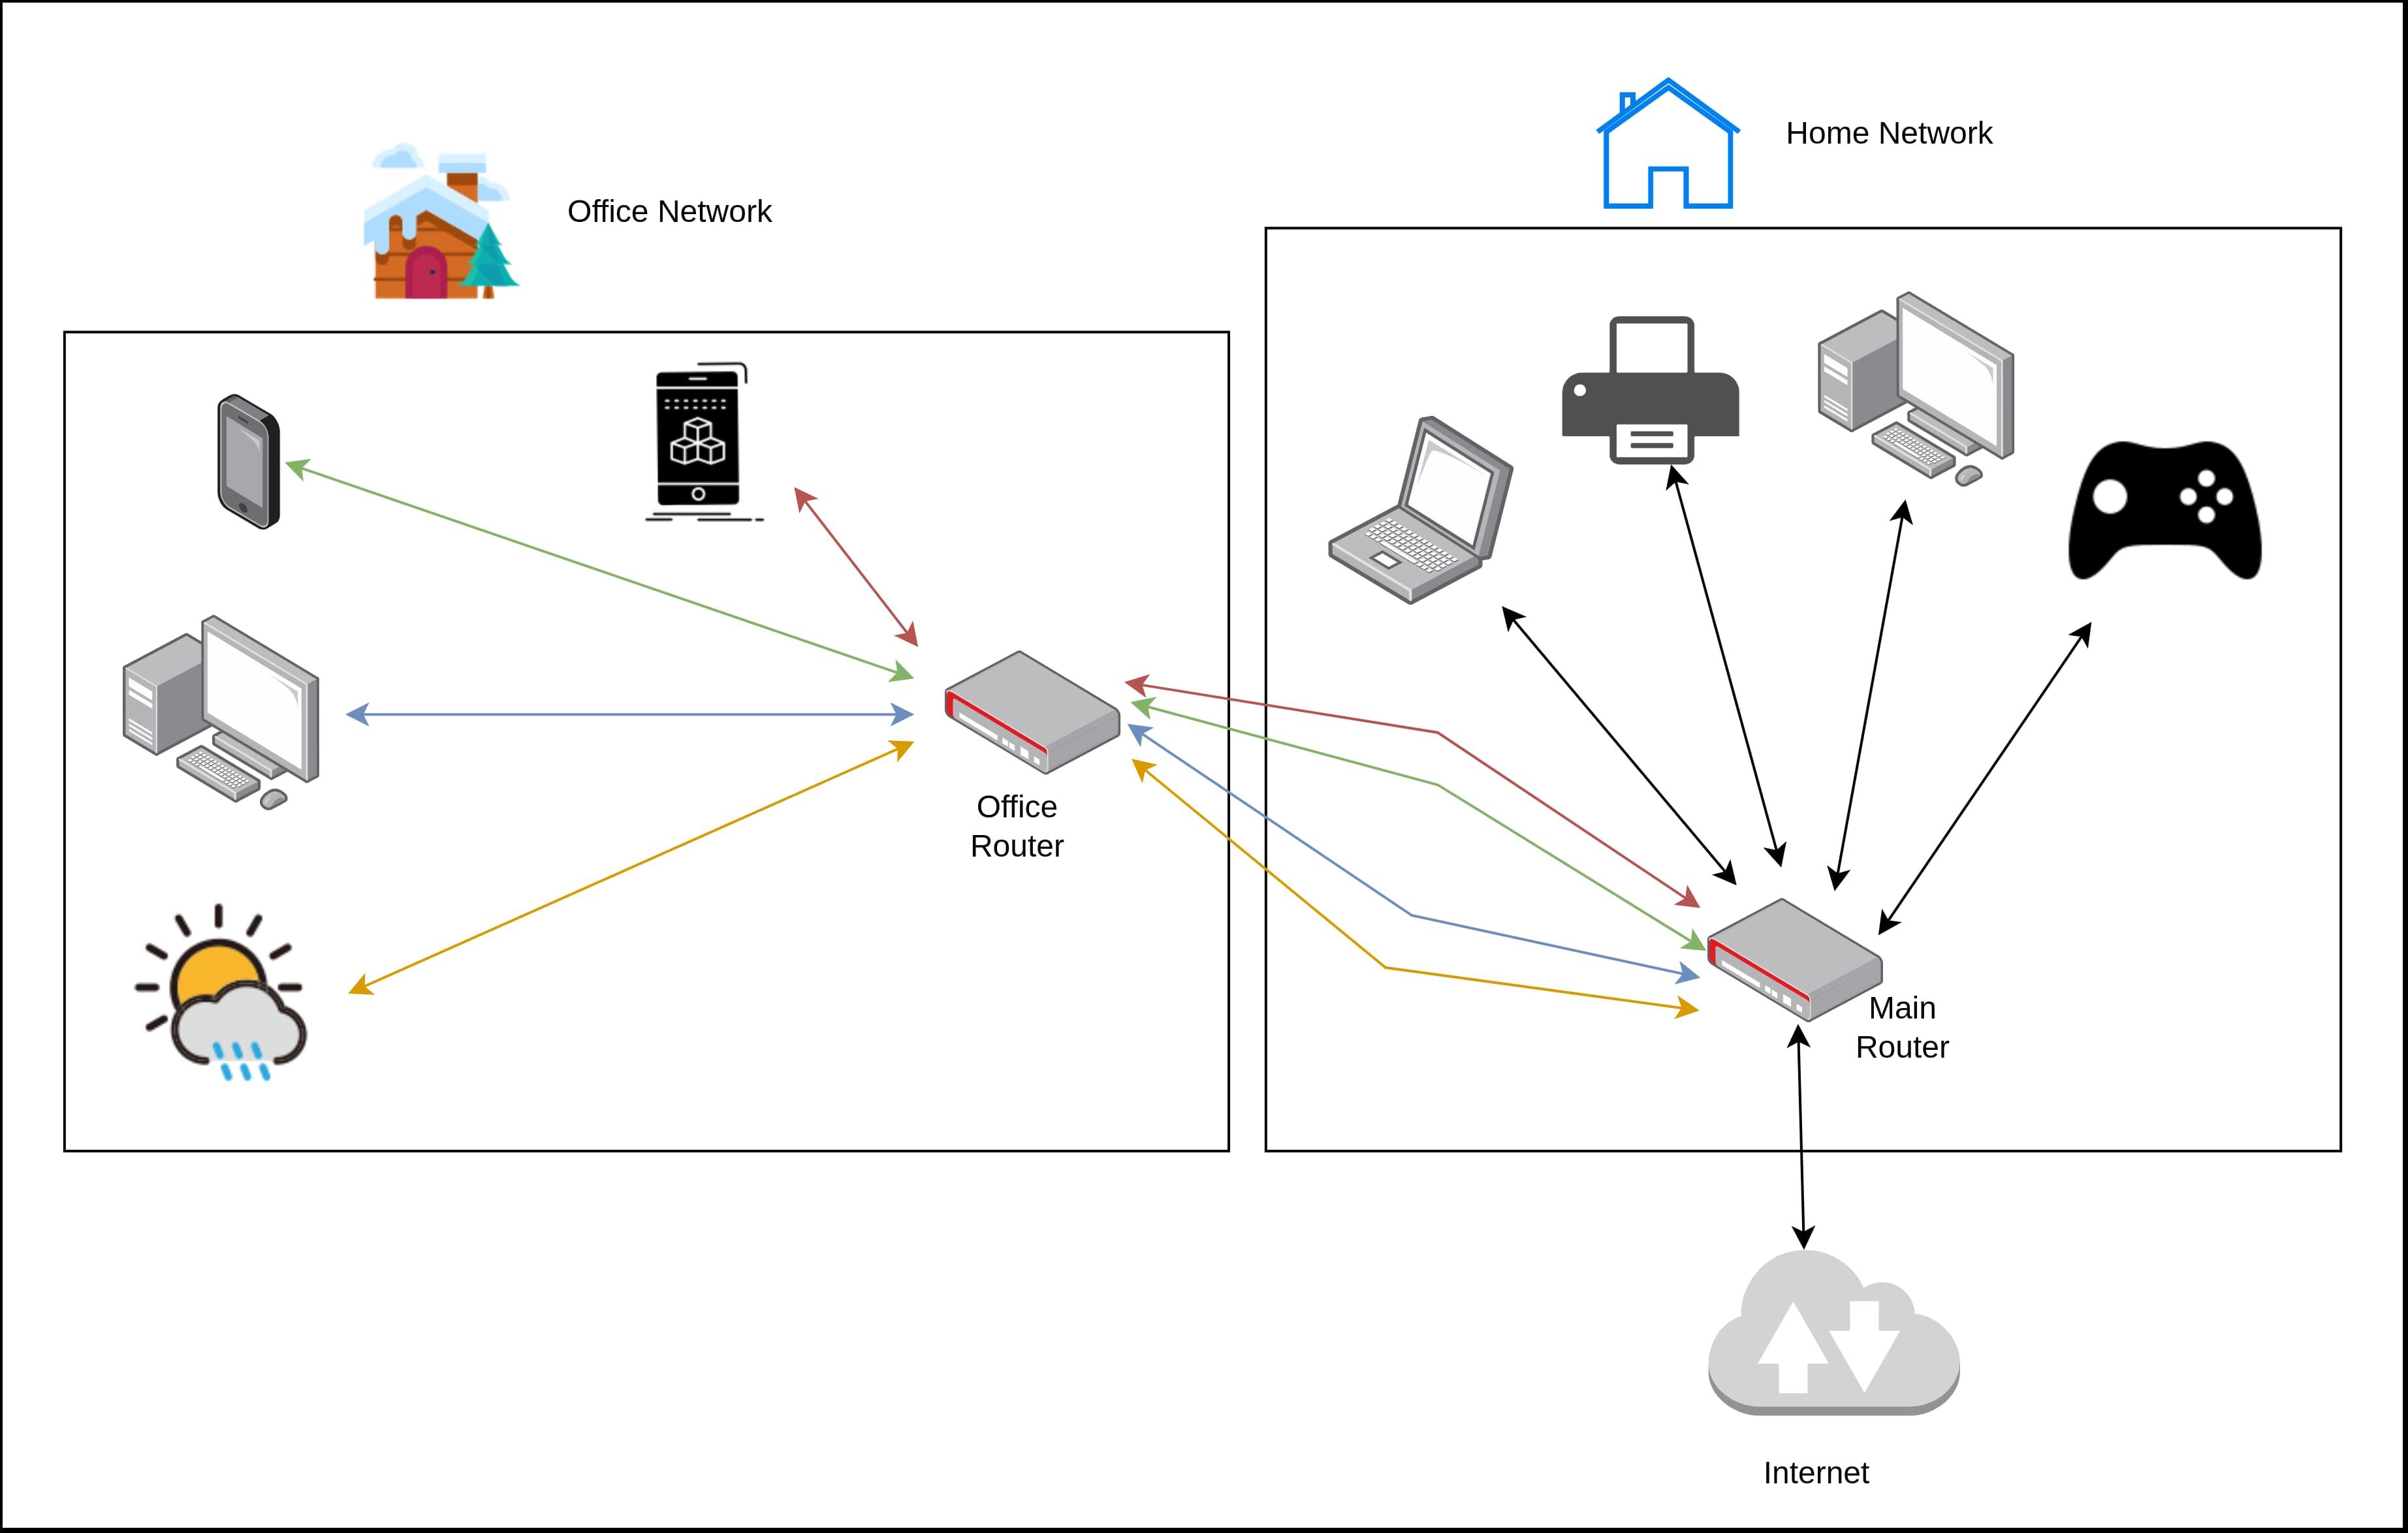
With the office router bypassed, my main router sees all its devices individually
It was at this point that I could finally attempt some version of the process I found outlined in this Reddit post, by user drbytes on the homeassistant subreddit.
Not coincidentally, I found this post after trying to see what my options were for connecting my weather station to HomeAssistant. I’ll steer clear of any further discussion to that end in this blog post. But sufficed to say, HomeAssistant is a beast into and of itself. And the HomeAssistant community is full of people who want to take back control of their “smart” home devices - by any means necessary.
So, according to this Reddit post, my next step was doing some packet sniffing. Lucky for me, my Mikrotik router is full of features. Most of which I’ll probably never use, but some of which have already come in handy in a big way. One such feature is the built-in packet capture and logging utility. This blog post gives a pretty good explanation of the process:
https://tojaj.com/packet-capture-from-mikrotik-to-wireshark/
In short, you can configure your router to intercept all incoming traffic from a certain IP address, and send a log of it somewhere else, while letting the packet go on its merry way like nothing happened. This can be an incredibly powerful tool for reverse-engineering and network troubleshooting. It’s basically a man-in-the-middle attack on your own network.
So, like the above blog post suggests, I fired up Wireshark (an advanced network analyzer program that’s beloved by IT technicians and ethical hackers alike) and took a look around. Since I had flattened the network topology, my Mikrotik router had set the IP address of my weather station’s indoor unit. Even though said unit was in my office, and connected to my secondary router. So I configured my Mikrotik router - from its extensive web control panel - to capture all network traffic from my weather station, and send a copy of it to my computer, where Wireshark was currently listending for incoming traffic. I let it run for a couple minutes, since I knew my weather station pinged Weathercloud and Weather Underground periodically.
From there, Wireshark spit out a massive log file. But I was able to filter through the noise, and get the HTTP requests that it was sending to the cloud services. The request to Weather Underground looked a bit like this (with new lines for readability, and not including some credentials that I removed from the URL):
GET /weatherstation/updateweatherstation.php?
indoortempf=74.5&indoorhumidity=36&tempf=38.7&humidity=82
&dewptf=33.7&windchillf=38.7&absbaromin=28.91&baromin=29.65
&windspeedmph=0.4&windgustmph=0.7&winddir=315&windspdmph_avg2m=2.0
&winddir_avg2m=180&windgustmph_10m=1.6&windgustdir_10m=135&rainin=0.0
&dailyrainin=0.04&weeklyrainin=0.2&monthlyrainin=1.44
&solarradiation=53.35&UV=0&dateutc=2023-11-22%2019:35:25
&action=updateraw&realtime=1&rtfreq=5
I know it might not look like much, but I was really happy to see this. Because believe it or not, all the relevant weather data is here in this big URL. Lucky for me, it was all in plain text, and in a pretty easy-to-parse format called “URL encoding”. URL encoding is a way to store key-value information in a URL. Consider a YouTube URL, where the video ID is encoded as youtube.com/watch?v=someVideoID. Only in this case, the weather data is encoded in the URL, in a key=value format, separated by ampersands (“&”).
Now that I knew that my weather station was outputting readable data that I could intercept, I wanted to do something with it. Namely, I wanted to set up my own self-hosted alternative to services like Weather Underground. I had heard good things about the WeeWX project, so I was pretty sure that’s what I wanted to use. But first, I had to set up my own instance of WeeWX, and find a way to pipe my weather station’s data into it.
So I set up a mini PC I had lying around as a home server. Been meaning to do something like this for a long time, just never had a good enough excuse. I installed the Debian operating system on it, and set it up as a headless server via SSH. Then I was able to install WeeWX (the instructions on their website are very extensive). That wasn’t too bad, especially on a fresh Debian server. But I still needed a way to have it ingest the weather data.
Along the lines of the Reddit post I linked above, I knew something like this required making a basic HTTP server. Luckily, I was able to use Node.js for this purpose (because I hate PHP, and feel pretty comfortable with JavaScript). But there another critical component to this - redirecting all traffic from my weather station to my home server.
My Mikrotik router and its extensive configuration options made that pretty easy. It took a couple attempts, but this is the configuration I ended up with:
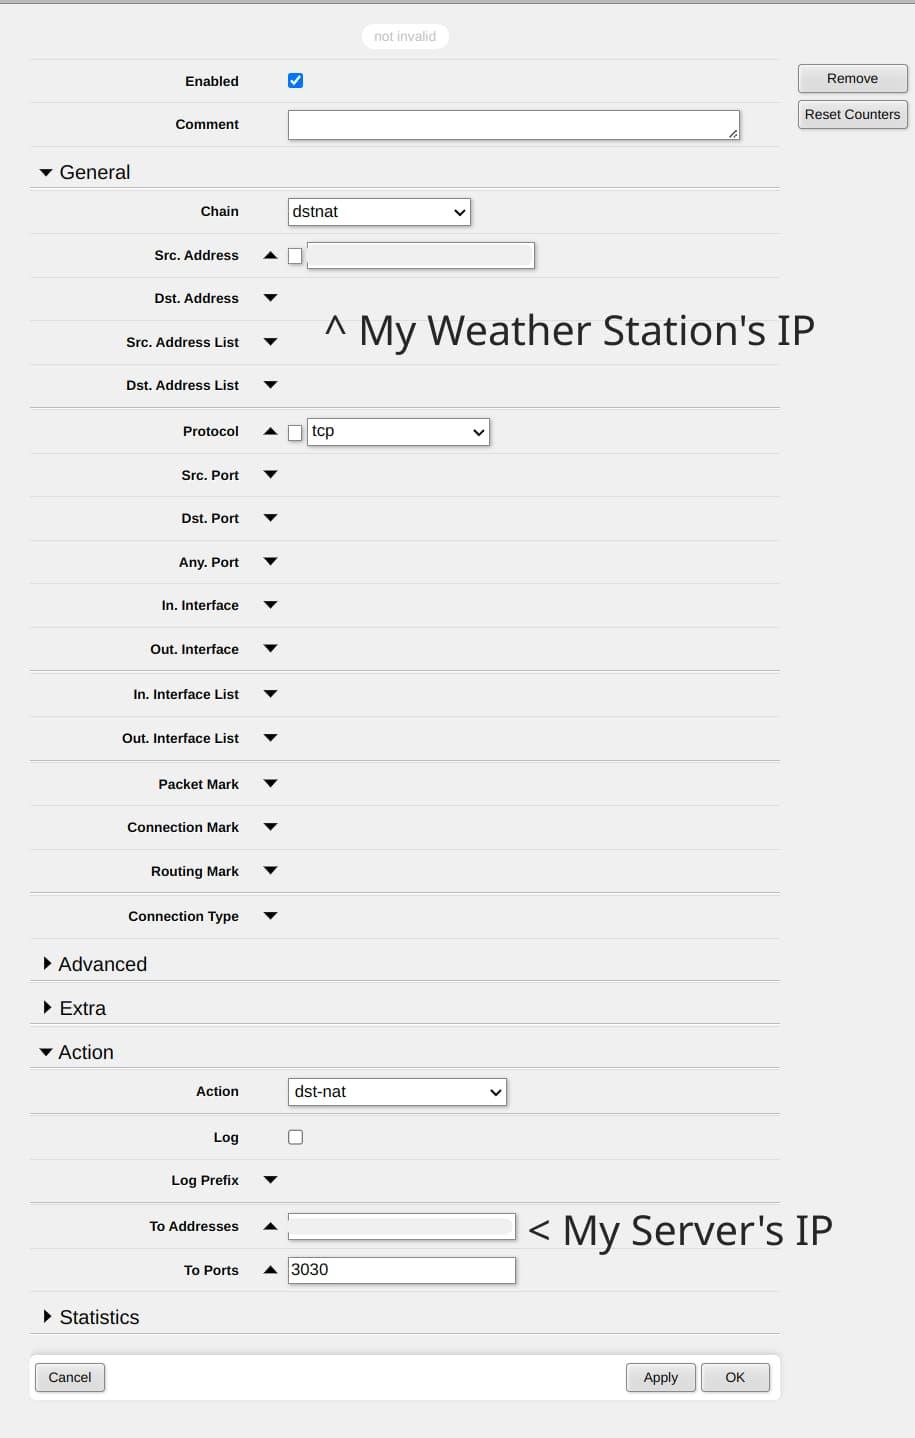
I added this as a new rule from the NAT tab of the IP → Firewall page
It’s pretty dense stuff, but the MikroTik RouterOS wiki has some advice on doing this kind of thing:
https://help.mikrotik.com/docs/display/ROS/NAT
It was a sight for sore eyes when I was finally able to get it working. My router’s configuration panel showed that packets were being successfully re-directed from my weather station to my mini PC server. My weather station went dark on Weathercloud and Weather Underground. And my quest was almost complete. But there was one last major piece of the puzzle.
As if this blog post wasn’t obscure enough already, here’s yet another niche thing I’m going to try to explain. MQTT (Message Queuing Telemetry Transport) is a protocol by which sensors and other “smart” devices can talk to each other. It’s pretty neat, because it can be used with even very low-powered devices. It can be fairly fault-tolerant (if desired), and it’s pretty simple to setup.
As the name suggests, MQTT is queue-based, meaning that messages will end up accumulating, single-file, and can be delivered one-at-a-time. This can be really handy for devices that periodically send data to a server (not unlike what my weather station does). MQTT requires an MQTT broker to act as a central server for MQTT clients to “subscribe” and “publish” to “topics”. Again, I really don’t want to go too far down the rabbithole here, but I’ll try to explain what I wanted to accomplish here.
In essense, I wanted to set up an MQTT broker on my home server. And I wanted two MQTT clients (for what it’s worth, a broker and a client can run on the same physical machine, although they don’t have to). The first MQTT client would publish the weather information received from the weather station, to the MQTT broker. And the second MQTT client would subscribe to the topic published to by the first client, and allow WeeWX to ingest the weather data.
I’m not 100% sure if it was necessary to have the MQTT broker act as a man-in-the-middle, but it seemed like the easiest way to do what I wanted to do. Because I was able to find the MQTTSubscribe “driver” (basically a type of plugin) for WeeWX, that allows WeeWX to receive data by subscribing to an MQTT topic:
Oh, and for all things WeeWX, I highly recommend this page on the project’s GitHub wiki. There’s a bit of everything here:
https://github.com/weewx/weewx/wiki
Anyway, it became apparent that I would have to write a bit of code to make this whole thing work. No big deal, in fact I was looking forward to it. Especially because this code could be in pretty much any language I wanted - HTTP servers and MQTT clients are really common things. I chose JavaScript, via Node.js. Tried to do it in Rust, but I just couldn’t figure out the asynchronous stuff involved in having an HTTP server communicate with an MQTT client in the same program. Anyway, here’s the code I came up with. It’s not the prettiest or the most optimal, but it does exactly what I need it to do.
/*
Home Weather Station Data Interceptor
Copyright (c) 2025 Matthew Piercey

Permission is hereby granted, free of charge, to any person obtaining a copy
of this software and associated documentation files (the "Software"), to deal
in the Software without restriction, including without limitation the rights
to use, copy, modify, merge, publish, distribute, sublicense, and/or sell
copies of the Software, and to permit persons to whom the Software is
furnished to do so, subject to the following conditions:

The above copyright notice and this permission notice shall be included in all
copies or substantial portions of the Software.

THE SOFTWARE IS PROVIDED "AS IS", WITHOUT WARRANTY OF ANY KIND, EXPRESS OR
IMPLIED, INCLUDING BUT NOT LIMITED TO THE WARRANTIES OF MERCHANTABILITY,
FITNESS FOR A PARTICULAR PURPOSE AND NONINFRINGEMENT. IN NO EVENT SHALL THE
AUTHORS OR COPYRIGHT HOLDERS BE LIABLE FOR ANY CLAIM, DAMAGES OR OTHER
LIABILITY, WHETHER IN AN ACTION OF CONTRACT, TORT OR OTHERWISE, ARISING FROM,
OUT OF OR IN CONNECTION WITH THE SOFTWARE OR THE USE OR OTHER DEALINGS IN THE
SOFTWARE.
================================================================================
Intercepts incoming redirected HTTP requests from Raddy WF-100SE Weather Station
Sends formatted data via MQTT topic to WeeWX

Original Blog Post:
https://overscore.media/posts/making-a-custom-offline-weather-station-with-weewx

Latest Update:
January 1, 2025
- Add MIT license, fix timestamp, fix rainfall calculation, & deny invalid data
*/

import http from 'node:http';
import url from 'node:url';
import { readFile, writeFile } from 'node:fs/promises';

// npm install mqtt
import mqtt from 'mqtt';

// MQTT configuration
const mqttBroker = 'mqtt://some_ip_address:1883';
// ^ Replace with your MQTT broker address
const mqttTopic = 'weewx/ingest';
// ^ Replace with the MQTT topic you want this server to publish to

// Create an MQTT client
const client = mqtt.connect(mqttBroker);

// HTTP server configuration (incoming data)
const port = 3030;

// The last reported rainfall is stored in a text file
// Because WeeWx wants the incremental rainfall, but the station
// gives the rainfall since midnight
const rainfallDataFilename = './last_rainfall.txt';

async function getLastRainfall() {
    try {
        const data = await readFile(rainfallDataFilename, 'utf-8');
        return parseFloat(data) || 0;
    } catch {
        return 0;
    }
}

const server = http.createServer(async (req, res) => {
    try {
        // Return an error response for any invalid URLs
        if (!req.url.includes('/weatherstation/updateweatherstation.php') || req.method !== 'GET') {
            res.writeHead(404, { 'Content-Type': 'text/plain' });
            res.end('Not Found\n');
            return;
        }

        // Parse the URL parameters
        const { query } = url.parse(req.url, true);

        // The station provides the cumulative rainfall since midnight
        const currentRainfall = parseFloat(query.dailyrainin);

        // Get the last recorded rainfall value from the text file
        let lastRainfall = await getLastRainfall();

        // Calculate the incremental rainfall
        let rain = 0.0;

        if (lastRainfall !== null) {
            if (currentRainfall >= lastRainfall) {
                rain = currentRainfall - lastRainfall;
            }
        }

        // Store the current rainfall value for the next calculation
        await writeFile(rainfallDataFilename, currentRainfall.toString());

        // Ensure the incoming timestamp is converted to local time, which WeeWX expects
        // But don't just use the system's current time, even though that'd probably be OK
        const dateUtc = new Date(query.dateutc);
        const timezoneOffsetInSeconds = new Date().getTimezoneOffset() * 60;

        // Convert the weather data from the URL parameters into a format that WeeWX recognizes
        let payload = {
            inTemp: parseFloat(query.indoortempf),
            inHumidity: parseFloat(query.indoorhumidity),
            outTemp: parseFloat(query.tempf),
            outHumidity: parseFloat(query.humidity),
            dewpoint: parseFloat(query.dewptf),
            windchill: parseFloat(query.windchillf),
            pressure: parseFloat(query.absbaromin),
            barometer: parseFloat(query.baromin),
            windSpeed: parseFloat(query.windspeedmph),
            windDir: parseFloat(query.winddir),
            windGust: parseFloat(query.windgustmph),
            // Take 10 minute average wind gust direction; only available datapoint
            windGustDir: parseFloat(query.windgustdir_10m),
            rain,
            radiation: parseFloat(query.solarradiation),
            UV: parseFloat(query.UV),
            // Get timestamp as local time Unix epoch seconds
            dateTime: Math.floor((dateUtc.getTime() / 1000) - timezoneOffsetInSeconds)
        };

        // If the temperature is -9999, that indicates the outdoor unit has lost power, etc.
        // In which case, only the inTemp and inHumidity can really be trusted
        if (payload.outTemp === -9999) {
            const { inTemp, inHumidity, dateTime } = payload
            payload = { inTemp, inHumidity, dateTime }
        }

        // Publish the payload to the MQTT topic
        await new Promise((resolve, reject) => {
            client.publish(mqttTopic, JSON.stringify(payload), (err) => {
                if (err) {
                    reject(err);
                } else {
                    resolve();
                }
            });
        });

        // Respond to the HTTP request
        res.writeHead(200, { 'Content-Type': 'text/plain' });
        res.end('Data received and sent to MQTT\n');
    } catch (error) {
        // Catch and log any errors
        console.error('Error:', error);
        res.writeHead(500, { 'Content-Type': 'text/plain' });
        res.end('Internal Server Error\n');
    }
});

// Start the HTTP server
server.listen(port, () => {
    console.log(`Server running at http://localhost:${port}/`);
});
At this point I should also mention that I was able to convert the data received from the weather station into data recognizable by WeeWX by referencing WeeWX’s wv_extended database schema.
Otherwise I would have been pretty lost as to what format the data was supposed to be in. As you can see in my code, things had to be given certain names, and put in certain formats. Luckily I didn’t have to do any complicated value parsing or unit conversion. WeeWX is smart enough to know what I mean, once I give it correctly-named variables, and I tell it everything’s in US units.
At this point I should also mention that I set up an Eclipse Mosquitto instance as my MQTT broker. Also running on my mini PC server, along with the other services like WeeWX and my custom Node.js code. And I’m using Docker to run the Mosquitto instance, and pm2 to run my custom Node.js server. This setup ensures that everything restarts on boot, if my mini PC loses power or whatever. So at least for my basic needs, it’s a pretty robust setup.
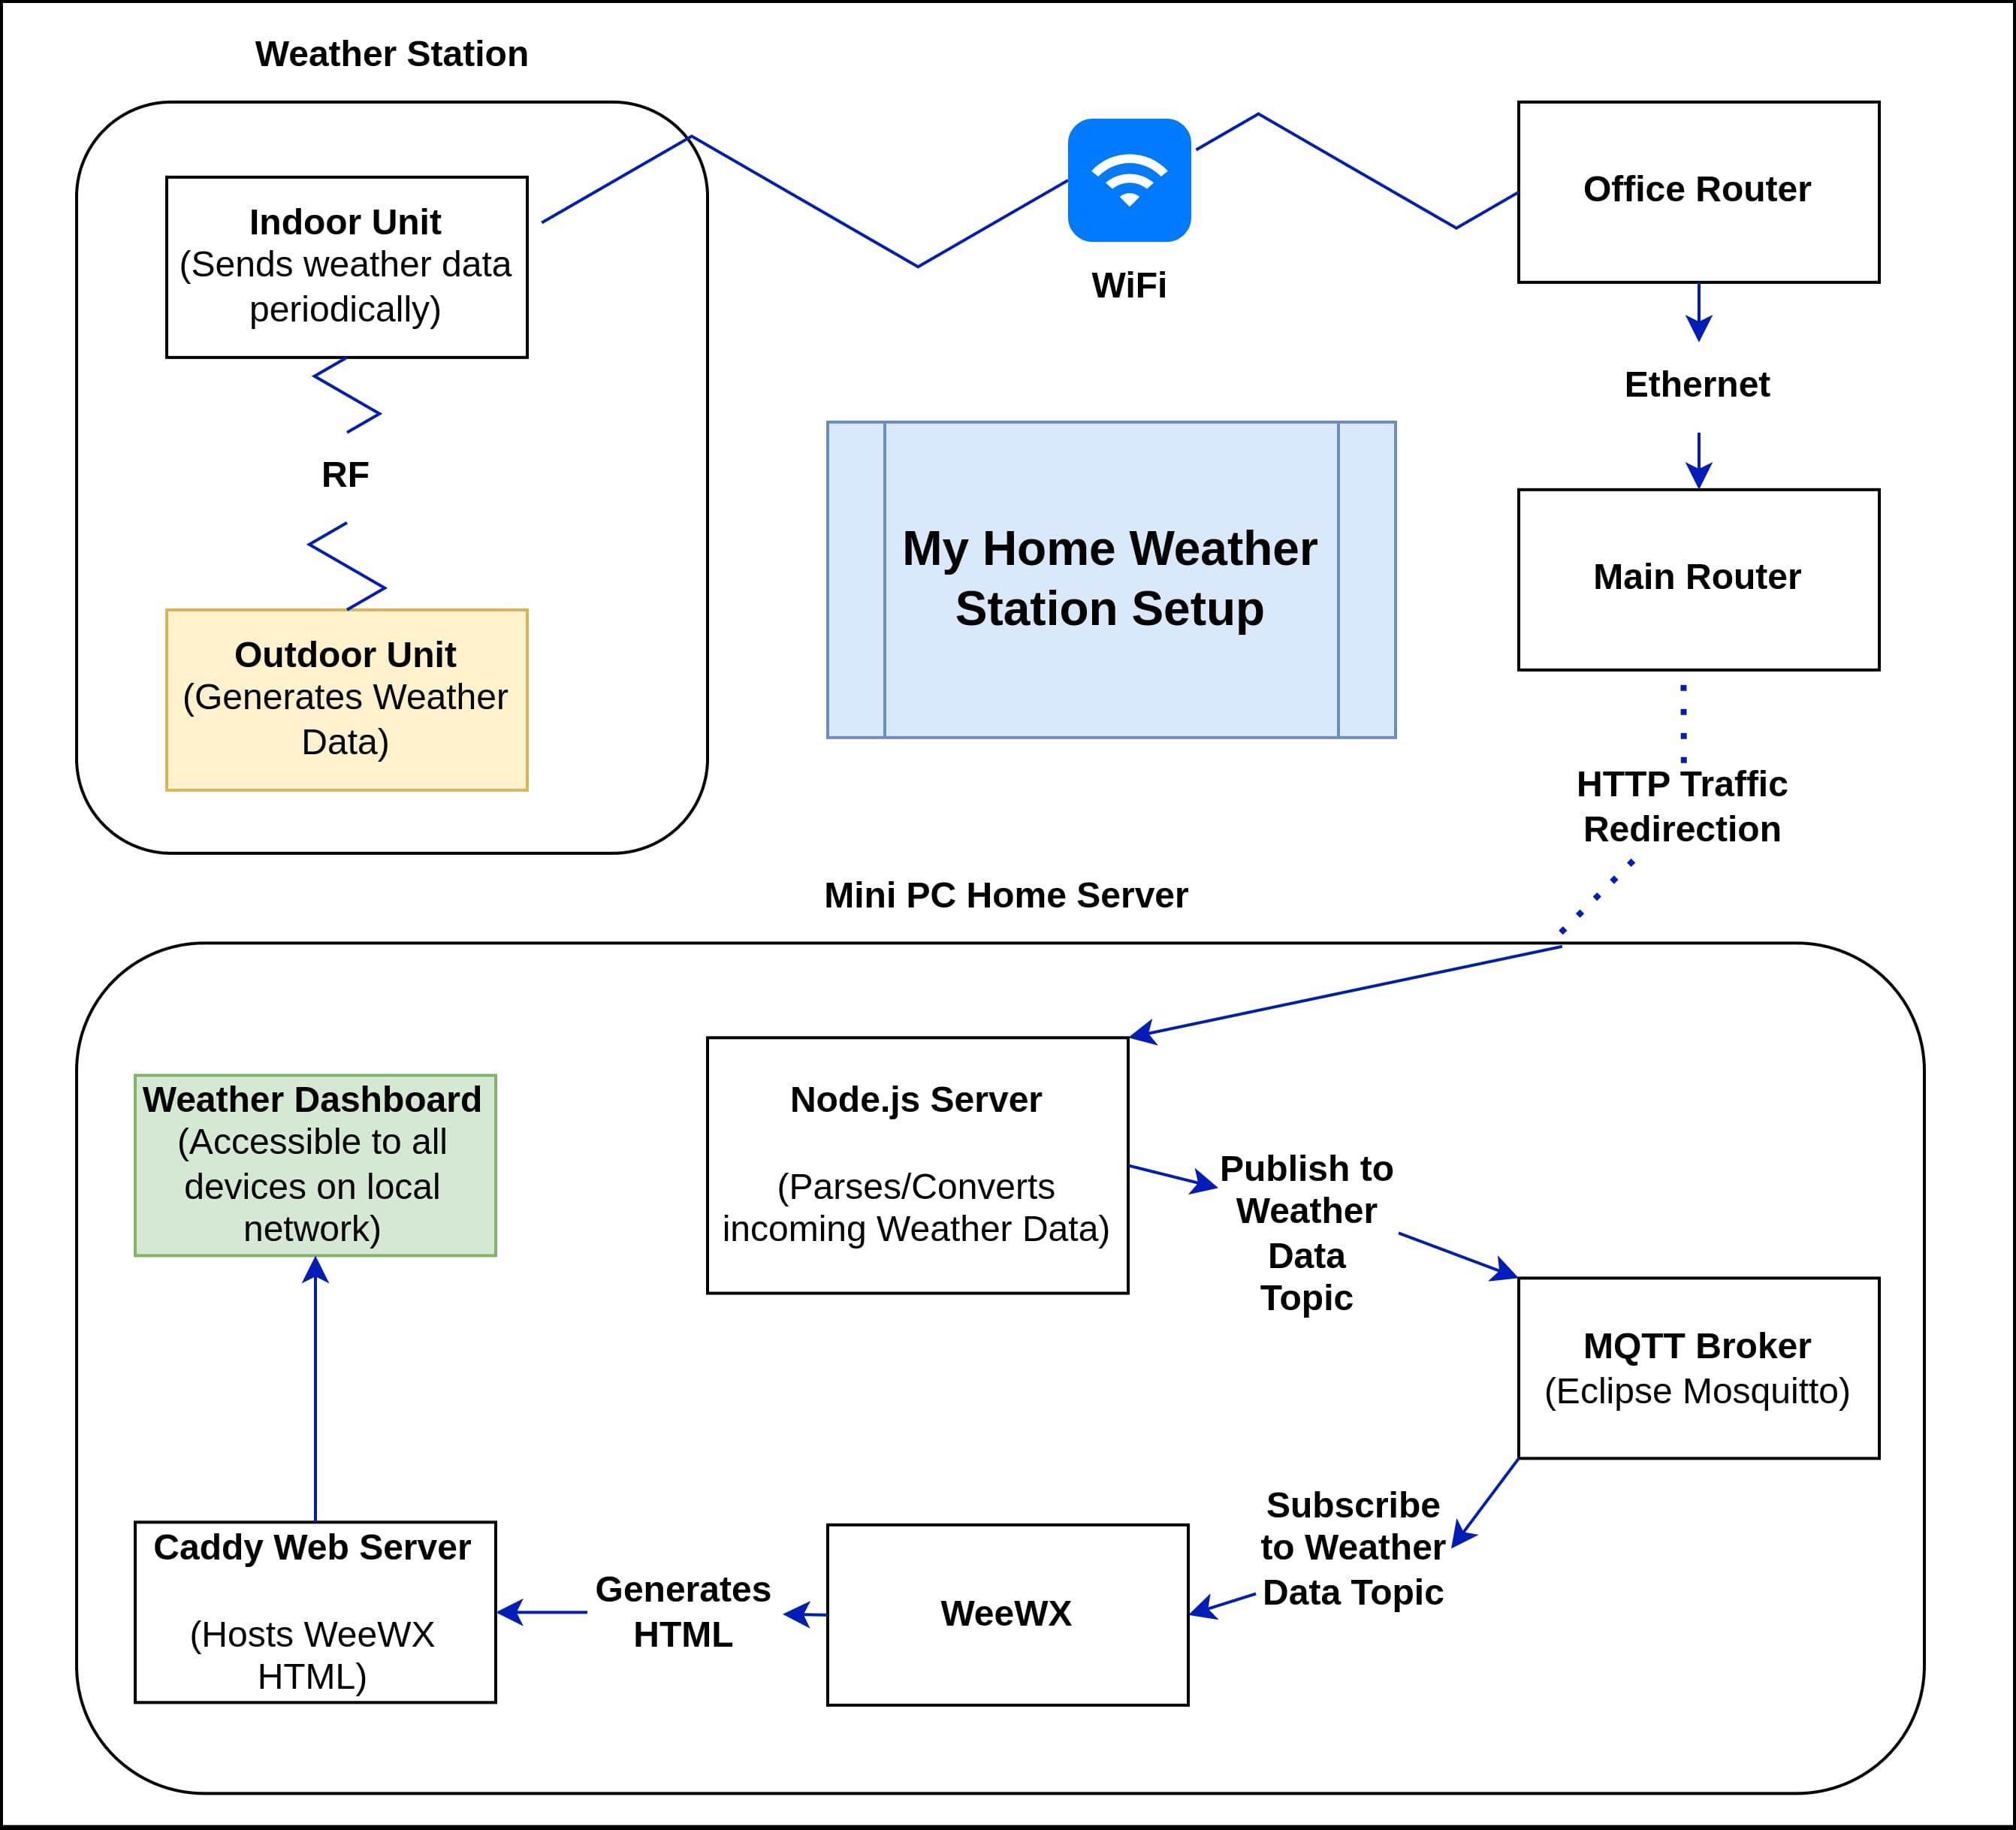
A diagram of the whole system
OK, finally time to show off the results. I installed the excellent Caddy webserver, so I could access my WeeWX instance’s web interface from anywhere on my home network. And I was able to find this really neat-looking skin/theme for WeeWX, to give me a beautiful web dashboard.
https://github.com/Daveiano/weewx-wdc/tree/3.x
Check it out!
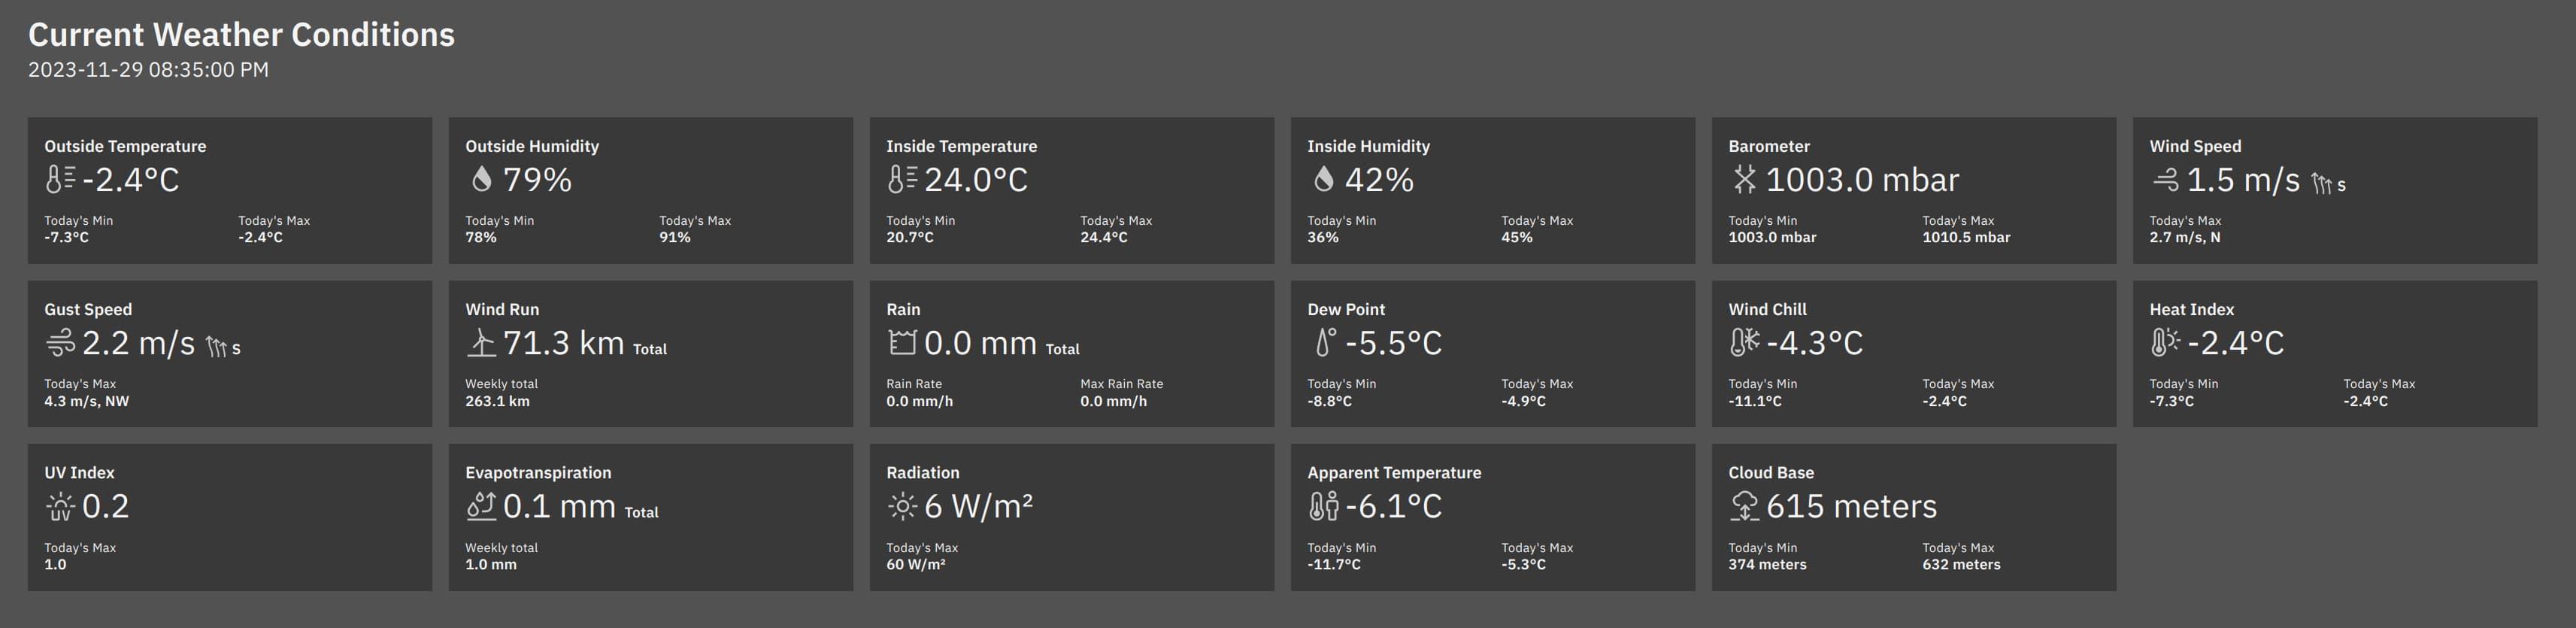
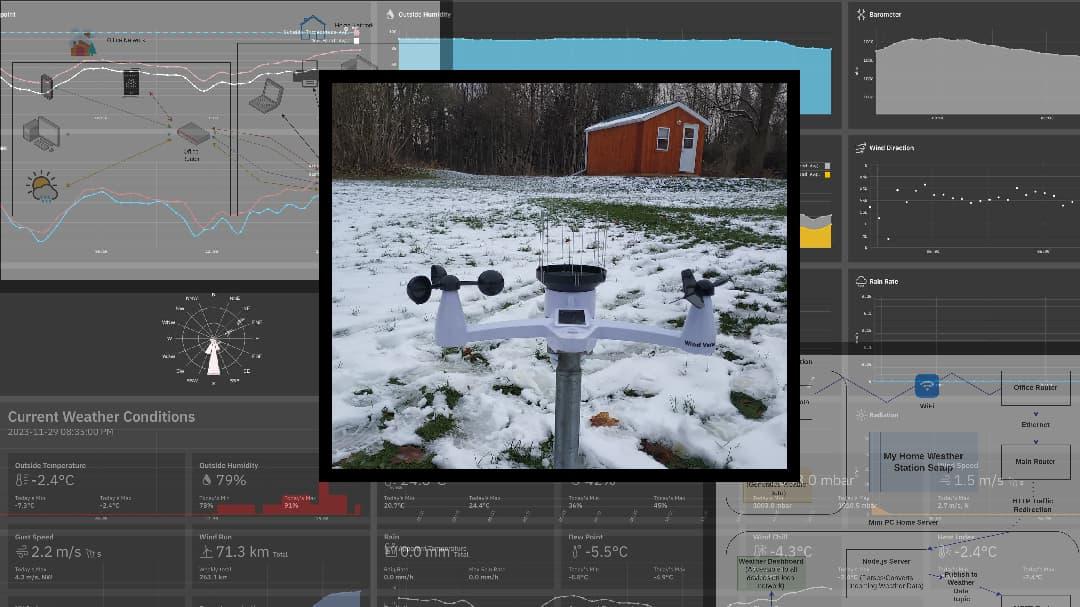
My WeeWX dashboard, with an absurd amount of information at-a-glance
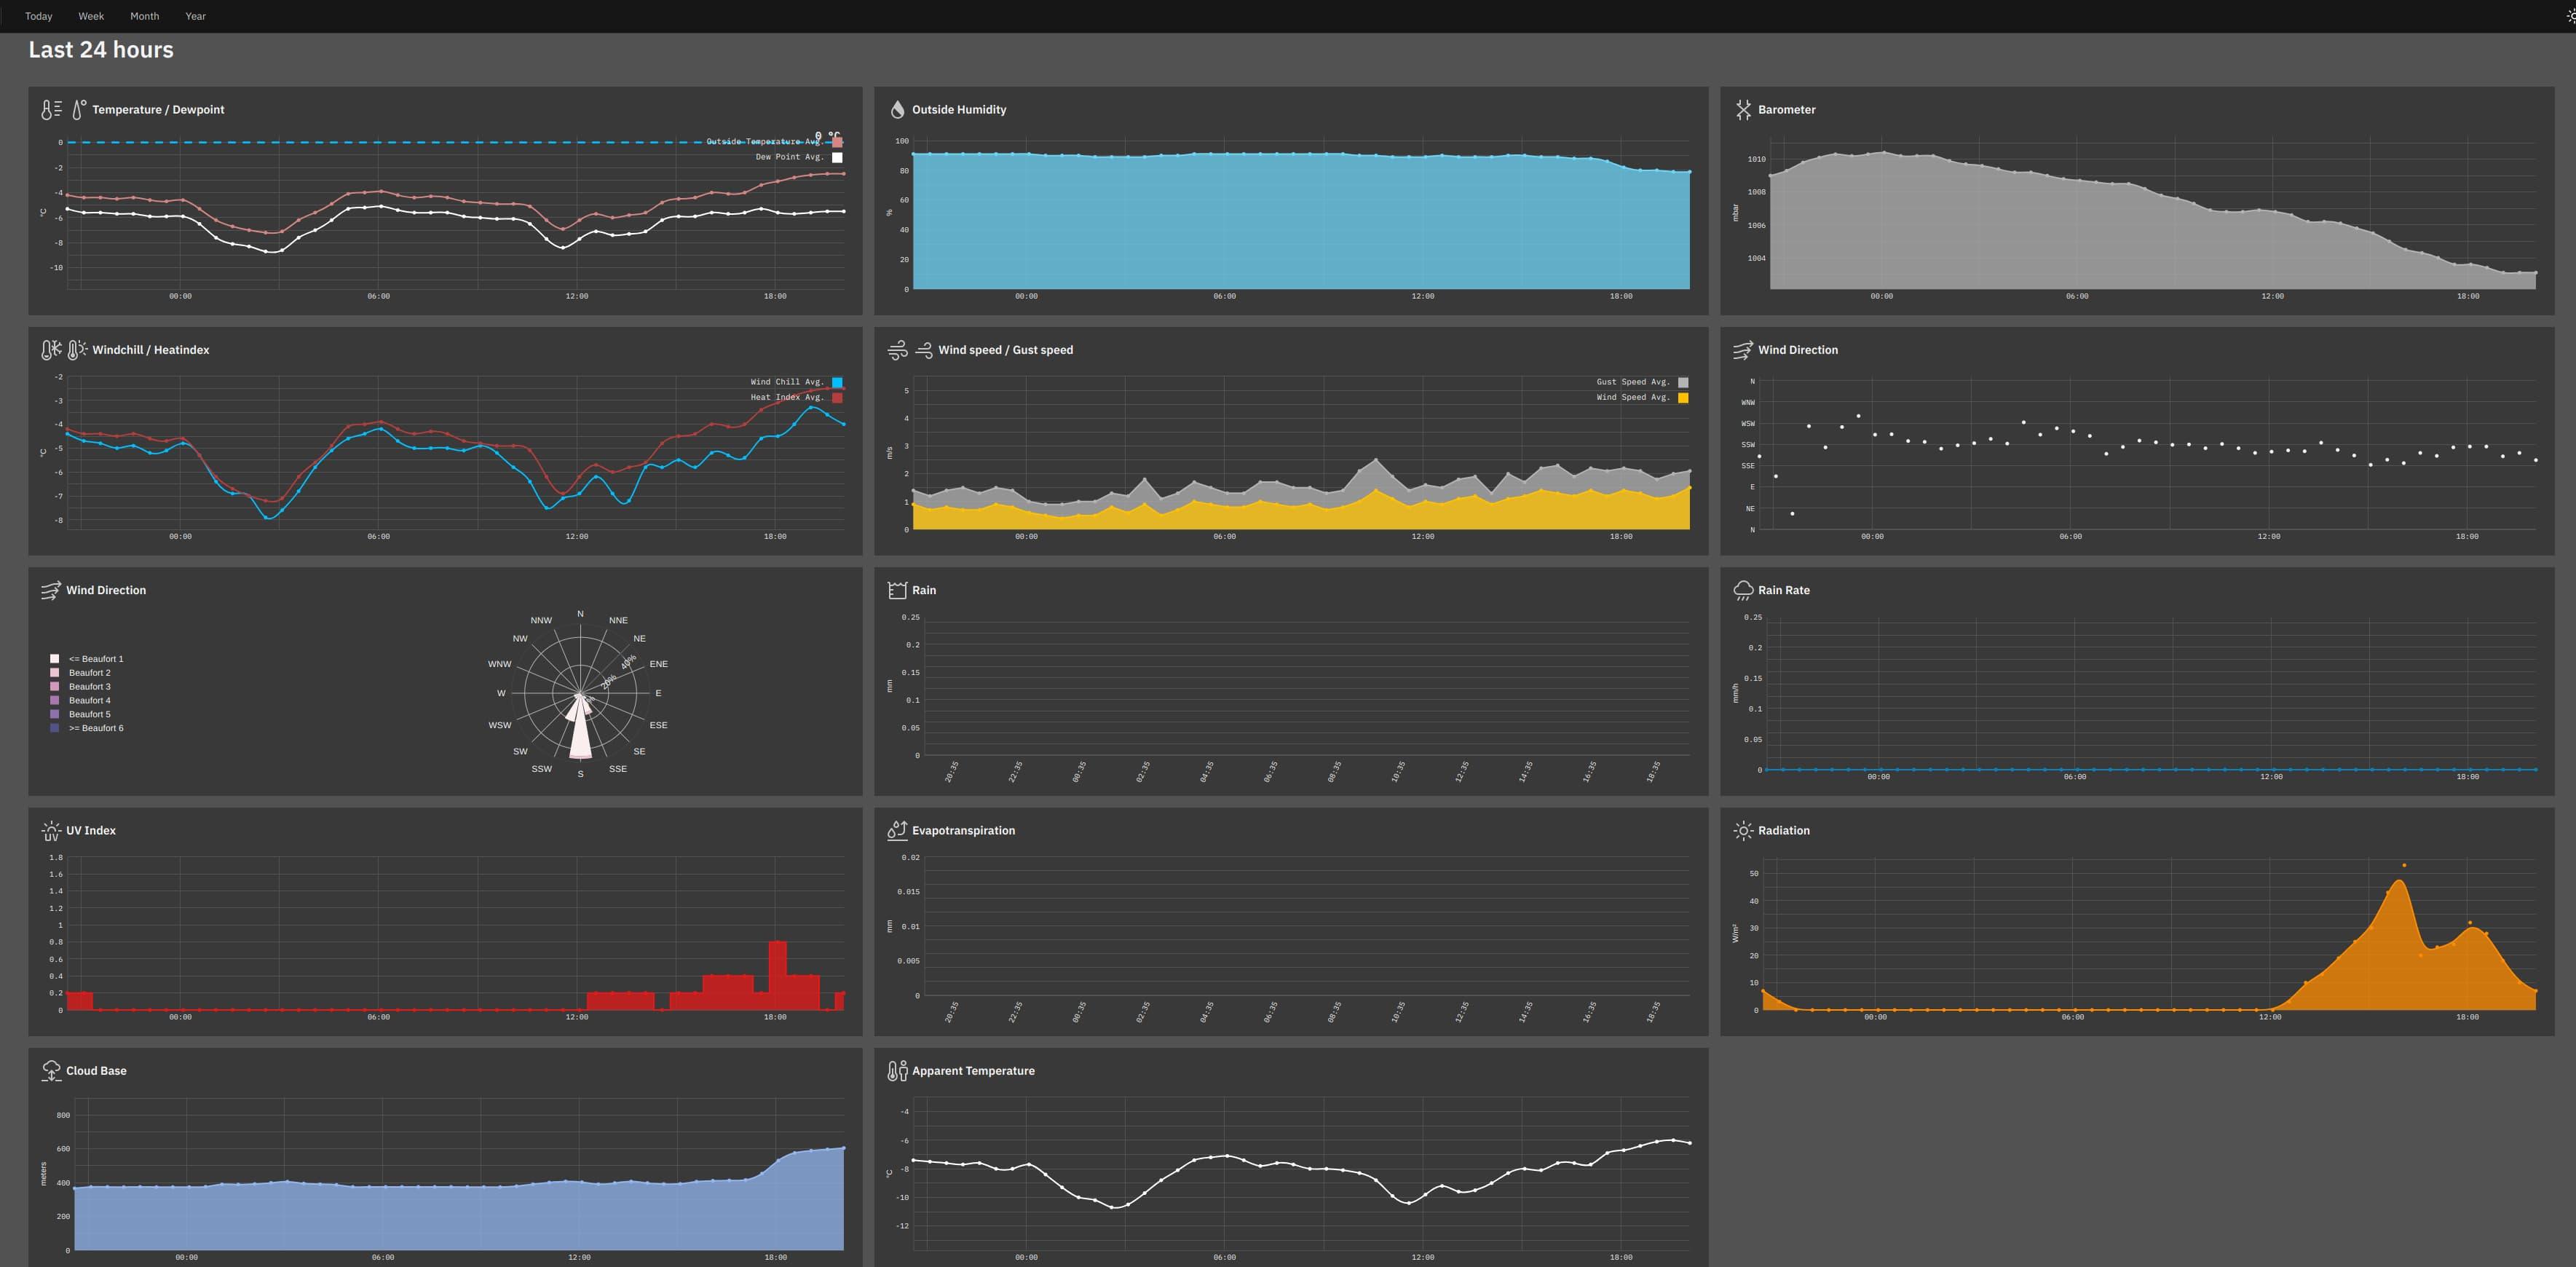
Data. Data everywhere!
So yeah, I’d say that’s a resounding success. From now on, my weather station’s data is mine and mine alone. Not that I have a problem with giving back to a community, or sharing my data for a good cause. But if said cause is somehow going to result in lining IBM’s pockets, I’ll just as happily stay out of it, thank you very much. That’s the cool thing about WeeWX - once you import data into WeeWX, you can share it with any number of Internet-based services - on your own terms. So call it selfish, but I don’t. I believe digital self-sufficiency is a necessary first step towards giving back. Because how can you give what you don’t really possess?
I know this whole process was rather involved, and not exactly for the faint of heart. But I think it was a great learning experience, and it gave me an excuse to setup a home server. Sure, you could argue it’s a small, inconsequential type of thing. Which I personally wouldn’t, but if it indeed doesn’t matter, why not run it all locally? I really wish it were easier and more accessible to do this kind of thing. But it’s good to know that there are awesome online communities, everywhere you look, working hard to achieve such a future. Home Assistant, openHAB, Domoticz, WeeWX, and many other software solutions exist, and have dedicated developers and users behind them.
If nothing else, I hope this blog post doesn’t scare anybody away from the self-hosted home automation scene. Trust me, while it’s a deep rabbithole, it’s not all this complicated and abstruse. Many devices have excellent compatibility with software like Home Assistant, right out of the box. And more and more integrations for self-hosted home automation suites are being worked on and released all the time. The most important thing is, it’s possible.
So call it frivolous, call it unnecessary, call it a waste of time if you will. I think it’s all worth it, for the peace of mind that I have full control over what’s become a fun and interesting gadget in my life. If this is the cost of taking one more step on the road to digital self-sufficiency, I’m all for it.