5 Tips for Permanent Starlink Installations
Last Updated: 10/30/2023
Sharing some lessons learned from my Starlink installation, in October 2023

Matthew Piercey

Oh, Satellite Internet. What a mixed bag you are.
On one hand, it’s the only viable option for many people living in rural or remote areas. On the other hand, it’s a demonstration of so many of the things wrong with our society. OK, bear with me on that one, but I promise it’s not completely out of left field.
The fact of the matter is, at least here in Canada, our society has become dependent on the Internet. One could argue over-dependent, I don’t think I’d disagree. This has brought with it some incredible opportunities, but in many ways it’s probably more trouble than it’s worth. But who am I to judge? I work online, and OverScore almost certainly wouldn’t exist without Internet-based communication. Both because it’s how our team communicates, despite being so geographically spread out, and because… well… we build websites.
That being said, having satellite be your only option really lays bare just how bloated the “modern” web has become. I think a lot of web developers and web designers would do well to spend a few months on satellite Internet, to see just how slow their applications really are, without the crutch of a fibre connection. Call me sadistic all you want, but good luck proving me wrong.
But I digress. Point is, I wasn’t happy with Xplornet (or “Xplore”, or whatever they call themselves these days). Before I first got the Internet at home in 2016 (yeah that’s right, I survived for years off library Internet, free Wi-Fi, and offline PC games) my only experience with Xplornet was that it sucked. One of my friends had it at the time, and it was better than dial-up, but not by much.
But it wasn’t as bad as I feared it would be. My main nemesis was not the speed, nor the reliability (which was decent except in heavy rain), but the dreaded bandwidth cap. For several years, we were stuck at 50GB a month. I became a data miser out of necessity. Watching YouTube in 144p, saving large downloads and system updates for near the end of the billing cycle, and watching with bated breath as the bandwidth counter crept up and up. Yeah, I know it kind of sounds pathetic when I put it that way. But again I offer the challenge - try it for a couple months and tell me what you really think. Especially if you have to work from home.
Anyway, eventually we were able to upgrade to a 200GB cap, which was better. But I still kept checking a certain page - the Starlink availability tracker. I watched as Starlink became more widely available, and was finally offered in my area. I read countless reviews and testimonials, and heard almost exclusively good things from all but the least-informed of detractors.
In September of 2023, I got suckered in to buying the full kit, because there was a great deal on at the time for rural Canadians. I was able to get the dish, the router, 50 feet of cable, and the dish’s little ground mount for about $500 off of what they normally went for. Of course, I also had to buy the ethernet adapter, a mounting pole, and a 150 foot cable, the last two of which weren’t cheap.
But, now that it’s all set up, I can safely say that it was well worth the wait, the initial investment, the time and effort to install it, and the extra $30-40 a month over Xplornet. It’s not cheap by any means, but I think it’s your best bet if you’re in a position like mine. Without getting too deep into the numbers, which I’m no expert on anyway, I can safely say that it’s 8-10 times faster than Xplornet, in every way, sometimes moreso. I generally get 80-90 Mbps download, 15-20 Mbps upload, and ping under 100ms. Which squarely beats the 10-15 Mbps download, abysmal upload of 1-2 Mbps, and ping sometimes more than a second under Xplornet. And there’s no monthly bandwidth cap with my Starlink plan (at least as far as I can tell), which is huge for me. And, the signal is also remarkably resilent, even through rainstorms (although it does slow down during rain). I’ll see what the winter holds, but the fact that the dish can heat up to melt the snow off of it sure beats having to climb up on a stepladder and sweep the snow off the Xplornet dish with a broom.
So, without further ado or digression, let me share five tips I picked up along the way. Hopefully someone can find them helpful. Fair warning, though, I’m no expert at any of this. If you choose to follow any of my advice, you do so at your own risk and volition. What worked for me may not necessarily work for you. Do your own research, make your own judgements, take your own risks. But I will do my best to be thorough and specific in my recommendations. So, if you agree with that disclaimer, let’s proceed!
The most important thing about any satellite dish installation - especially with Starlink since there isn’t just one satellite it’s looking for - is visibility. With Starlink, since the dish aims itself once you set it up (which is always fun to watch) your main concern should be the overhead view.
The dish will orient itself more or less to the north. But you should provide it with as clear of a patch of sky as possible. Directly above it, and slightly in front of it. Use the Starlink app to scout out a good location. The app will get you to point your phone up at the sky, and orient it around to capture a full view of the sky above your position. Honestly, I was super hesitant that the app’s visibility tester would be any good. After all, it just uses your phone’s camera and onboard sensors. But after several tests, I can truly say it’s pretty reliable. You most certainly shouldn’t only rely on it, and I’ll get to that, but it’s a great first step. Make sure to stand roughly in one place while you’re using the app, and just move the phone around.
So, get somewhere with a clear view of the sky in all directions, and use the Starlink app’s visibility tester to determine what obstructions - if any - are possible at that location. You might think it’ll be impossible to find a clear patch of sky big enough, but if the app says you’re good in a certain location, I think it’s worth giving it a try.
The biggest obstructions are likely going to be trees and buildings. Rule of thumb is if you can’t see through it, neither can the dish. If you’re setting up Starlink in the fall, winter, or early spring, make sure to take into account that leaves will obstruct the signal. So if you have a nice looking location in November, straight through the bare branches of a deciduous tree, you might have a rude awakening come May or June when the tree gets its leaves back. This might seem like common sense, but it’s worth noting. Because there were a couple locations that would have been good for me, but for leaves.
Ideally, you’ll want to have a general idea of a good location before purchasing Starlink. You should be able to refund the dish and kit if it doesn’t end up working out for you. But it’s better to scout out a location ahead of time, if practical. Again, the app is actually your friend in this case. I rarely say that about gimmicky mobile apps, but this one’s a definite exception in my book.
Once you get the dish, I recommend finding a way to test it in multiple locations. Set it on its little ground mount, and run some cable back to the nearest building. If you can reach a porch, I think that would be ideal. Because you’re going to need a place to plug the router in, and ideally let it sit for several hours without getting rained on or exposed to the elements.
Again, your mileage may vary, but this definitely helped in my situation. I had the 150 foot cable, so it was trivial to test multiple locations around my house, keeping the router on the front porch in a protected area. Plug in the router and the dish, and give the dish a few minutes to activate and orient itself. Then check the status of the connection via the Starlink app. And maybe run a speed test or something over the WiFi. Then leave the dish for some time, maybe all day or overnight, depending on what time of day you set it up.
So, what’s the big deal with this step? Well, if you can manage it, I’d recommend letting the dish sit in a given area for several hours. Might be six or more. Because the app will eventually tell you what obstructions, if any, the dish has identified in its current location. You’ll get a nice heatmap of the patch of sky above the dish, with blue meaning unobstructed sky, and red representing a possible obstruction. You can also check the logs of the app at this time, they should give you estimates on the amount of time, if any, the signal was temporarily lost due to visual obstructions. Because as decent as the app’s visibility tester is, you don’t want to rely on it solely. This step is crucial, in my opinion, and it should provide you with actionable insight as to the quality of your proposed installation location.
Unless you get lucky and get a great or perfect location the first try, I really think you should test the dish in multiple potential locations. Maybe even throw in a questionable location, just to prove to yourself that the readings from the dish’s self-test are reliable.
I recommend this step, because you really want to make sure the spot is ideal before you do anything permanent. And yes, I think you really should do something permanent once you find a good spot. Don’t kid yourself into thinking you’re done after the dish is plugged in, especially if you live in a place with harsh winters. You’ll be better off finding a permanent location for your dish, running the cable through a conduit or on the side of a building, and putting the router in a safe, climate-controlled place indoors.
Clear skies ahoy!
So, this step doesn’t necessarily apply to everyone. But it did apply in my case, and I think it’s worth considering in most situations. The point is, there are a number of possible mounts for Starlink dishes. They will be available for purchase after you’ve bought your dish. But you can scout out the available options before you buy anything, as Starlink does offer some literature regarding the different mounting options, from their website.
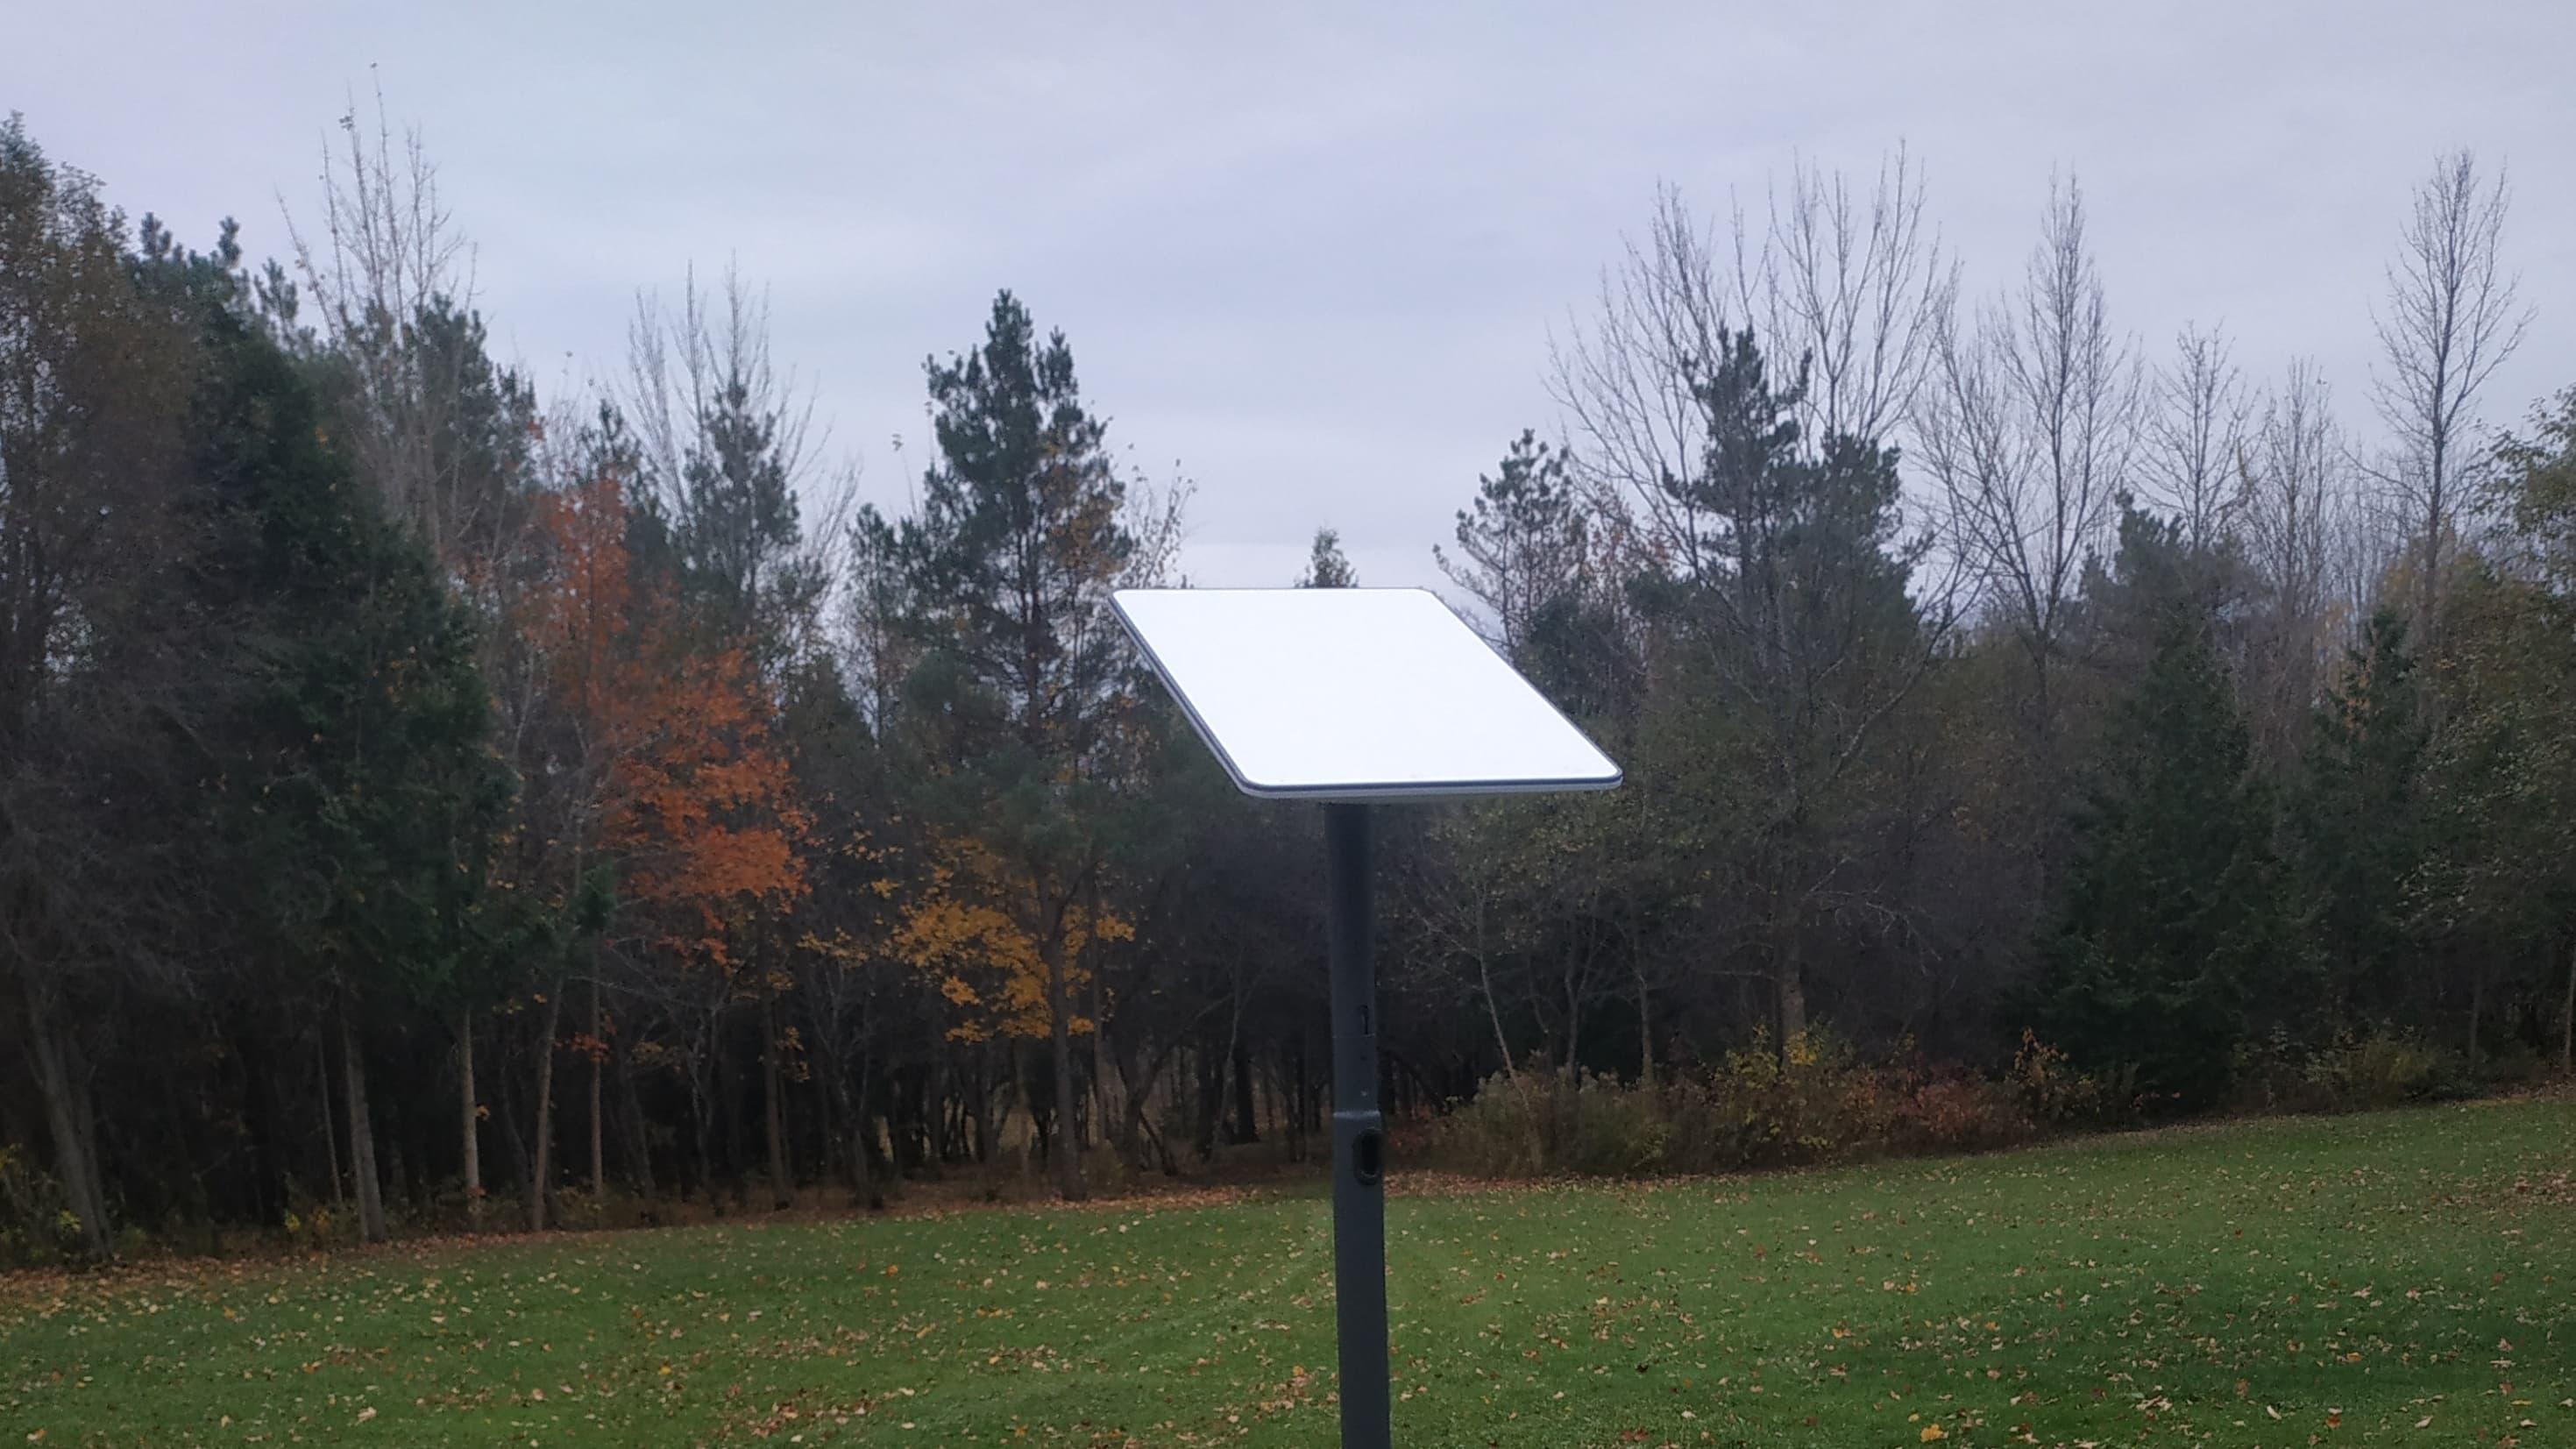
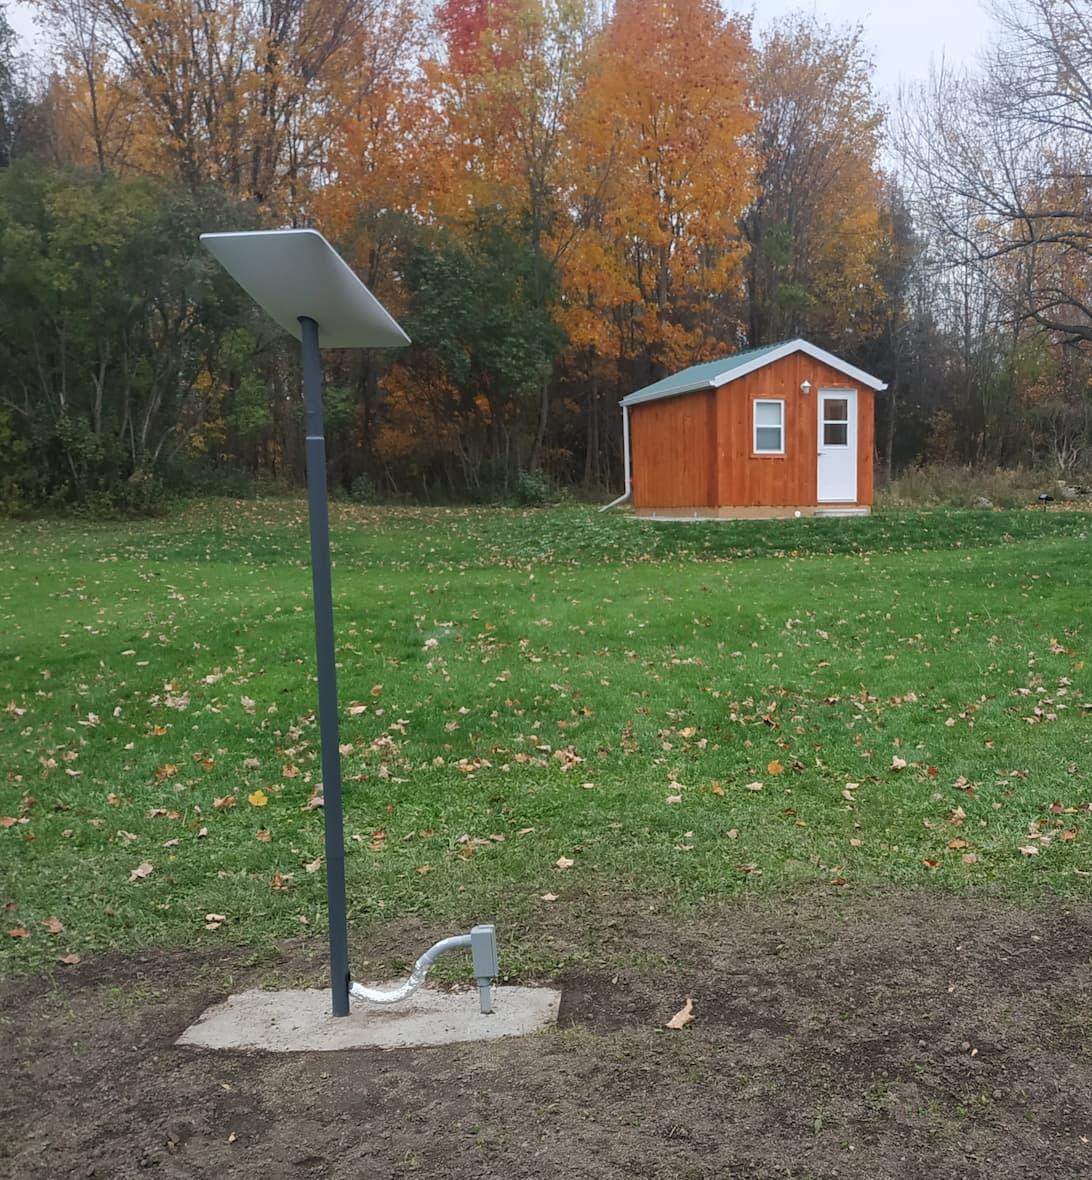
I recommend the pole mount. It will keep your dish high enough off the ground for it to not get buried in the snow. And being a few feet off the ground might help with visibility, too. It could turn an OK location into an excellent location, depending on what types of obstacles you have in the way. I also like the pole mount, because it keeps it away from any buildings. You might prefer a roof mount, there are several options available. And that’s cool, if it works for you. But in my opinion, the fewer things you have to put on your roof, the better. You have to make sure to do a roof mount installation correctly, or you could have problems like roof leaks or stability issues. Further, working at heights is tricky and can be very dangerous. Whereas once you have the pole mount figured out, it’s a lot more accessible. If you ever needed to replace/upgrade the dish, for instance, you wouldn’t have to go up on a ladder and risk life and limb for it. All I’m saying is, I’ve known too many people who have fallen from roofs and ladders - some professional roofers even - to be naive enough to think it’s easy work.
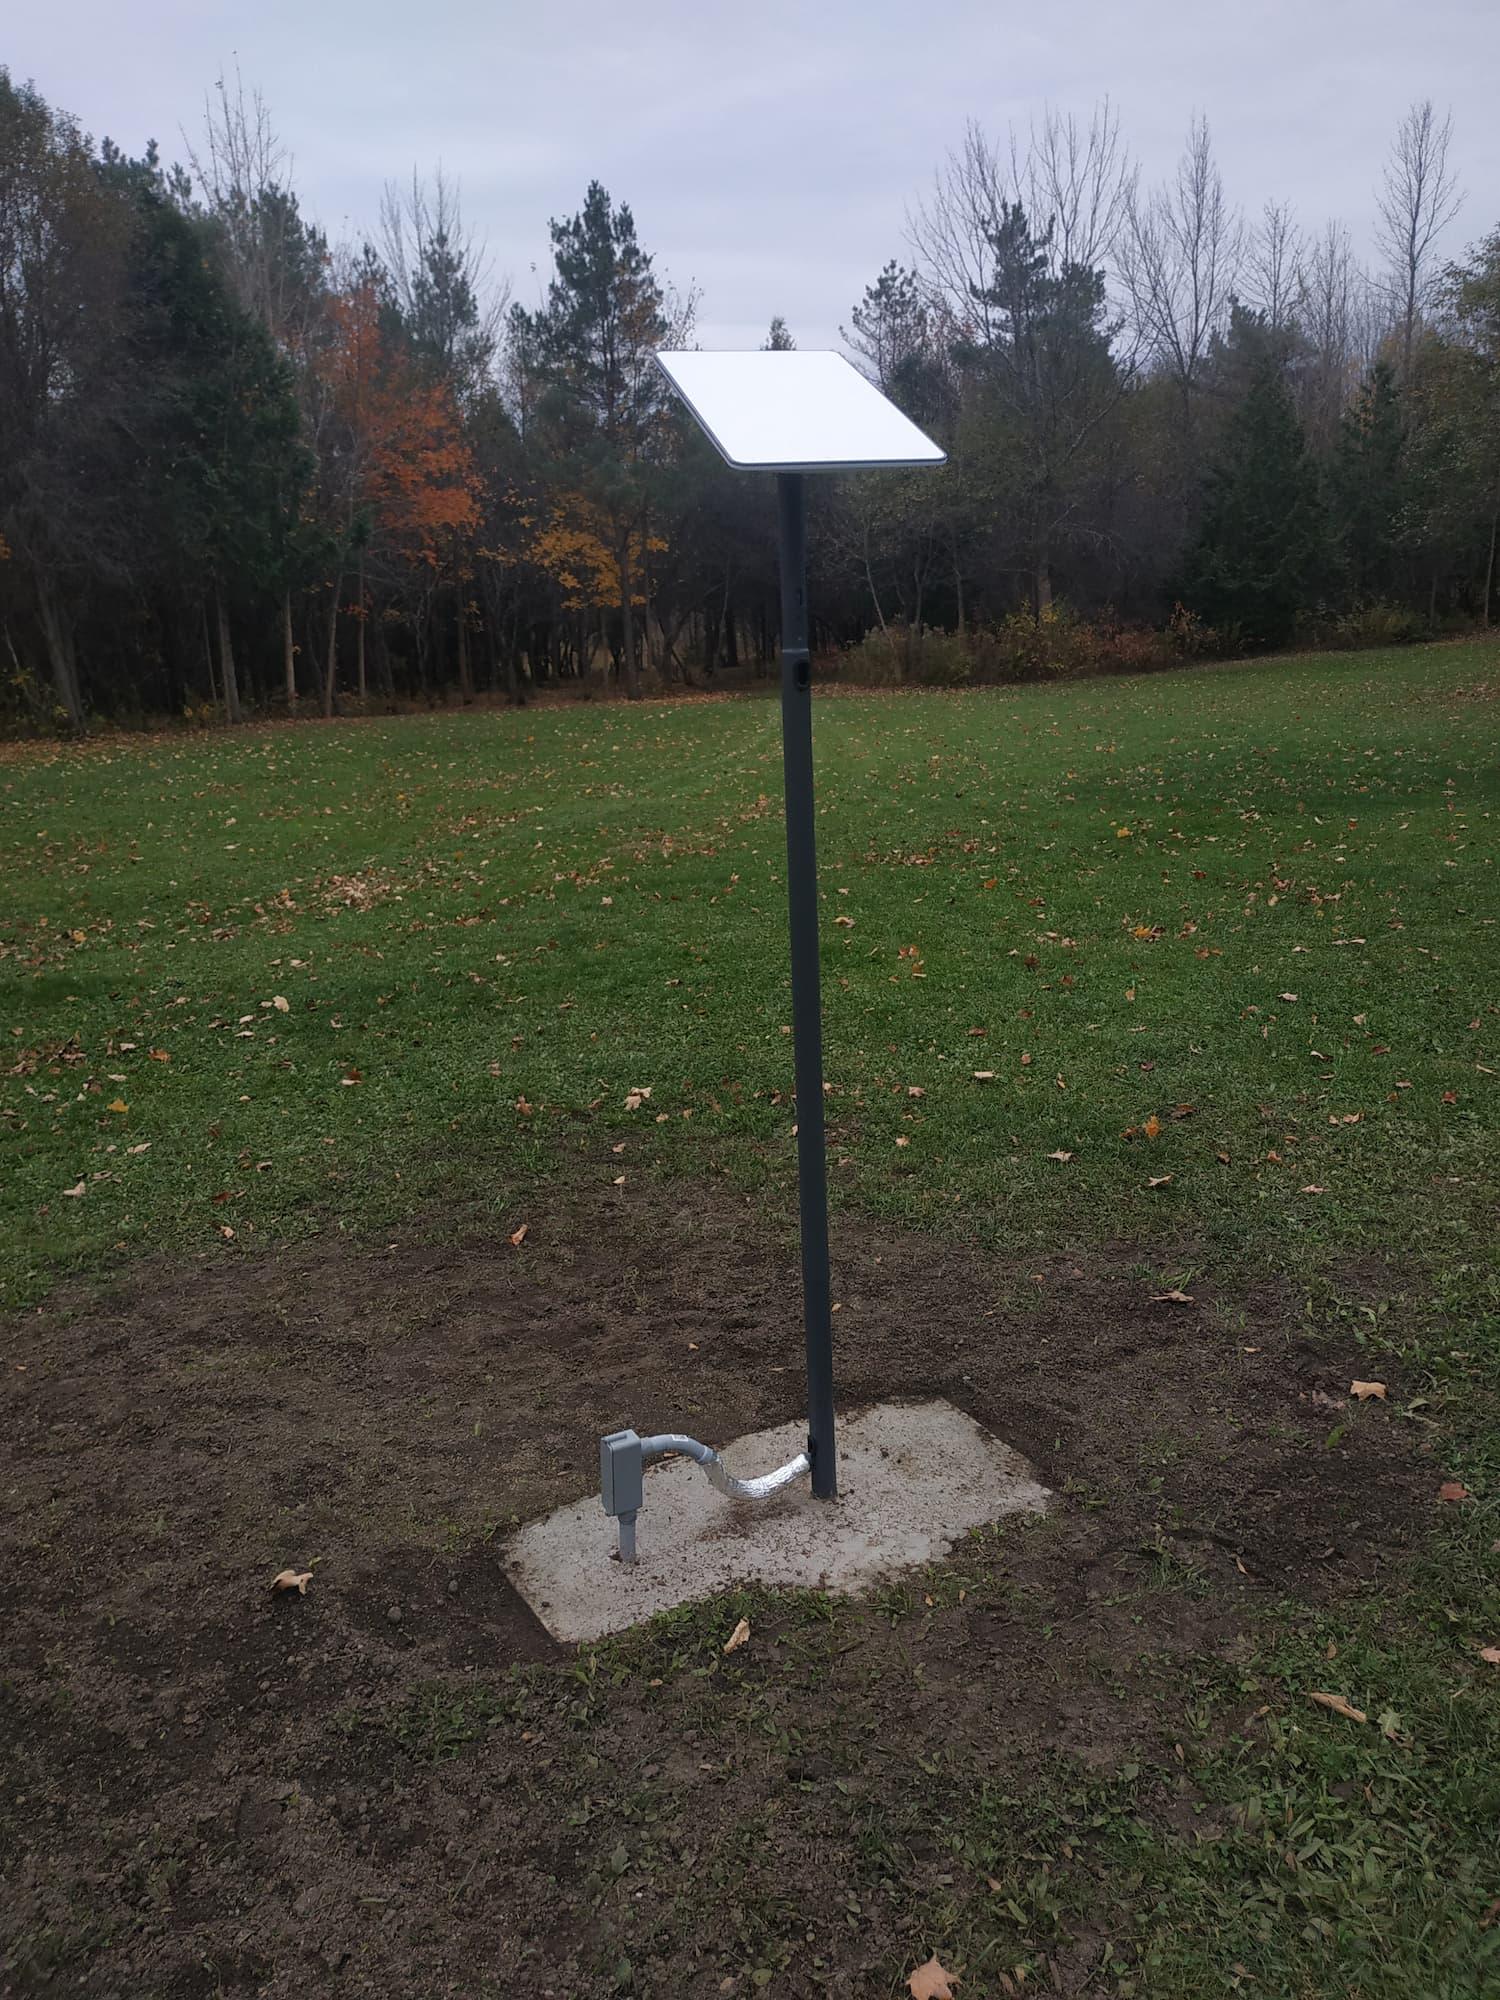
Mind you, every permanent mounting option is going to come with its own challenges. For the pole mount, in particular, be prepared to pour a large cement pad for it. I know Starlink has a a reputation that it’s “no installation necessary”, but I really think that’s a bit of a myth. It’s like saying “I don’t need a refrigerator, it’s cold outside”. So ideally, as challenging as it is, try to have a permanent installation plan in place before buying the dish. Consider your options, do your research, and seek out good help if you need it. There are many “Starlink Installers” out there, on Facebook or other websites. And no doubt many of them are honest, professional, and competent. But like with finding any type of contractor, be careful and try to only work with trusted contractors that others have vetted.
Ideally, if you don’t want to do the work yourself, a handyman or landscaper worth their salt should be able to help with most of the process. Be prepared to explain it to them, in detail.
For what it’s worth, for the pole mount, you’ll want a roughly 2 ft deep by 1.5 ft wide hole in the ground. You want to make sure the pole is straight and level, and a few inches above the ground. It has a hole at the bottom for the cable to go into. Make sure not to cement up to that, but to leave enough space for it. When pouring cement to serve as a base for the pole, it might be helpful to mix in some gravel, or add some rebar to the sides of the hole before the pour for extra stability. Now here are two neat tricks that might help with getting the pole positioned, and keeping it positioned while the cement dries:
Stick a piece of metal/rebar straight into the ground at the bottom of the hole, and put the pole on top of it
Stick a metal driveway marker in the ground next to the hole, and connect it to the pole with a cargo strap. Adjust the tension on the strap, or the placement of the marker, and use a level to confirm the pole is in the right position.
Either way, ideally you’ll want to have a permanent mounting solution in mind, and purchase it right after you purchase your dish. Annoyingly it has to be two separate orders, but if you order everything at once, then you won’t be stuck without a permanent mount once the dish arrives. And you won’t be tempted to forego a permanent solution, in favour of just sticking the dish on the ground and putting the router in your garage. Listen, whatever works for you. I’m not here to judge. But I have a lot more peace of mind knowing that my dish and router - which let’s not forget are a significant investment in and of themselves - are installed in a safe, future-proof manner.
Because one major complaint I’ve heard about Starlink is that their customer service is pretty poor, or at least very slow to respond. So you don’t want a preventable issue on your end to leave you without Internet for possibly weeks or (perish the thought!) months. Just saying, it’s better to be prepared.
A Pole-rizing View
Look out, rant incoming!
My one personal major issue with Starlink, especially the company, is how proprietary all of their tech is. This should come as no surprise, seeing as Starlink would likely not exist were it not for Elon Musk’s dreams of space colonization. Tesla’s hatred of the right to repair is evident in Starlink too. Just not to as egregious of a degree. At least Starlink is a fairly simple setup, as opposed to a Tesla, which apparently can’t even get its tires changed at a regular auto shop (boo).
But I don’t feel like too much of a hypocrite for going with Starlink, despite my misgivings about how they do business. Because, in truth, there are no options that even come close. Say what you will about them, but Starlink genuinely cares about connecting rural communities to the great Information Superhighway. The other guys, barring Xplornet and a few small/local players, do not. Trust me when I say that my alternatives are slim to none, that are anywhere close to replicating what Starlink can do. The big guys offer “Unlimited 4G internet” but if you read the small print it’s actually only a few dozen gigabytes a month, then you get dropped down to literally slower than dial-up. Seriously.
That whole mess aside, I’m not a huge fan of their proprietary cable. The connector is a weird sort of USB-C-adjacent thing. And it’s cat5e ethernet mixed with some kind of PoE-based power delivery system. It’s a nightmare, that’s all I can say. And it really bugs me that the only available cable lengths are 50ft, 75ft, and 150ft. I could’ve easily gotten away with a 100ft cable, but whatever. I got a few dozen feet of cable spooled up in my basement. Because even if I wanted to, there’s no viable way of splicing the cable to make it shorter. Woo-hoo, weird proprietary cable with no publicly-available data that’s only available from one vendor in a limited number of lengths! Gotta love that, right?
In all seriousness, I honestly really do have an issue with their cable. What I wouldn’t have given to get a 100ft, direct burial rated version. Oh yeah, and that’s the best part - the cable isn’t even rated for direct burial!
Now, for you non-cable geeks out there, this means that you really shouldn’t just dig a trench and bury the cable on its own. Direct burial-rated cables generally have a special gel layer that protects the wires on the inside from the elements, and the nasty conditions that come from sitting in dirt for long periods of time. It’s not the easiest thing to find if you’re looking for a particular type of cable, but you can get direct burial-rated Ethernet cable. I personally bought 100ft of burial-rated Cat6A cable from Infinite Cables for my office cabin, but that’s neither here nor there.
Point is, I don’t know for sure, but it really seems like your best bet is to run a PVC conduit to place your Starlink cable inside. Running a conduit is a challenging task, but it more or less boils down to the following steps. Again, I’m no expert. If you’re interested in doing something like this, seek the advice of an electrician. Luckily I had my Dad for help with this, who’s an all-around handy guy. He made a career out of home and commercial appliance repair, so this kind of stuff was fairly trivial for him to figure out. But anyway, this is the basic process, as I understand it:
Find a diameter of PVC conduit that will fit the cable (3/4 inch worked for me)
Buy enough conduit pieces to go from Point A to Point B (including elbow joints and junction boxes at the start and end of the conduit, and bends if you need them - although depending on the radius of the conduit, you should be able to bend long pieces a little bit)
Ensure the cable can fit through each of the pieces of the conduit, like elbow joints. Another “fun” thing about the cable is how it has big, unremovable connectors. So make sure the smaller one fits
At this point I should mention, keep the bigger end of the cable inside, and run the smaller end (that goes to the dish) out of the building and towards the dish. This way, you won’t have to worry about pulling the really fat piece of plastic on the router side of the cable through the conduit.
Dig a trench at least 18 inches to 2 feet deep, and perhaps a foot or so wide (this is hard work, but there are walk-behind trenching machines which may be available for rent in your area)
Lay the pieces of conduit out into the trench, and ensure they fit. Make adjustments (like cuts or adding extra pieces) where necessary
Glue all the pieces of the conduit together, with weatherproof sealant made for PVC, and let the glue dry
If you’re running the conduit to a building, you’ll probably want to drill a hole through a wall, connect a junction box of the conduit to the outside of that hole, and seal it with some sort of environment-resistant putty
Open the junction boxes on both sides once you’re ready for the cable pull
Use a spool of wire fish tape to go from the dish side of the conduit. It should pop out the junction box on the house side. You may need another pair of hands for this
You may need to use some kind of lubricant to get the wire fish through (dish soap can work, but be careful as it also makes tape harder to stick)
Again, your mileage will vary. And this is not an instruction guide, I’m just detailing the process that worked in my situation. That being said, it was at this point that the cable had to be routed in my case.
Getting the dish end of the cable to connect to the wire fish proved tricky. The first time we tried to pull it through after connecting it with electrical tape, the lubricant in the conduit ended up making the tape slip off the cable. So we had to use a combination of electrical tape and cable ties, to jerry-rig a connection between the end of the wire fish, and the end of the Starlink cable. If you plan on attempting something like this, be very careful. And don’t pull the cable too hard, there should be very little resistance if you’re doing it properly. You might also want to temporarily remove the little rubber gasket on the end of the Starlink cable.
After somehow connecting the wire fish and the end of the Starlink cable, it’s just a matter of pulling the fish back through the conduit, and the Starlink cable along with it. Do not exert a significant amount of force, you don’t want to damage the cable. This can be a stressful process, especially if you aren’t experienced with it. I would highly recommend seeking the assistance of someone who is experienced with cable pulling. As far as pulls go, this is a pretty tricky one if you have a long or winding conduit - especially because of the strange shape of the connector. But if you do your homework, and make sure the conduit has been assembled such that there aren’t any tight bends or obvious snag points, it should be far from impossible.
After pulling the cable through to the other side (the dish side), we removed the tape and cable ties (very carefully) from the amalgam of wire fish and Starlink cable. And I gave the end of the Starlink cable a good clean with isopropyl alcohol and compressed air, just to ensure no tape or lubricant residue was present inside. And I put the rubber gasket back onto the end. And then it was just a matter of running the cable up the pole (which had already been erected in now-dry cement), popping the dish on top, plugging it in inside, and callilng it a day.
Gotta admit, after all of that, watching the dish finally orient itself on the top of the pole was truly a sight for sore eyes.
The final tip I want to share is regarding the indoor side of the installation. I’ll just be frank and say that I don’t like the Starlink router. There are a number of reasons for this, but let’s just say it boils down to lack of features, meh WiFi range, and customization. So this tip won’t apply to everyone, because maybe you’re fine with just using WiFi in a small area near the router. But for anybody interested in building a home network (even if you’re not an IT expert) I think the Starlink Ethernet Adapter is worth purchasing.
The first Starlink routers had an Ethernet port built in. But they eventually removed it, in favour of this adapter approach. I’m not going to make a stink about this, because at least the adapter isn’t too expensive, and at least it works well for my needs.
I think there are three main ways to set up the indoor side of a Starlink network:
Use their router over WiFi only
Use their router with WiFi, and the Ethernet adapter connected to one device
Bypass their router with the Ethernet adapter, and connect to your own router for WiFi and other connectivity options
I went with the third option here. My Mikrotik ax3 router has served me well so far, so it was a simple choice for me to use it as my main home router. Mikrotik routers are not for the faint of heart, as the initial setup and available options can be very overwhelming. But there are many good routers put out by other companies like D-Link, ASUS, NETGEAR, Linksys, TP-Link, Synology, and others, that may be more beginner-friendly. I’d recommend doing your research, setting your own priorities (and budget) and finding a router that works best for your situation.
I just find it rather ideal to use the Starlink router as a connection point to the dish, and nothing more. But it depends on your personal situation and preferences. I’m just saying that this setup will allow you more options with regard to expressing those preferences. And in my opinion, more options are almost always a good thing.
So yeah, that’s what I wanted to share with regard to my recent Starlink installation. Again, take everything I’ve said with a grain of salt. And if you plan on doing something like this, make sure to get good help. Personally, I am very grateful to have had my Dad to help with the more complicated parts. I’m especially grateful that he was able to pour the cement pad for the pole, and assemble the conduit for the cable. It can be a major project, but I wholeheartedly recommend it to anybody living out in the sticks, like me.
Sure, Starlink is a weird company in some ways, and it’s not like I don’t have my misgivings about parts of what we had to do to get this to work. The cable especially, is dumb, and you can’t convince me otherwise. That being said, the service itself is excellent and I consider it a major upgrade in every way.
I would definitely recommend looking into a plan for permanently installing the dish, if you are considering Starlink. Hopefully some of what I’ve shared might be helpful in your situation. The pole mount and conduit is only one potential option. That’s a good thing about Starlink, you do get a lot of options. If nothing else, I hope this blog post has got you to consider your Internet connectivity options. Whether you’re planning on installing Starlink, or not.
Because yeah, our society is too Internet-dependent in ways. And I really wish that weren’t the case, especially when dealing with government agencies and educational institutions. But I do believe we ought to make the most of our respective situations. And for me personally, working from home is an option I’m very grateful for. So for me, this upgrade was a long time coming, but it was totally worth the wait.
My Dishy's permanent home