Making my First 3D Video Game with Godot
Last Updated: 12/08/2023
The story of finally developing Millennium Junction, my first 3D video game, using Godot 4

Matthew Piercey

Like many who came before me (and surely many who will come after) my introduction to computers came from the world of videogames. I guess it kind of started when I was playing edutainment games in Kindergarten (some of which were really fun, and not just because I was young). I soon realized that some of those same games, along with others, were available on the kids’ computers at my local library. I had about an hour of library time per week, which I spent almost exclusively on games for several years.
One of my favourites was My Amazing Human Body by DK (which, among other things, included a wacky mini where you had to balance the physical needs of walking, talking skeleton named Seemore throughout his increasingly erratic week). Millie’s Math House was also pretty good, with a bunch of different minigames to choose from. Krazy Art Room was a painting program with an (unintentionally) eerie atmosphere that I remember spending a lot of time with. I also specifically remember enjoying Spongebob Squarepants Typing, though I’m sure there were others. But eventually I realized that the “real computers” also had games on them. Well, more accurately, they could be used to access online games. Since it was the mid 2000’s at the time, that meant the best kind of online games - Flash games.
Oh, Flash games. Don’t get me started! I could make a list of dozens - probably hundreds - that I distinctly remember enjoying. At the time, I remember starting to feel like I was wasting my limited library time, playing so many games. But looking back, I treasure those memories. While most of the games I enjoyed have luckily been preserved as part of the Flashpoint Archive, there are a few which are no longer available. One of my favourites of which was Deeqs, a Dairy Queen game of all things. Where you played as little ice cream people. It was all quite charming.
But when I got my first laptop, a whole new world of interactive experiences opened up for me. Let’s just skip the Leapster chapter, shall we? But yeah, I had a Leapster (and a Leap Pad for that matter, and still do have them). Yet again, a Spongebob game was among my favourites on that platform…
Point is, getting a laptop opened the floodgates of PC gaming. Back when they still had a massive warehouse of old stock, my Dad bought me a bunch of PC games from RadioShack (later The Source in Canada, currently a shell of its former self). My personal favourites included (in no paticular order, I love them all): Polar Bowler (and Polar Golfer), 18 Wheels of Steel: American Long Haul (and 18 Wheels of Steel: Pedal to the Metal), Chuzzle Deluxe, LEGO Stunt Rally, Peggle, NHL 2000 (and NHL 2004), Trackmania, WALL-E, The Sims Carnival: Snap City, Hard Truck Tycoon and Super Collapse.
But that’s not even the full story, because my grandparents had a Dell Optiplex GX1 (which I have since upgraded with a 500 MHz processor and a whopping 768 MB of RAM). And on this computer, I had another collection of games to enjoy. Like NASCAR Racing: 1999 Edition, Tonka Construction 2, Tonka Raceway, Kid Pix, Hotwheels: CRASH and the Break! collection by eGames. I’ve since gone on to enjoy a bunch of other games - don’t get my started on the Wii or plug-and-play TV games, or we’ll be here all day. But I stand by the assertion that 1995-2010 was peak PC gaming, and I’m just glad I was there to enjoy it. Those were the days…
Anyway, enough preamble. I just felt the need to set the stage. Because if I remember correctly, one of the first things I wanted to do with my then-new laptop (in 2007, yes it ran Vista, at least it had Purble Place) was make a videogame. I had this elaborate concept for an open-world city game, where you could choose from a range of outlandish vehicles, and you could drive up buildings. Not up the sides of buildings, like the city was full of buildings designed to be driven up. Like a building with a big elevator shaft that lifted your whole car up to the top, or a skyscraper-sized parking garage. And if you looked out from the top of a building, you’d see complete nonsense on the roads beneath. For some reason, I thought it’d be fun if the roads were populated with insane, out-of-control cars that somehow just barely never hit each other. That part sounds a bit like Burnout, come to think of it. I might end up revisiting this concept someday, but for the purposes of this story it’s a stepping stone.
I tried to learn what I could about game development back then. I tried building my own Windows Vista Sidebar Gadget, but got bogged down once I realized it involved skills I didn’t have at the time, and didn’t know how to learn. Looking back, it’s probably for the best I didn’t pursue that line of development, but it is worth throwing out there. I remember looking forward to new sidebar gadgets under the “Techy, Geeky, Cool” category of Microsoft’s gadget library, and downloading the ones I liked onto a USB flash drive to install back home. Seriously…
Eventually, I tried a different approach. I knew game development involved programming, and that there were different “languages” for programming. I found an ebook on game development in Python, and I got excited. It walked me through the process of setting up IDLE (a simple-yet-effective program that helps you write Python code) and I started to learn. I made a “Hello World”, a “Hello [name]” program, a simple number guessing game, and various other programs that depended on user input.
But I got about as far as understanding the basic syntax of Python (probably Python 2.6 at the time) before realizing that this wasn’t what I was expecting. I flipped through the virtual pages of the book, near to the end. And it dawned on me that the most complicated game this book would help me make was basically text-based tic-tac-toe. Looking back, it probably would have done me some good to stick with it and finish the exercises in the book, but I couldn’t help but be disappointed when more interesting things like graphics and sounds didn’t seem to be involved. Again, if I had followed the book, then picked up some tutorials on something like the Pygame library, I would’ve probably gotten somewhere. But with my limited patience (mostly due to my limited Internet time) I gave up on that pretty quickly.
But I eventually did find out about some honest-to-goodness “videogame” creation tools. I think the first of these was probably RPG Maker 2003. It was fairly intuitive, had a lot of premade assets for characters, backgrounds, enemies, etc. And there were a lot of available tutorials for it. But despite all my time in programs like MS Paint, Kid Pix, Krazy Art Room, and Tux Paint, I was far from a good digital artist - let alone a good pixel artist. So when it came to trying to make my own characters, enemies, backgrounds, and items, I gave up on that, too. Again, in retrospect, I could have just stuck with the default assets and tried to make something with them. But, as always, my sights were aimed higher.
The next tool I found was GameEditor. This was a lot closer to what I was looking for. A full 2D custom game creation suite. Moving sprites around the screen. It had support for graphics and music. Again, in retrospect, I would have been pretty happy with Pygame if I had stuck around in the Python scene. Anyway, I made a couple of very basic platformer style games before I realized that game development is only a subfield of a much broader topic - game design. And without a proper design, it didn’t matter what tools I used. But what I really wanted was something 3D, so GameEditor wasn’t going to cut it for me. Yet again, I aimed higher.
After some research, I found the Genesis3D game engine, and some tutorials to go along with it. This was far more my style, at least it seemed like it at the start. It gave me a 3D character and a bunch of pre-made weapons, and plopped me down in a 3D environment. But try as I might, I couldn’t make sense of the 3D map editor, no matter how closely I followed the tutorial. I kept falling through the floor, or getting stuck between walls, or putting textures on the wrong sides of things. Again, looking back, I was really close to making something interesting. Especially because a lot of the hard parts were already done for me. I basically just had to make a 3D map for the pre-existing character to traverse. But I did have quite a bit of fun running around custom (albeit janky) 3D environments, shooting the pre-made weapons. One of which was a rocket launcher. Much to my amusement, I found that if I aimed it too close to me, the resulting explosion would damage my character. Don’t know why I found that so funny, but it was probably because none of the other premade weapons did that. And as far as I know, I don’t think I had seen that sort of thing in a videogame before. Obviously I hadn’t played Team Fortress 2 or Quake yet at the time, where self-damaging “rocket jumps” are a hilarious-yet-legitimate strategy to reach higher platforms and achieve absurd velocities.
But Genesis3D proved too frustrating to do much interesting with. This time I quit not because I was getting bored or impatient, but because it was genuinely outside of my capabilities, at least at the time. Ironically I eventually discovered Scratch, an educational visual programming environment that can be used to make simple (and not-so-simple) games. Although 3D games are technically possible in Scratch, I got bored of it pretty quickly, because I didn’t want to make a 2D game.
I also had a brief stint trying to understand ClickTeam Fusion, after hearing that’s how Five Nights at Freddy’s was made. I couldn’t make heads nor tails of it. Mad respect to Scott Cawthon for making anything good with that set of tools, but I would certainly not recommend them.
All this to say, kids growing up today are spoiled for choice. There are so many great tools and learning resources out there for aspiring game developers. Tools like Godot, GDevelop, GameMaker Studio, Unreal Engine 4 and 5… Even Roblox technically counts (and yes, I did try to make a Roblox game at one point).
But I digress. Point is, I’ve been a fan of videogames since I first learned what computers were. And I’ve been wanting to make videogames for just about as long. So if you’ll bear with me, I’d like to walk through the story of creating my first “proper” 3D “game” with Godot 4. You’ll understand the purpose of the quotes soon enough. But sufficed to say, this has been a long time coming. And I’m just glad to finally put something out there.
My original concept for this game was to make some kind of mall simulator. A virtual early 2000s shopping centre, much like the ones I have fond, vivid memories of. Some would say it was a simpler time, but I would also argue it was a more sensible time. So call it blind nostalgia, but I genuinely think the late ‘90s and early 2000s had a lot going for them. I find myself agreeing with the meme that the machines in The Matrix set the simulation in 1999, not because that was the present day when the movie was released, but because it was literally the peak of human civilization…
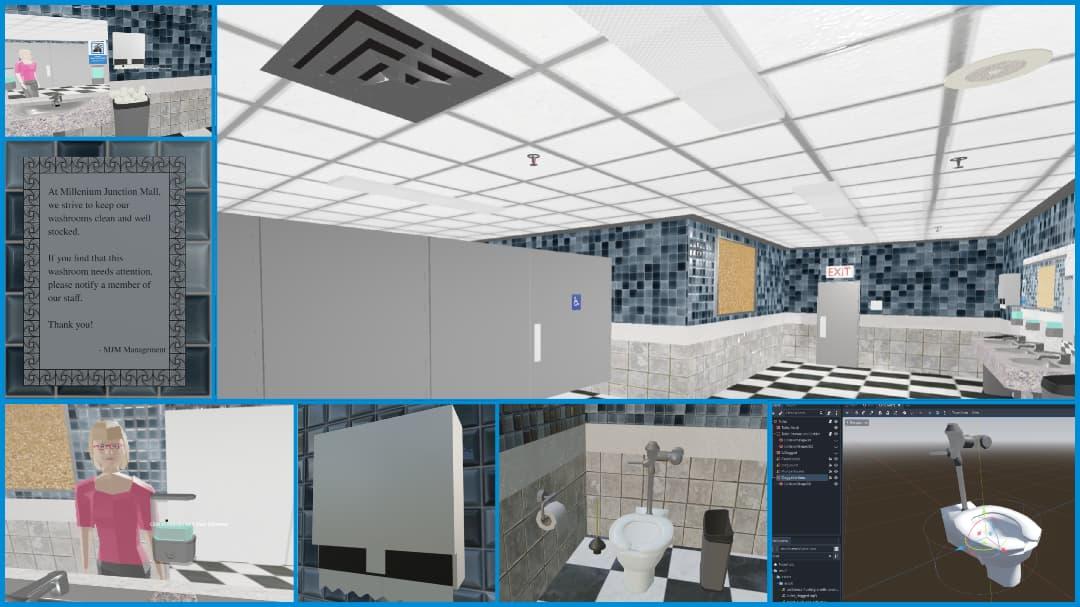
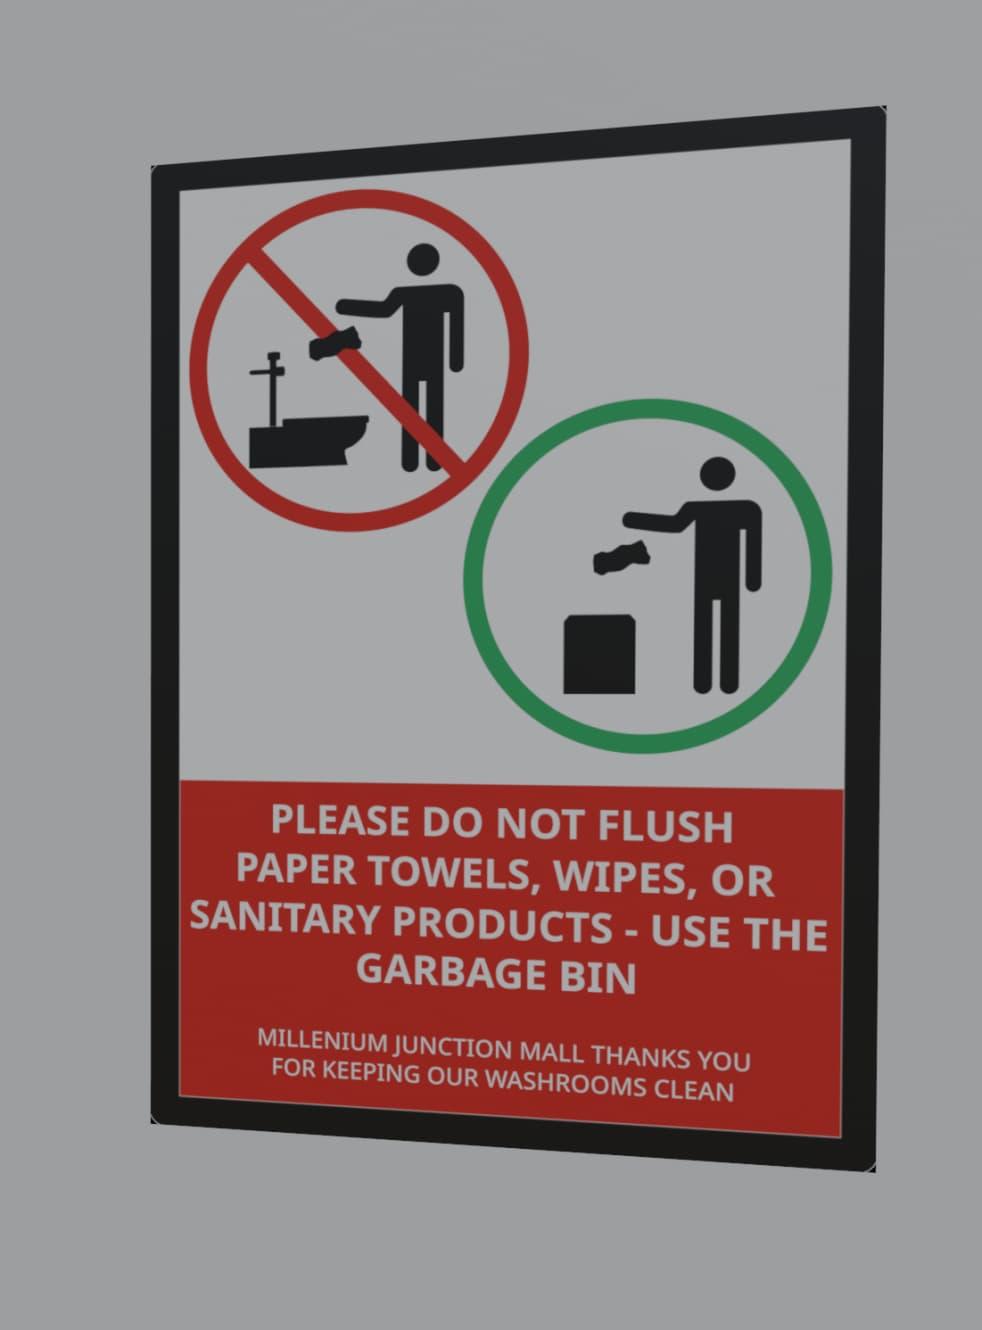
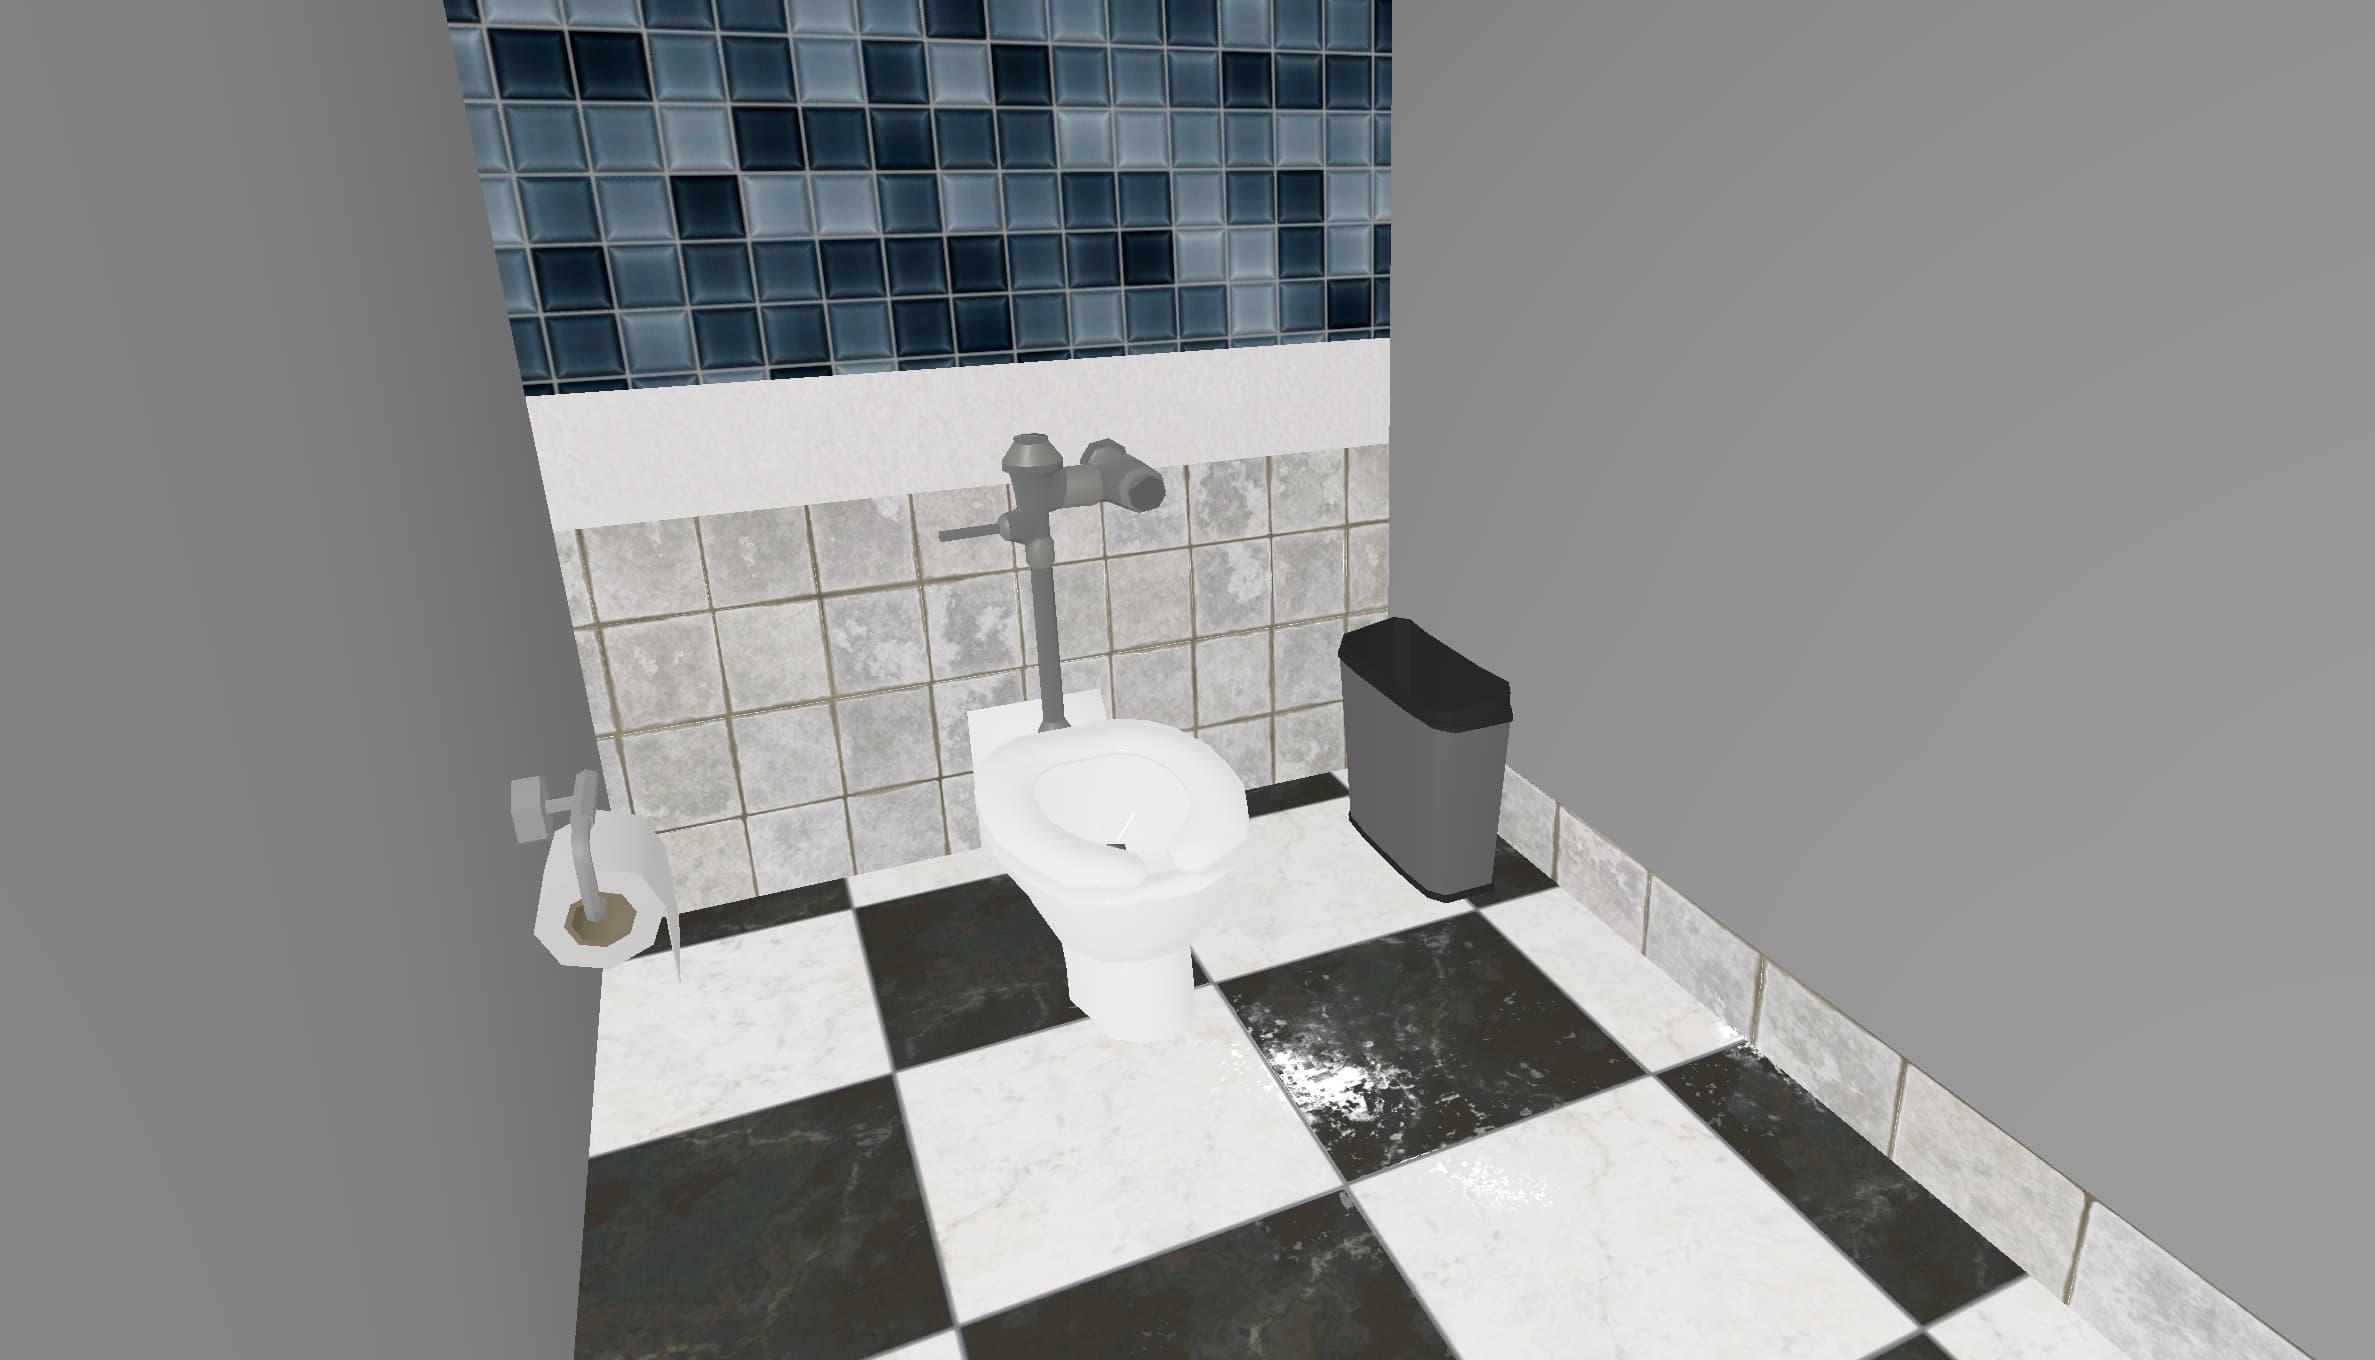
Anyway, I wanted to try to capture some of that feeling in an interactive 3D experience. And I still do intend to expand this project in the future, so it eventually encompasses a whole life-size mall. Someday. For now, I made a washroom. Why a washroom, you ask? Well first, it’s a relatively small, enclosed space, so it’s fairly easy to model in 3D. Second, there are a lot of areas for interactivity in such a space. Third, because I have pretty vivid memories of mall washrooms, that I was able to draw from that. And fourth, because many (but certainly not all) videogame washrooms disappoint me. It’s like many exist solely to say “look at the realism of this environment” yet so many don’t even have working mirrors. Not to take jabs at any games or developers in particular, since that’s really not fair. I now know a fraction of how much work goes into making these kinds of things. So silly as it may seem (and is) I thought a washroom would be a great “vertical slice” of what it takes to build an immersive, interactive 3D environment.
From the start, my main goals were attention to detail, interactivity, and atmosphere. I knew I didn’t want to go the full photorealistic route, but I wanted a bunch of little details that often get overlooked. I wanted something that had a distinct, consistent atmosphere to it, and personally I think I achieved that goal the most. But without interactivity, the whole thing would just feel like a lifeless 3D model. No, I wanted “working” sinks, soap dispensers, paper towel dispensers, toilets, and doors. And a working mirror of some sort. Otherwise I didn’t feel like it would be worth my time.
So, barely knowing where to start, I got to work. I knew the environment was going to be 3D, so I fired up Blender and made a room. Actually, first I attempted using Godot’s GridMap system to create a 3D room from 2D square tiles connected together. The result looks like a cereal box, or pop-up book from the outside, but inside it appears to be an enclosed space. I think it’s a neat system that has its uses, but I knew I needed more control than what GridMap could give me. So Blender it was.
I started by laying out the room. It was going to have a number of stalls on one end, and a slimmer part where the sinks were. From the top, it looked a bit like a backwards capital L.

The room from above
I don’t know, pretend there’s a janitor’s closet in the empty space there. But this seemed architecturally viable to me, like a space that could actually exist.
Once the basic layout was achieved, I wanted to start texturing the room. I knew I wanted a “drop ceiling” and a checkerboard tile floor. Let me take this time to mention ambientcg.com. What an excellent resource for 3D modellers. So epic of them to give everything away under a CC0 1.0 license, too. I picked up most of the image textures I didn’t create myself from ambientcg. And I’d highly recommend it for anybody getting into Blender. Their textures and other resources can save you a ton of time, and you won’t have to worry about licensing issues down the road.
For the walls, I picked out two more types of tile textures, along with some plaster? to go in-between. So far, the room was really starting to look like something.
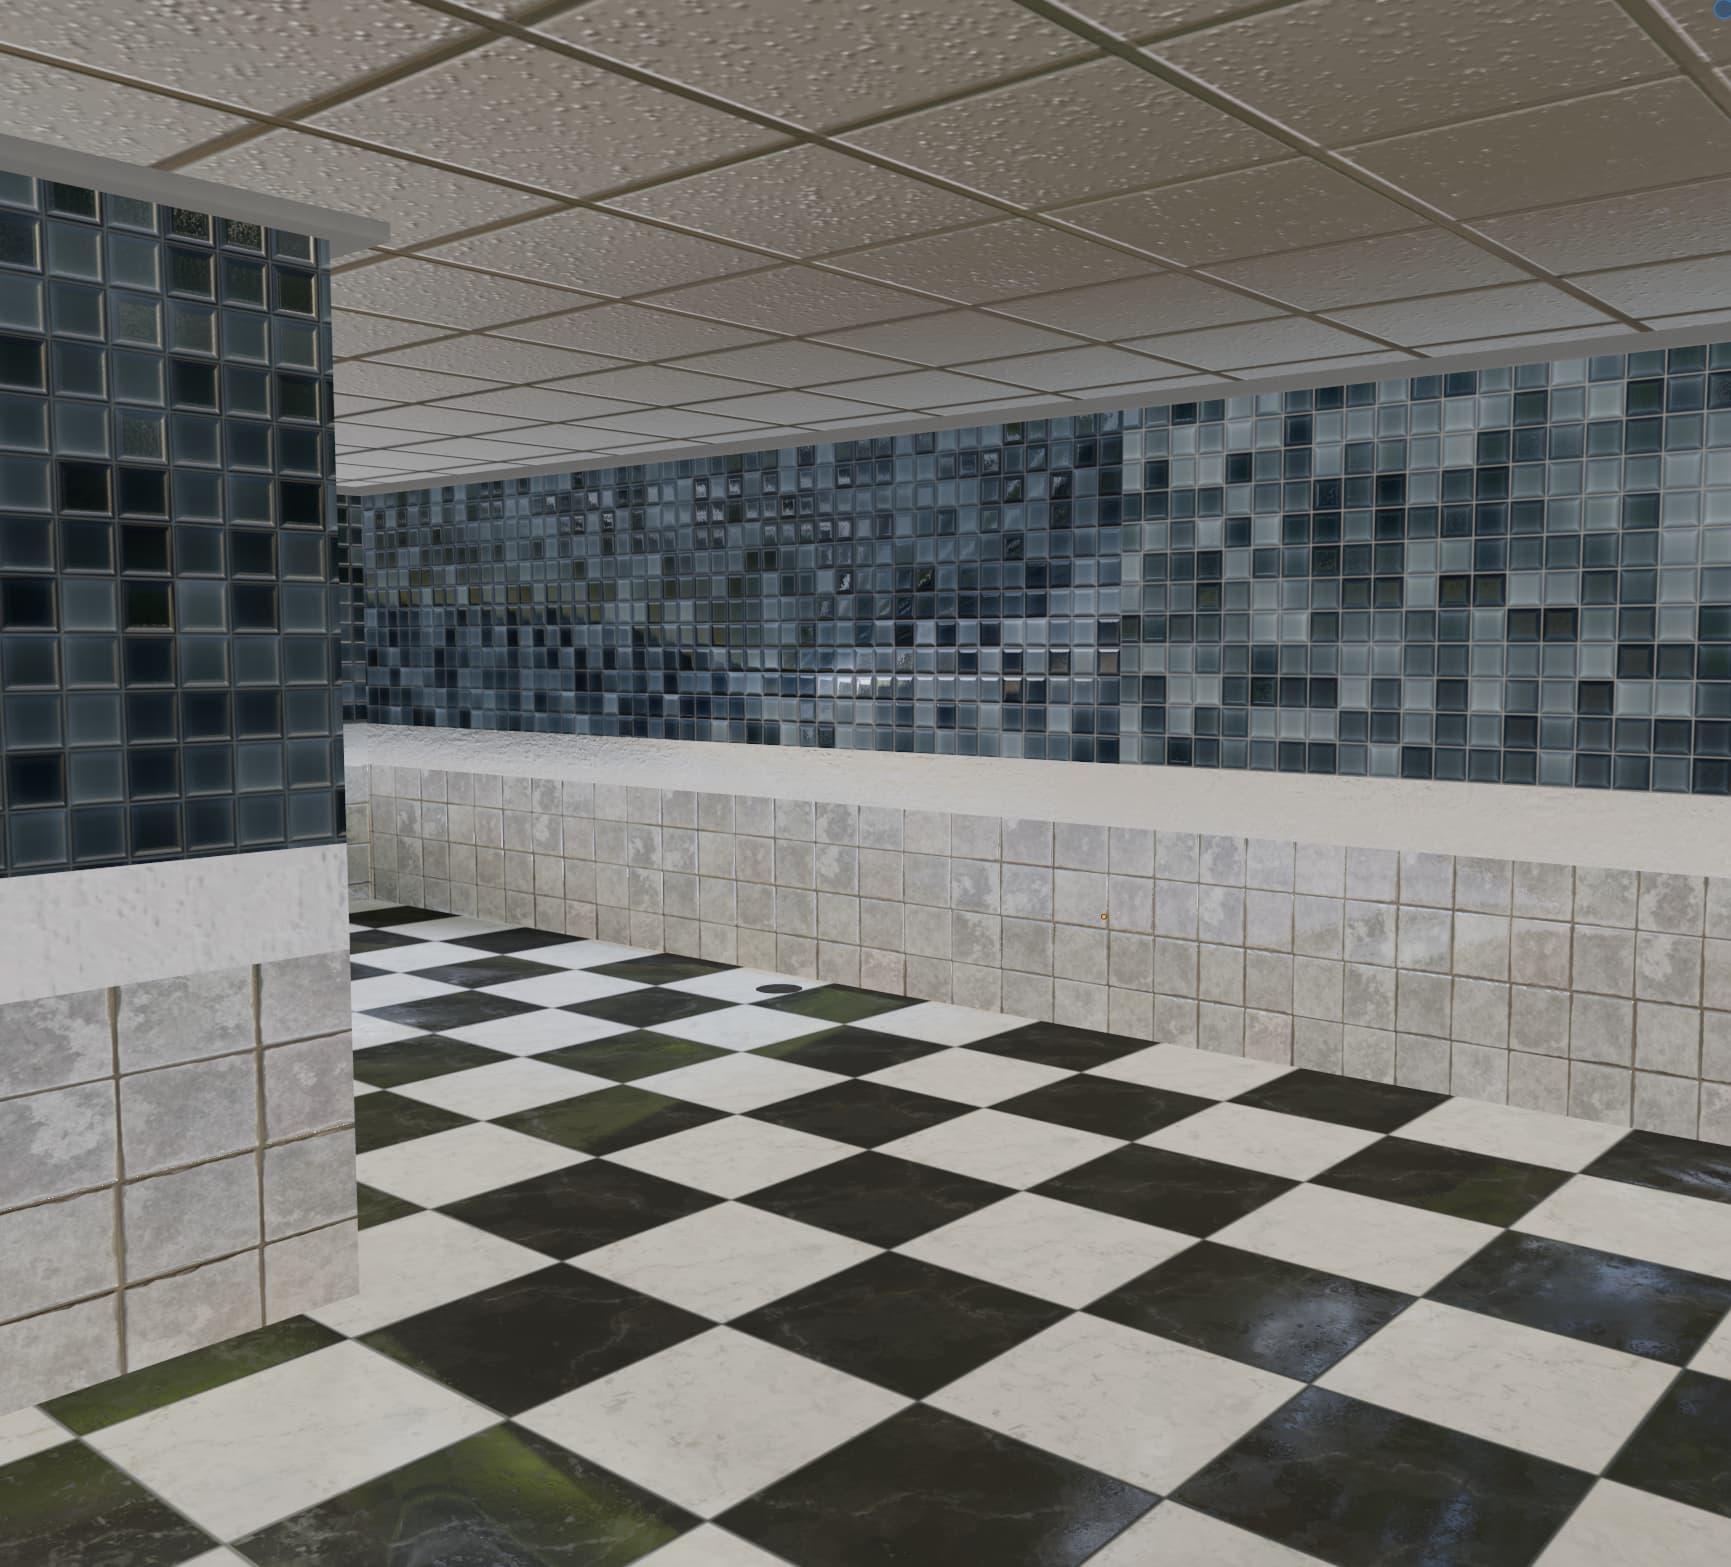
Amazing what can be done with the right textures and some basic geometry
At this point I was quite pleased at the look and feel of the room itself. I then underwent the process of importing the room into Godot. Wasn’t too bad, using Blender’s GLTF 2.0 export. GLTF is such a great file format for 3D models, I love it. There are some quirks about importing from Blender to Godot, and I wish I could give a decent tutorial on them. I do go into a bit more detail on the process in my blog post about rigging low-poly characters with Mixamo. But at least I can give some basic tips, here.
You can create a “New Inherited Scene” in Godot from a .gltf/.glb file, then save it (give it a file name), then right-click on the root node of the scene, then click “Clear Inheritance”, then save the scene again. And from that point on, you can interact with the elements of the GLTF scene as if they were native Godot nodes (for the most part)
Once your 3D model has been imported as an editable Godot scene, you can add other stuff to it. Like collision boxes (there are shortcuts in the User Interface to do that). The “Mesh > Create Tri-Mesh Static Body” option is helpful in many situations, to generate a collision shape that matches the contures of a 3D object. Although for more-complicated models, you may want to make your own simplified collision shape (like a simple box or capsule or sphere)
If you gave your model Shape Keys in Blender (and exported them as part of the GLTF) then you can access them as Blend Shapes in Godot. I made extensive use of this
You might want to ensure that the origins of individual objects make sense. For instance, it’s much easier to create an animation of an opening door, if the door’s origin is where you’d expect the hinge to be (and not, for instance, in the geometric middle of the door). There are many ways to do this in Blender, like moving the 3D cursor to a given vertex, and setting the object’s origin to the 3D cursor
Complex procedural materials made in Blender will not automatically import into Godot. You will have to look into either re-creating them on Godot’s side (generally very difficult) or bake procedural textures as image textures. There are many good tutorials out there for that process in Blender
Sometimes Blender is weird about it, so you generally want to ensure that the “Apply Modifiers” checkbox is checked (under the “Mesh”) tab when you’re exporting a GLTF model from Blender. Otherwise, if you had a mirrored model in Blender, only half of it would be exported as a GLTF.
Anyway, maybe those were helpful, maybe they weren’t. Either way, you will eventually build a bit of a muscle memory for this, after exporting/importing dozens of 3D models between Blender and Godot. Like many things in game development, practice will help.
But now that the basic layout of the room was complete, I got to work on fleshing it out.
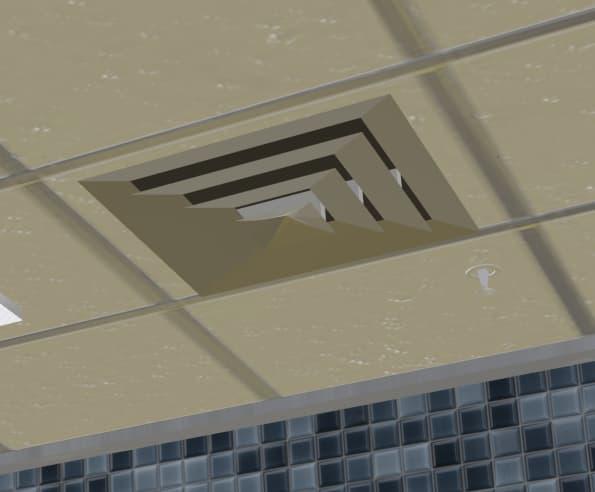
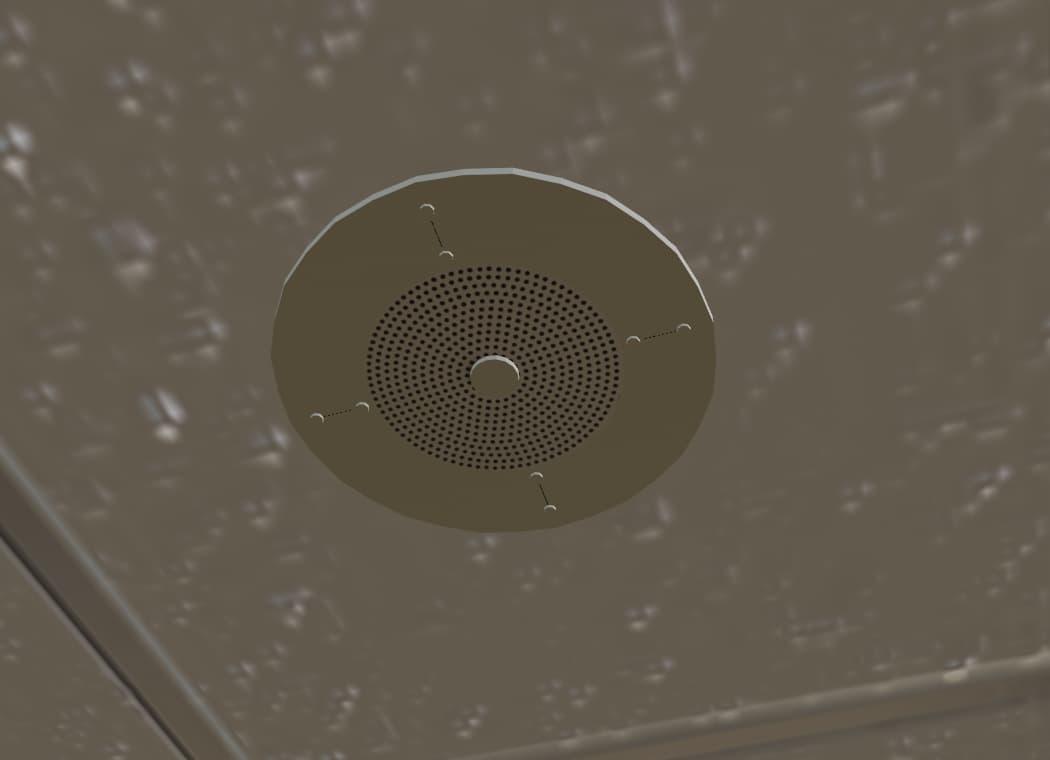
OK, this is less of a montage, more of a slideshow. But you get the point. I had a pretty clear idea in mind, and my next logical step was to create the objects that would fill this space. Luckily, I was getting pretty comfortable with 3D modelling in Blender at this point.
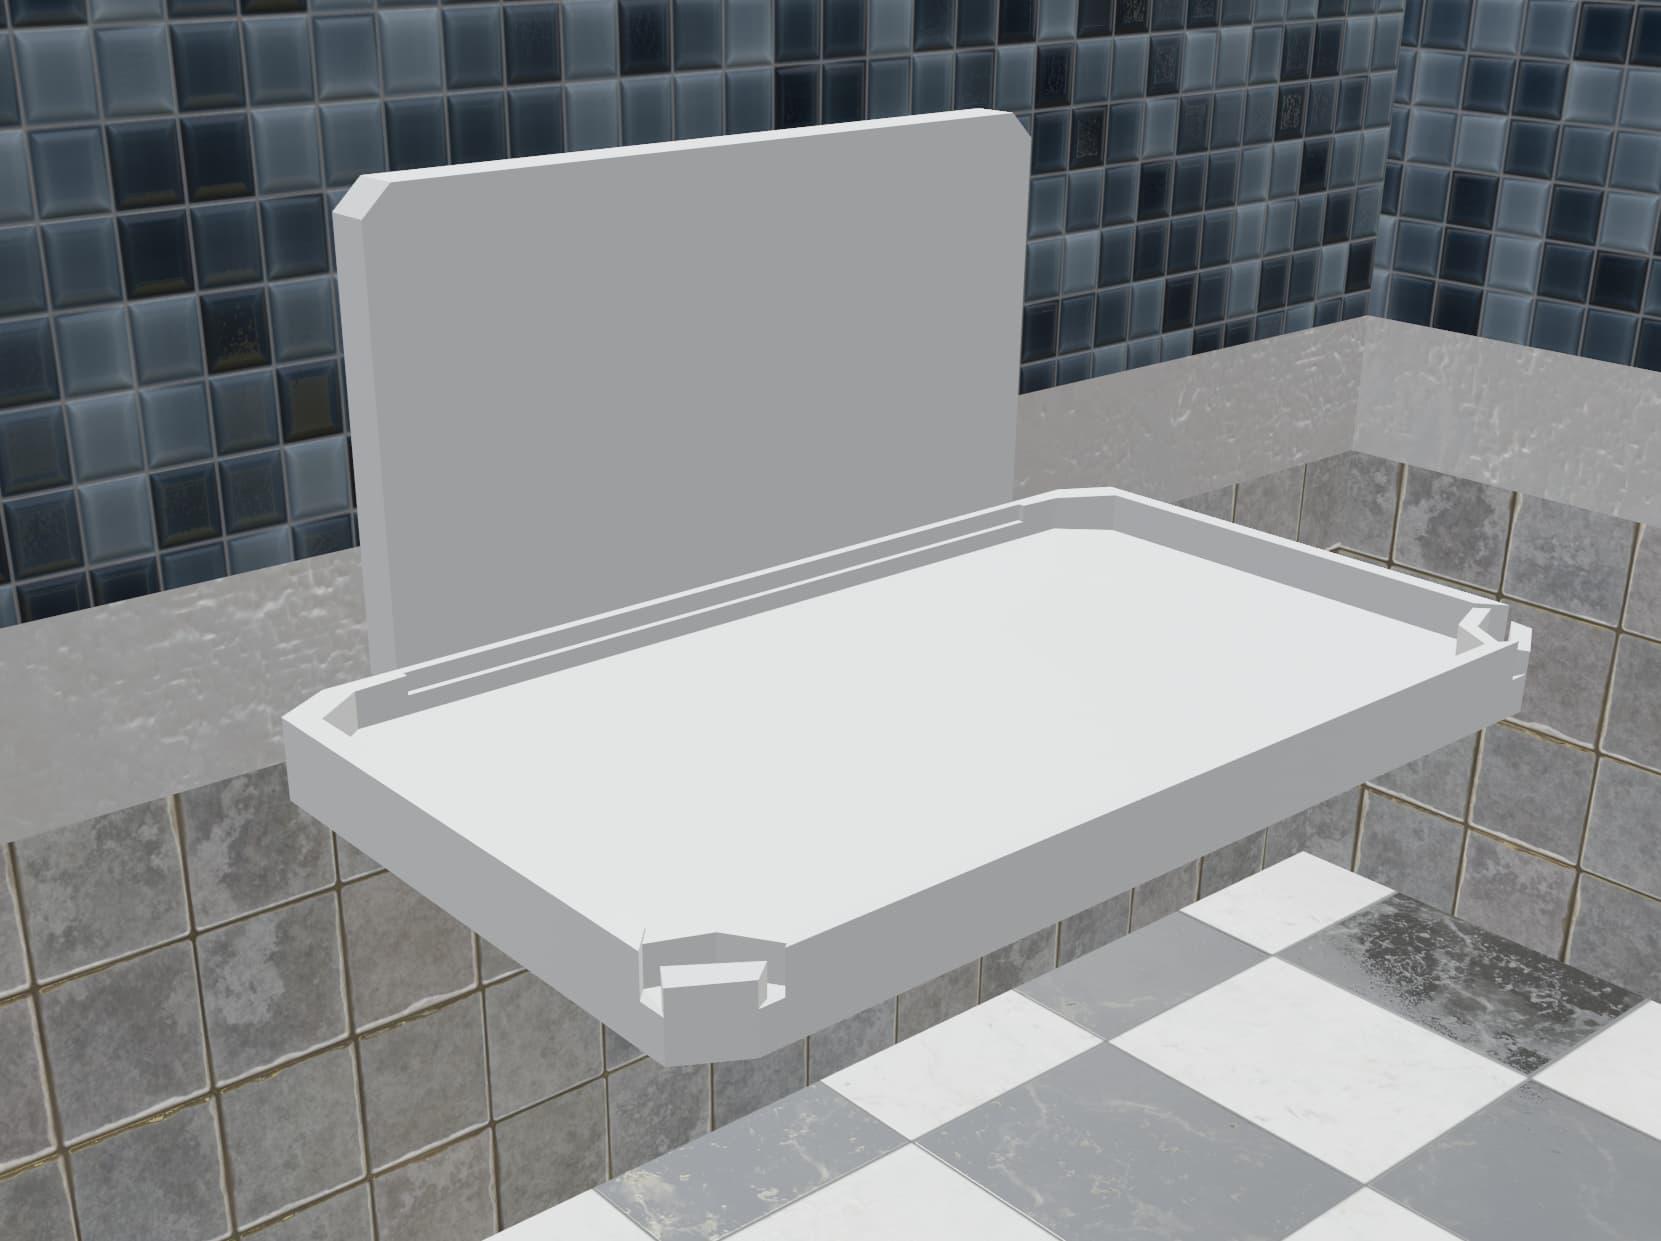

Changing Table
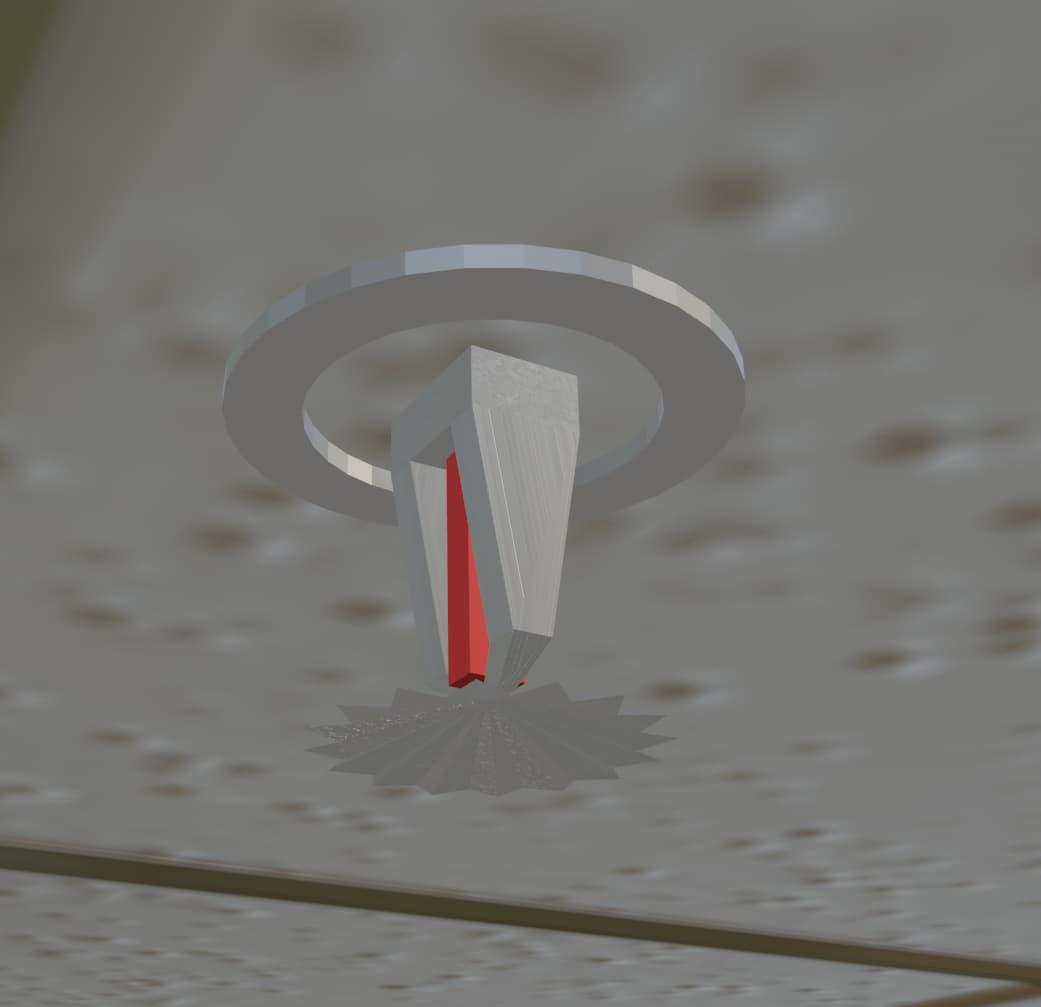
I had a lot of fun coming up with these different models. Because unlike my previous attempts at game development, I was finally able to create my own assets. I especially like how the ceiling sprinklers, ceiling speaker, and plunger models turned out. I was able to use some clever trickery, some of the same trickery employed by actual game developers, to make the most out of minimal geometry and textures. Like the ceiling speaker has an image for the “dots” of the speaker itself, they’re not individually modelled. The ceiling sprinklers have fairly simple geometry (like a circle with every other vertex pushed downwards) but I think they get the point across pretty well.
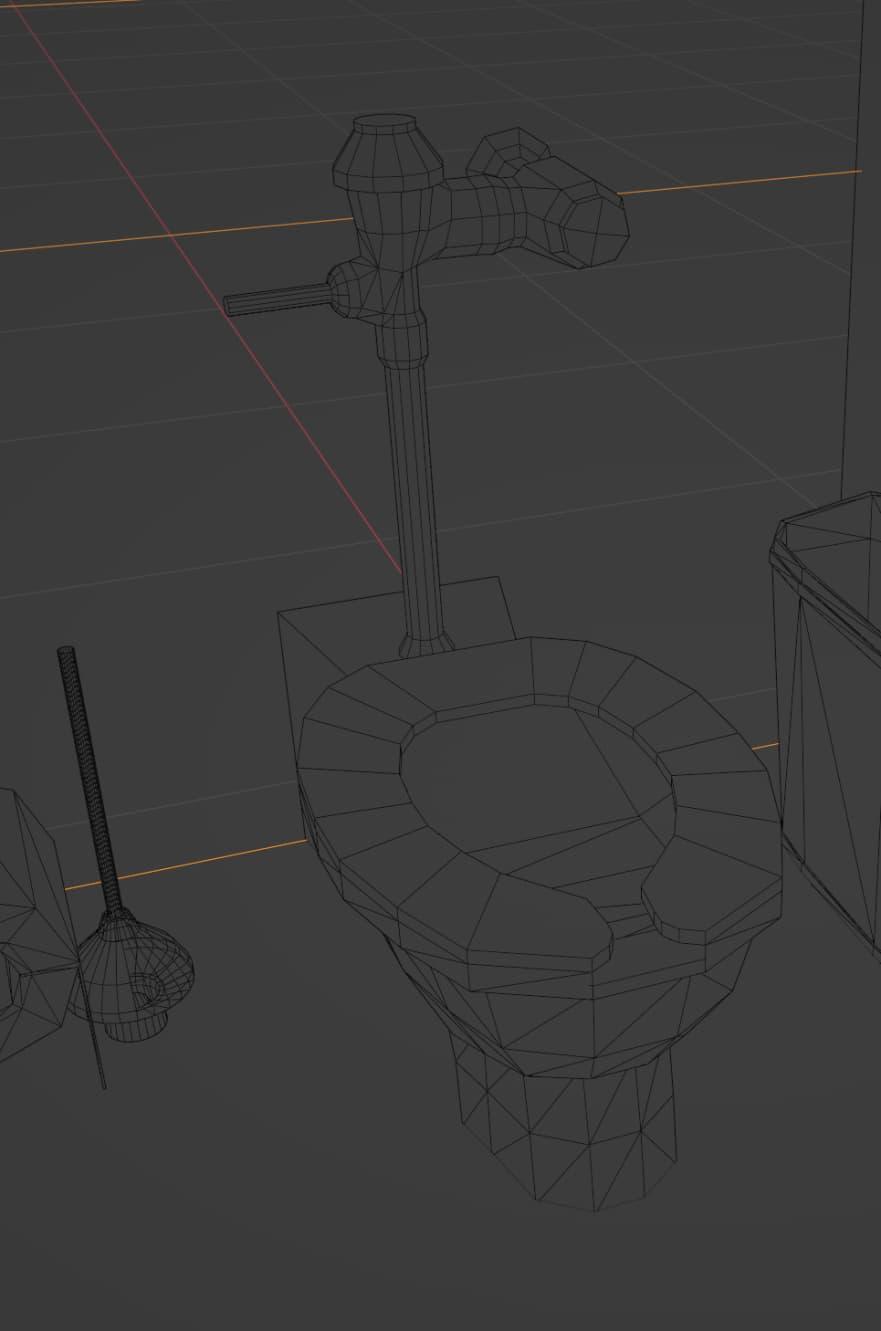
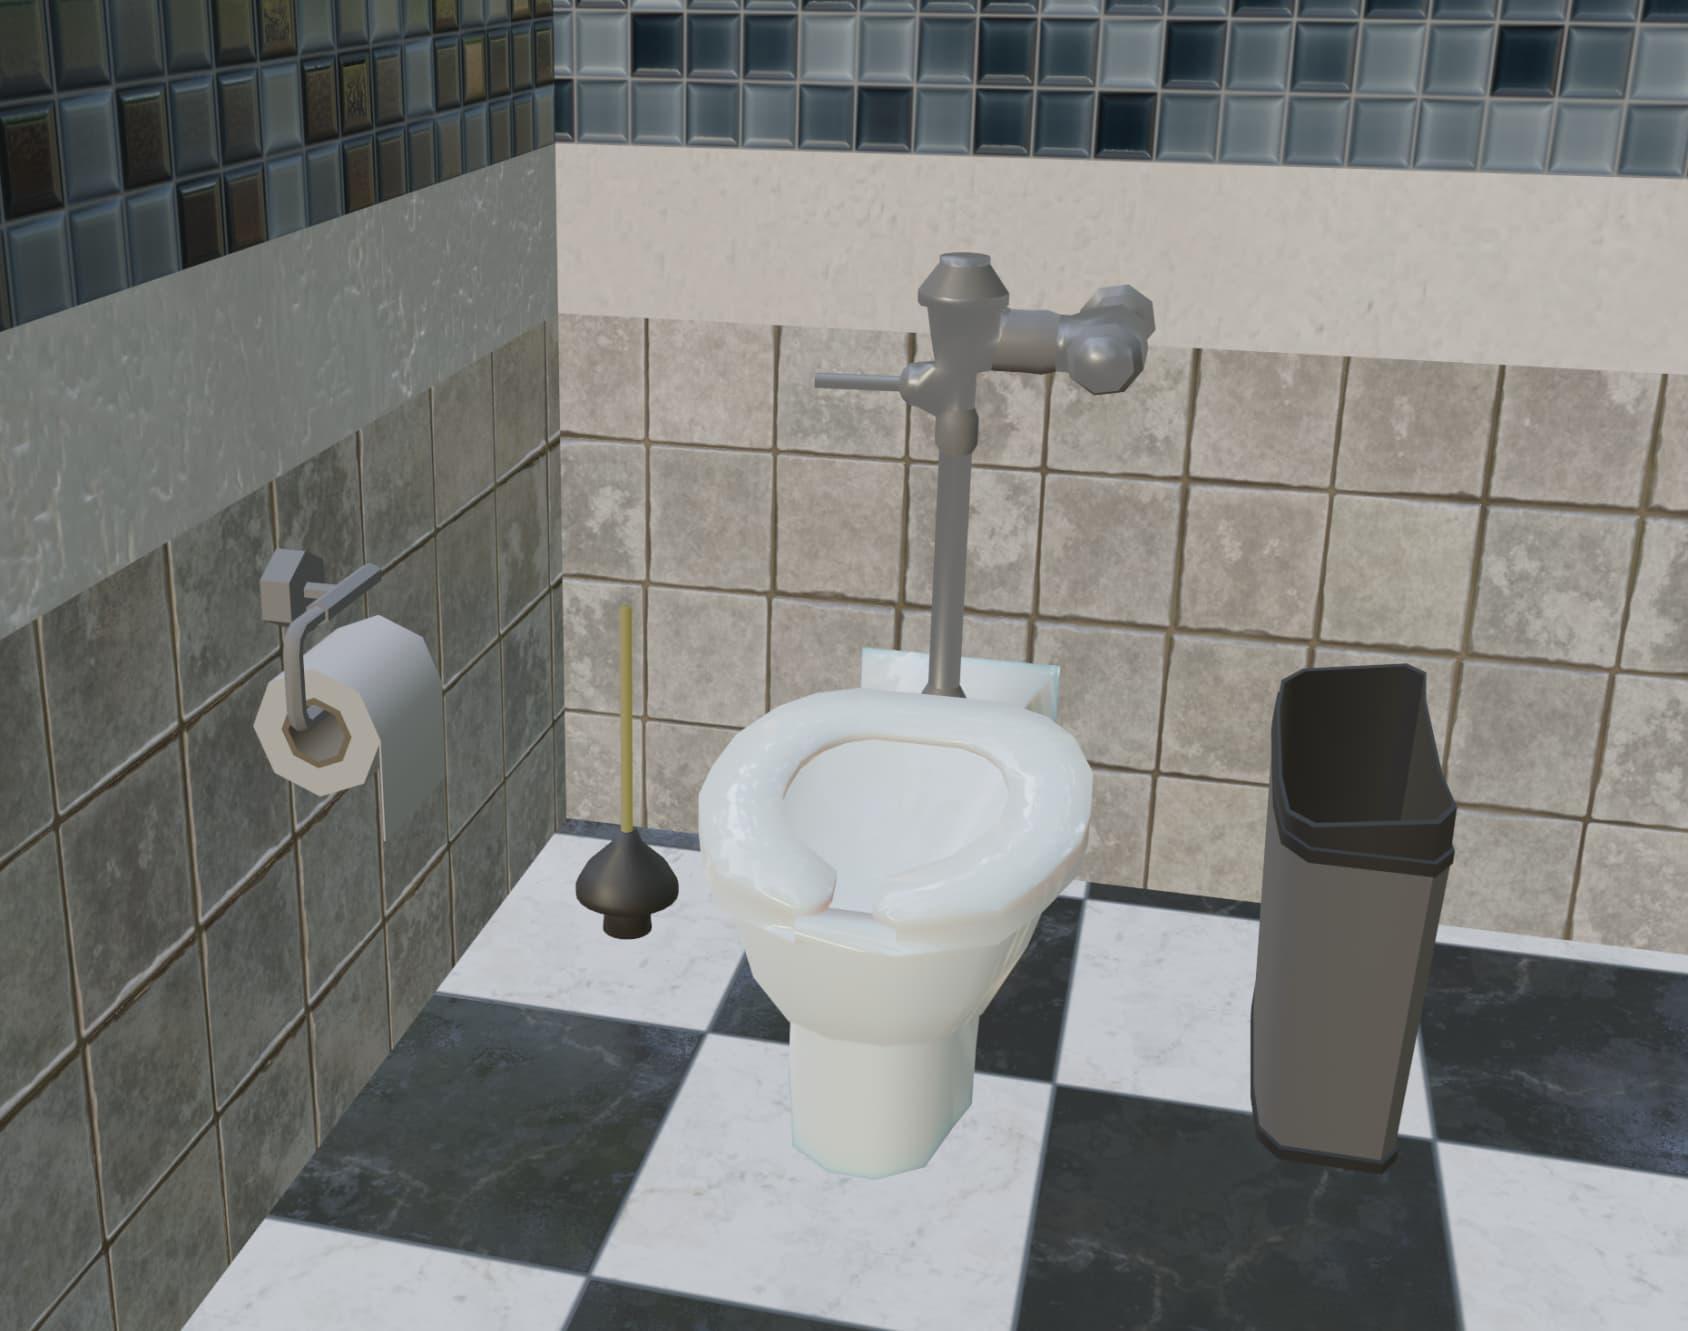
A few models (the sinks, toilet, garbage cans, door, and toilet paper holders) were based on CC0 models by Quaternius on Poly Pizza, much obliged. Yet again, I’d recommend checking out Poly Pizza to see all the excellent freely-available models. It’s great fun to find free assets that you can use as a base for something custom.
Speaking of freely-available things, I’d also like to shout out Pixabay. They have freely-available images, video clips, sound effects, and music. It’s another awesome resource, and I was able to use several sound clips from Pixabay in this project. I was able to edit them with the Audacity audio editor; most just needed some trimming. I’m no audio engineer, but I really appreciate how easy it is to make fairly immersive audio in Godot. The AudioStreamPlayer3D node is great fun. You can stick it anywhere, and it’s like a little virtual speaker you can turn on and off on-demand.
With most of the modelling done, I wanted to start on the interactive elements. First of all, I pretty much promised myself that this wasn’t going to be worth it if I couldn’t have a working mirror. I didn’t need it to be perfect (spoilers, it’s not) but I wanted it to work. This tutorial from Miziziziz got me most of the way. While it’s not as mature of a platform, yet, there are some really dedicated YouTubers and other tutorial writers out there for Godot. But if you’re starting out, I’d recommend trying to find tutorials specific to Godot 4, the latest major version. They changed a lot (for the better) over version 3.
Anyway, I’m not going to pretend like it was easy, or that I fully understand what I did. But basically, a made a rectangular MeshInstance3D and put a SubViewport node under it in the hierarchy. Then I put a Camera3D under the sub-viewport, and edited some attributes of the camera so it would act kind of like a mirror. I’ll have a link to my Godot project in a bit, where you can check it out for yourself. But while Godot (as of version 4.1.3) complains a bit about this approach, it works pretty well. It’s not 100% accurate, but neither is any of the rest of this project. But it gets the point across, which was all I needed it to do.
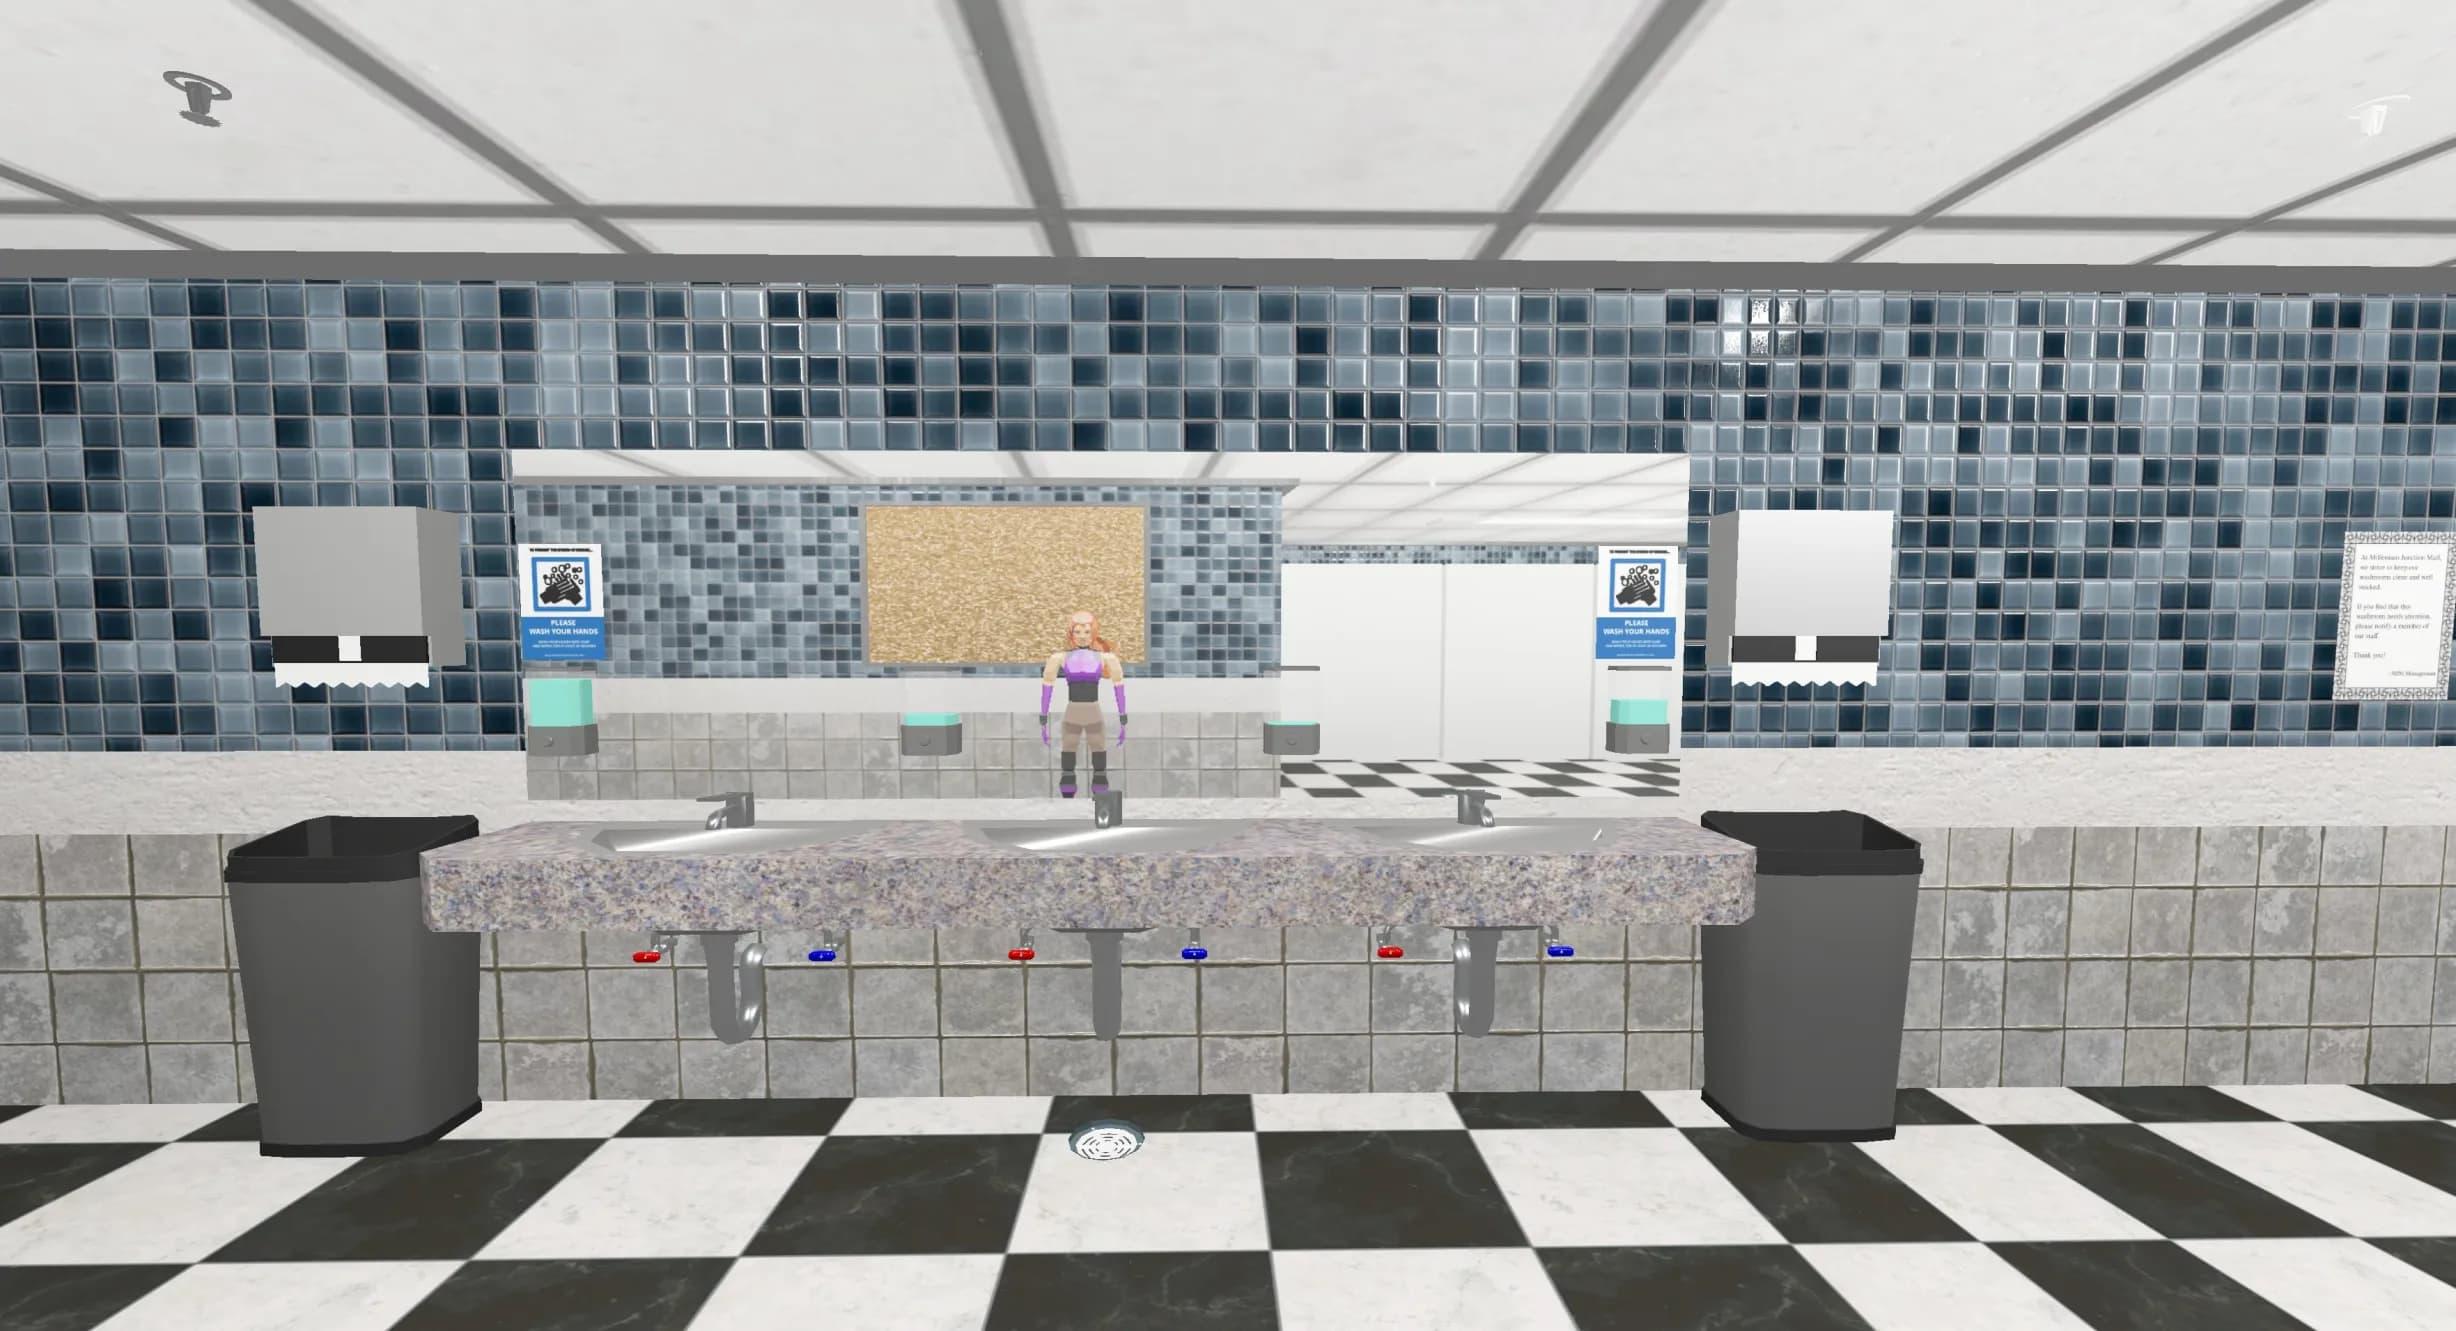
Starting to shape up
If you squint, you’ll notice my Magenta character in the mirror. She’s a character from another videogame concept that I’ll make “someday”, but at the time this was the only 3D character model I had in my possession. Sure, there are many good free 3D character models out there, but I wanted to make my own for this project. And that’s where things went a little bit off the rails, but in a good way.
It was at this point I decided to create a custom 3D character for this project. But why make it just for this project, when I could use it for any number of future projects? And why just make it, why not document it? And why just make one character, when you could make the building blocks to create hundreds of custom low-poly 3D characters?
OK, maybe I went a little bit off the rails with this idea. But I’m honestly glad I did. Because I was able to use this project to start my blog series on low-poly character creation in Blender. And it was really good practice for modelling and texturing in Blender. And the results speak for themselves in my opinion. To see what I mean, feel free to check out the OverScore Proxy character creation set on OpenGameArt!
So, after a few weeks of (constructive) distraction, I had a modelled, textured, rigged, and animated character for this project. So I wouldn’t have to use a placeholder model.
She's a low-poly girl, in a low-poly world
With a room layout, a bunch of different models, a 3D character, and a plan for “finishing” this project (or at least getting it to a state where I wasn’t too embarrased to release it), there was one major element remaining.
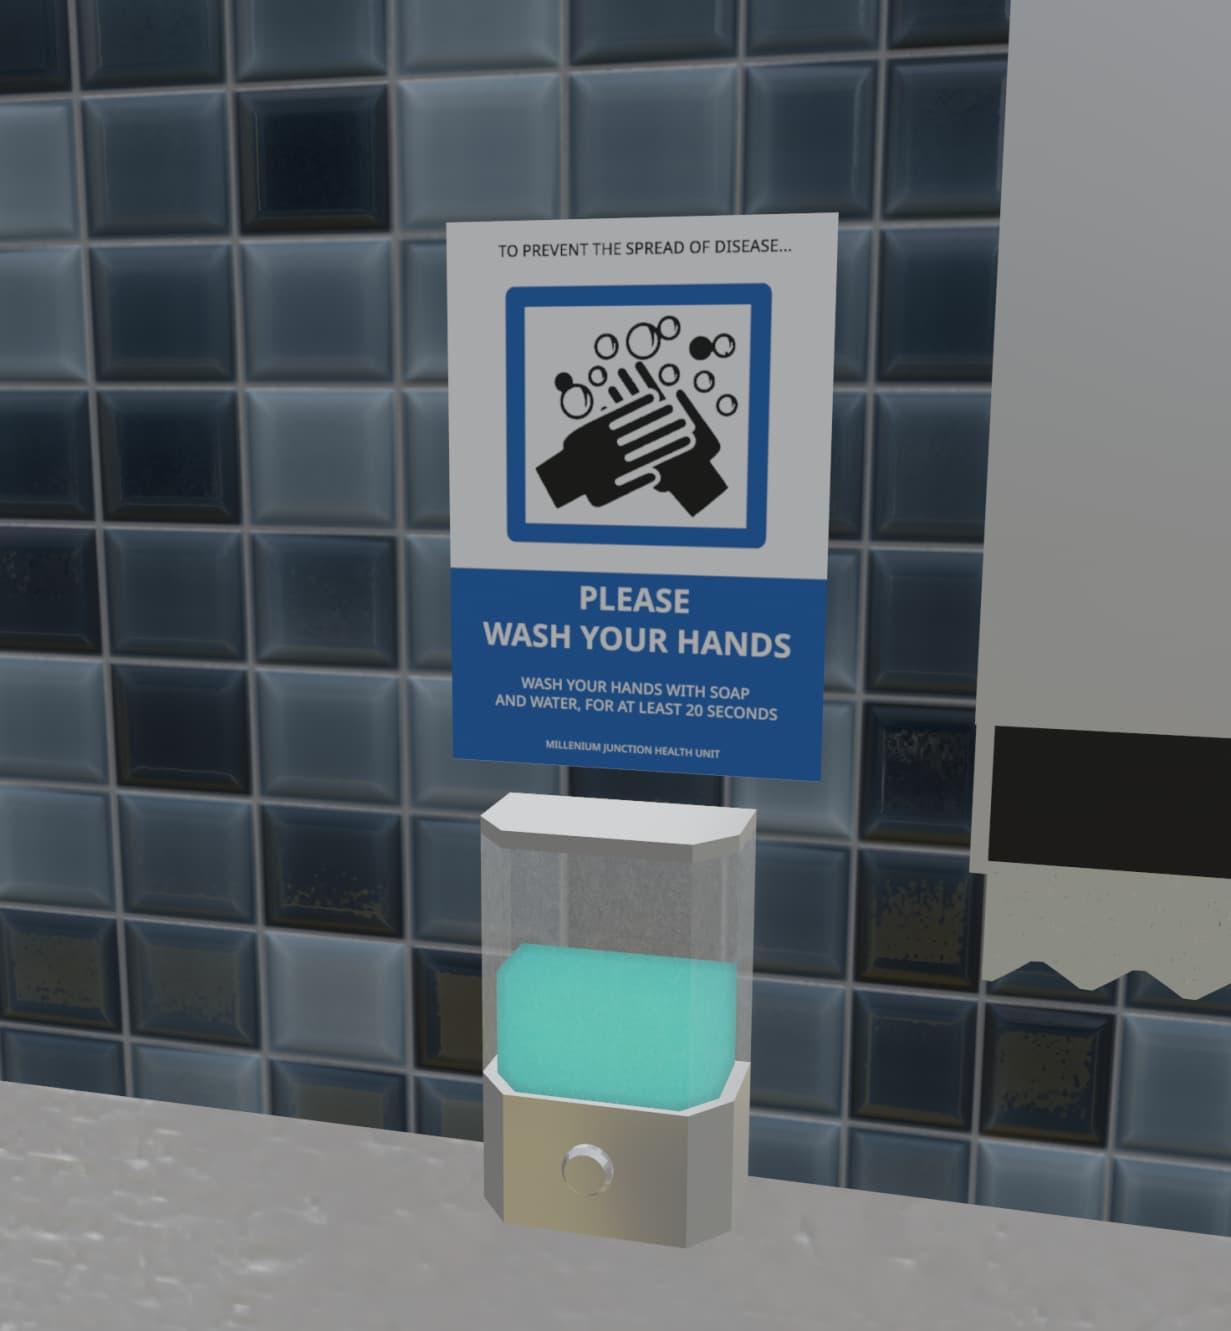
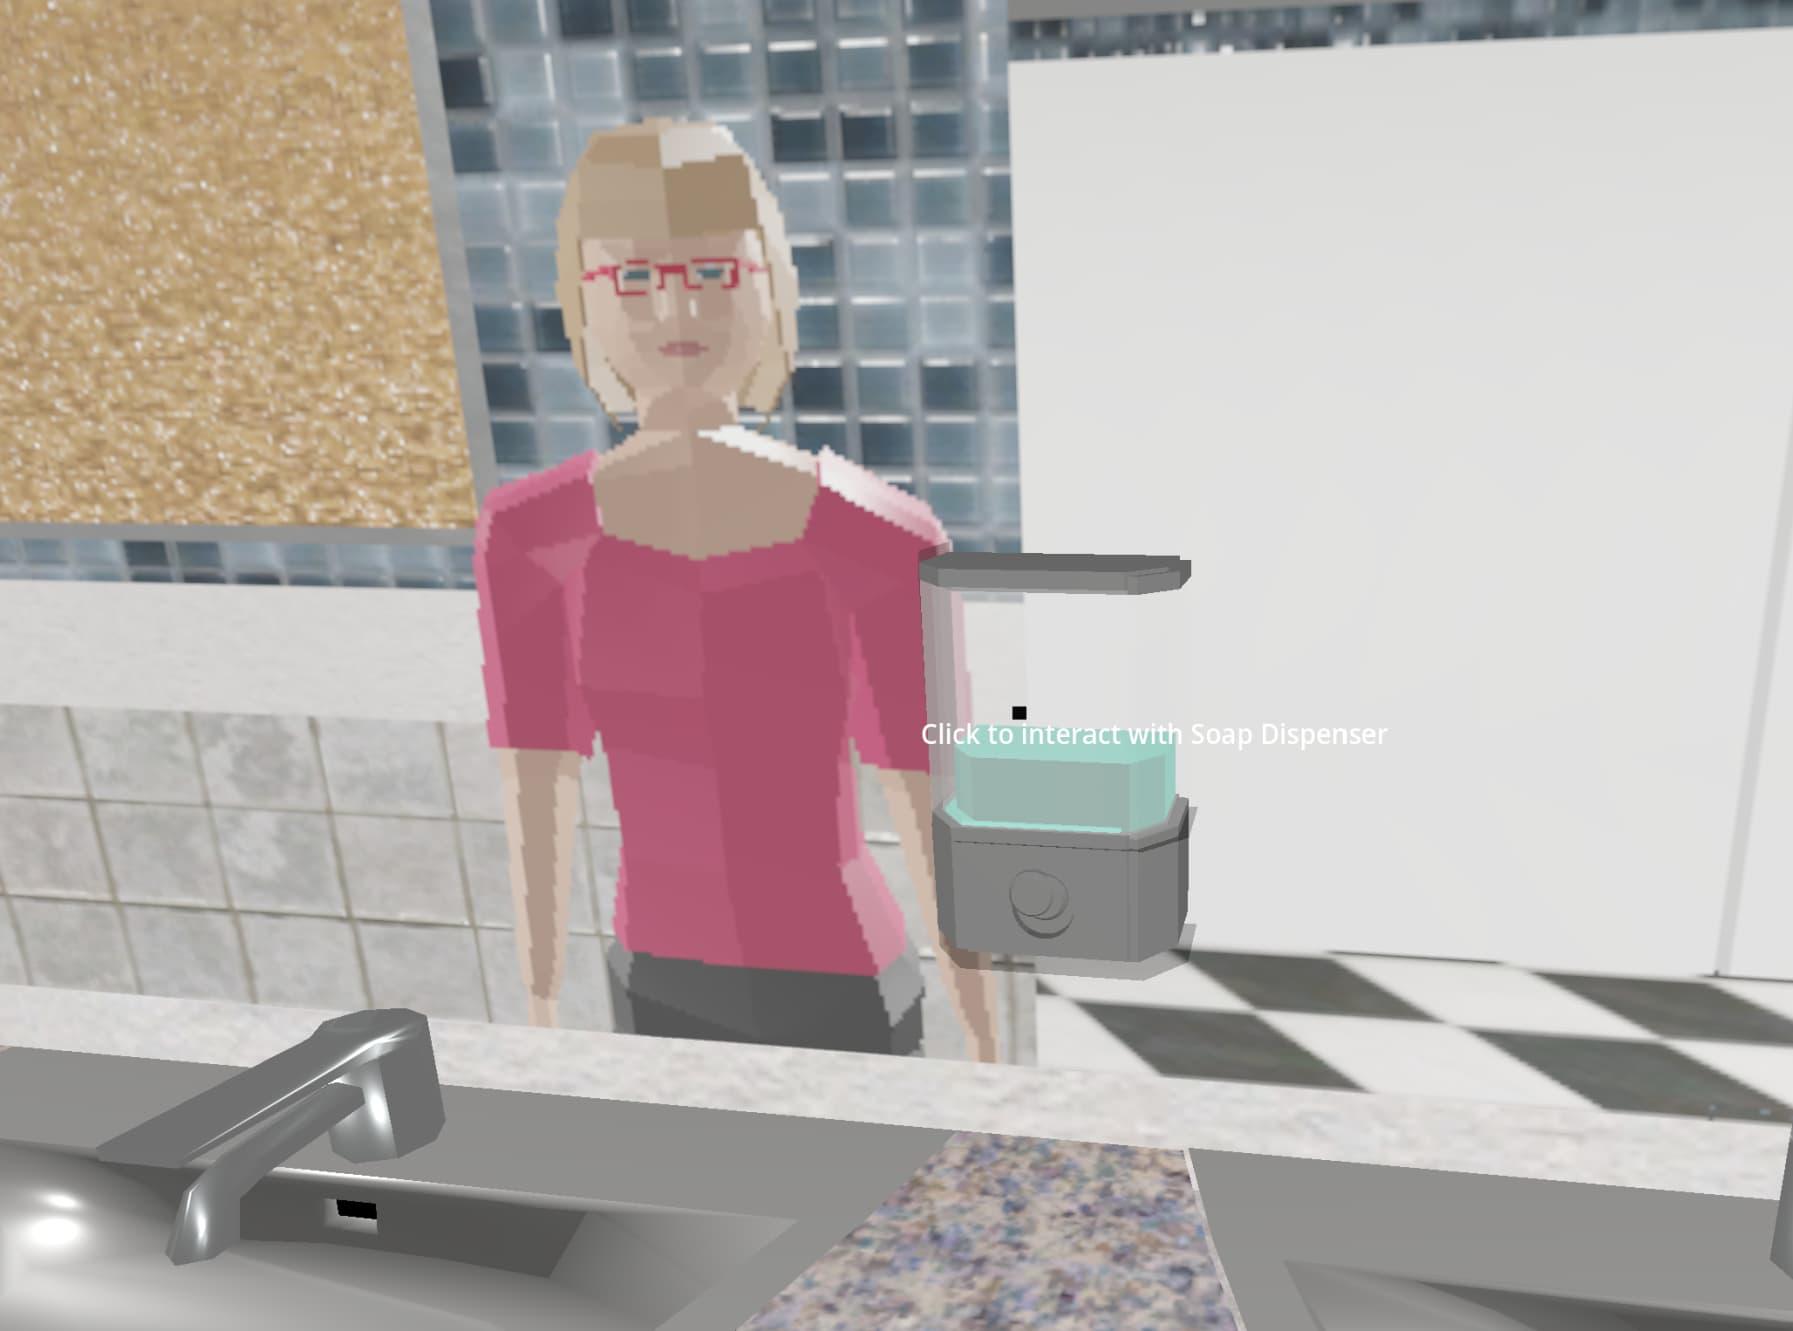
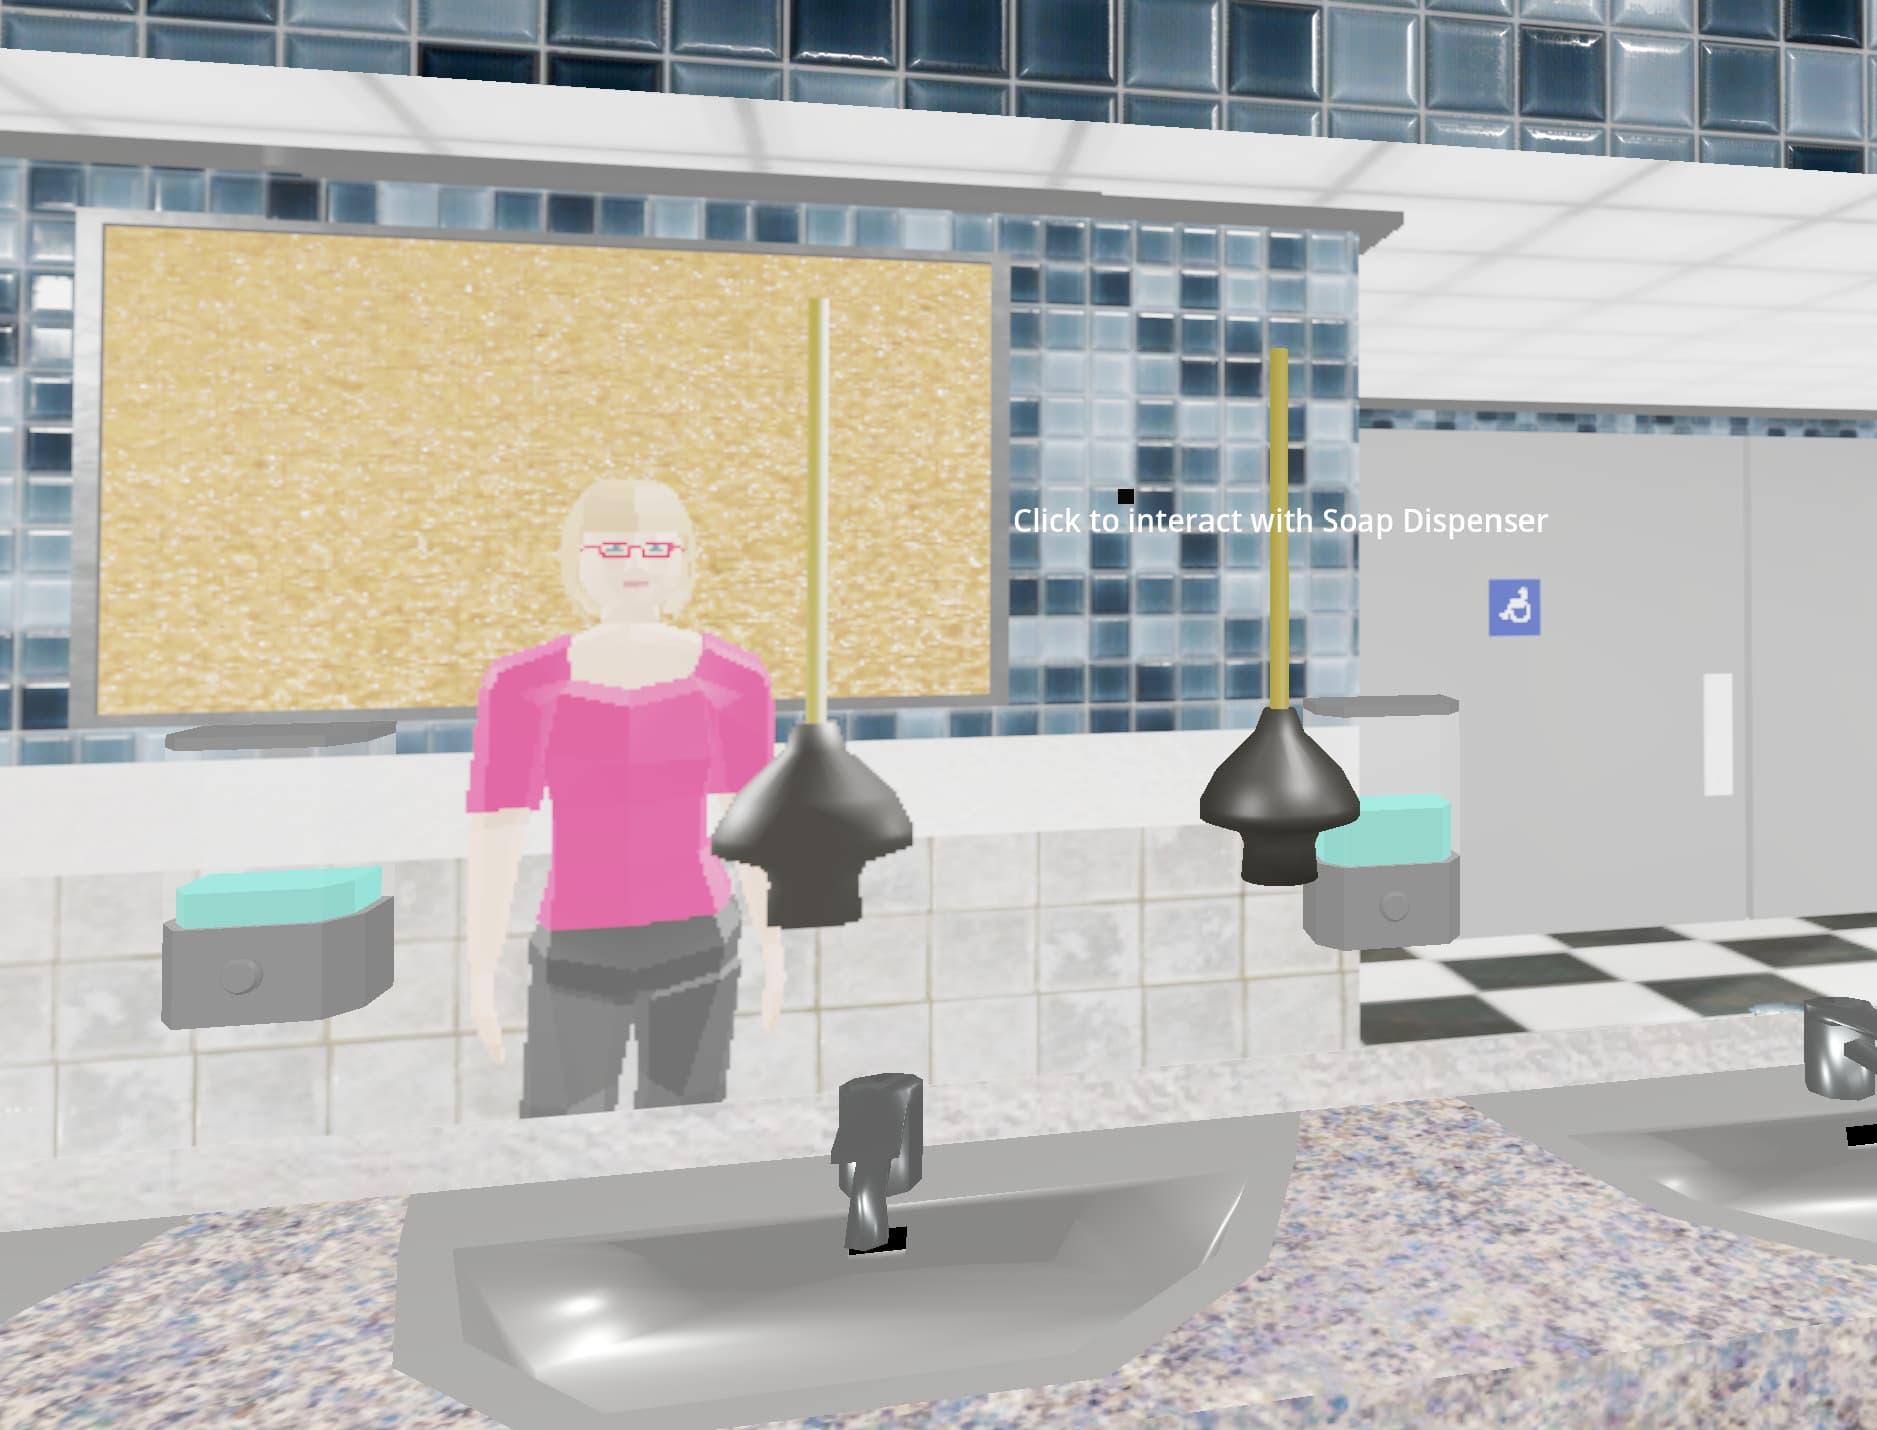
For a time, I was pretty stumped as to how to turn this collection of 3D models into an interactive scene. Because other than a collision box for the floor and walls - and the mirror - this was a pretty lifeless scene that didn’t feel like it actually existed. But this ended up being an eye-opening process that taught me a bunch of tricks for adding interactivity. As the above picture with Proxy demonstrates, one of the first things I got working was the soap dispenser.
As I briefly mentioned above, you can give models Shape Keys in Blender. This is a very powerful feature, which lets you basically smoothly transition between two more more states. In this case, I made a shape key of a “full” soap dispenser, and a shape key of an “empty” soap dispenser. And since Godot makes Blender shape key import easy, I was able to set it so I had full granular control over the amount of “soap” in the dispenser.
@tool
extends Node3D

@export_range(0, 1) var soap_level: float = 1:
	# So changing the soap_level is reflected in the editor
	set(new_soap_level):
		soap_level = new_soap_level
		$Soap.set_blend_shape_value(0, soap_level)

func _ready():
	set_soap_level(soap_level)

func set_soap_level(new_level):
	if new_level >= 0 && new_level <= 1:
		soap_level = new_level
		$Soap.set_blend_shape_value(0, soap_level)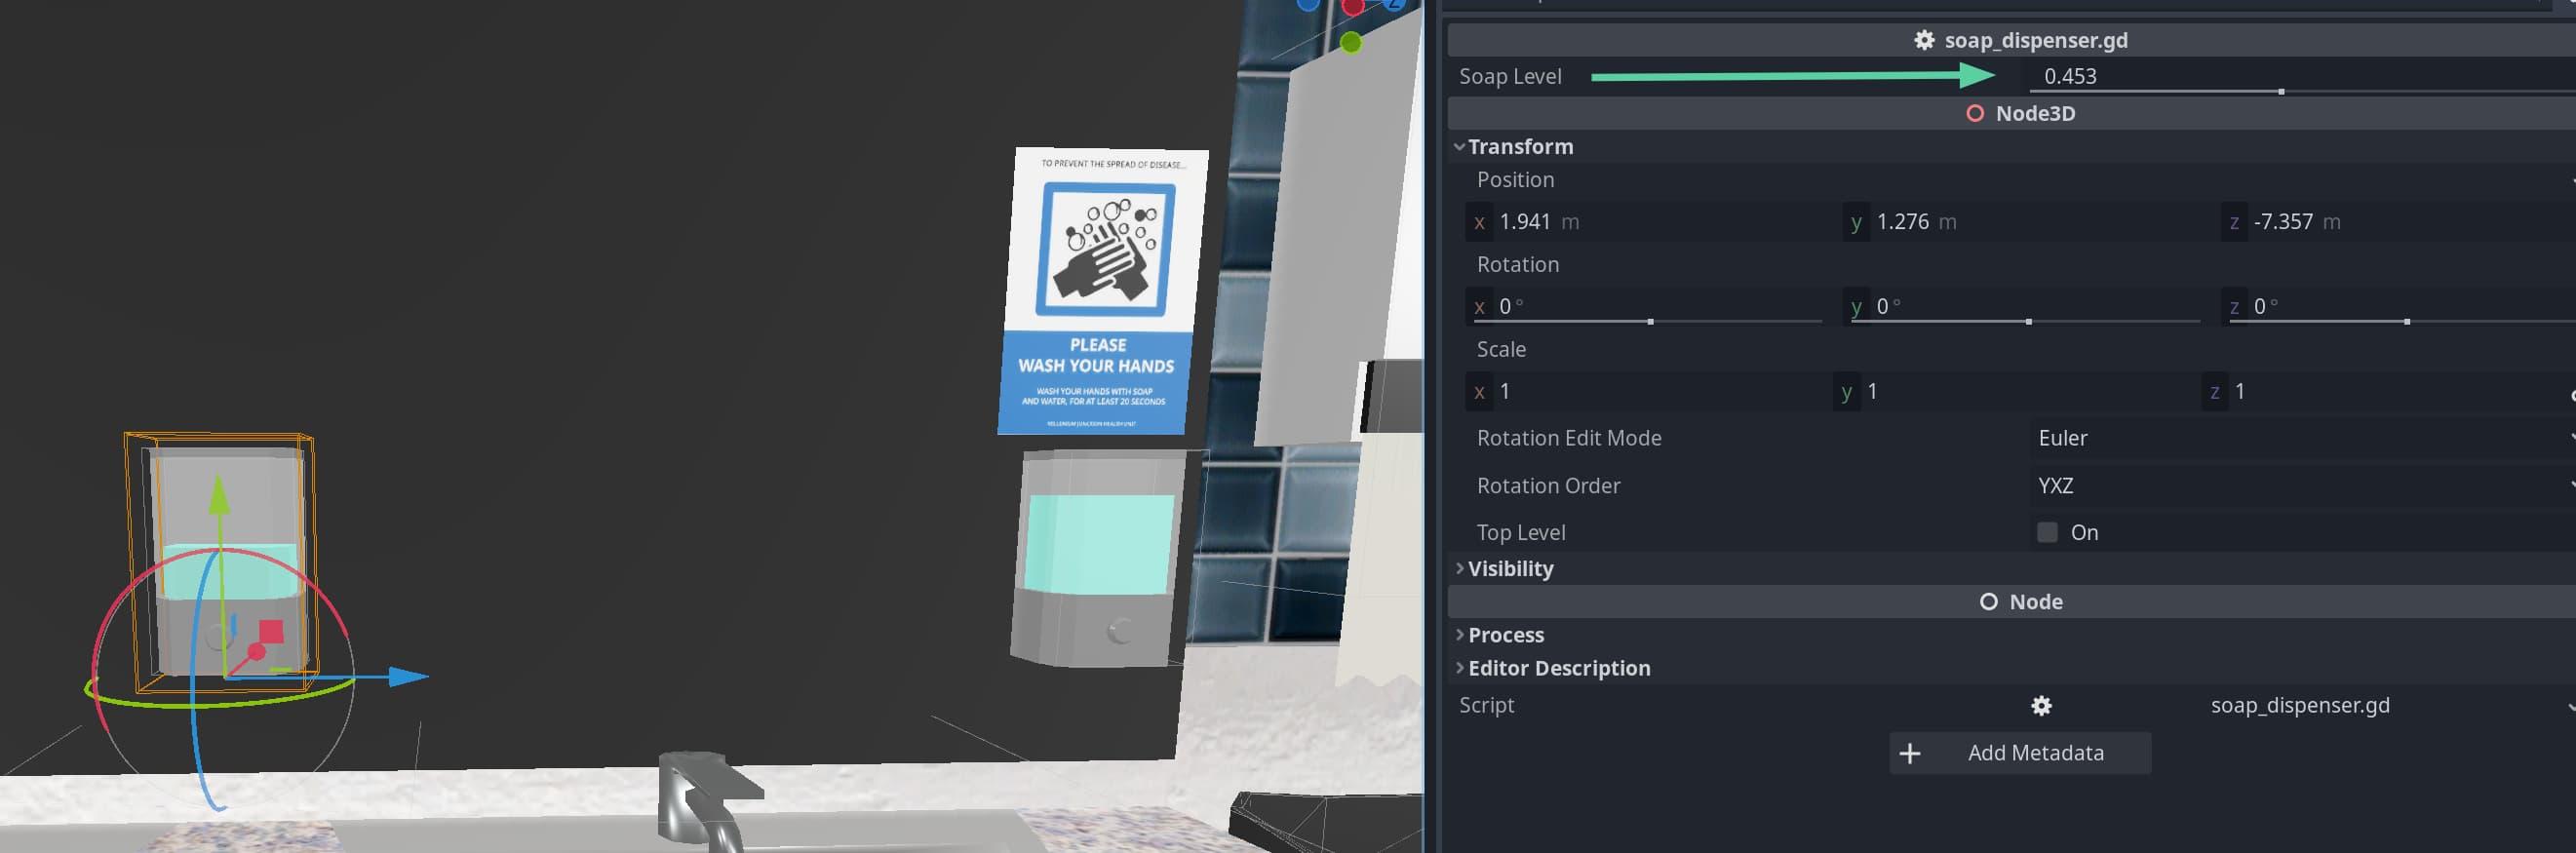
Setting a dispenser's soap level right from the editor
My code probably isn’t the best, but the cool thing is how easy it became to set the soap level. Even from the Godot editor UI. So I could place the soap dispensers in the scene, and individually control how much soap was left in each. Maybe it’s silly, but it was part of the attention to detail that I wanted to focus on. Because in a real washroom, the soap dispensers (if they have any soap in them at all) are pretty much never at the exact same level.
But anyway, the next part of this was to make them interactive. I was able to set the soap level, and with some extra code I was also able to get the soap level of any given dispenser. So in the “character_camera” script, I came up with a simple raycast-based solution to get the “currently looked-at object”. And if said object had some kind of interactivity available, clicking on it would trigger it. In this case, clicking on an actively-viewed soap dispenser would decrement the amount of soap in it by a barely-noticeable amount. Successive clicks would empty the dispenser further, until its soap level reached 0.5% of the available soap. At that point I disabled the interaction, because in real life I’ve noticed that a lot of soap dispensers stop working while there’s still technically some soap in them. It just gets stuck in the top part, and doesn’t flow down when you need it. Again, it gets the point across. Here’s a snippet of the code I used to make this work (you can view the whole thing by downloading the Godot project for yourself.
extends Camera3D

# Setup the global variables
var mouse = Vector2()
var currentlyHighlighted = null

@onready var crosshair = get_node("../../CanvasLayer/CenterContainer/Sprite2D")
@onready var crosshairHelperText: Label = get_node("../../CanvasLayer/CenterContainer/Label")

# When the scene is first loaded
func _ready():
	crosshair.visible = false
	crosshairHelperText.text = ""

# Catch any input
func _input(event):
	if event is InputEventMouse:
		mouse = event.position

	# If the input event is a mouse movement, set collider to the currently looked-at object
	if event is InputEventMouseMotion:
		var collider = get_collider()

		if collider != currentlyHighlighted:
			currentlyHighlighted = collider

	# If the left mouse button has been pressed, and the currently looked-at object is a soap dispenser
	elif event is InputEventMouseButton and event.pressed:
		if event.button_index == MOUSE_BUTTON_LEFT:
			var collider = get_collider()

			if collider != null && collider.has_method("set_soap_level"):
				var soap_level = collider.get_soap_level()
				soap_level = soap_level - .005

				# Dispense a little bit of soap
				if soap_level > 0:
					collider.set_soap_level(soap_level)

# Helper function to get the currently looked-at object via raycasting or something
func get_collider():
	var worldspace = get_world_3d().direct_space_state
	var start = project_ray_origin(mouse)
	var end = project_position(mouse, 3.5)
	var result = worldspace.intersect_ray(PhysicsRayQueryParameters3D.create(start, end))
	if result && result.collider:
		return result.collider
	return null
Admittedly, my GDScript isn’t the best. Still working on it. And I’m definitely doing some things wrong, or sub-optimally here. But I honestly don’t care. I had to start somewhere, and I will improve with time and practice. Plus, as good as the available resources are, and as much care as is poured into its official documentation, I still feel like Godot is less documented as opposed to a more “mature” game engine like Unreal Engine 5. It’s still new, and the community is still relatively small. But I do think Godot is our best bet, for a fully open-source fully-functional game engine that’s currently getting better in leaps and bounds.
And it’s still better documented, more powerful out-of-the-box, and more beginner-friendly than many of the other tools I tried before. With the possible exception of RPG Maker (although other than its clone, Open RPG Maker, it’s not open-source). I think it’s no accident that I was finally able to make something release-worthy with Godot, after all these years and after all the other tools I tried and gave up on.
So, with this basic interactivity system working, I moved on to make other things interactive. Starting with the next logical option, the sinks.
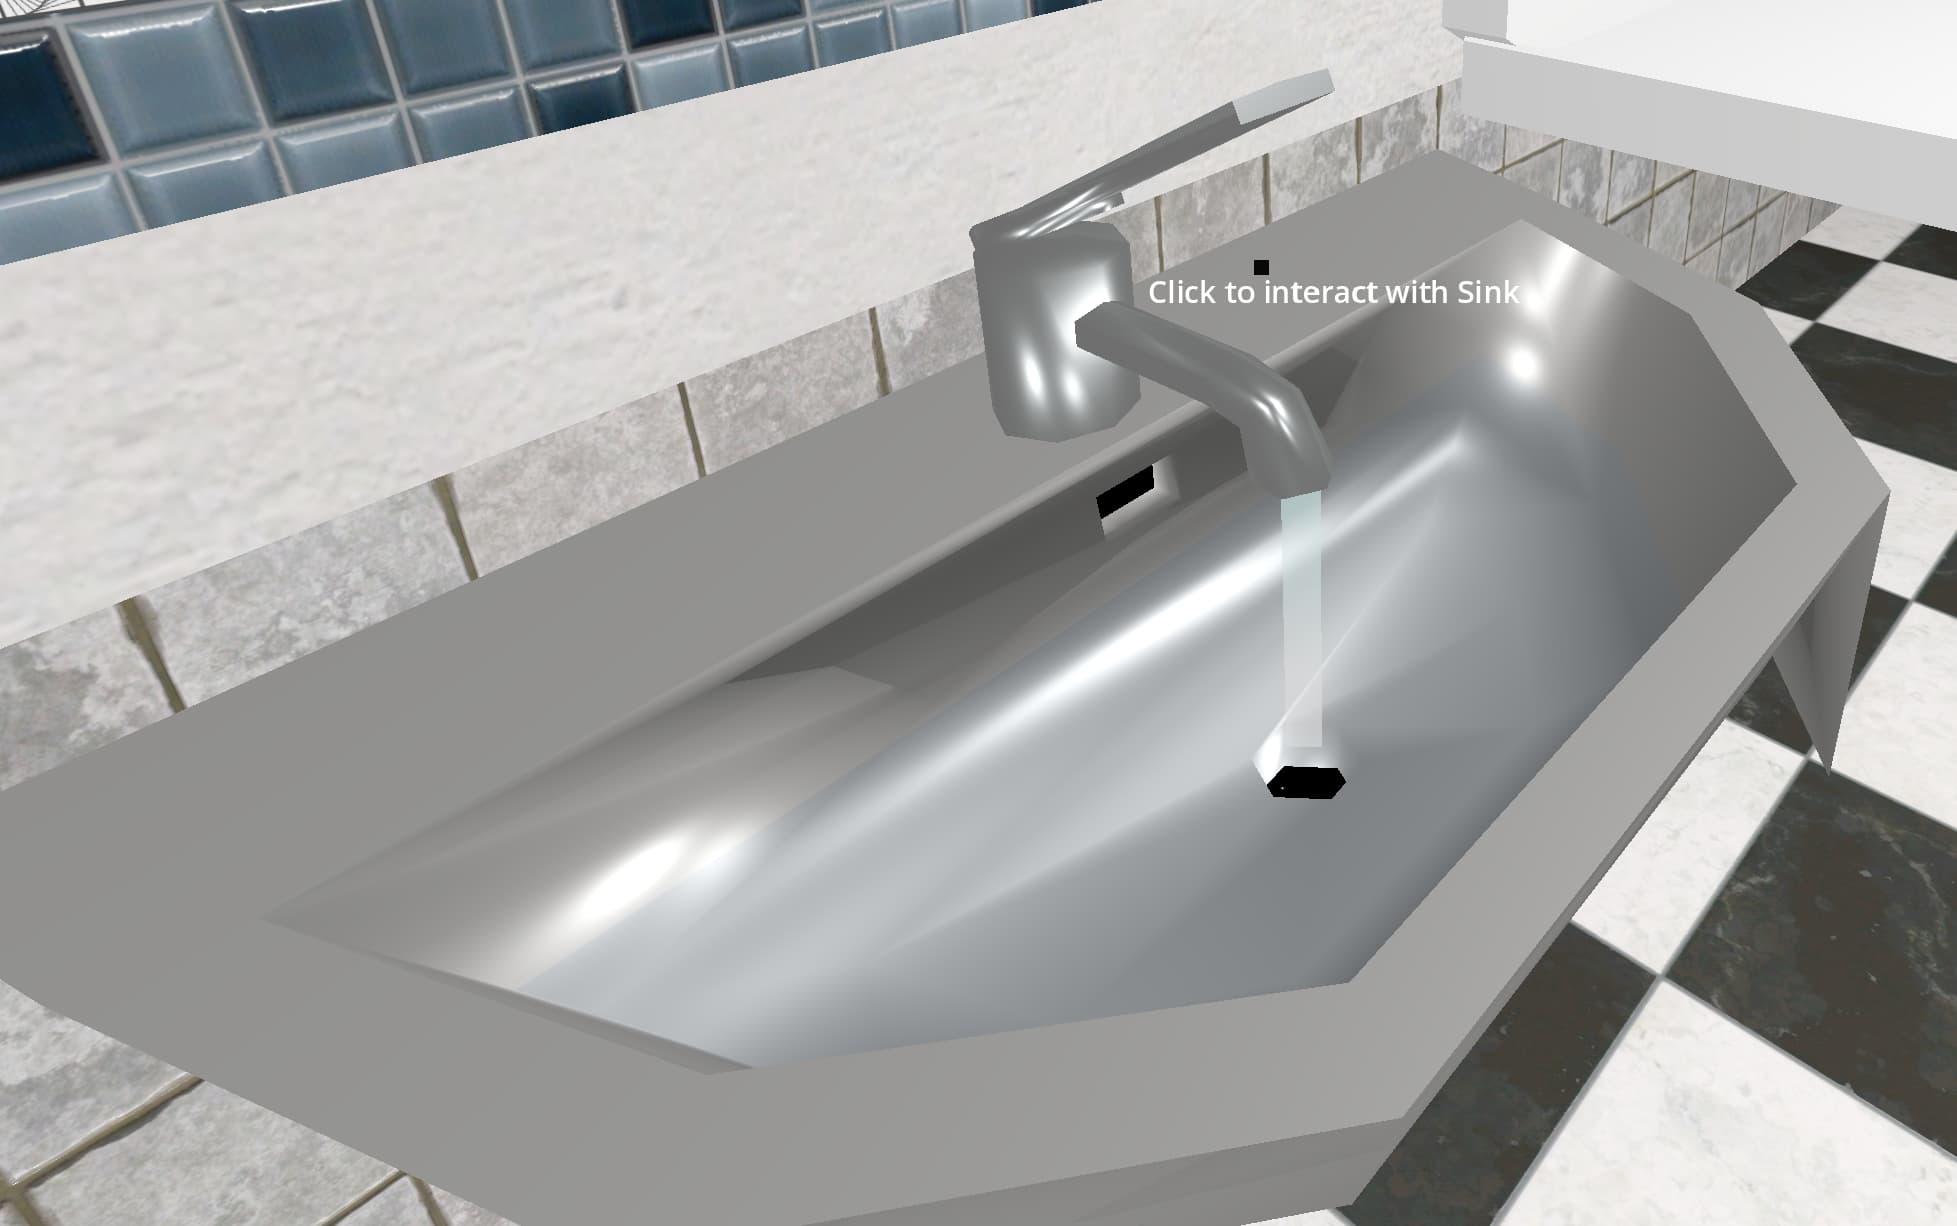
It gets the point across
Blender Shape Keys came in handy yet again, as I was able to animate the tap going up and down. I also added a simple billboarded sprite for the water (basically a blue and white rectangle that looks the same from any direction). The Y-Billboard mode of the Godot Sprite3D was really easy to set up. It’s not exactly realistic, but with some additional sound design, I find it quite satisfying to turn the taps on and off.
Simple rotation-based animations were all I needed to get the baby changing table, the door, and the stall doors to be animated. Again, a bit of sound design (with some samples from Pixabay) went a long way towards making these interactions feel satisfying and fun.
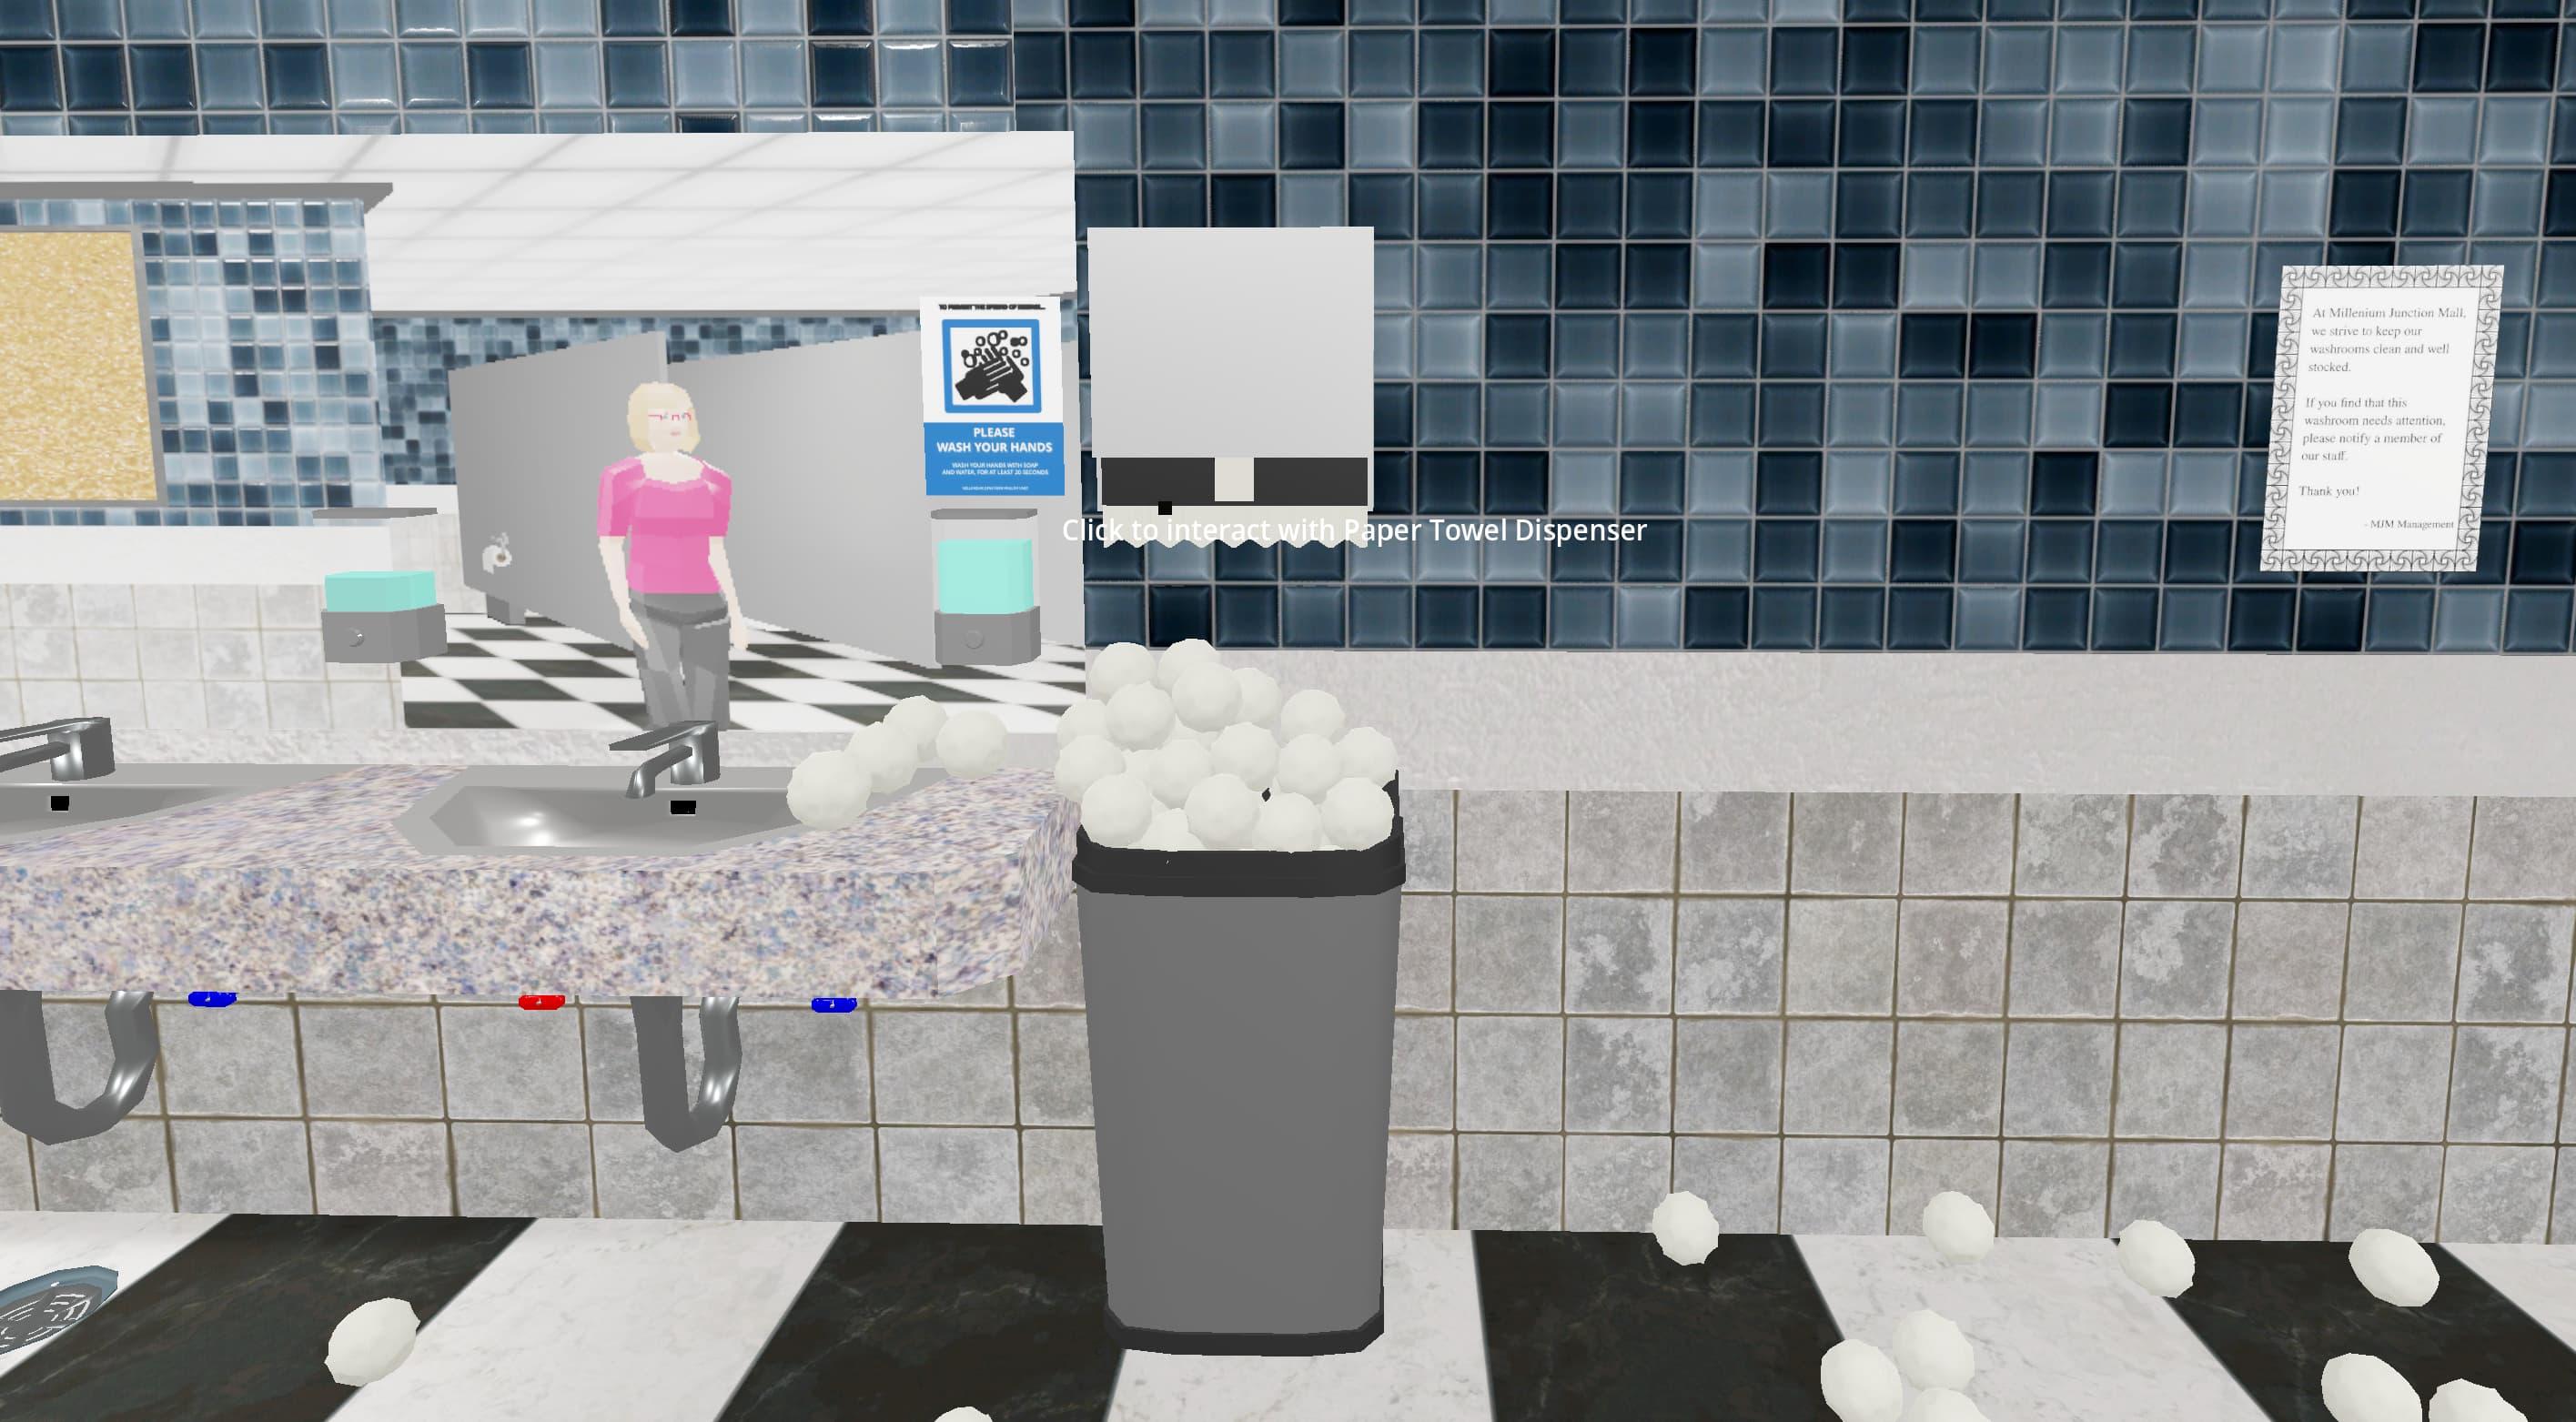
The paper towel dispenser was a bit more involved to animate. Basically, I used a shape key on the dispenser itself. So I could control the length of paper coming out the bottom of it. Then, when the paper was at the bottom, I sneakily retracted it back to its top/rest position, while spawning in a separate sheet of paper towel on the same frame. Said paper towel sheet then travels downwards some distance, before disappearing. The effect is pretty convincing with the addition of a tearing paper sound effect. Here’s my (admittedly messy) code for paper towel animation:
extends Node3D

# Global variables
var dispensing: bool = false
var paper_falling: bool = false

var towel_position = 0
var target_position = 1

var original_paper_towel_position = 0
var paper_towel_position = 0

signal spawn_paper_towel_ball(position_vector)

# Record the initial position of the separate paper towel sheet (currently hidden)
func _ready():
	original_paper_towel_position = $"Paper Towel".position.y

func _process(delta):
	if dispensing && !paper_falling:
		# Play the paper ripping sound
		if !$PaperTowelRipSound.playing:
			$PaperTowelRipSound.pitch_scale = randf_range(0.9, 1.1)
			$PaperTowelRipSound.play()

		# Move the paper towel on the dispenser down a bit, via the Shape Key
		towel_position = towel_position + delta * 3
		towel_position = min(towel_position, target_position)
		$"Paper Towel Dispenser".set_blend_shape_value(0, towel_position)

		# If the paper towel on the dispenser is all the way down, reset it and show the separate sheet
		if towel_position >= target_position:
			towel_position = 0
			$"Paper Towel".show()
			$"Paper Towel Dispenser".set_blend_shape_value(0, 0)

			paper_falling = true
			dispensing = false

	# Now the separate sheet of paper will start falling, until it eventually disappears
	if paper_falling:
		paper_towel_position -= delta * 0.75
		$"Paper Towel".position.y = original_paper_towel_position + paper_towel_position

		if paper_towel_position <= -0.5:
			$"Paper Towel".hide()

			# Once the paper towel has reached its final position, signal for a paper towel ball to spawn
			var paper_towel_ball_position = $"Paper Towel".global_position
			paper_towel_ball_position.y -= 0.75
			spawn_paper_towel_ball.emit(paper_towel_ball_position)

			$"Paper Towel".position.y = original_paper_towel_position
			paper_towel_position = 0
			paper_falling = false

# Set the dispensing flag to true, if it is currently false
func dispense_paper_towel():
	if !dispensing:
		dispensing = true
Now, if you can make any sense of my code (and I don’t blame you if you can’t) you’ll notice that there’s a reference to a “paper towel ball”. And that’s the last part of this trick. Because once the paper towel sheet disappears, a paper towel ball will take its place. It’s a RigidBody3D, thus affected (somewhat) by physics. So once it spawns, it’ll drop into the garbage can.
So the whole effect is split into the following phases:
Player clicks on paper towel dispenser
If not currently dispensing, the shape key of the dispenser will be changed, so the attached sheet will move downwards
At a certain point, the attached sheet will snap back to its original position, and a separate paper sheet will take its place
The separate sheet will travel a given distance downwards, then disappear
Upon its disappearance, a paper towel ball will be spawned to take its place
The paper towel ball, affected by “gravity”, will fall into the garbage can
And all this for one fairly simple animation. Yikes, I get it now. This stuff is tricky.
But now’s a good time to mention signals. See, in Godot, signals are basically events that can be emitted and listened for. So the paper towel dispenser is emitting the signal to spawn a paper towel ball. And back in the main scene of the game, I set up a listener that will spawn a paper towel ball whenever any paper towel dispenser within it emits the spawn event.
The great thing about this setup (and I know I at least did this right) is that you could have as many “Paper Towel Dispenser”’s as you wanted in a scene. Within reason, but it’s not just bound to 1. And since I can pass a position along with the emission of the signal, I have full control over where the paper towel balls spawn in. The code for that looks a bit like this:
func _on_spawn_paper_towel_ball(position_vector):
	var new_paper_towel_ball = paper_towel_ball.instantiate()
	add_child(new_paper_towel_ball)
	new_paper_towel_ball.global_transform.origin = position_vector
So I was almost done from the interactivity side of things. But there was one last system I wanted to implement before releasing what I made so far.
Many games have a system of item pickup, item use, item dropping, etc. I think Minecraft is a classic example. Where you can pick up blocks, tools, or other items, place blocks/use items, and drop things you no longer want to hold. I’m not doing those systems justice, because they’re deceptively complicated. But I wanted at least a rudimentary pickup/dropping system. Because I really wanted to implement some “emergent gameplay”. It’s at this point that I’d encourage you use this link to download the game, and try it for yourself. I’ve explained most of what it took to get it working, but I think it would be interesting to let you try it for yourself before explaining the last few features I implemented. Don’t worry, I'll wait.
…
OK, presumably you’re back. Or you’re not averse to spoilers. But seriously, I recommend trying it first if you want. I don’t want to spoil the surprise.
But I just have to explain this eventually, so here goes nothing.
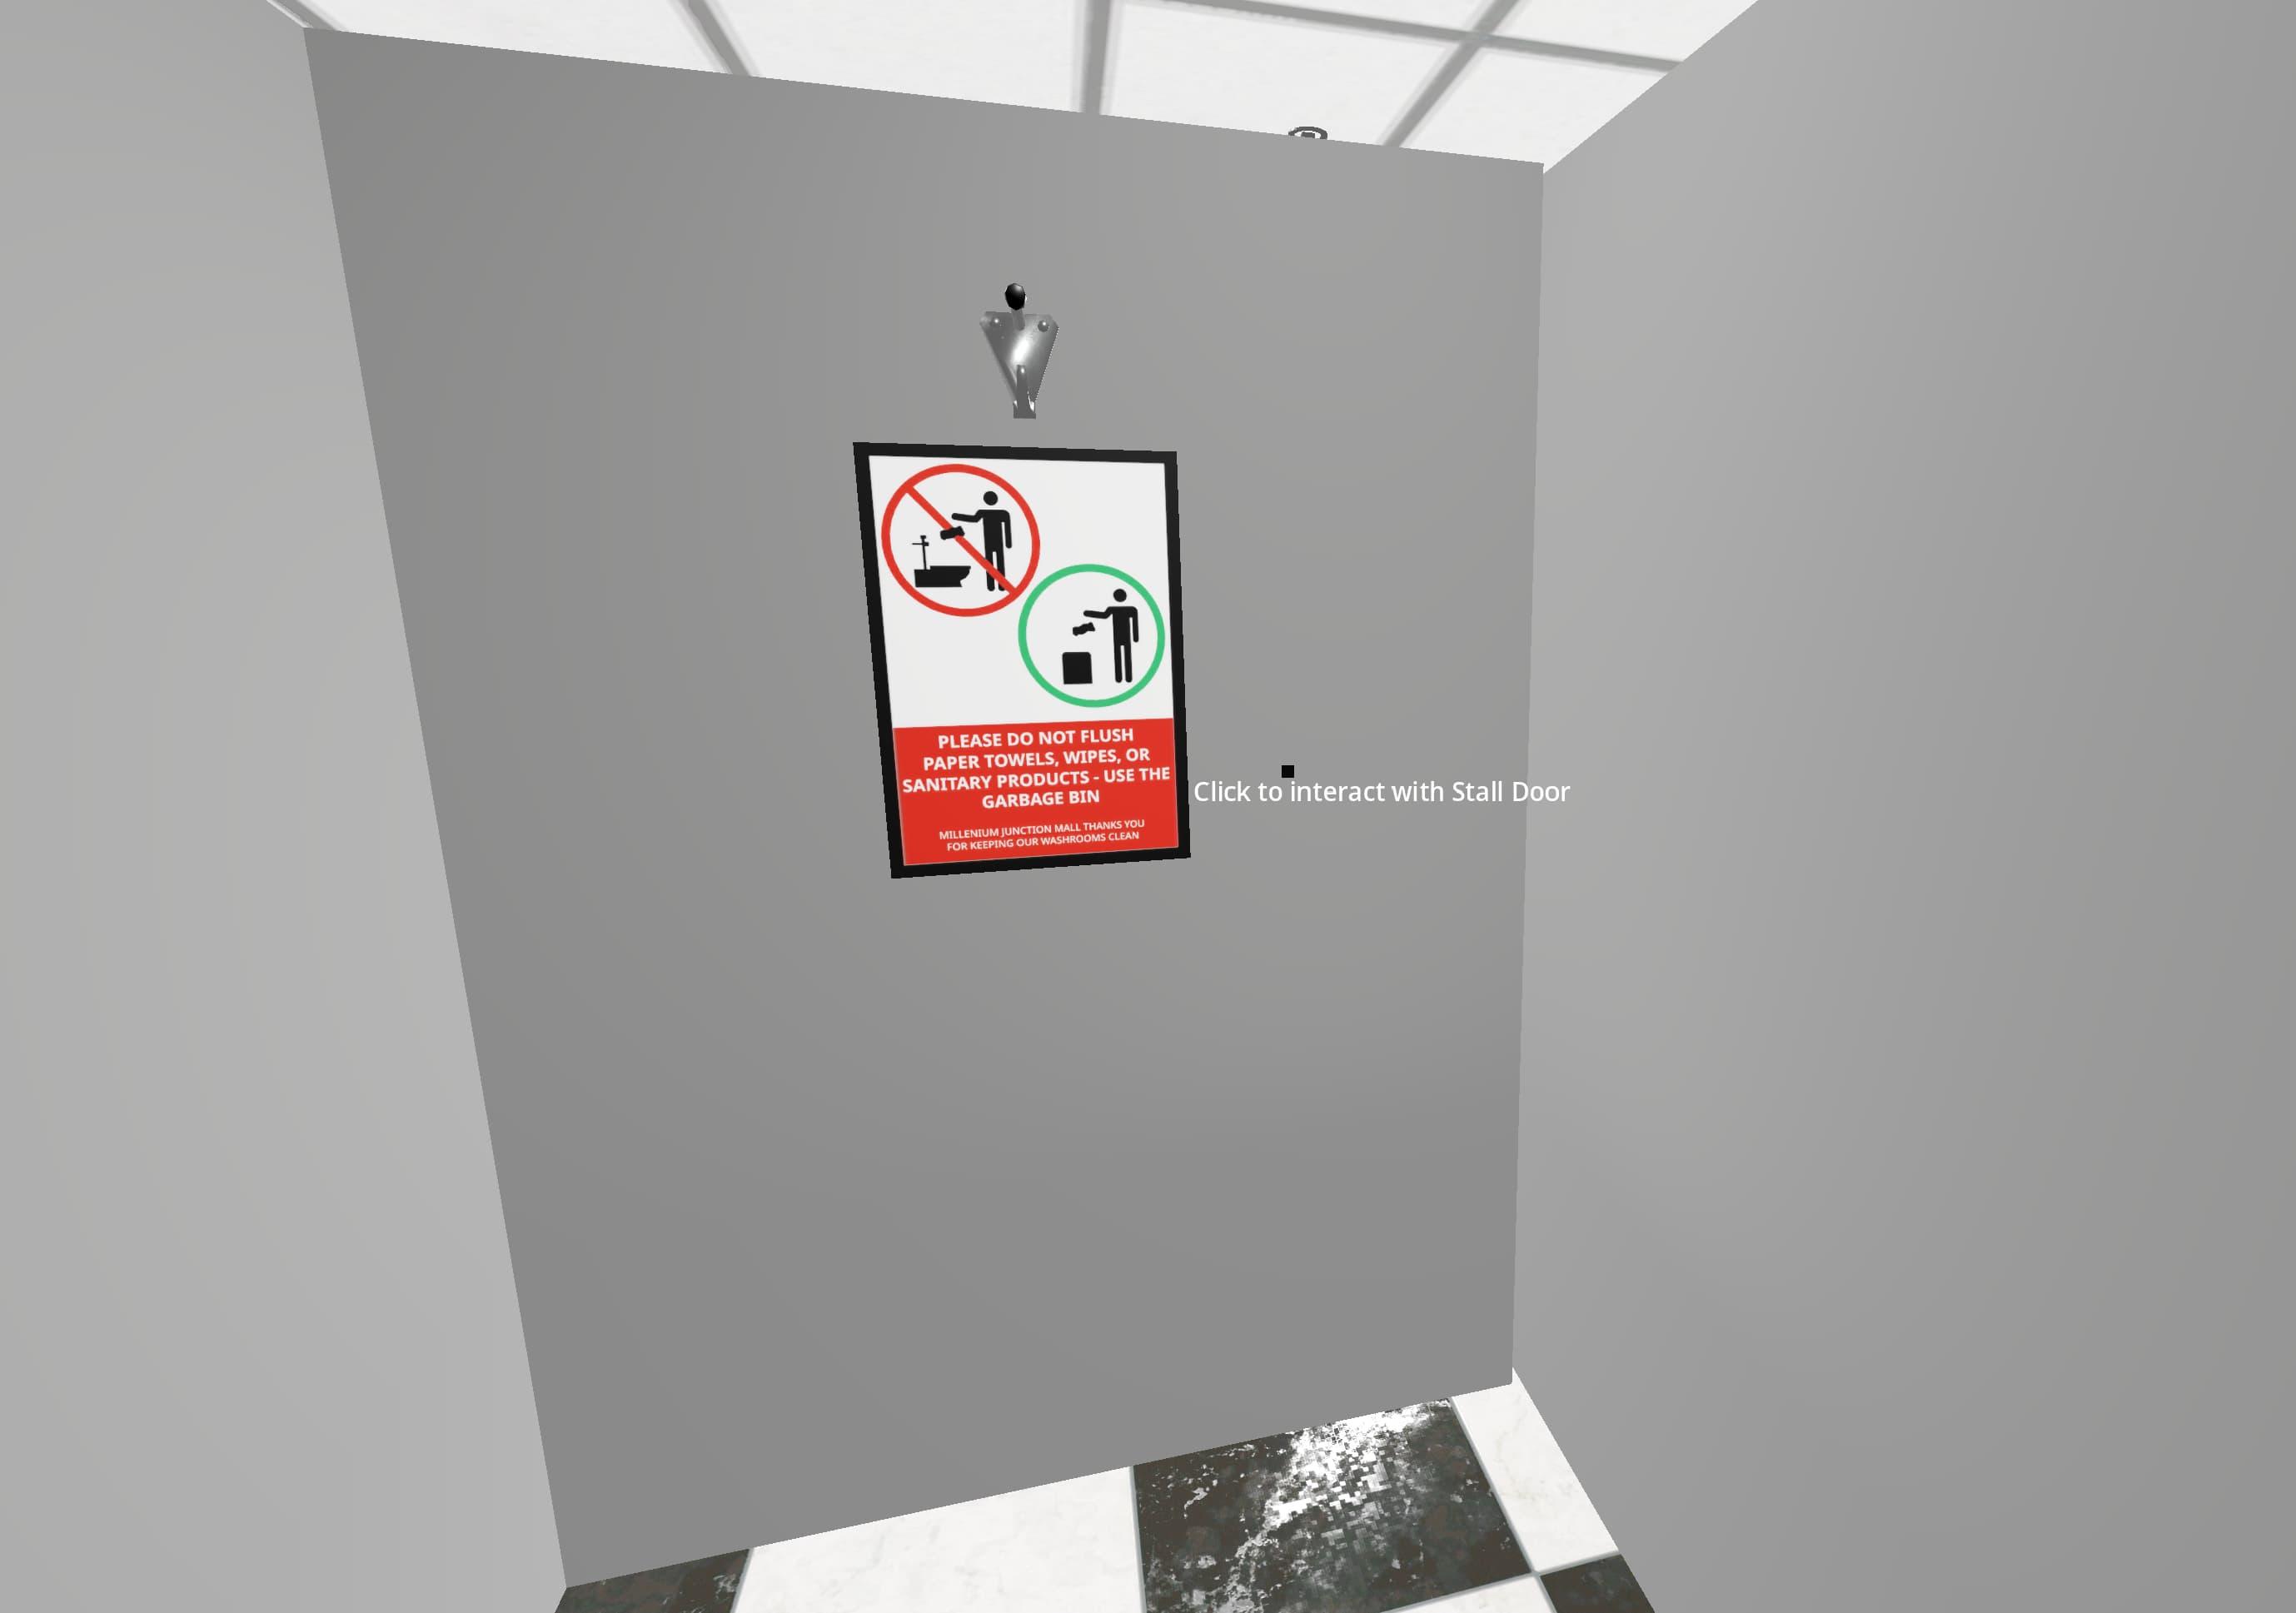
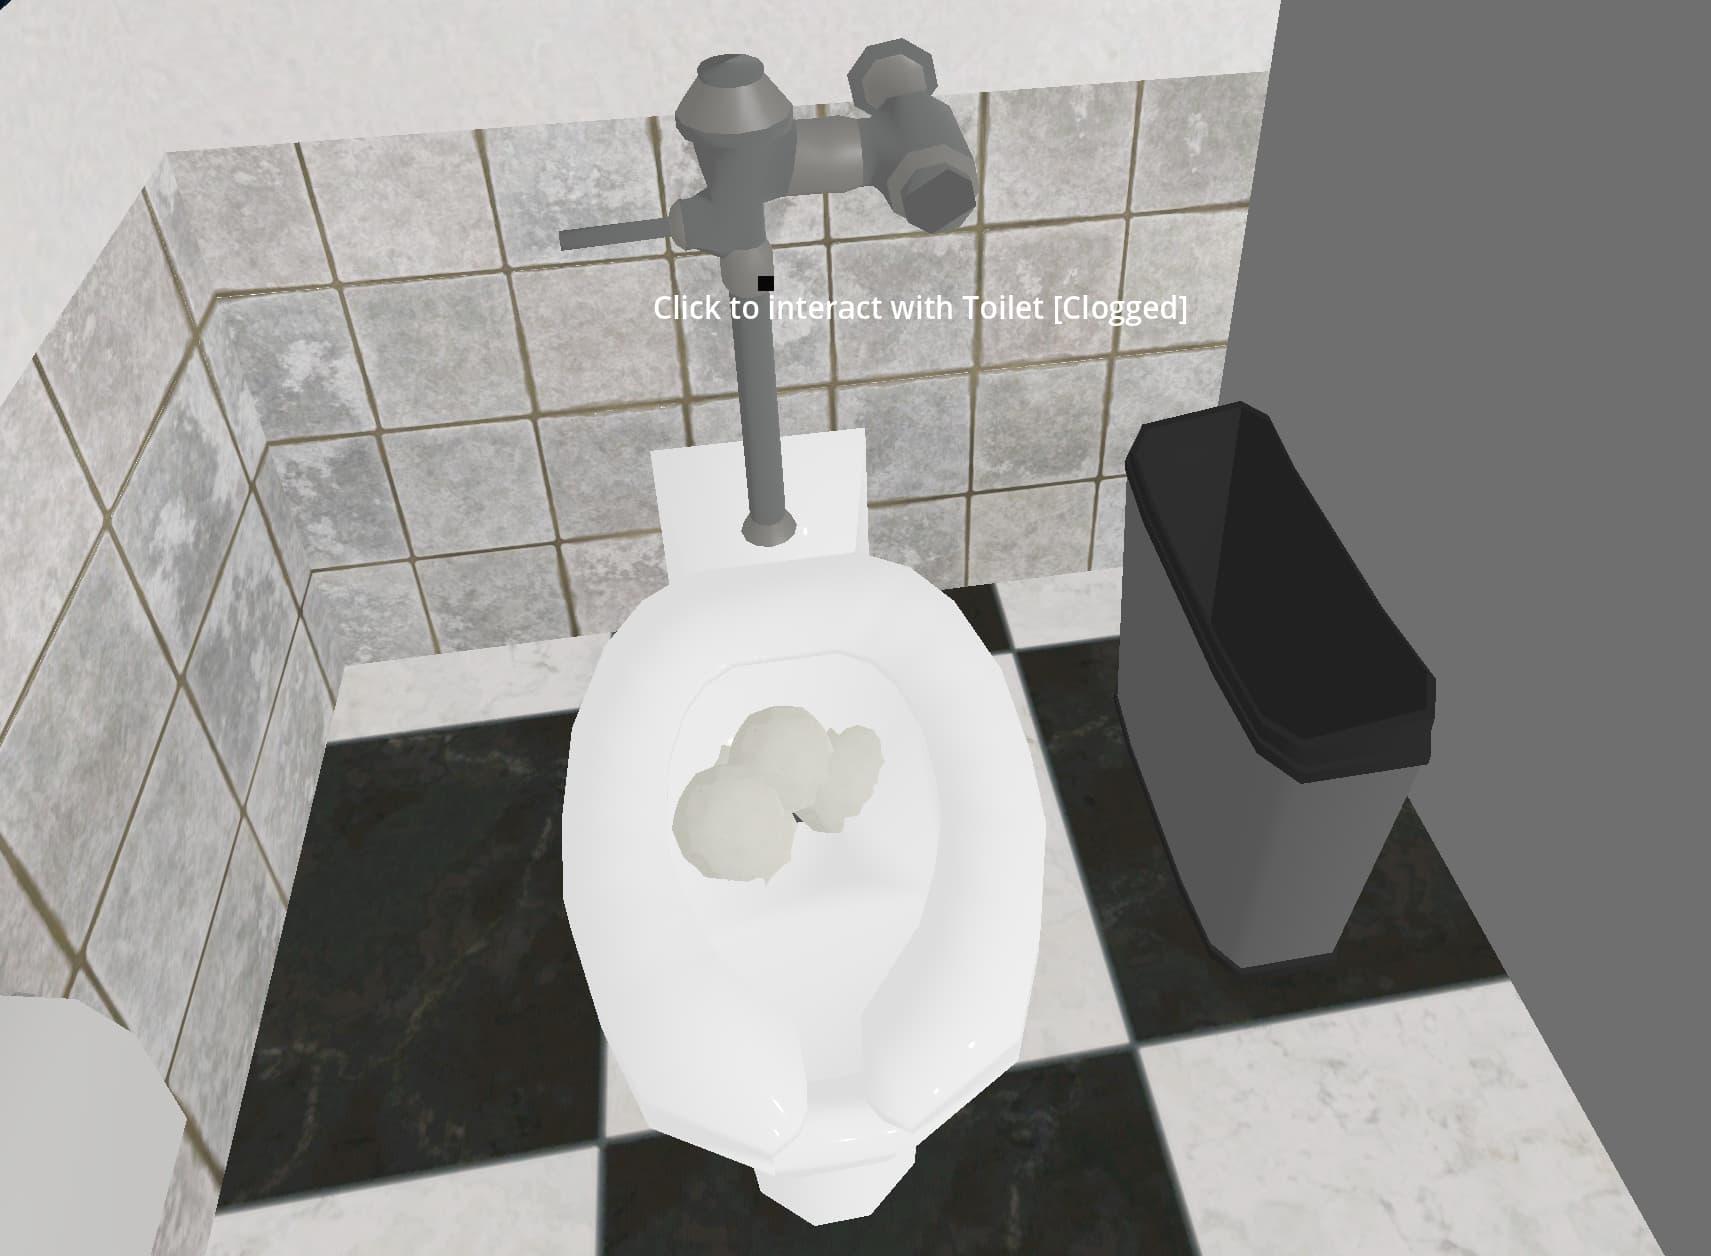
Now, there’s a mechanic you may have noticed if you played the game and are the curious type of player. Maybe someone who enjoys The Stanley Parable and other such games that make messing around and limit testing part of the core experience. That mechanic is quite straightforward - you can clog the toilets. Yep, if you’re feeling particularly anti-establishment, you can rip off some paper towels, pick up one or more of the resulting paper towel balls, blatantly disregard the clear warning signs, and drop them (with the right mouse button) into any toilet. Upon attempting to flush said toilet, you’ll hear and see that it’s clogged.
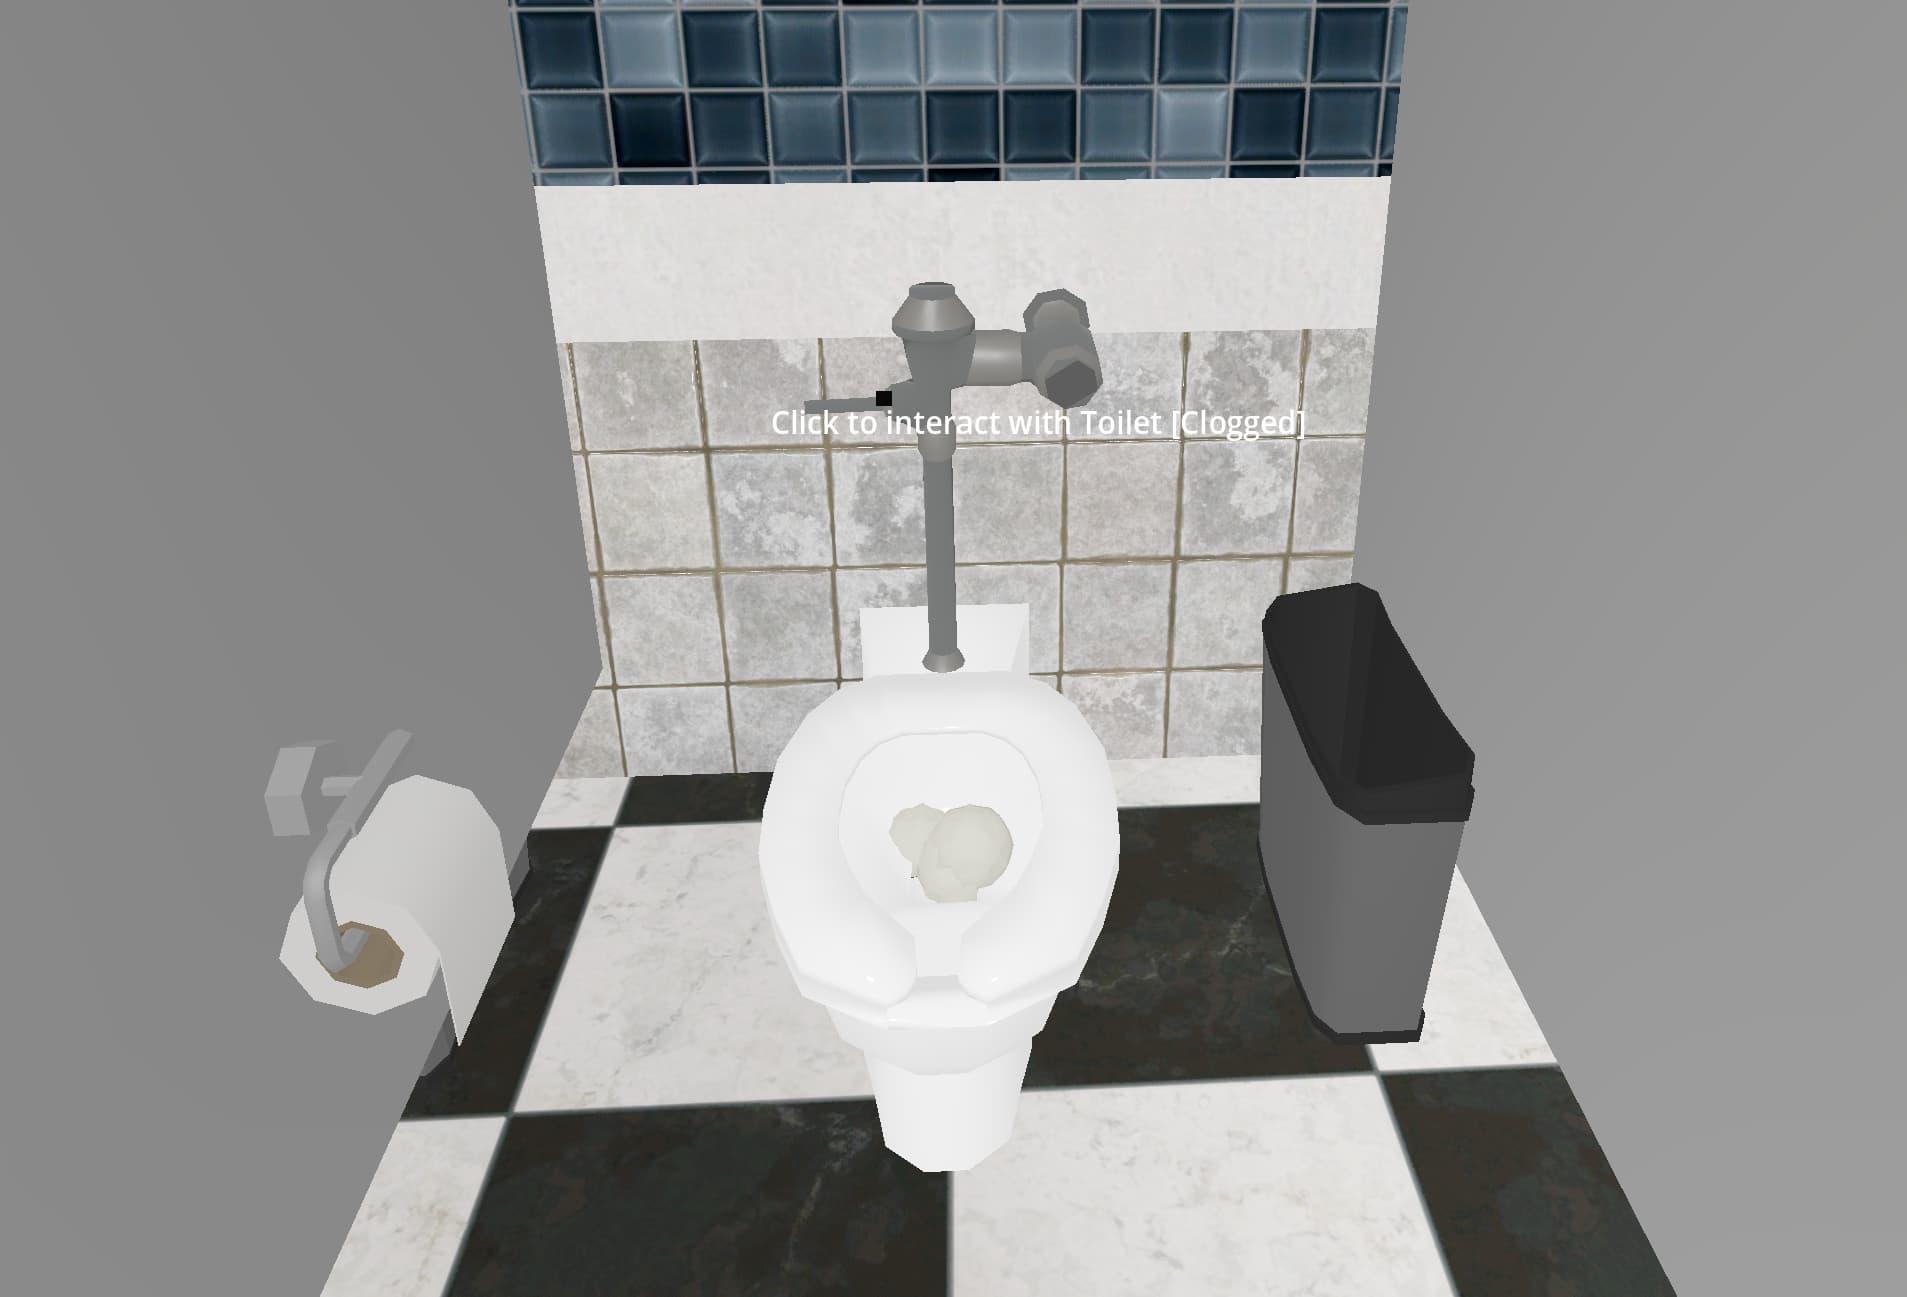
Tsk, tsk, tsk. For shame...
I hope you’re proud of yourself. You menace to society, you. But wait! Perhaps you’ve had a change of heart? Well, if you have, you can always channel your inner plumber, and do your good deed for the day. Pick up the plunger, in the left-most stall, and drop it (with the right mouse button) on top of the clogged toilet. If the stars align, you very well may end up unclogging the toilet. Of course, you’re just about as likely to accidentally drop the plunger through the wall. Hey, I never claimed this thing was finished. Just that it was in a somewhat-releasable state.
But if you’re interested in the technical implementation allowing you to atone for your grievous misdeeds, let me elaborate.
The two items in the game that are currently able to be picked up are paper towel balls and plungers. From the character camera’s side, both item pickup and item dropping have been implemented.
It’s probably not ideal, but the character camera script checks if the currently looked-at object can be picked up (via collider.has_method(‘pick_up’)). If the player has just pressed the left mouse button while looking at an object that can be picked up, and if the player is currently not holding another object, the player will pick up the object.
Similarly, if the player is currently carrying an object, they will drop the object when pressing the right mouse button. I wish I had better UI indicators for these features, but that might be coming in a future update.
When an item is carried, all collision/physics logic is disabled on it. And it will be held out a certain distance away from the player. It will also follow the rotation of the camera when the player moves the mouse. It’s pretty primitive, but it gets the point across.
When an item is dropped, collision/physics is turned back on, so it will fall. And it will be removed from the global state of the camera script. It’s that simple. Arguably too simple, but that’s a problem for future me. For now, I just wanted something that technically worked, even if it was a bit janky.
Speaking of janky, here’s a snippet of the character camera code that enables item pickup and dropping:
extends Camera3D

var mouse = Vector2()
var currentlyCarried = null
var shouldDrop = false

func _process(_delta):
	if currentlyCarried != null:

		if shouldDrop:
			# Re-enable collision on the carried object
			currentlyCarried.collision_layer = 1
			currentlyCarried.collision_mask = 1

			# Remove the carried object from the global state of the camera
			currentlyCarried = null
			shouldDrop = false
			return

		# Disable collision on the carried object
		currentlyCarried.collision_layer = 0
		currentlyCarried.collision_mask = 0

		# Set the carried object's global position relative to the camera's position/rotation
		var offset = Vector3(0, -0.4, -1.5)
		currentlyCarried.global_transform.origin = global_transform * offset


func _input(event):
	if event is InputEventMouse:
		mouse = event.position
	if event is InputEventMouseMotion:
		var collider = get_collider()
		if collider != currentlyHighlighted:
			currentlyHighlighted = collider

	# When a mouse button has been pressed
	elif event is InputEventMouseButton and event.pressed:
		# Item pickup (when left-clicking on a pickable item, when there is no currently-carried item)
		if event.button_index == MOUSE_BUTTON_LEFT:
			var collider = get_collider()
			elif collider != null && collider.has_method("pick_up") && currentlyCarried == null:
				currentlyCarried = collider
				collider.rotation = Vector3(0, 0, 0)
				collider.pick_up()

		# Item dropping (when carrying an item, and right-clicking)
		if event.button_index == MOUSE_BUTTON_RIGHT:
			if currentlyCarried && currentlyCarried.has_method("drop"):
				currentlyCarried.drop()
				shouldDrop = true

# Helper function
func get_collider():
	var worldspace = get_world_3d().direct_space_state
	var start = project_ray_origin(mouse)
	var end = project_position(mouse, 3.5)
	var result = worldspace.intersect_ray(PhysicsRayQueryParameters3D.create(start, end))
	if result && result.collider:
		return result.collider
	return null
The effect is far from realistic, it looks like telekinesis. But I don’t mind, because it didn’t require making any complicated animations or new assets. In a way, it’s kind of funny, and feels like using a dollar store version of the Gravity Gun from Half-Life 2.
It's not a bug, it's a feature!
Once item pickup and dropping was in the game, it was relatively simple to implement the last part of my evil plan. I made it so dropping an item in the vicinity of the toilet did something, depending on what item it was you dropped.
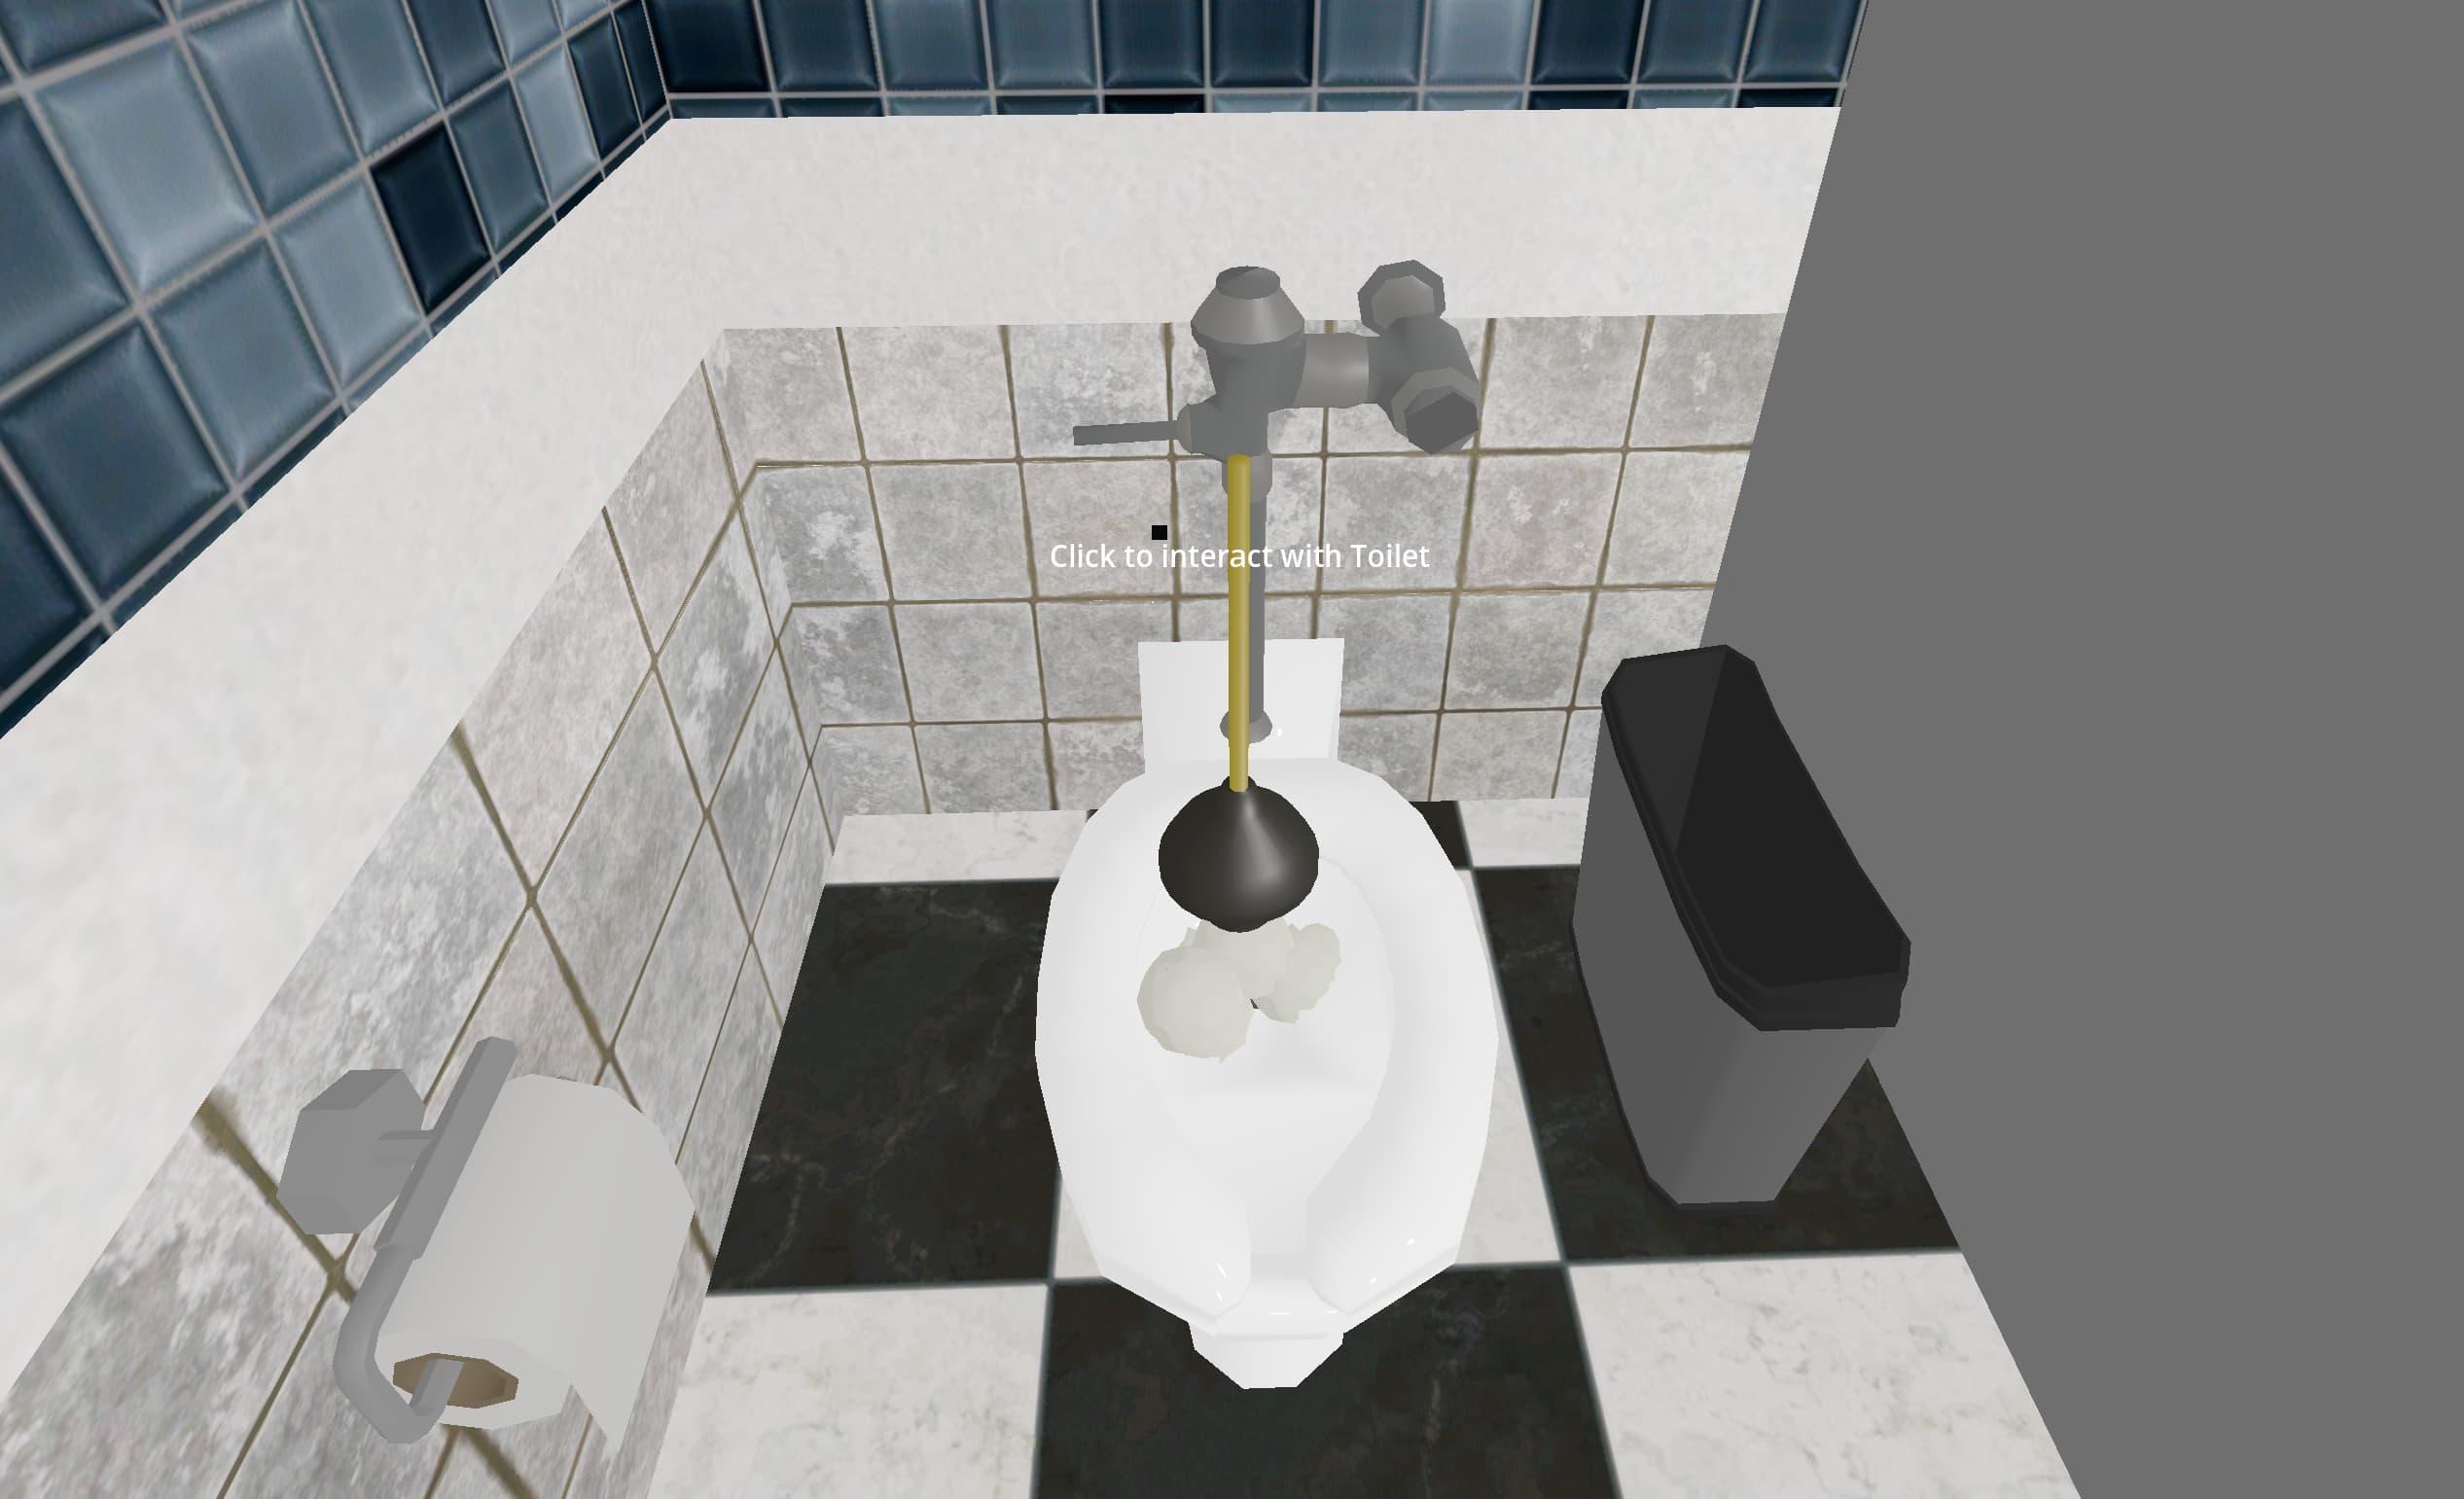
I first had to set up an Area3D around the toilet boil. Godot makes it pretty straightforward to trigger events (via signals) when a collidable object enters or exists an area. Due to the janky nature of item pickup and dropping, I made a rather generous area.
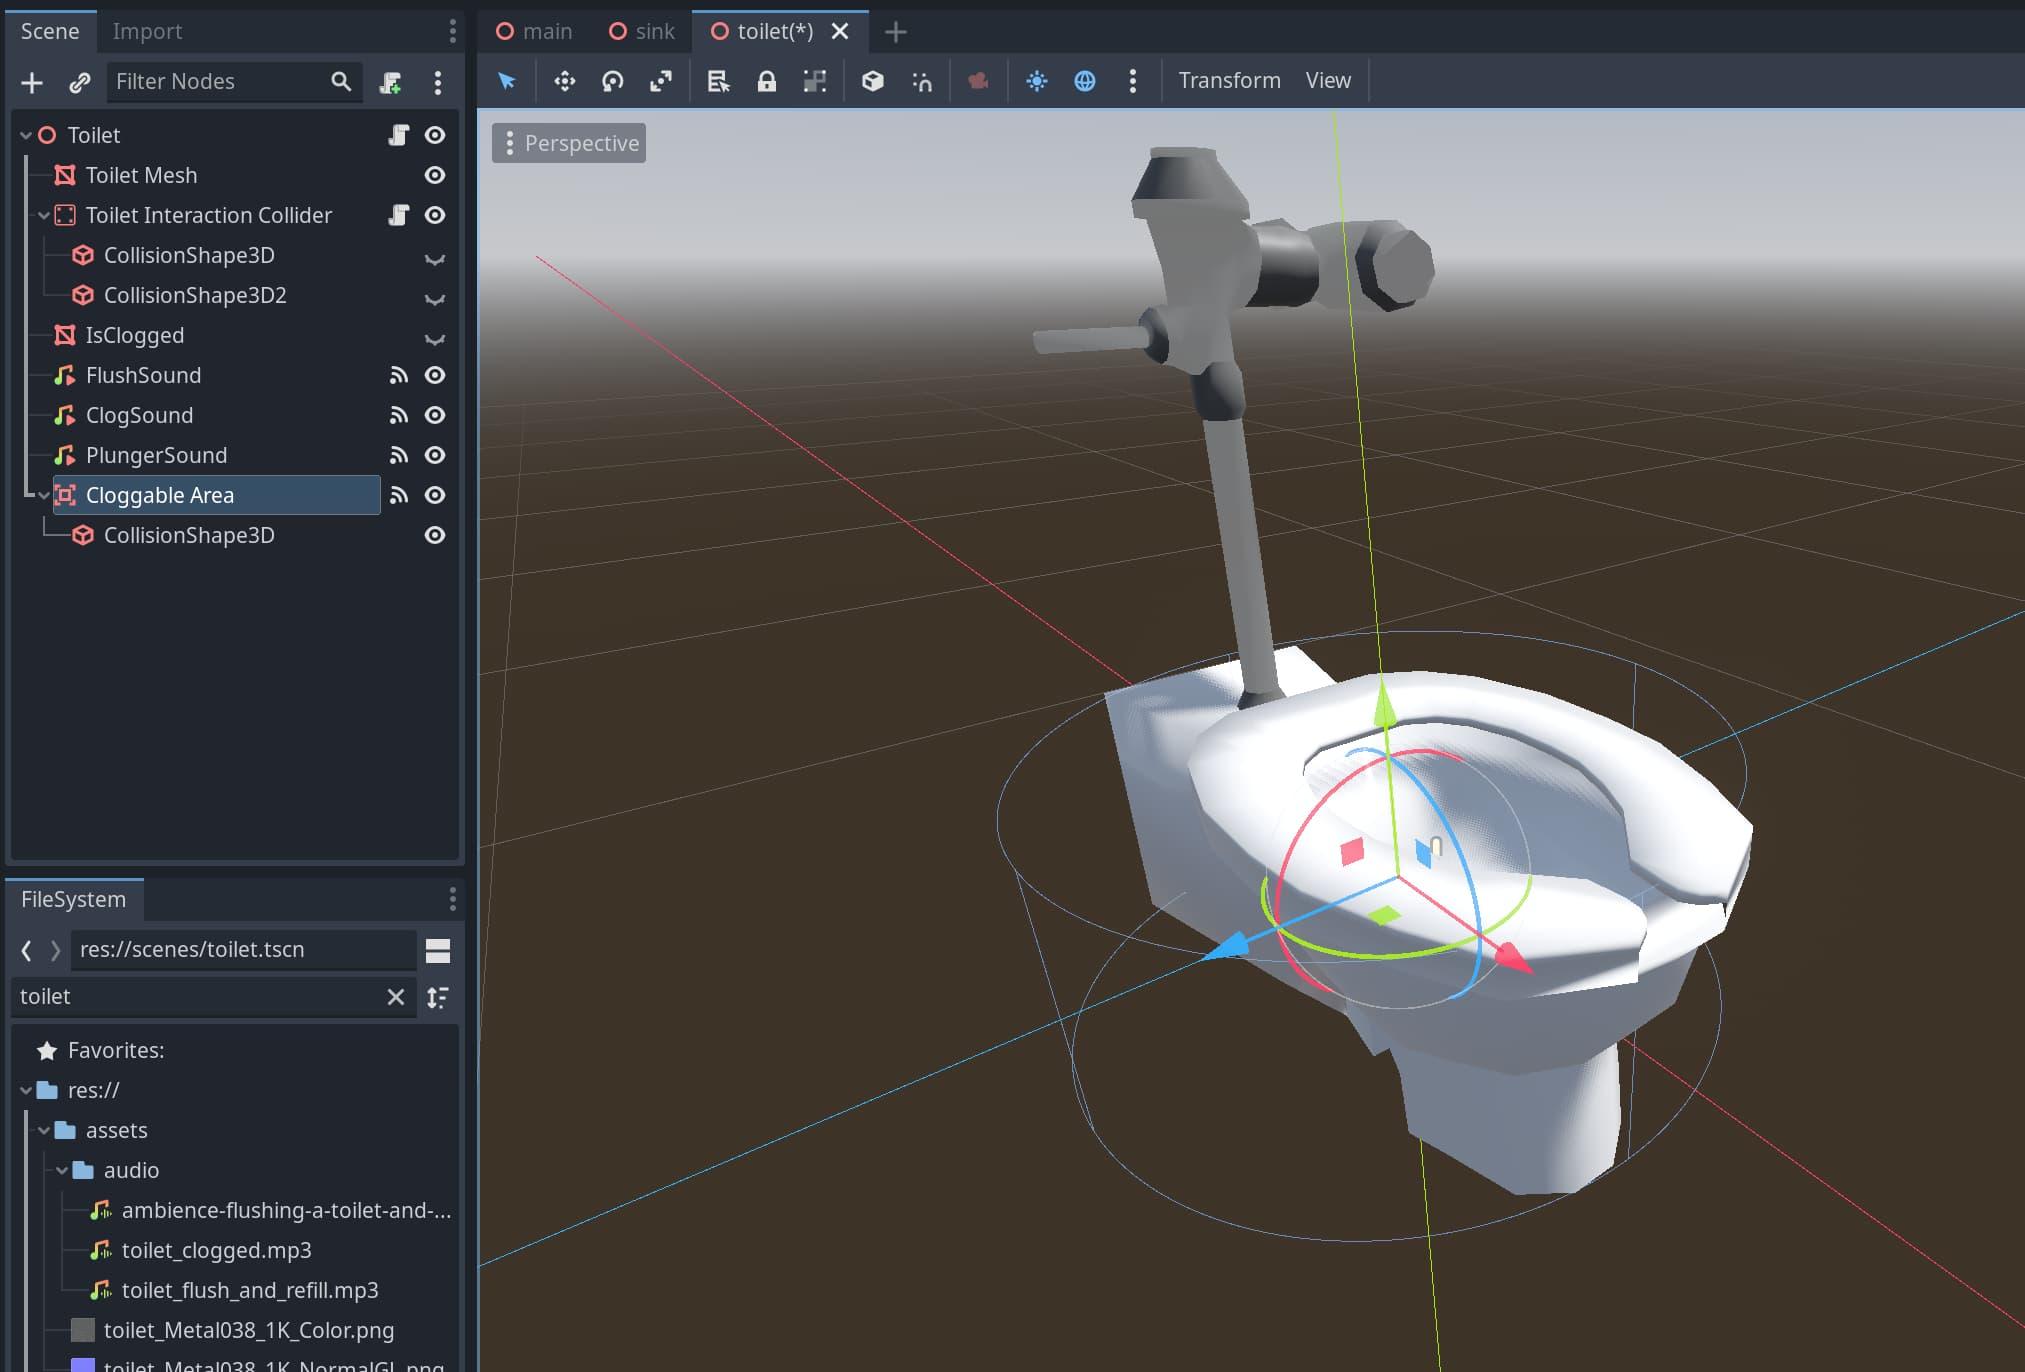
The Cloggable Area is the faint blue cylinder around the base of the toilet. It includes all the area inside it, as well as a bit outside
Here’s the code for the toilet, including the state and functions that handle flushing and clogging, and a function that runs when an object enters the cloggable area.
Note that the function that runs when an object enters the cloggable area doesn’t respond to objects with their collision turned off. So while you’re carrying something, you can bring it into the area, and it won’t trigger the clogging state. Until you decide to press the right mouse button, and drop it into the area.
Also note that this function, and some others (like the functions that run when certain sounds are finished playing) had to be attached to various signals in the Godot editor. You’ll see what I mean if you download the Godot project, and open up the toilet.tscn scene for yourself.
I found it rather handy to run functions when sounds are finished playing. Because that allowed me to have a ~15 second sound of the toilet flushing and filling back up again. And in that time, you can’t trigger another flush (because the toilet’s still filling up, duh). Those kinds of tricks helped me in a number of places. It’s not (under normal circumstances) possible to say, flush the toilet twice while it’s refilling, or rip two sheets of paper towel off at a time, or turn the sink on and off too quickly.
Anyway, here’s the toilet code:
extends Node3D

# Global state
@export var is_clogged: bool = false
var should_clog: bool = false
var flushing: bool = false

var handle_should_move: bool = false
var handle_moving_down: bool = true

var handle_position = 0
var transition_time: float = .75

# Objects and sounds
@onready var toilet = $"Toilet Mesh"
@onready var cloggable_area = $"Cloggable Area"

@onready var flush_sound = $FlushSound
@onready var clog_sound = $ClogSound
@onready var plunger_sound = $PlungerSound

# The list of objects stuck in the toilet
var clogging_objects = []

# Handle the flushing animation (via a blend shape/shape key on the handle)
func _process(delta):
	if flushing:
		if handle_should_move:
			if handle_moving_down:
				handle_position += delta / transition_time
				if handle_position >= 1.0:
					handle_position = 1.0
					handle_moving_down = false
			else:
				handle_position -= delta / transition_time
				if handle_position <= 0.0:
					handle_position = 0.0

					# Reset handle state, in preparation for next flush
					handle_moving_down = true
					handle_should_move = false

			toilet.set_blend_shape_value(0, handle_position)

# Handle flushing (set the object's name to "Toilet" or "Toilet [Clogged]" based on clog state)
func flush():
	if !flushing && !flush_sound.playing:
		handle_should_move = true
		flushing = true

		# Based on the should_clog flag, determine whether the flush sound or the clog sound should play
		if !should_clog:
			$"Toilet Interaction Collider".object_name = "Toilet"
			flush_sound.play()
		else:
			is_clogged = true
			$"Toilet Interaction Collider".object_name = "Toilet [Clogged]"
			if !clog_sound.playing:
				clog_sound.play()

# Runs when a collidable object enters the cloggable area (like when an item is dropped into it)
func _on_cloggable_area_body_entered(body):
	if body && 'object_name' in body:

		# Paper Towel Ball handling
		if body.object_name == 'Paper Towel Ball':
			# Disable the paper towel ball's collision
			body.collision_layer = 0
			body.collision_mask = 0

			# Set a random position for the paper towel ball, roughly within the toilet bowl
			var offset = Vector3(randf_range(-0.1, 0.1), randf_range(0.01, 0.1), randf_range(-0.1, 0.1))
			body.global_transform.origin = global_transform * offset

			# Disable physics on the paper towel ball, keep it in one place
			body.freeze = true
			body.freeze_mode = RigidBody3D.FREEZE_MODE_STATIC

			# Add the paper towel ball to the list of clogging objects
			clogging_objects.push_back(body)

			# Set the should_clog flag; the next flush will trigger a clog
			should_clog = true

		# Plunger handling
		elif (should_clog || is_clogged) && body.object_name == 'Plunger':
			should_clog = false
			is_clogged = false
			$"Toilet Interaction Collider".object_name = "Toilet"

			# Remove/destroy all clogging objects
			for clogger in clogging_objects:
				clogger.queue_free()
			clogging_objects = []

			# Trigger the plunger sound, which will in turn trigger a (successful) flush
			if !plunger_sound.is_playing():
				plunger_sound.play()

# Functions that run when certain sounds have finished playing (attached to signals in the editor)
func _on_clog_sound_finished():
	flushing = false

func _on_flush_sound_finished():
	flushing = false

func _on_plunger_sound_finished():
	flush()
At this point I was pretty satisfied with everything. I had implemented all the interactions I had originally planned, and added enough little flourishes that the space felt real. Or at least like it could be real, in this low-poly world stuck outside of time and space.
After a bit of cleanup, I was ready to release what I had so far. So I did. As I’ve said, you can download the game, its source code, and assets, from itch.io. But before we go, I’d like to share some closing thoughts.
Wow. Where to even begin? This project, silly as it may seem, taught me a lot. About 3D modelling, and game development, and tools like Blender and Godot. And where to find resources like textures, materials, 3D models, sounds, and music, for free. Not to mention some coding concepts in GDScript. Although I still have a lot to learn in that regard. But I’m honestly really glad I started with a washroom, because it’s a common room with a high space-to-interactivity ratio. So with a bit of environment design, I was able to pack in a lot of interactivity, and dare I say charm.
Anyway, a specific challenge I’ve encountered is realizing just how difficult it is to keep track of many 3D objects/meshes. I still don’t know if I have a very good workflow for exporting from Blender into Godot. But at least for now, it works. There are definitely things I could do to reduce the size of certain assets, like image textures (especially on the wall, ceiling, and floor tiles), but that’s going to be tricky without sacrificing the level of detail I want to go for. Also, I learned that UI in videogames is really tricky. It’s like the complexity of responsive web design, but with a whole unique set of challenges. So forgive me if my little off-centre crosshair and “Click to interact with [Object Name]” text is a bit primitive. I’ll get there someday.
One of the most interesting lessons that this project taught me was all the options that are out there for animating 3D objects. Blender’s Shape Keys are awesome, straight up. And I love how seamless the import of shape keys into Godot has been (at least for me and my purposes). But also, if you place the origin of a 3D object in the right place, animations like door opening/closing become a fairly trivial matter of rotating the door along its origin/pivot point. And when it comes to programmed animations, you can achieve some really neat effects with a little bit of code. Just pass around position data from one function to another, and do some basic vector math on it if you need to. Godot makes that really easy, and that’s how I got things like item pickup and the paper towel dispensing animation to work.
But I also learned just how difficult it is to convincingly/stylistically light a 3D scene. I still have no idea how to do it properly, in Godot or elsewhere. But I’m going to keep trying. But lighting seems to be a huge field in and of itself in gamedev, 3D modelling, and CGI in general. It seems like it’s one of the areas where there’s the biggest trade-off between “looking good” and “running smoothly”. Granted, I still think the options for lighting are somewhat limited in Godot compared to more mature engines like Unreal, so it might be easier with different tools. But I’m by no means holding that against Godot’s developers, because I’m just really grateful such an awesome tool exists and is free and open-source.
I’m also just grateful to be “done”. Finally, after all these years (and several months of working on this project off-and-on) I have something resembling a videogame to my name. But fear not, I’m far from resting on my laurels here. If I have anything to say about it, this may be the first videogame project from me, but it won’t be my last.
Well, for a while, my next step with this project is to take a break from it. The last thing I want to do is to work on this project too much/for too long that I start to resent it. It’s supposed to be a fun learning opportunity, and something I’m happy to share. Not an obligation, not a chore. So I think I’m going to take a hiatus from this project for a while. But trust me, I’ll be back.
The first high-level thing I’d like to do is attempt to decrease the filesize of the final binary. It’s currently sitting at like 100MB for Windows. Which, admittedly, is ridiculous. And a lot of that is from poorly-optimized image textures, I’d presume. But not all of it. I’m not sure how much more I can reasonably do, but I’d like to get the filesize down quite a bit more.
Second, and along the same lines, I’d like to get it to work in a web browser. Godot has WebAssembly export, and I have technically gotten it to work, but I don’t want to ship something this big to a web browser. Luckily I made a point from the start to only use basic features of Godot wherever possible, so it shouldn’t be too difficult to get it running smoothly on the web. I think that’d be a lot of fun.
Third, I’d like to clean up the UI quite a bit. Better positioning and styling of things like interactivity messages. And maybe some indicator as to what you’re currently holding, and how to drop it. And a main menu would be neat, as well.
Fourth, I’d like to add support for other input methods, like a game controller or a touch screen. If I got this working, it’d be cool to try to export it for Android and maybe even Xbox. One thing I really wish Godot had was better console export support. Right now it seems like you have to rely on a third party to get a game made in Godot to work on something like a Nintendo Switch. Do wish that were more seamless, although that’s a bridge I can cross when I get to it.
Fifth, I’d like to clean up the code a bit. Make it more composable? Or reusable? Or abstract? I don’t know the right words. But cleaner, at least. And there are a few known bugs I’d like to tackle, if I have the opportunity.
Sixth, I’d like to add something outside the washroom, i.e., something other than an empty, endless void. Like another part of the mall. That’s a whole other can of worms, but at least most of the rest of the mall wouldn’t need the same level of granular interaction that I wanted to put into the washroom.
And in terms of “stretch goals”, better physics for item pickup/dropping would be nice. Better character animations (and not just walk or stand still with no in-between pose) including head movement and maybe actually physically holding things. And maybe a character customizer, because I am kinda sitting on a huge collection of 3D character assets with the OverScore Proxy project. And hey, different game options for things like graphics/sound/accessibility would go a long way to making this whole thing feel more legitimate. Might also be worth trying to recreate it in another engine like Unreal. Eventually, who knows? The sky’s the limit. Multiplayer? VR support? Why not, honestly? It’s not like any of this is practical in the first place, why not have lofty goals?
But bottom line, I’m absolutely fine with this project evolving alongside my knowledge of gamedev, no matter how long it takes to make something “interesting”. Because this is already interesting to me, and it can only go up from here.
In the meantime, I’m releasing it all as open-source (MIT license for the code, CC0 1.0 for the assets). So you can freely play it, see how I made it, or make your own project with it. I don’t know if I’d necessarily recommend the last option at this point. It’s far from an ideal example of the kinds of things you can make with Blender and/or Godot. But I figured hey, why not share it?
If you would like to check out the game, its code, or its assets, be my guest. If nothing else, I hope you enjoyed reading this blog post, and hearing my story. Because the story of my interactions with computers is so tightly intertwined with the story of playing and now making PC games. And I’m just glad to be able to share it.
I’ll close with some “glamour shots” of the “finished” product, and a brief gameplay video. Until next time!
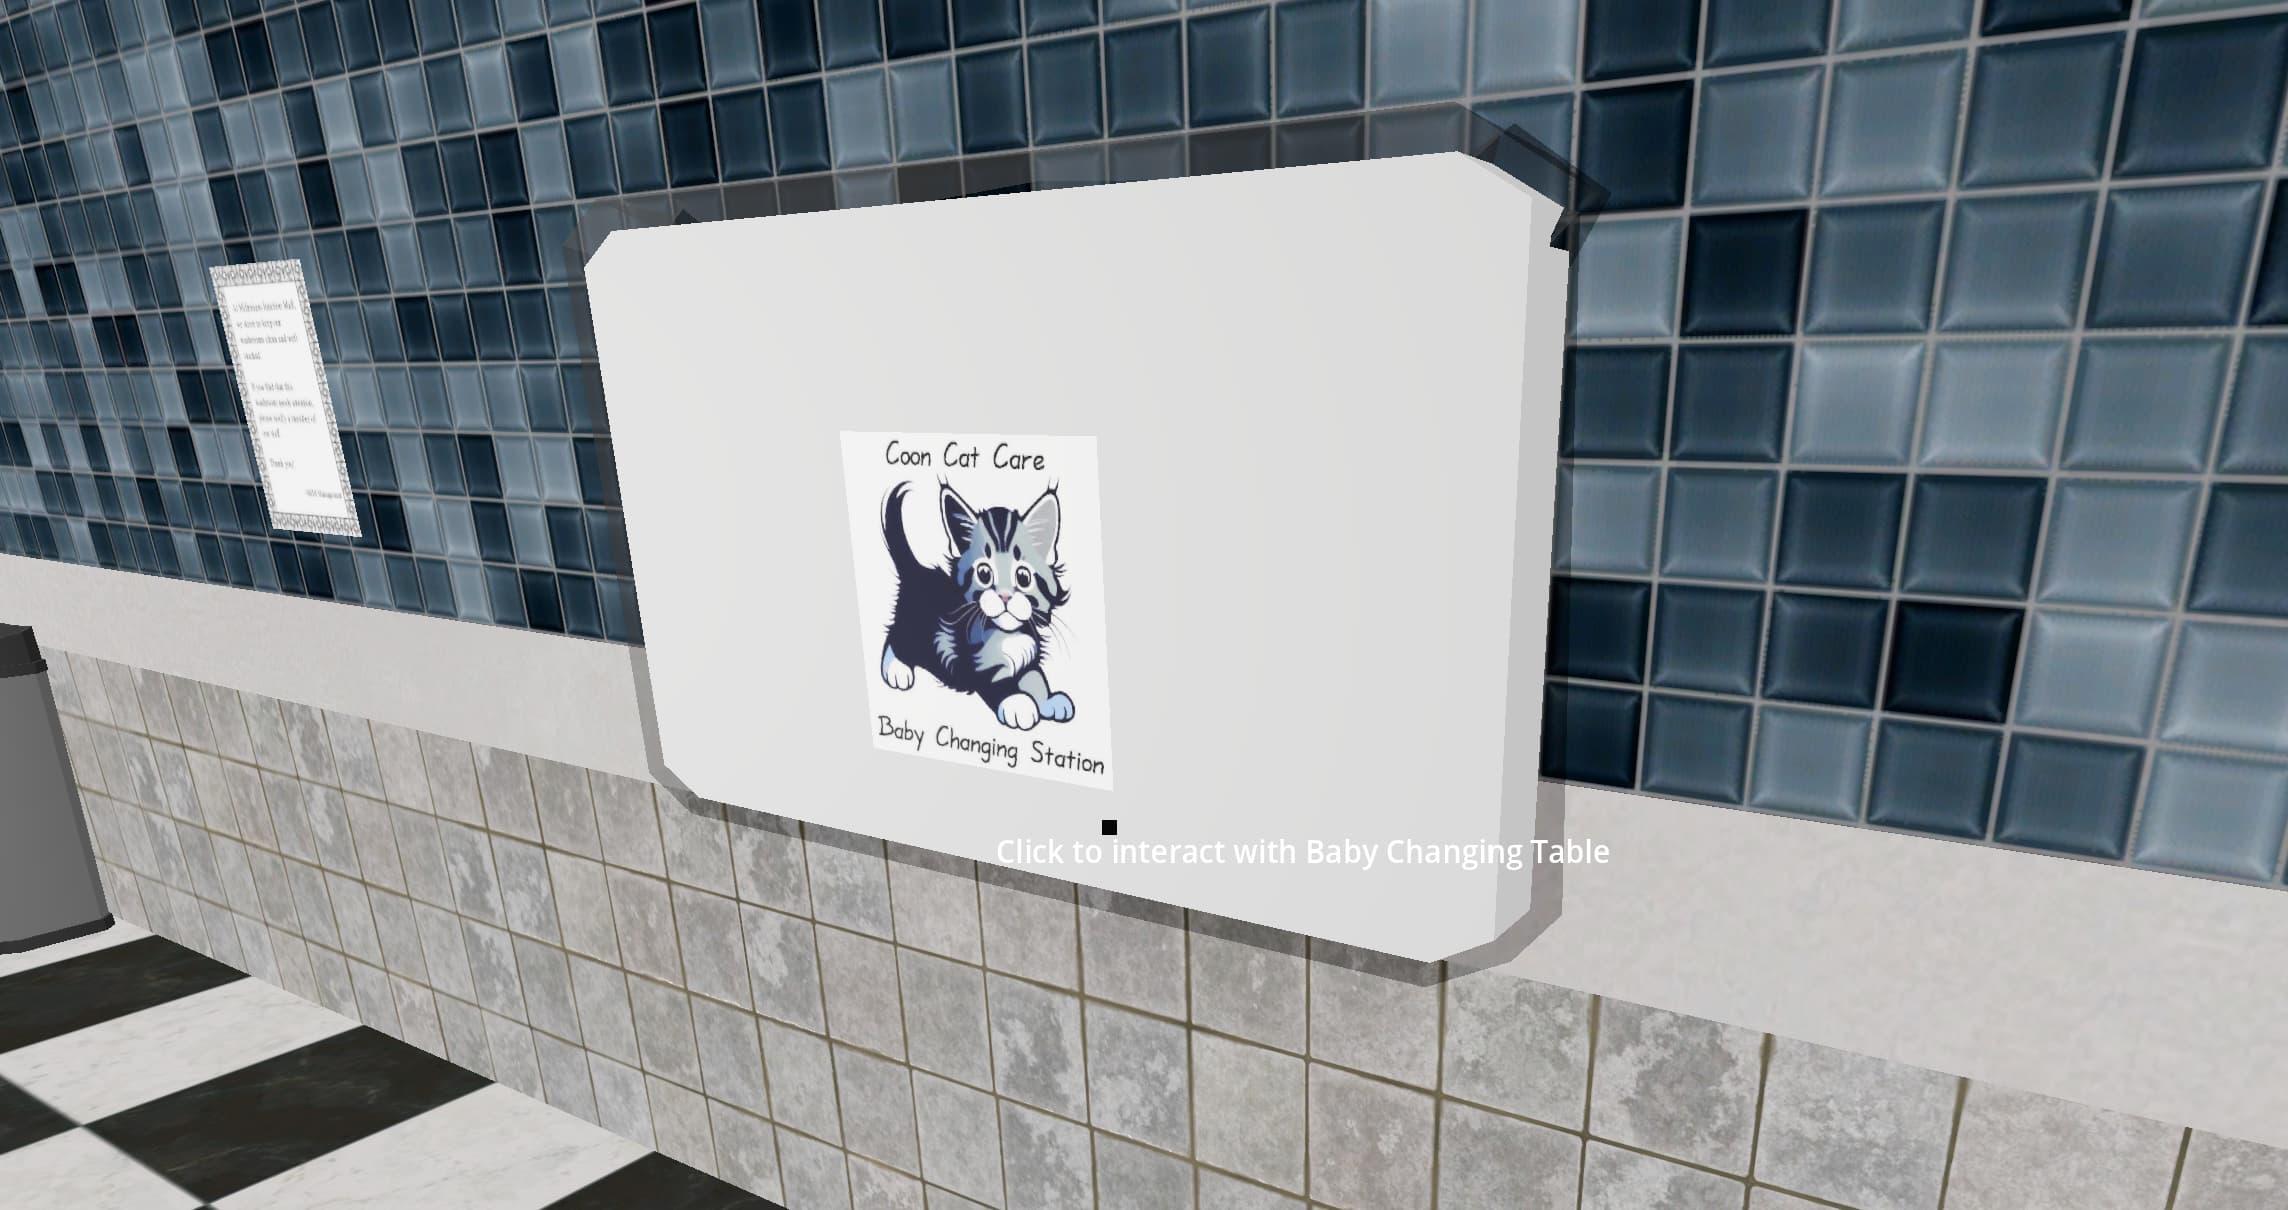
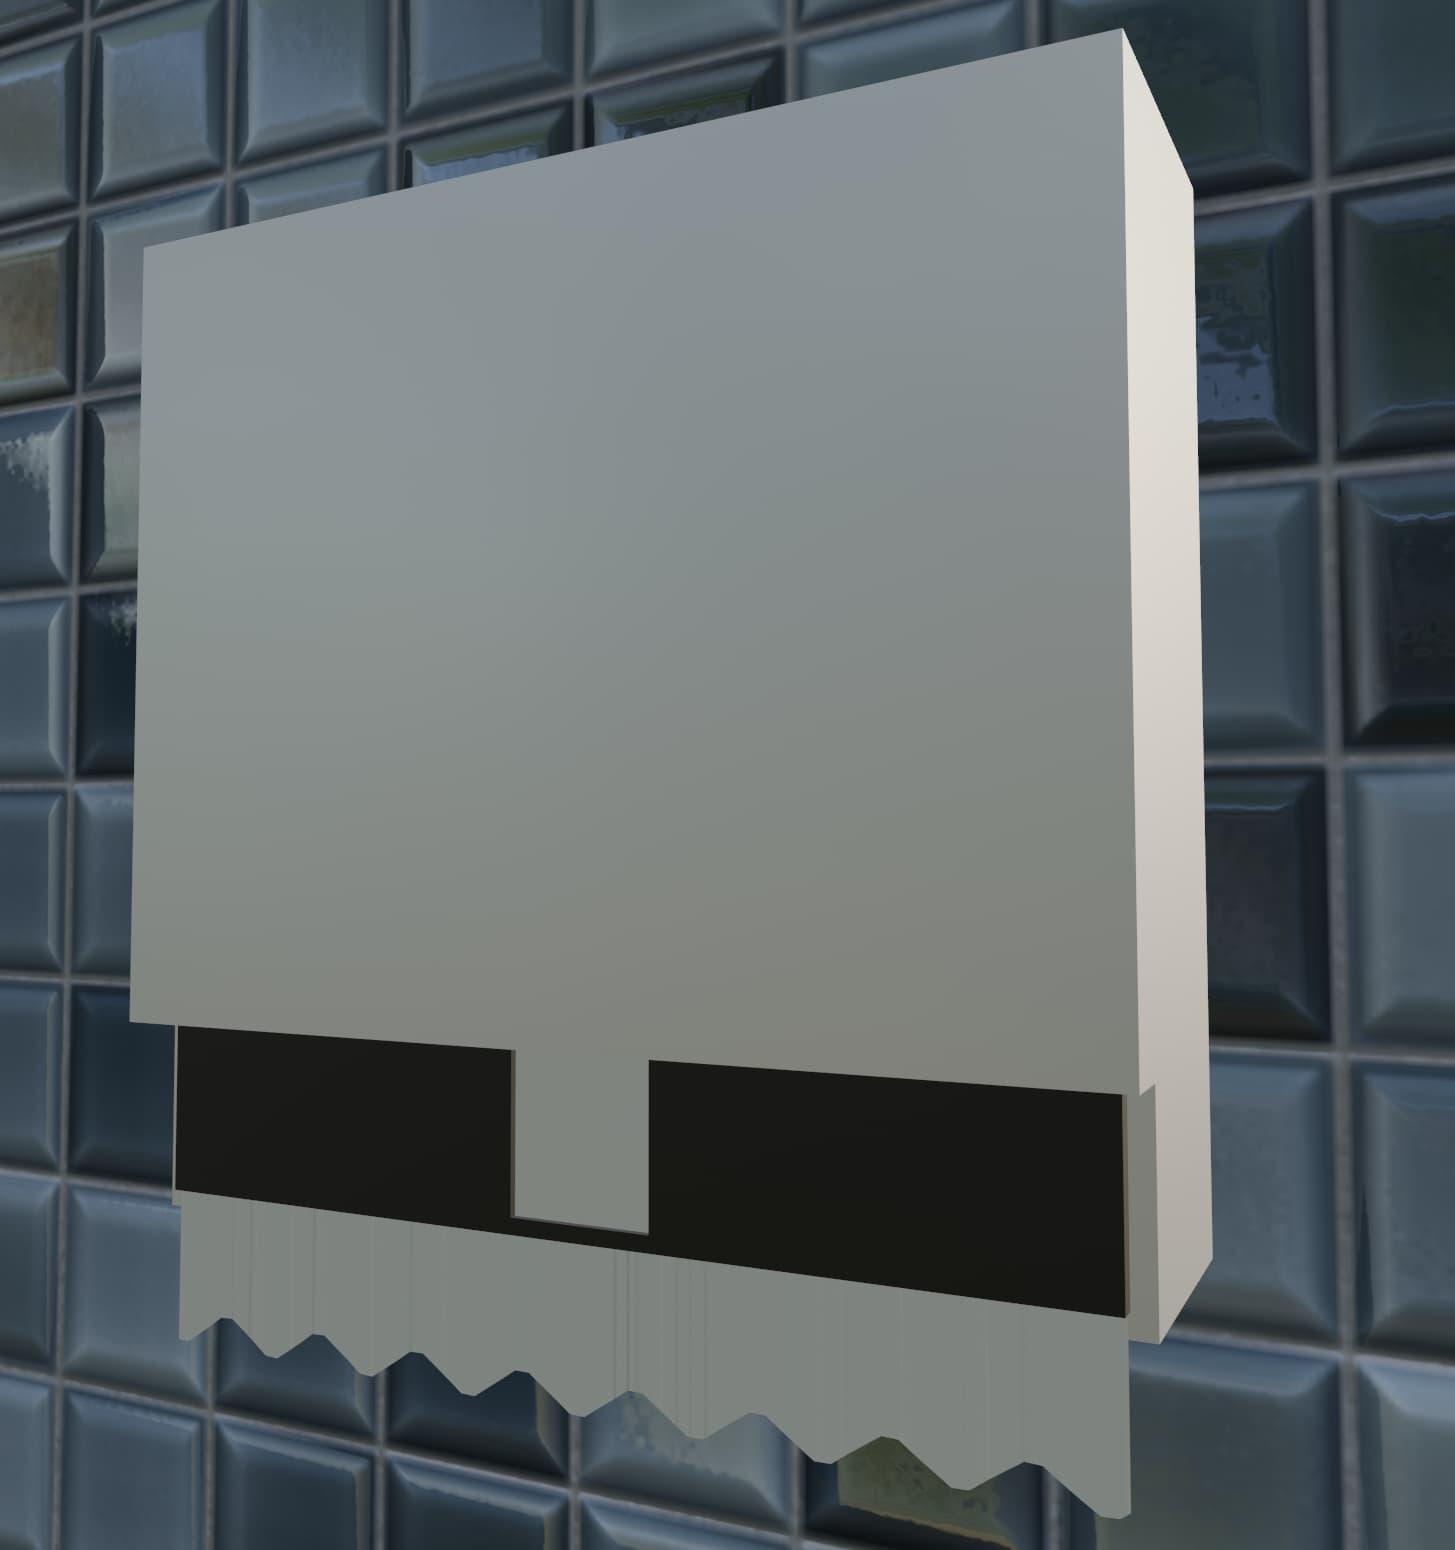
Baby Changing Table with Coon Cat Care branding