Low-Poly Character Rigging with Blender and Mixamo
Last Updated: 11/01/2023
A step-by-step process for rigging and animating low-poly 3D characters, using Blender and Mixamo

Matthew Piercey

If you’ve been following along in this series, you’ll know that I recently released OverScore Proxy, a low-poly character model that’s free to use in any project. Throughout the last post in this series, I outlined the process I use to model low-poly 3D characters. It was great to find a modelling workflow that felt natural, logical, and fun, and I enjoyed sharing it.
Well, since then, I may have gone a bit overboard in creating accessories, outfits, and variants for the Proxy character. So much so that it’s turned into a modular character creation set. So far, I’ve made 151 different clothing and accessory models to go along with the base character model. And I’m really pleased with the results.
It sounds like a lot of work, and in some ways it was, but it was an exercise in refining my workflow even further, and making it quite efficient. One thing I found very helpful, is that once I created a type of clothing or accessory for the first time, it was a lot easier to create variants for it. Like after I made a t-shirt, I was able to copy the t-shirt model, and use it as the basis for making different versions of shirts. The mirror and solidify modifiers in Blender came in handy big time.
If you’re interested in following along with this blog post, which is probably the closest thing I’ve done to a proper tutorial so far, I’d recommend you to start by downloading the OverScore Proxy set from its OpenGameArt page:
https://opengameart.org/content/overscore-proxy-modular-low-poly-female-character-creation-set
It’s released under a CC0 license, meaning you can use or modify it however you wish, and use the characters you create in any personal or commercial project. Hopefully you’ll find it useful. I certainly enjoyed coming up with all the models and outfits. I’ve provided a .blend file, which you can open up in Blender, the free and open-source program for 3D modelling, animation, and many other things. I highly recommend downloading Blender and taking it for a spin, if you haven’t already. And following the steps in this blog post could be a great excuse to do that!
So if you want to follow along, I suggest downloading the .blend file from OpenGameArt now.
I can wait…
…
…
…
OK, presumably you’re back. Or you’re just scrolling down the page, I can’t really tell. Either way, welcome back!
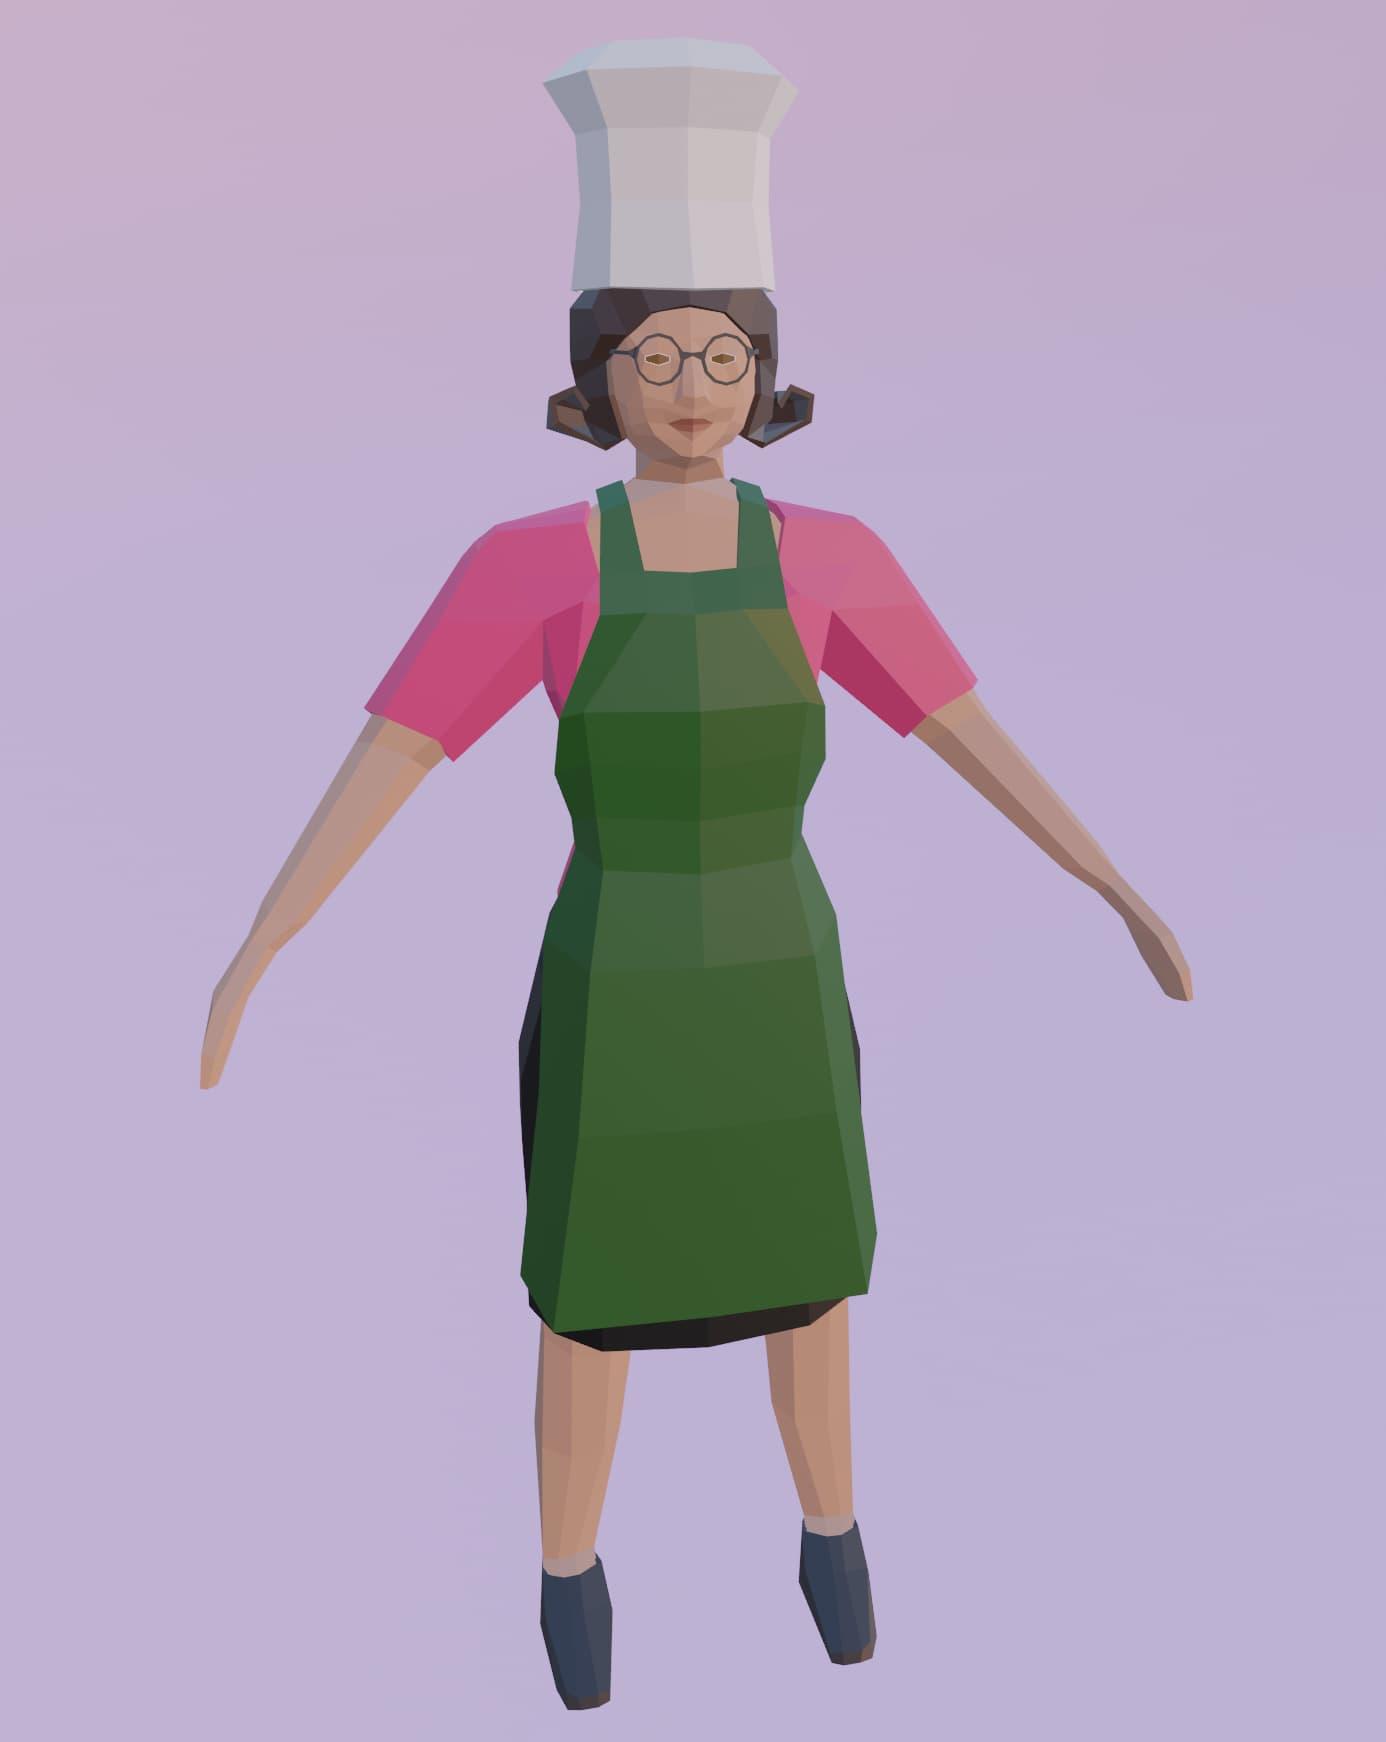
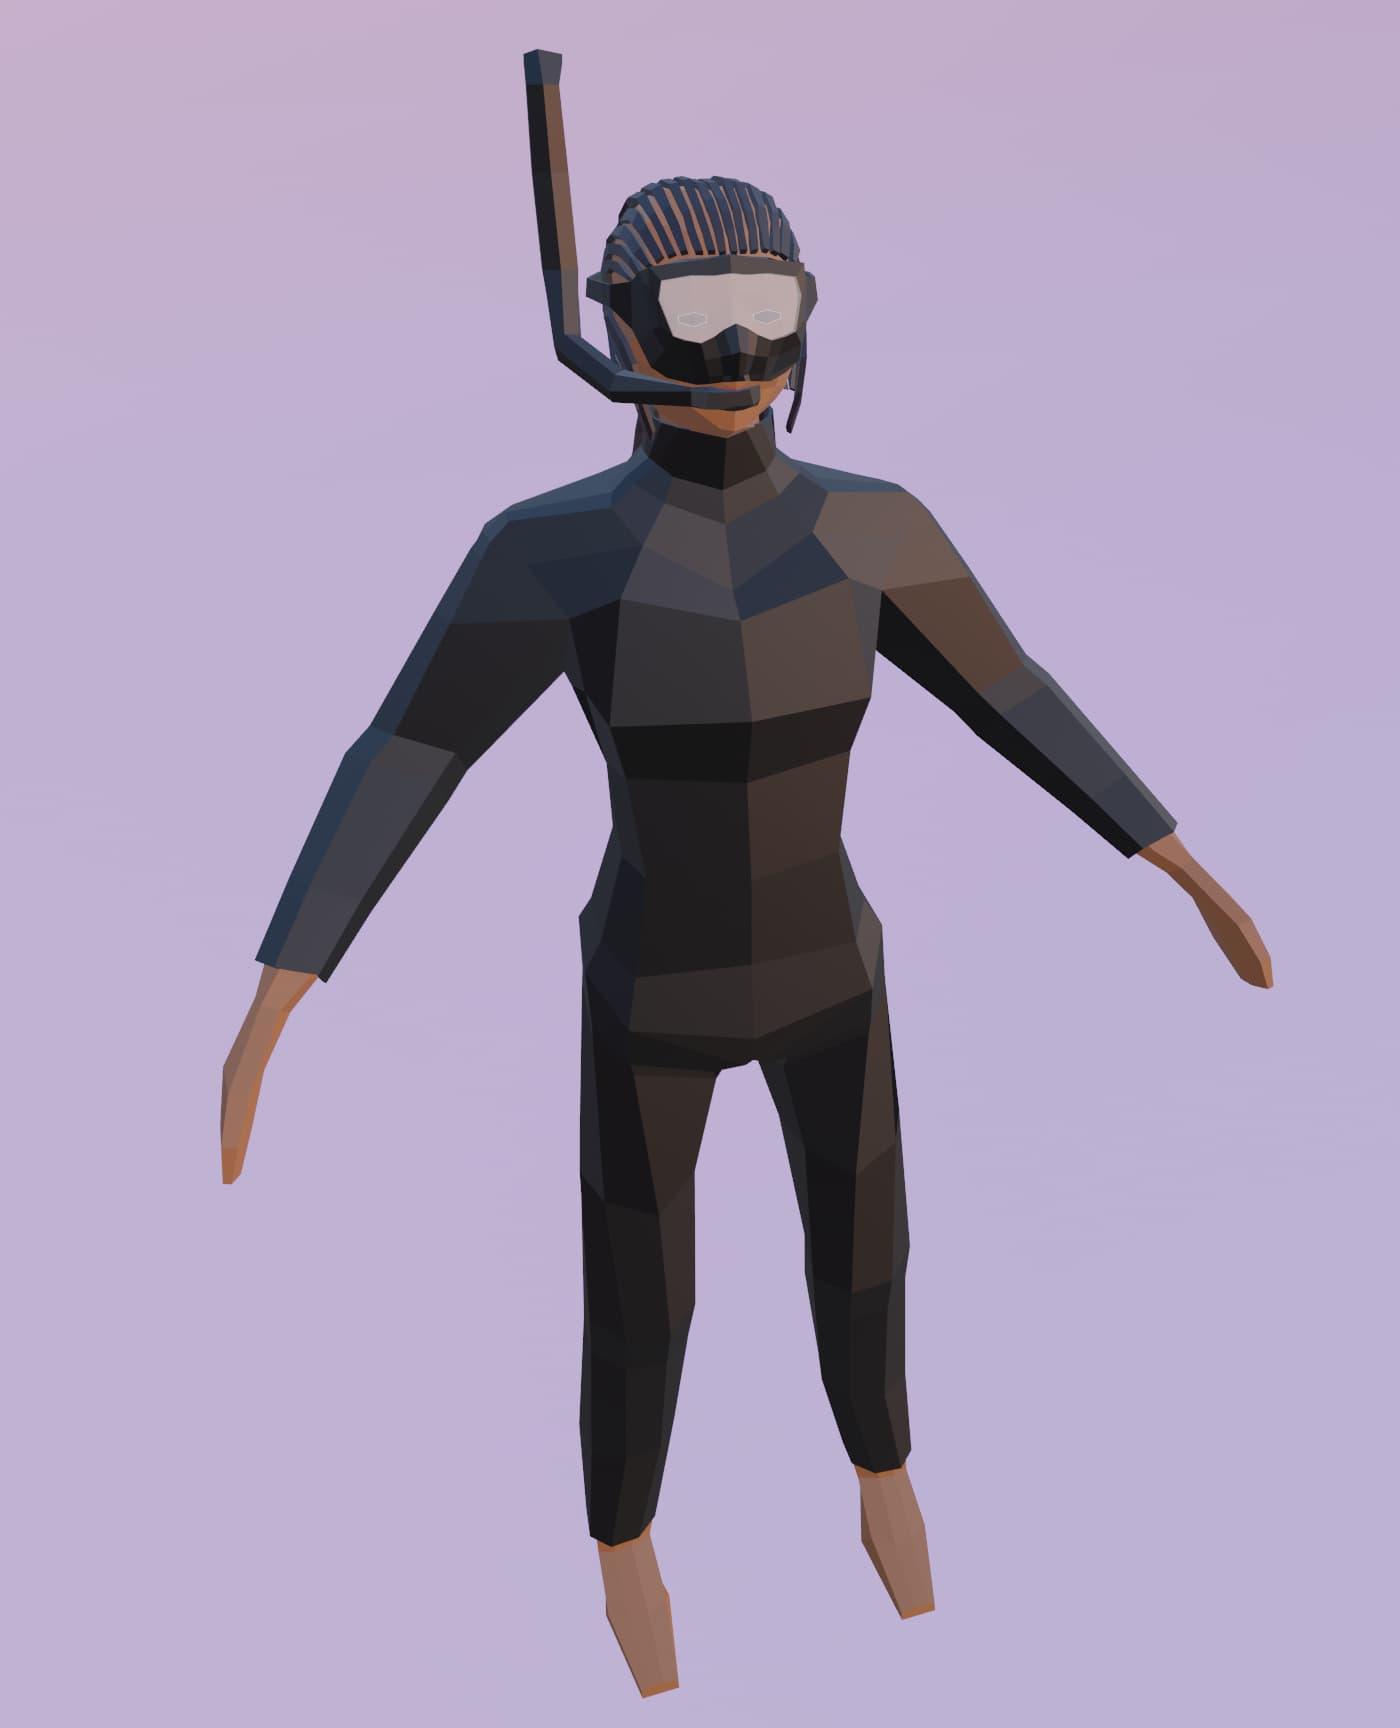
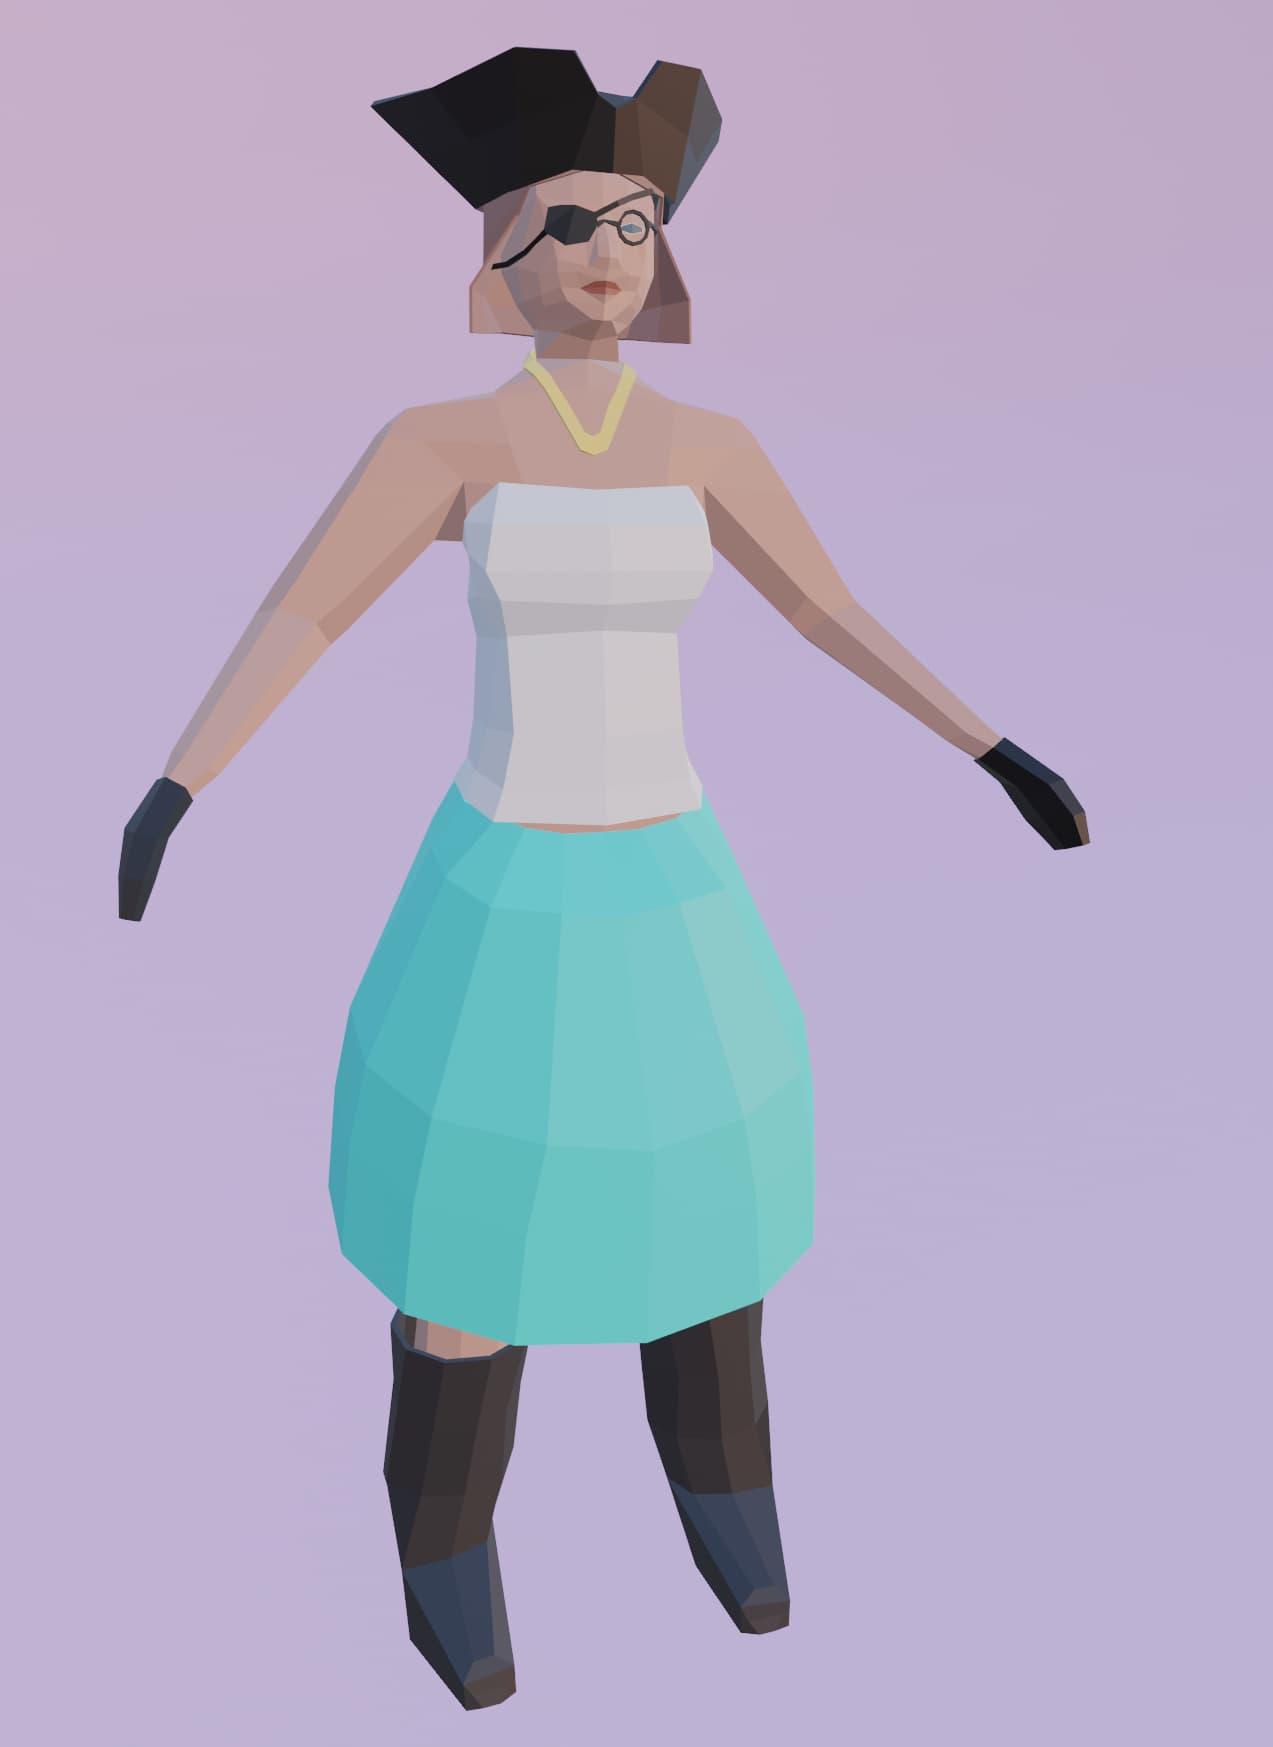
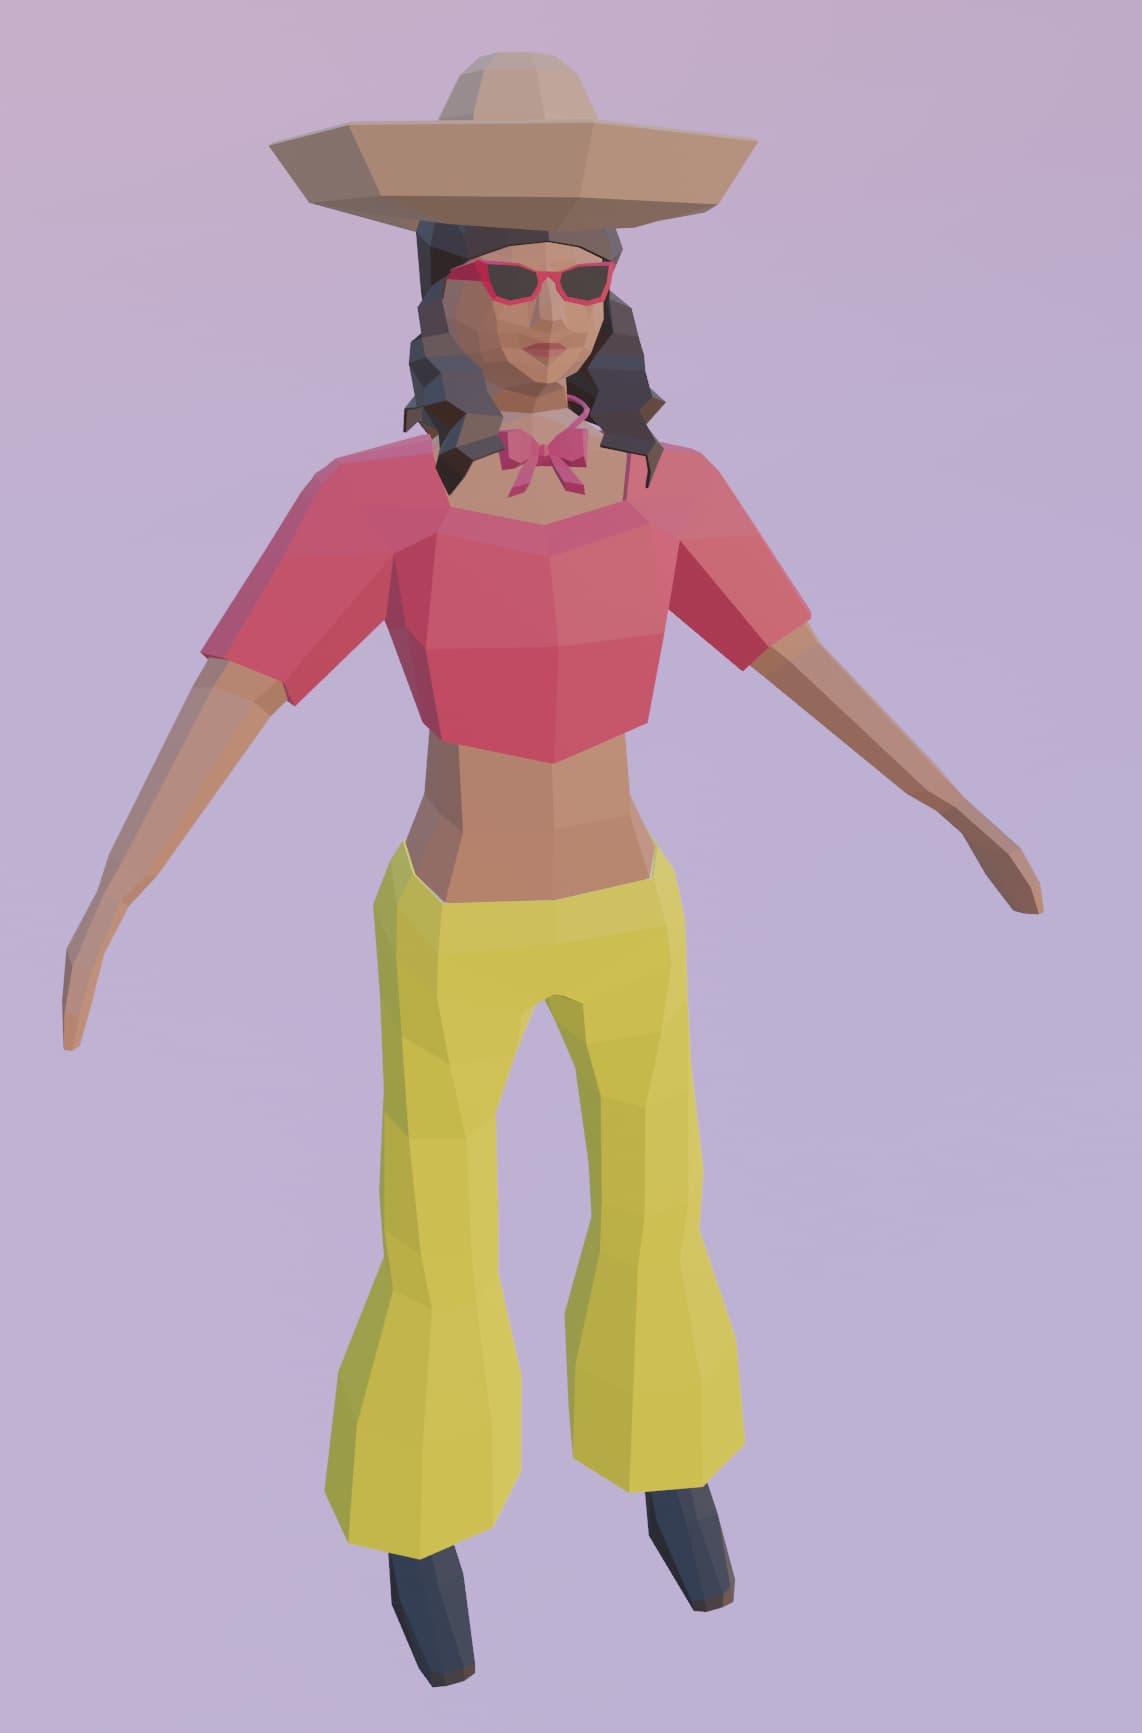
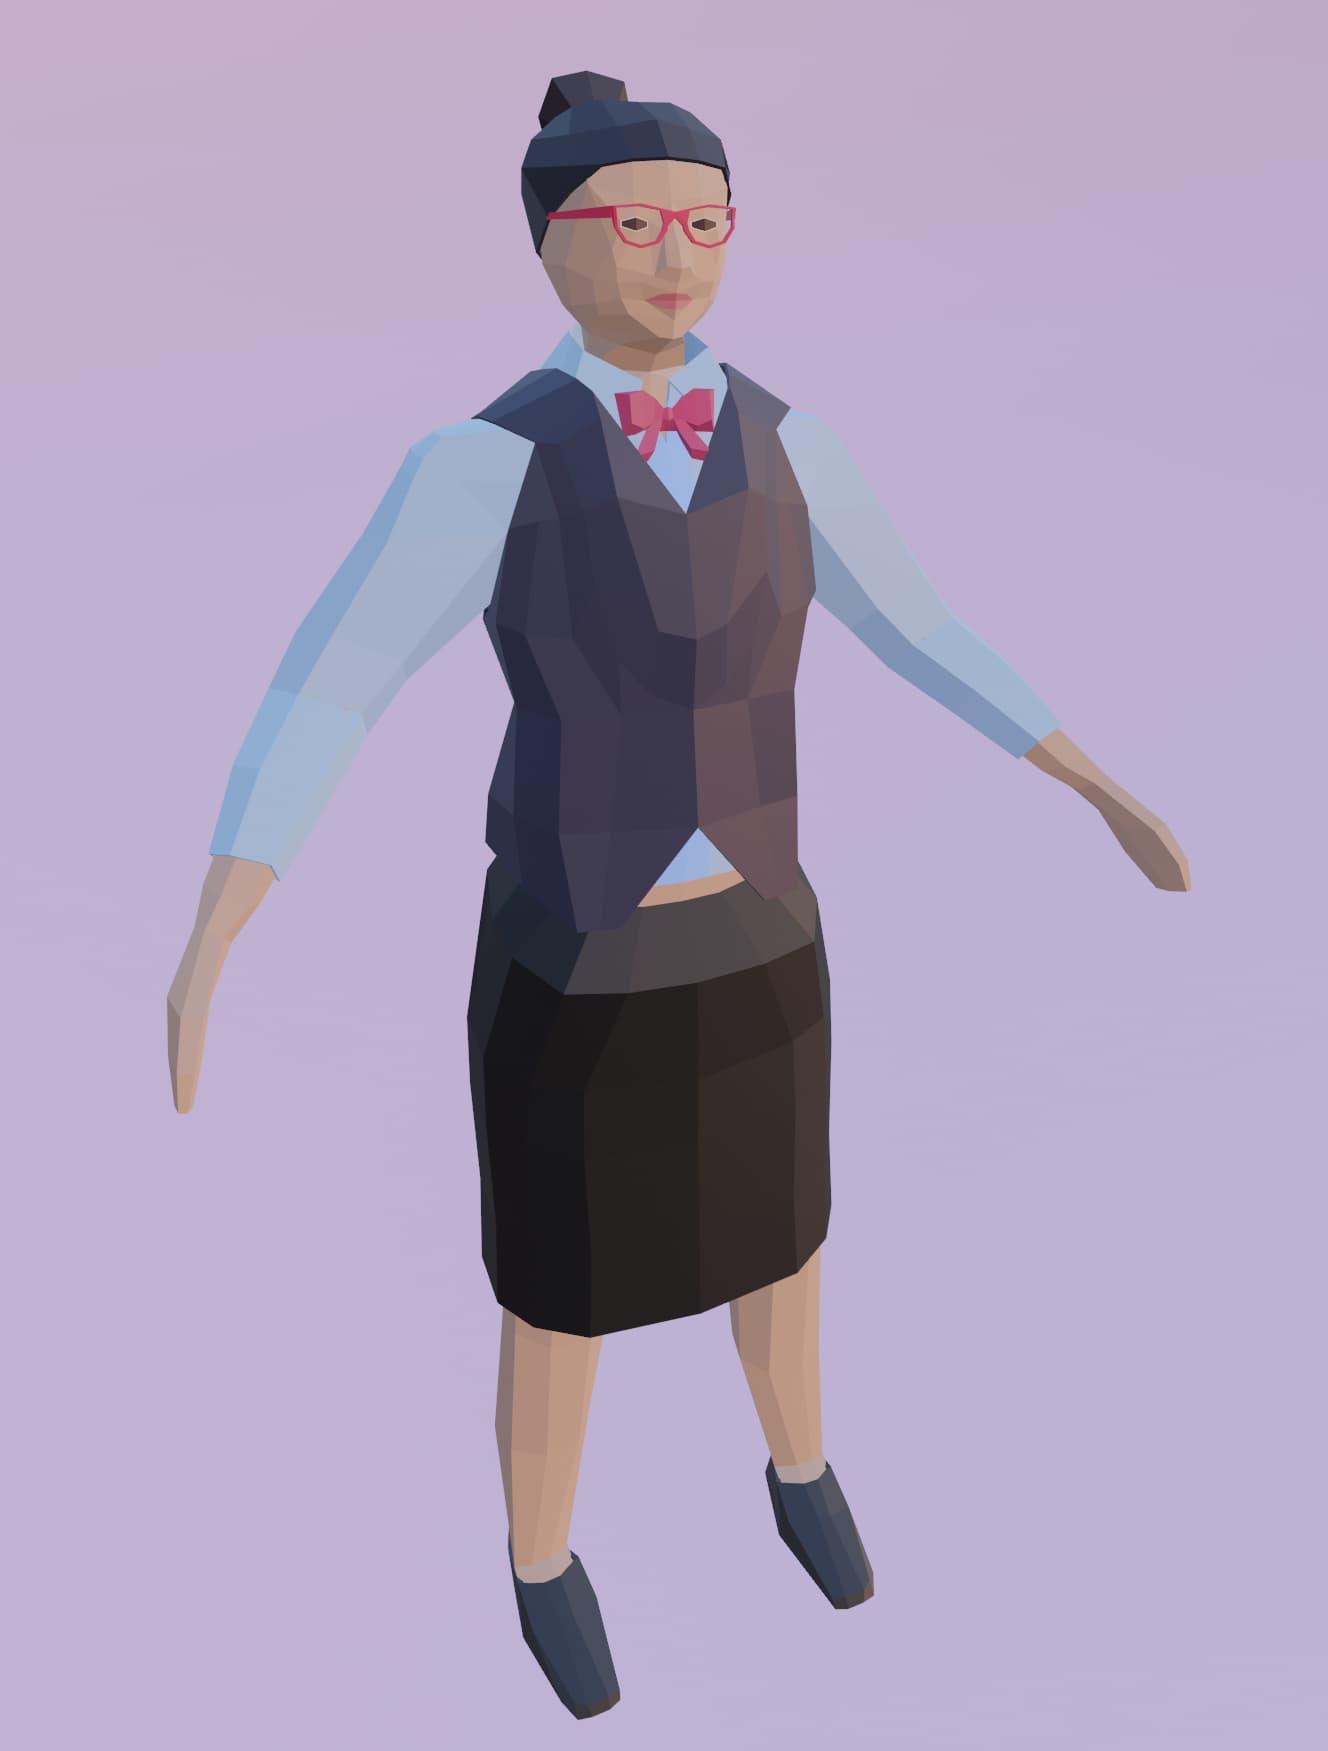
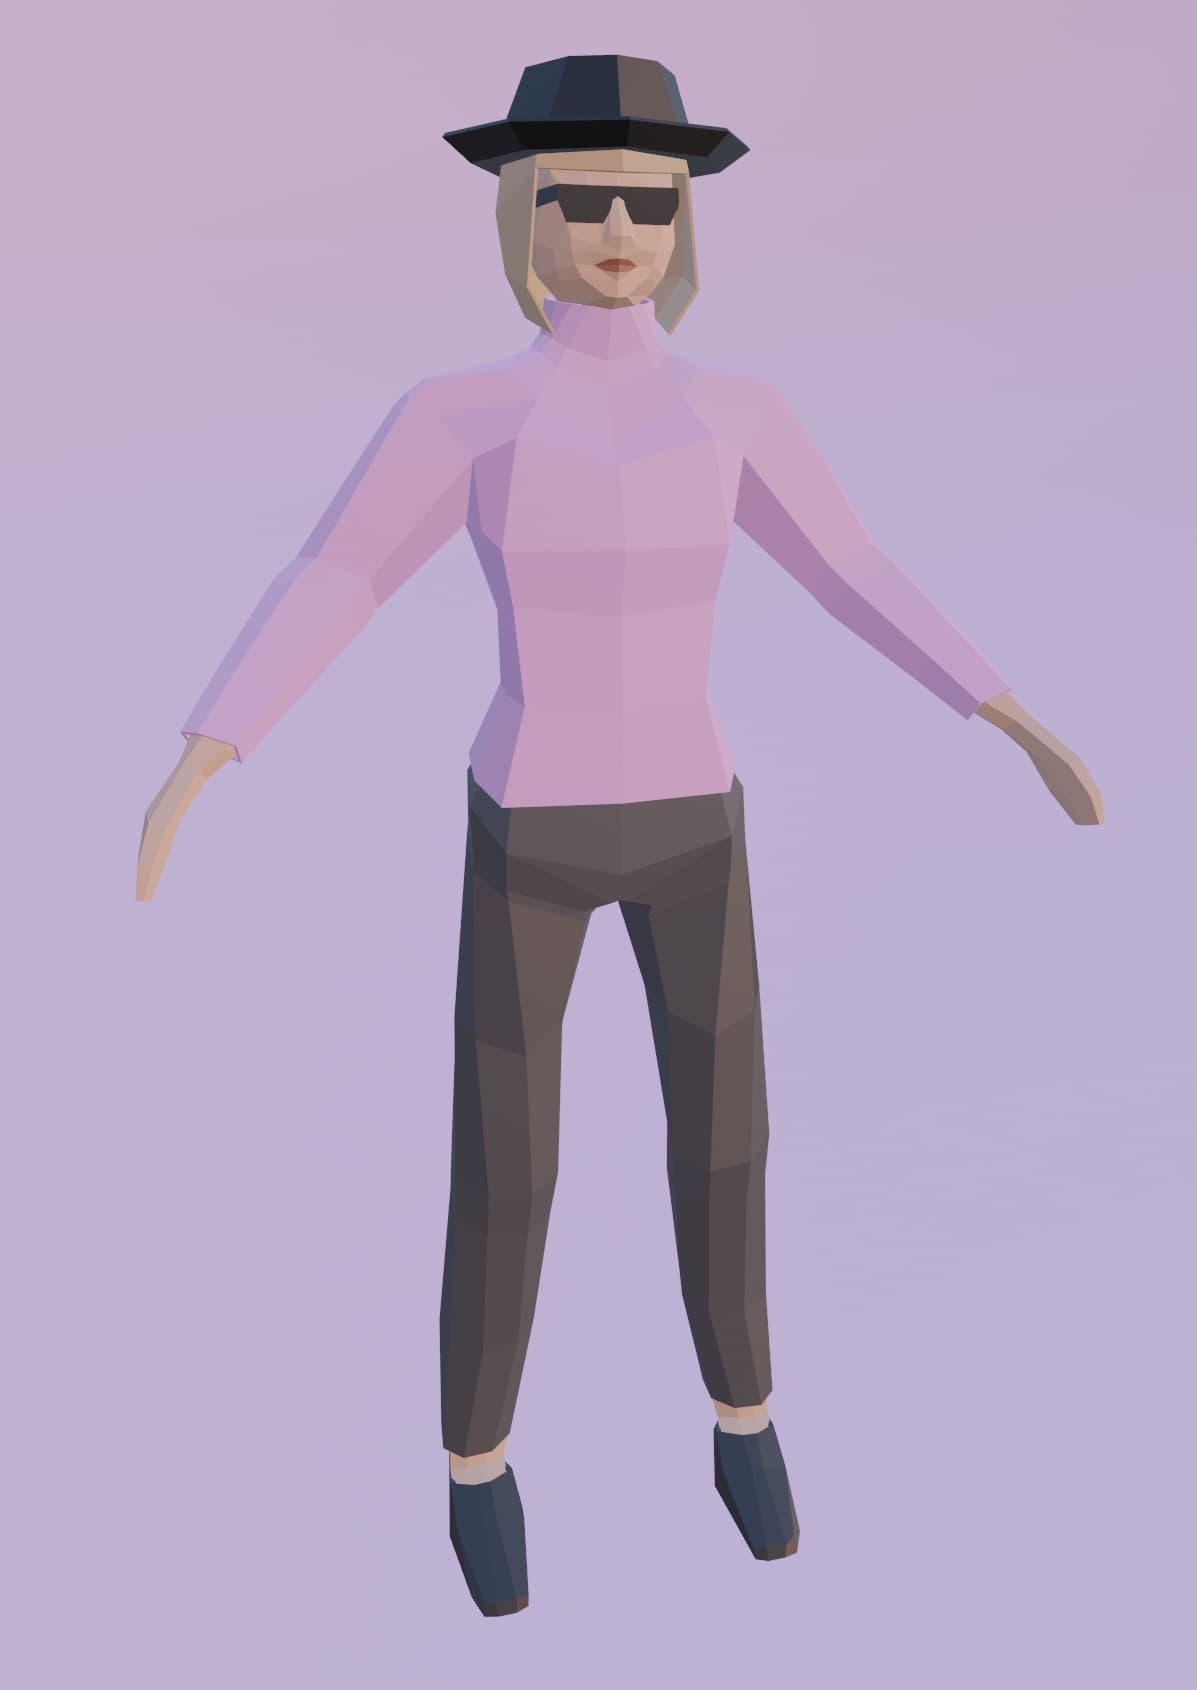
Anyway, while you can see them all on OpenGameArt, here are a few of the character designs that I was able to put together using the Proxy set. There are more where these came from, and many more combinations you can come up with yourself!
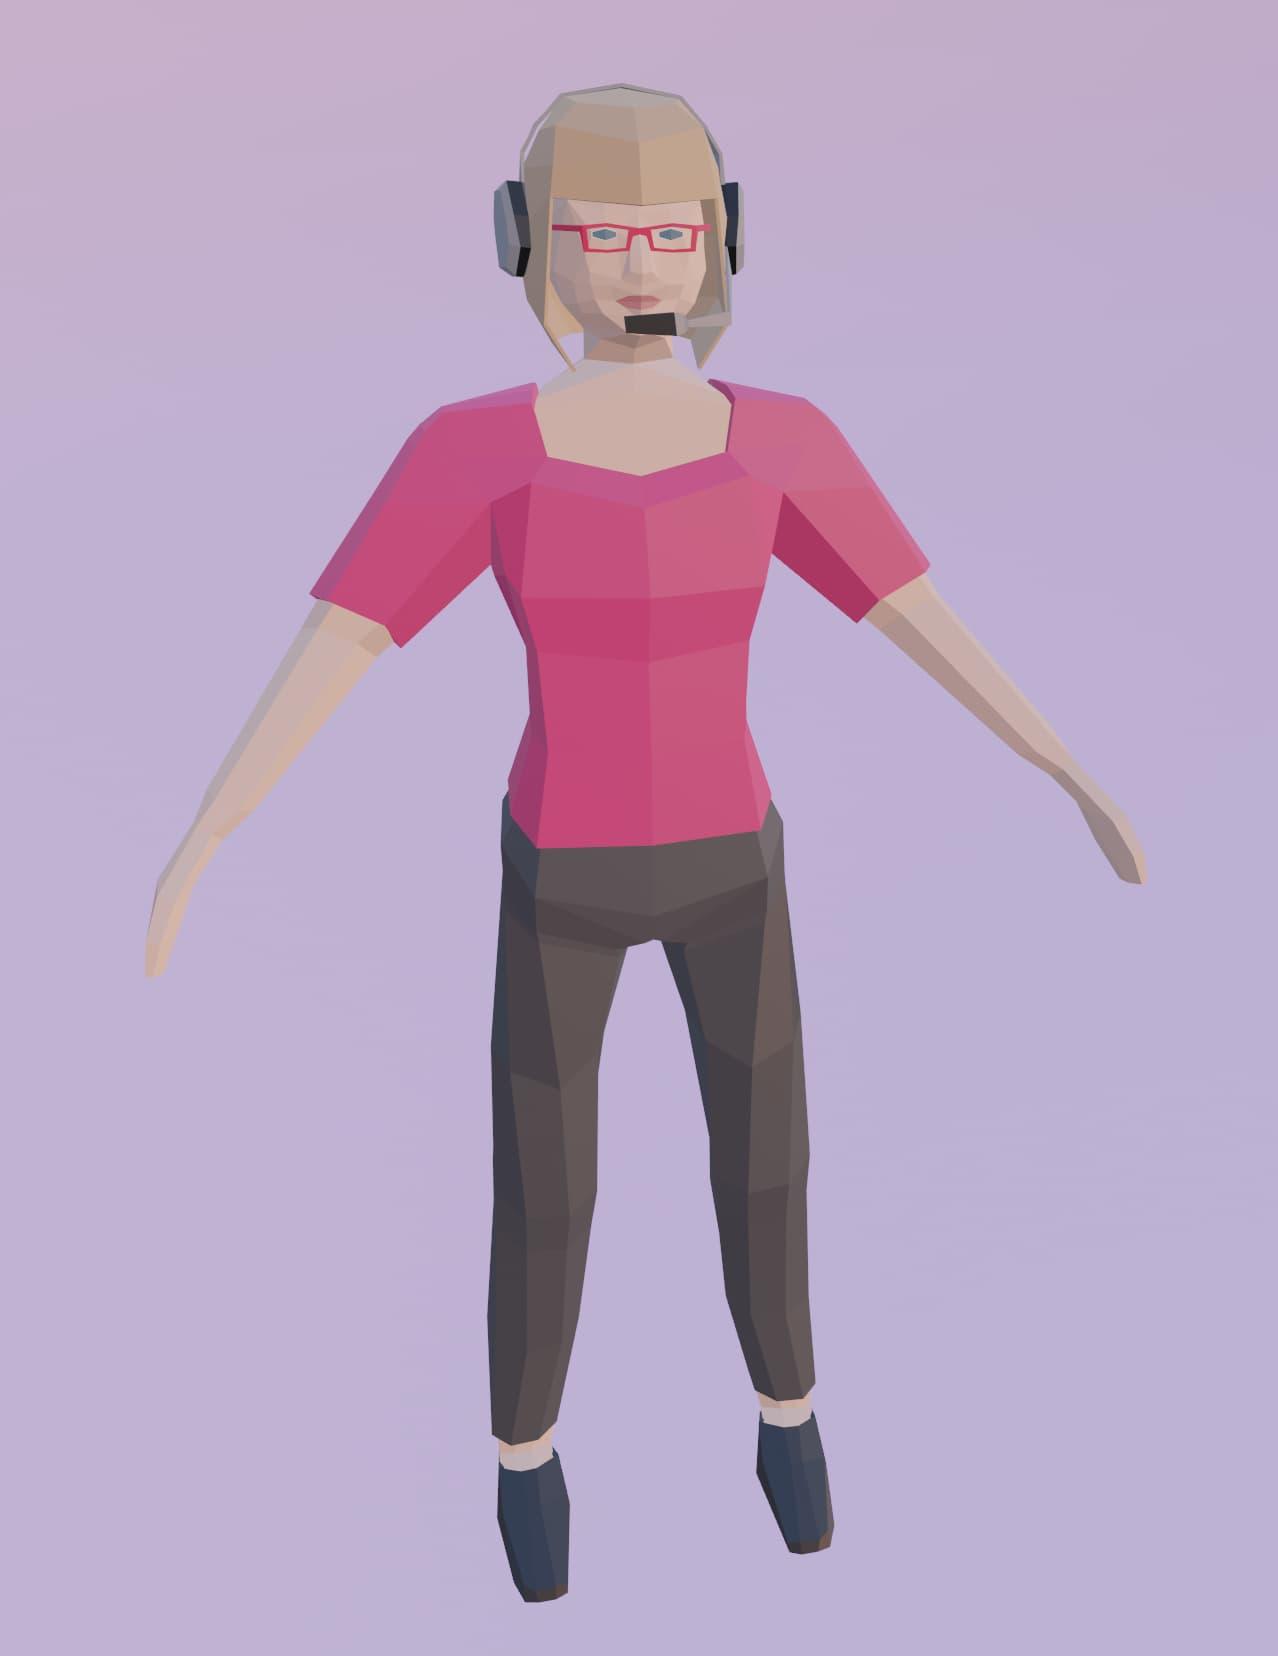
The OG - Air Traffic Controller Proxy
Now while I’m really proud of the Proxy set, and all the different characters you can design with it, I wanted to take it a step further.
No, but literally. I want characters created with OverScore Proxy to be able to take steps. As in letting them walk. As in animating them!
…OK, maybe that segue wasn’t as smooth as it felt in my head. But I think the next logical step is rigging, which will lead right into animation.
But first, an overview of the process.
Basically, when you create a 3D model, you’re defining a number of points in 3D space, and how they ought to be connected to one another. In Blender, you work with vertices, individual points in space. And two vertices connect together to form edges. When edges connect together, you can choose to have them filled in as faces.
Now, the modelling process is concerned with coming up with the initial geometry. The vertices, edges, and faces. But after a character is modelled, how can you get it to be animated?
The full answer is honestly really complicated, and would require a discussion involving math, history, computer science, art, anatomy, game development, and physics. At least. Seriously, it’s a dense topic. If you’re interested in such things, I’d highly recommend doing some research into the process, both as it stands today and how it developed.
But because I’m no expert in any of those fields, and because I’m just too practical, let me present two basic ways to animate a 3D character.
Movement of individual parts
Deformation-based animation
The first method involves separating a 3D model into its component parts, and moving each of them independently. In game development, that’s often referred to as “PS1”, “Residential Evil” or “Metal Gear Solid” character animation. It can be a very interesting style if done right, and there are many great tutorials on YouTube and elsewhere for creating such characters.
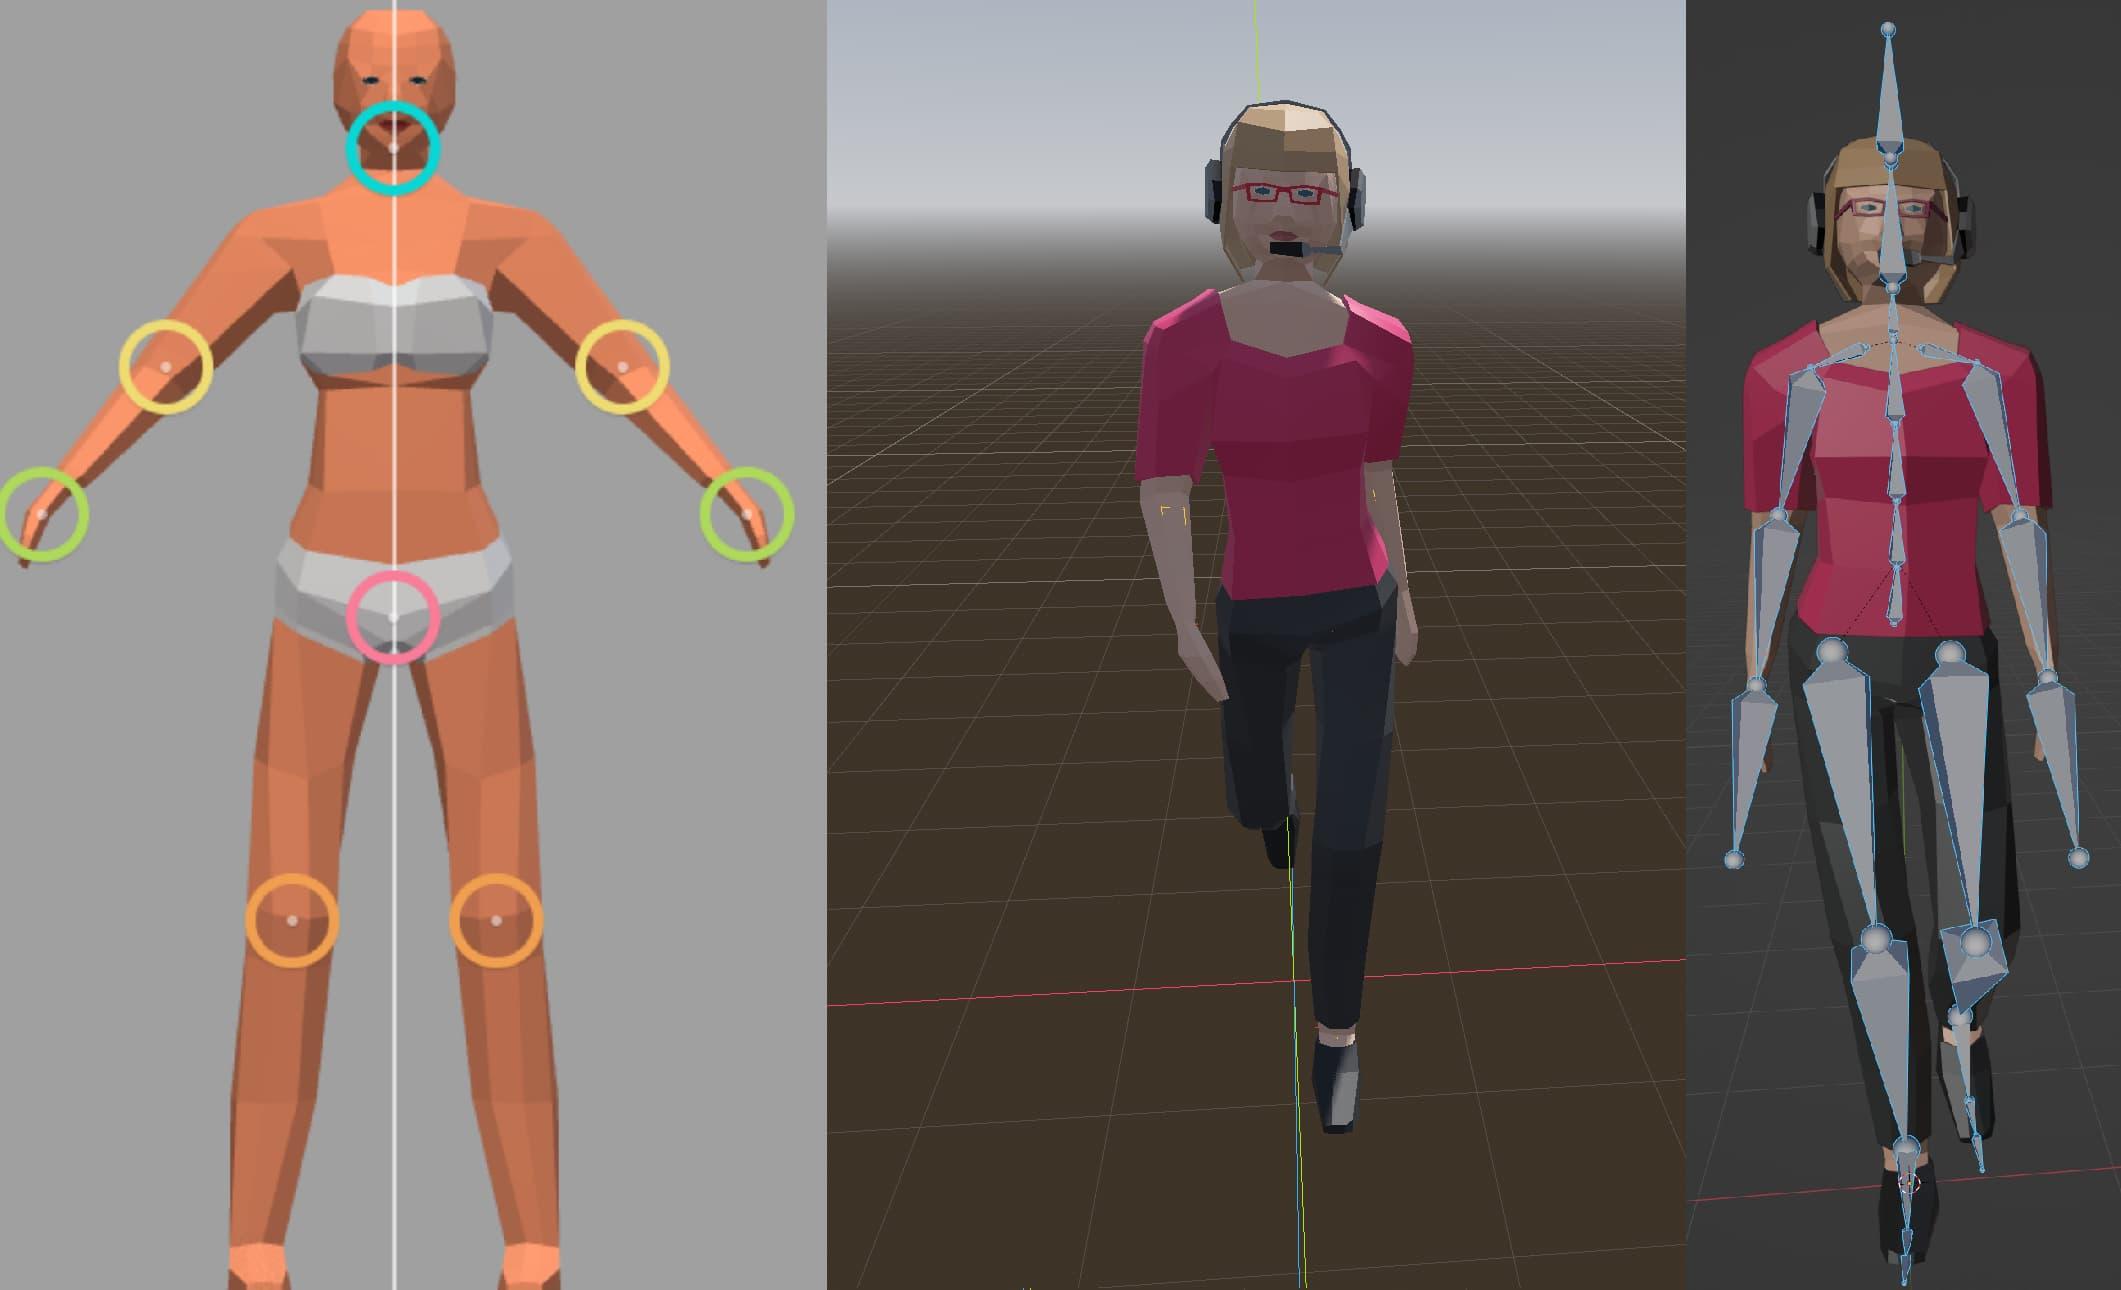
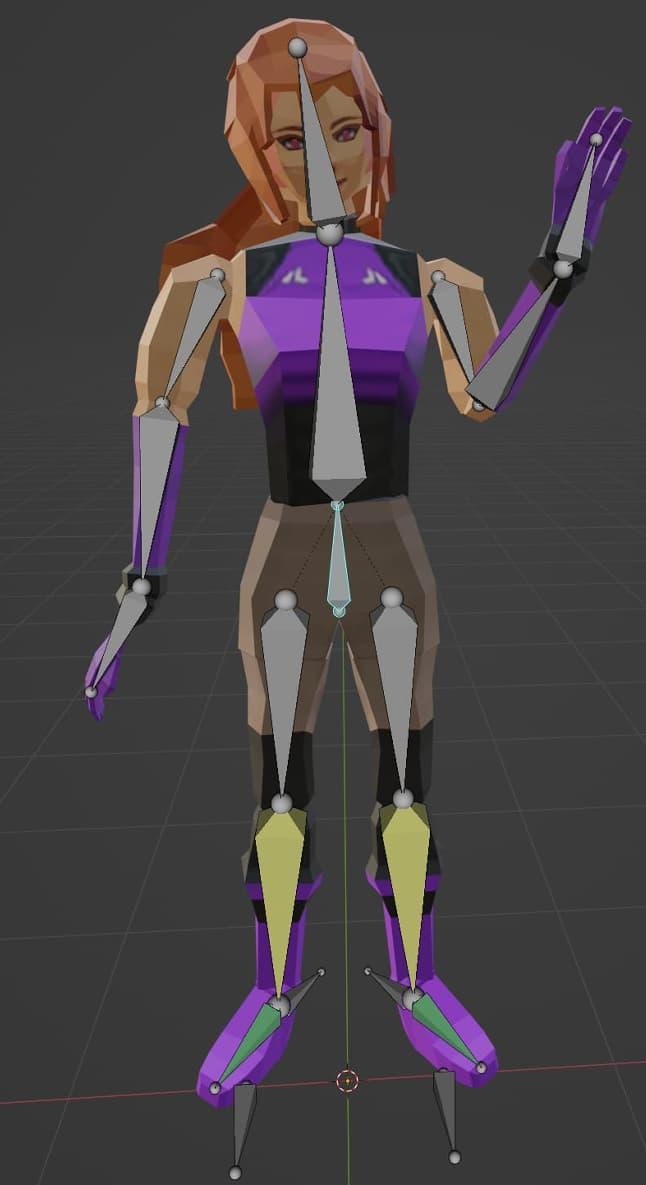
I’ve dabbled in the process myself, through the creation of Magenta, a character for a game I keep telling myself I’ll make someday. Observe:
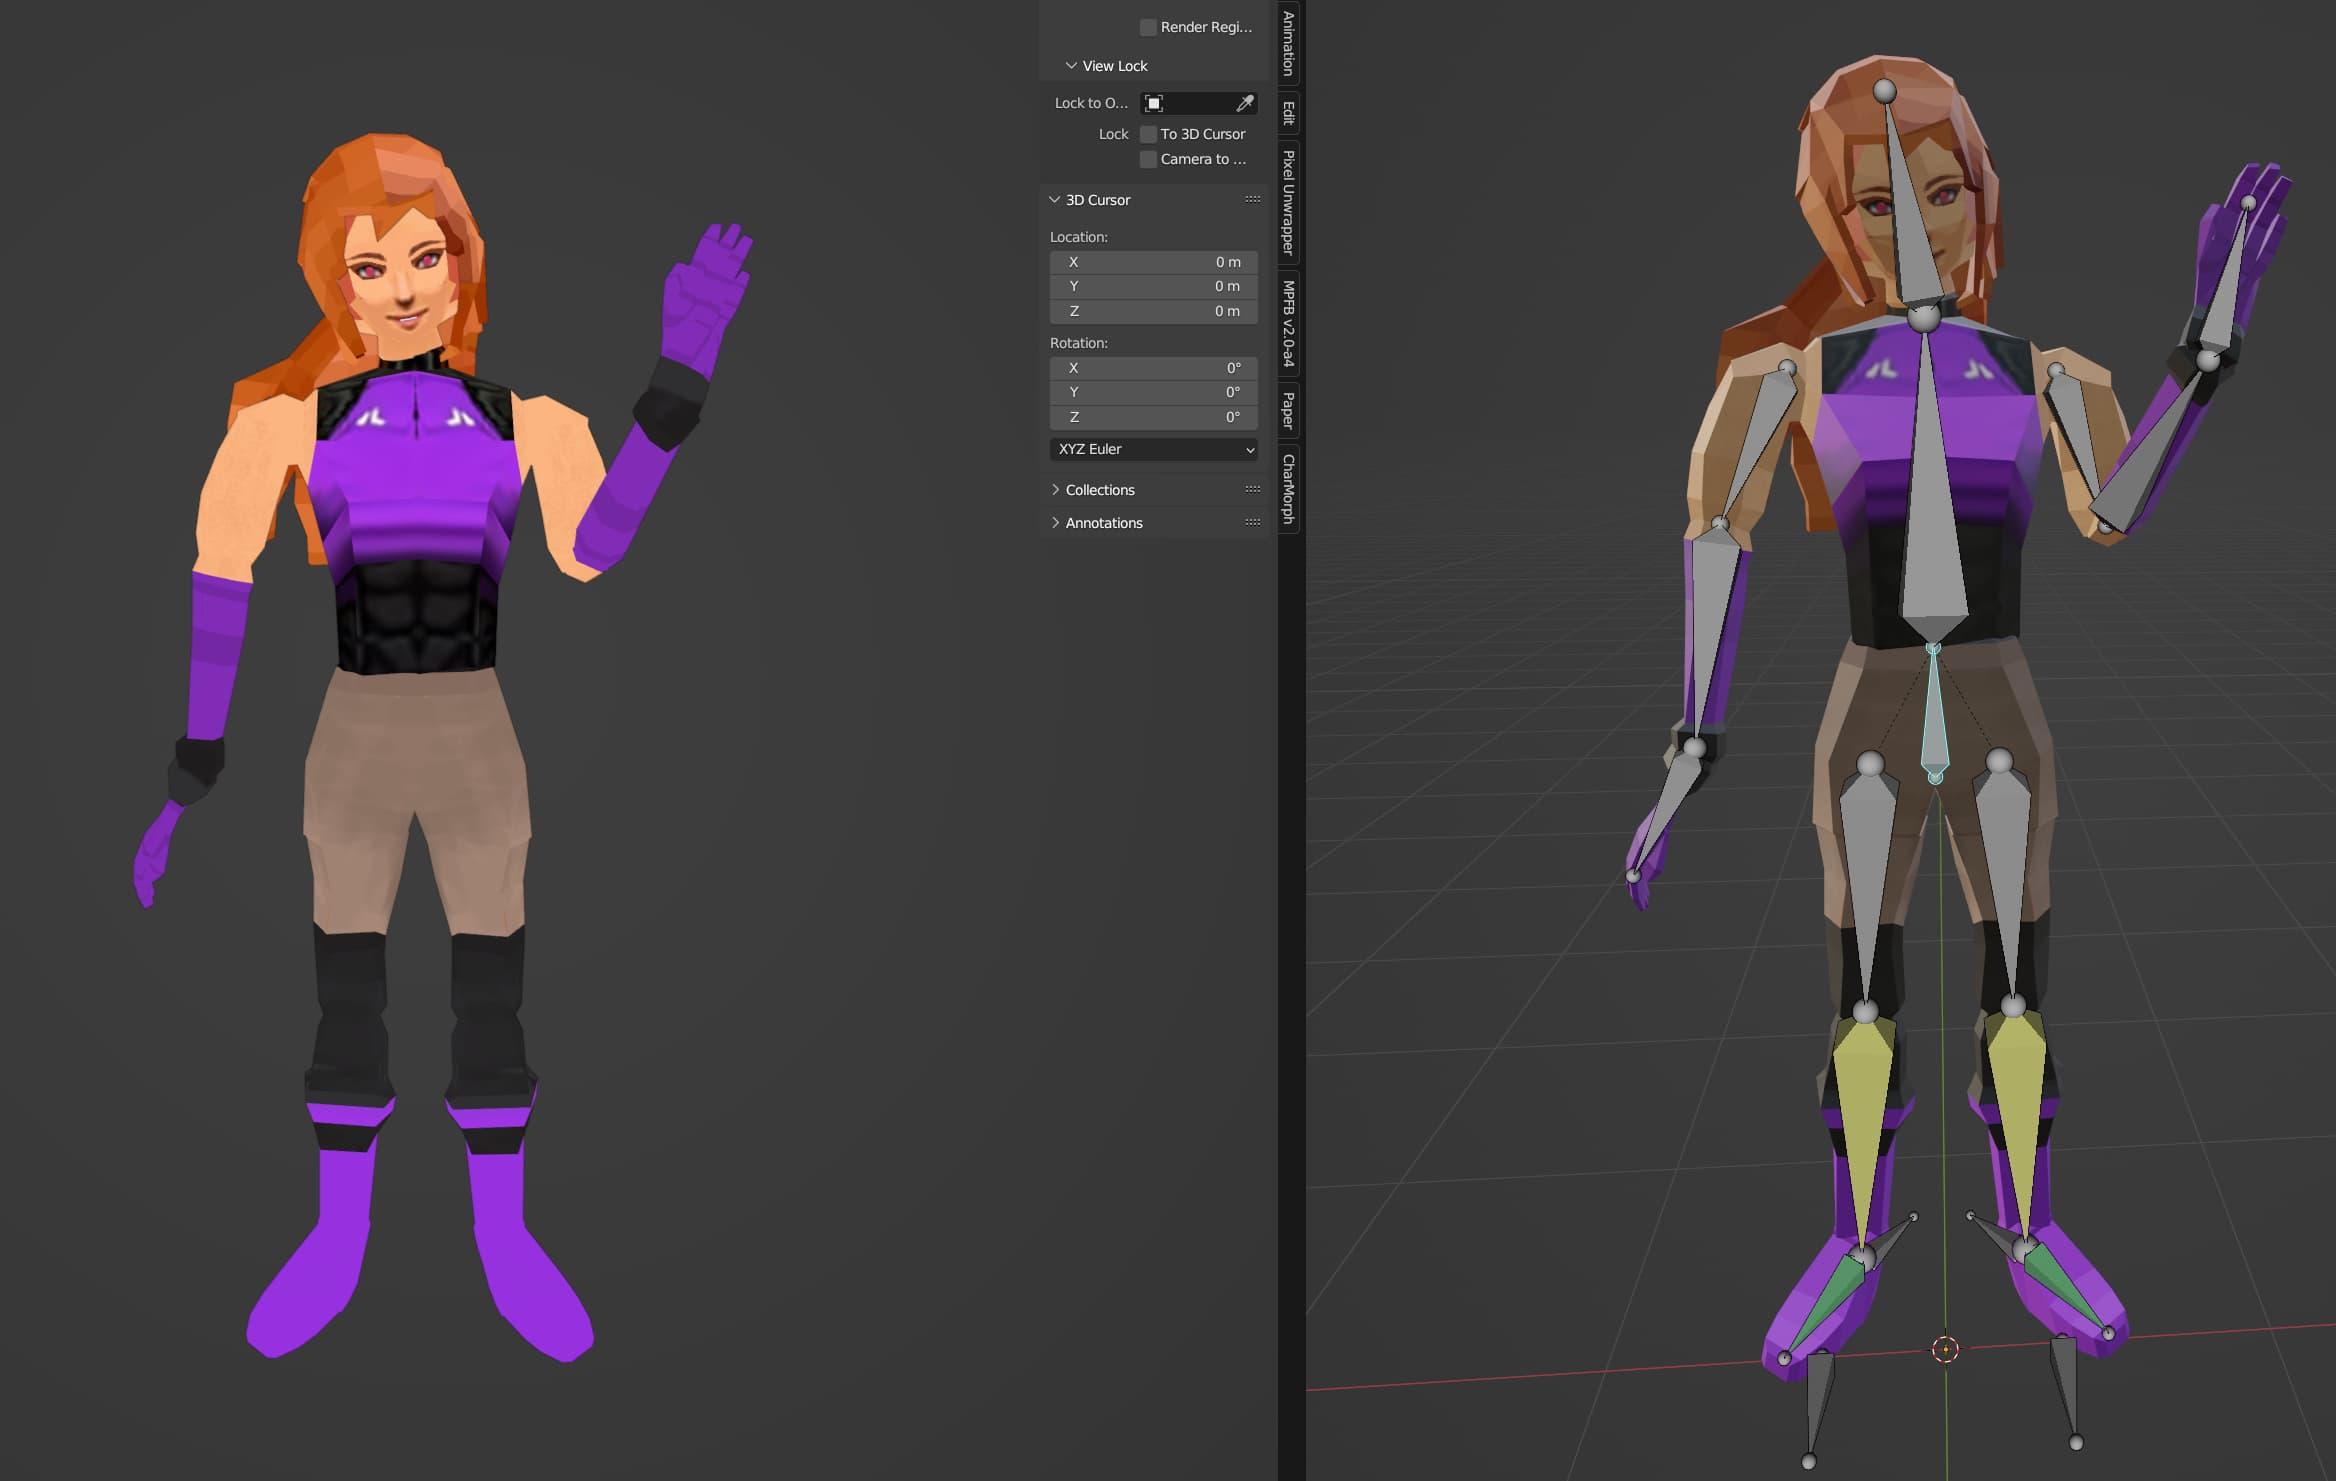

Notice the skeleton on the right, and how each main body part has one bone associated with it
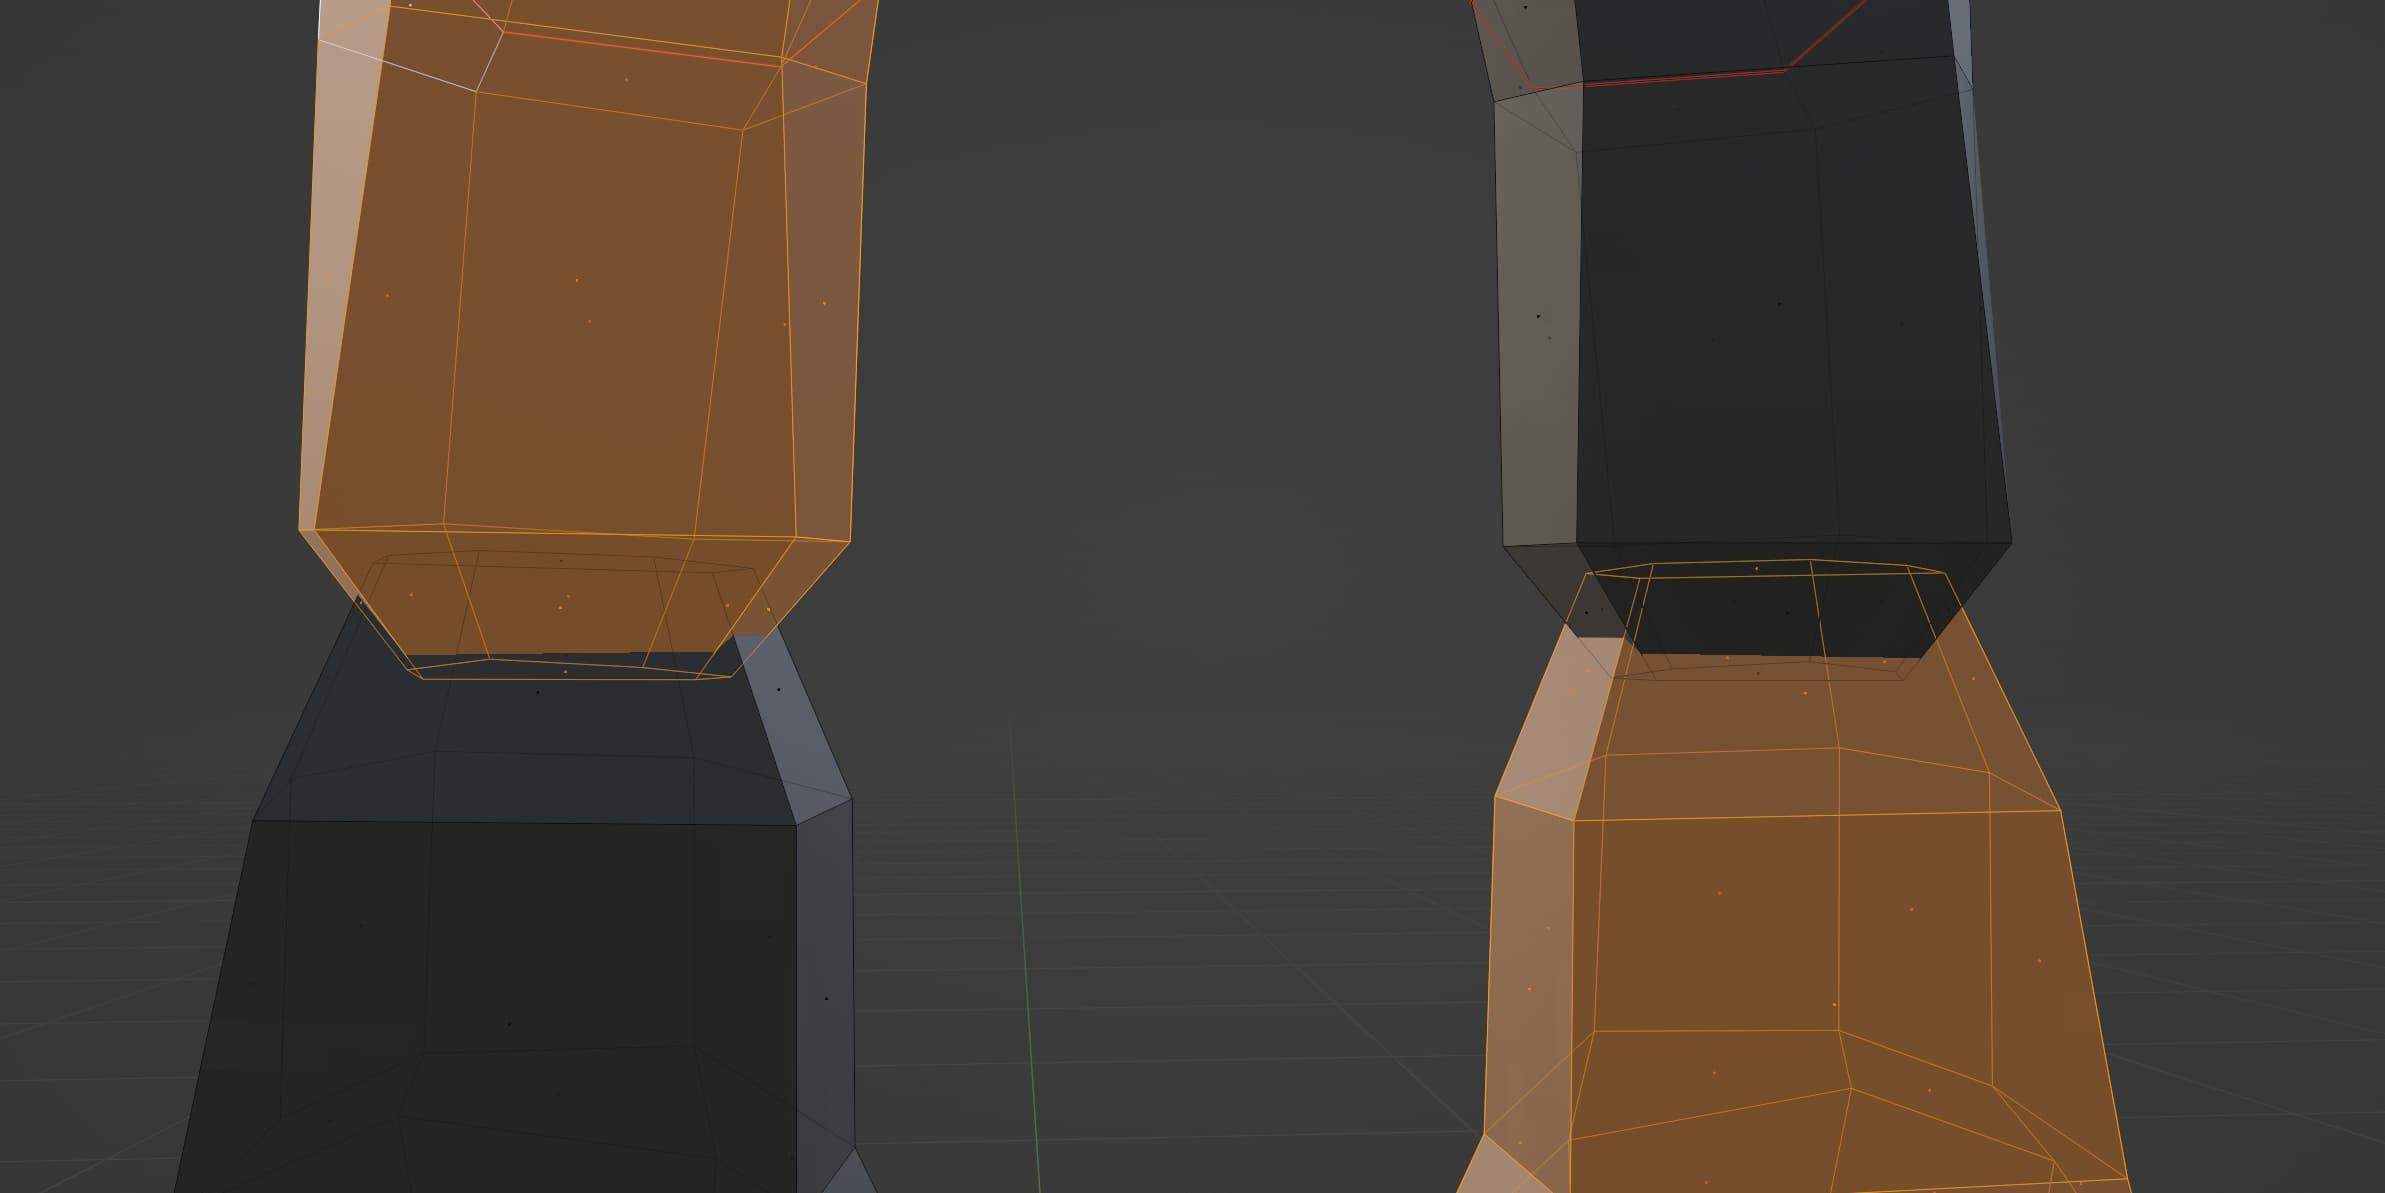
Hopefully that was a good enough illustration to prove my point. Basically, this style of character animation relies on each movable body part having separate geometry that overlaps a bit with the part connected to it.
This type of character animation then requires that the character be designed with it in mind. So you might have noticed how anywhere two body parts connect, each part is tapered down so it fits within the other one. And generally, both sides of the “joint” have the same colour or material. Take Magenta’s shoulders for instance (which admittedly could use a bit of work, but you get the point). When designing this character, I had to be deliberate about where the joints were going to be placed, and how overlapping geometry could be used to hide the “seam”. It’s definitely an art, and I’m not the greatest character designer to begin with, let alone an expert PS1-style modeller. But I’m pretty satisfied with this result, and I hope to use this technique in future projects.
Back in the early days of 3D games, this was a very clever trick to bypass technical limitations. Nowadays it’s considered a stylistic choice, which is ironic in its own way. Not unlike how the pixel art aesthetic made a resurgence. Though I would argue this “Resident Evil style animation” is far less overdone, compared to pixel art. And in my opinion, it’s easier to do right. It seems really limiting at first glance, since nothing actually bends and it’s just rigid parts rotating around each other.
But believe it or not, you can actually achieve some pretty wild poses. Even without completely breaking the illusion that it’s a complete character, and not a bunch of loosely-connected body parts. Again, observe:
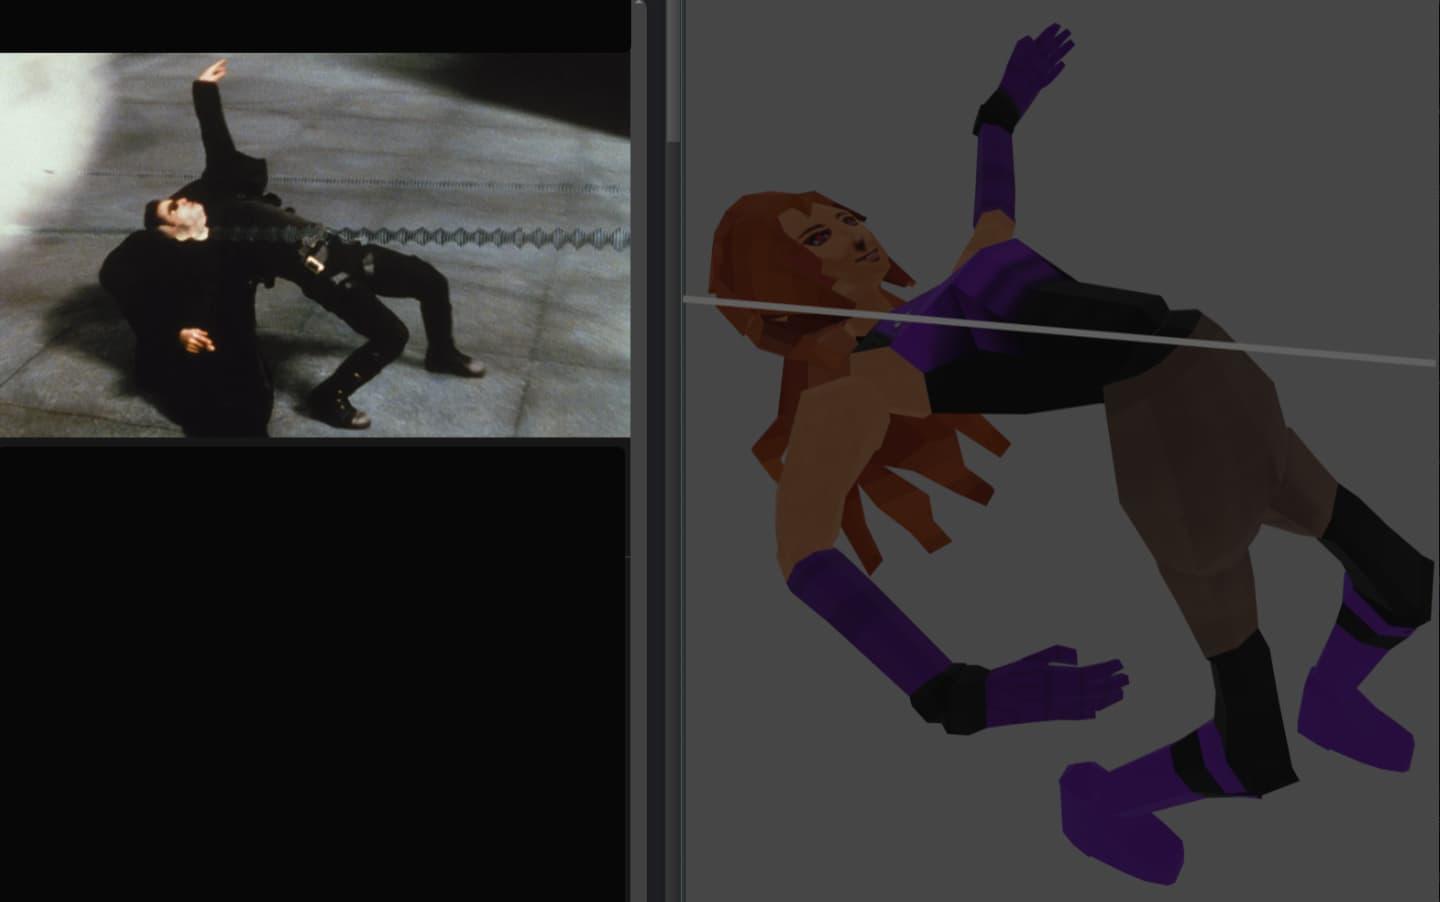
Magenta in the Matrix
So yeah, that’s one way to do it. It’s honestly pretty fun once you get the gist of it. I definitely want to dedicate a future blog post to this method of character animation, especially giving a practical example in Blender. But for the time being, let’s move past it to get down to the point of this blog post. The other type of character animation I mentioned.
As opposed to this “Resident Evil rigging”, deformation-based character animation relies on a technique known as mesh deformation. I’m not even going to try to explain it in detail, but at its simplest, mesh deformation is the process of manipulating parts of a model’s geometry while keeping it connected with the rest of the model.
Mesh deformation can lead to some really lifelike animations if done right. Whereas the PS1 style is almost robotic, and hearkens back to an era of technical limitations (that’s not a jab at it, it can be really effective if done right) mesh deformation is a lot more like how actual living things move.
Take your elbow for instance. When you bend your arm, the bones themselves don’t bend or stretch (at least they most certainly shouldn’t). But your muscles, and your skin, and parts of your anatomy like joints, tendons, and ligaments do bend and stretch, at least to some extent. So it should come as no surprise that two big concepts in the world of mesh deformation are bones and skin. Skin is basically the part of a mesh that can stretch, and bones are the non-stretchy internal structure of a character. So it really boils down to this: move the bones to stretch the skin.
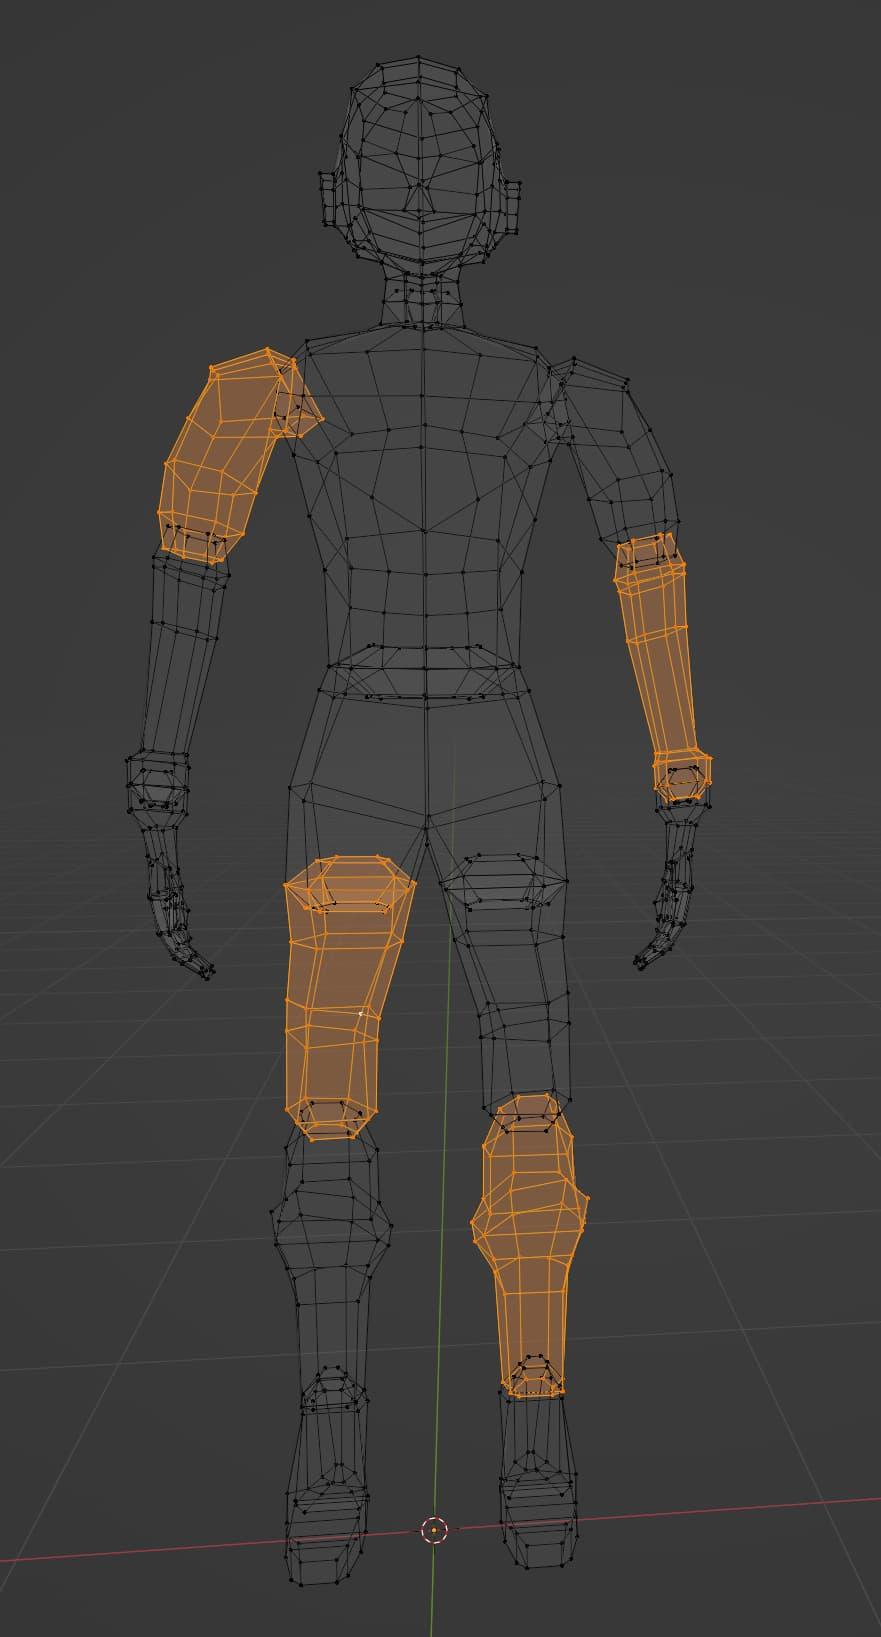
But I don’t want to get too ahead of myself hear, so let’s take a step back to look at my model of Magenta again, in closer detail:
Fun Fact: Inside every skeletally-rigged 3D model is a spooky scary skeleton!
It’s at this point I should attempt to clarify a few terms. There are better tutorials and explanations for this stuff out there, probably not hard to find. But I’ll try my best.
Mesh - a collection of connected points in 3D space; many 3D models are composed of meshes
Rigging - the process of turning a “static”, immovable 3D mesh into a model with parts that can be posed
Skeletal Rigging - a type of rigging that uses (generally) immovable parts called bones to animate a 3D model
Mesh Deformation - the process of “stretching” parts of a mesh to simulate force or movement of some kind; often used in conjunction with skeletal rigging
Armature - basically a synonym for a model’s full collection of bones
Sorry if that was a bit of an infodump. Feel free to ignore the parts that didn’t make sense to you right now, or do your own research to try to make sense of them further. But again, I’m a practical person, so let me show you how to make sense of these concepts by actually getting to create a skeletally-rigged 3D character that’s ready for animation via mesh deformation!
So step one in my process is to get a rigged model. Now, there are multiple ways of doing this. Either constructing the rig entirely by hand (which can be very accurate, but also very timeconsuming), using a tool like Blender’s Rigify add-on to help you generate a rig, or using an auto-rigging service like Mixamo.
For this blog post, I’m going to go with the third option. While I’m always hesitant to recommend proprietary cloud services (especially those owned by Adobe of all people) there is honestly no viable alternative (as far as I can tell) that comes even close to offering what Mixamo offers out of the box. And (at least for the time being) Mixamo is free to use.
Mixamo offers a number of features for 3D character animation. They have a library of free-to-use characters, a library of free animations, a free auto-rigging service, the ability to apply their library of animations to characters offered by Mixamo or custom uploaded characters, and free FBX character export.
Since I’m going to actually try to make this process repeatable and somewhat educational, go ahead and download the OverScore Proxy character creation kit from its OpenGameArt page. The link for which, may I remind you, is below:
https://opengameart.org/content/overscore-proxy-modular-low-poly-female-character-creation-set
Now, once you’ve downloaded the .blend file, go ahead an open up Blender. Again, if you don’t already have it installed, I’d recommend giving it a try. I’m currently using version 3.6.4, but anything close to that or a newer release should work more or less the same.
Open up Blender, and you should be treated with a screen similar to this one:

The start-up screen for Blender 3.6.4
From this screen, click somewhere in the Blender window itself, to close the welcome screen. Then click wihin the main editor pane, press A on your keyboard, and the default cube, camera, and light should be highlighted.
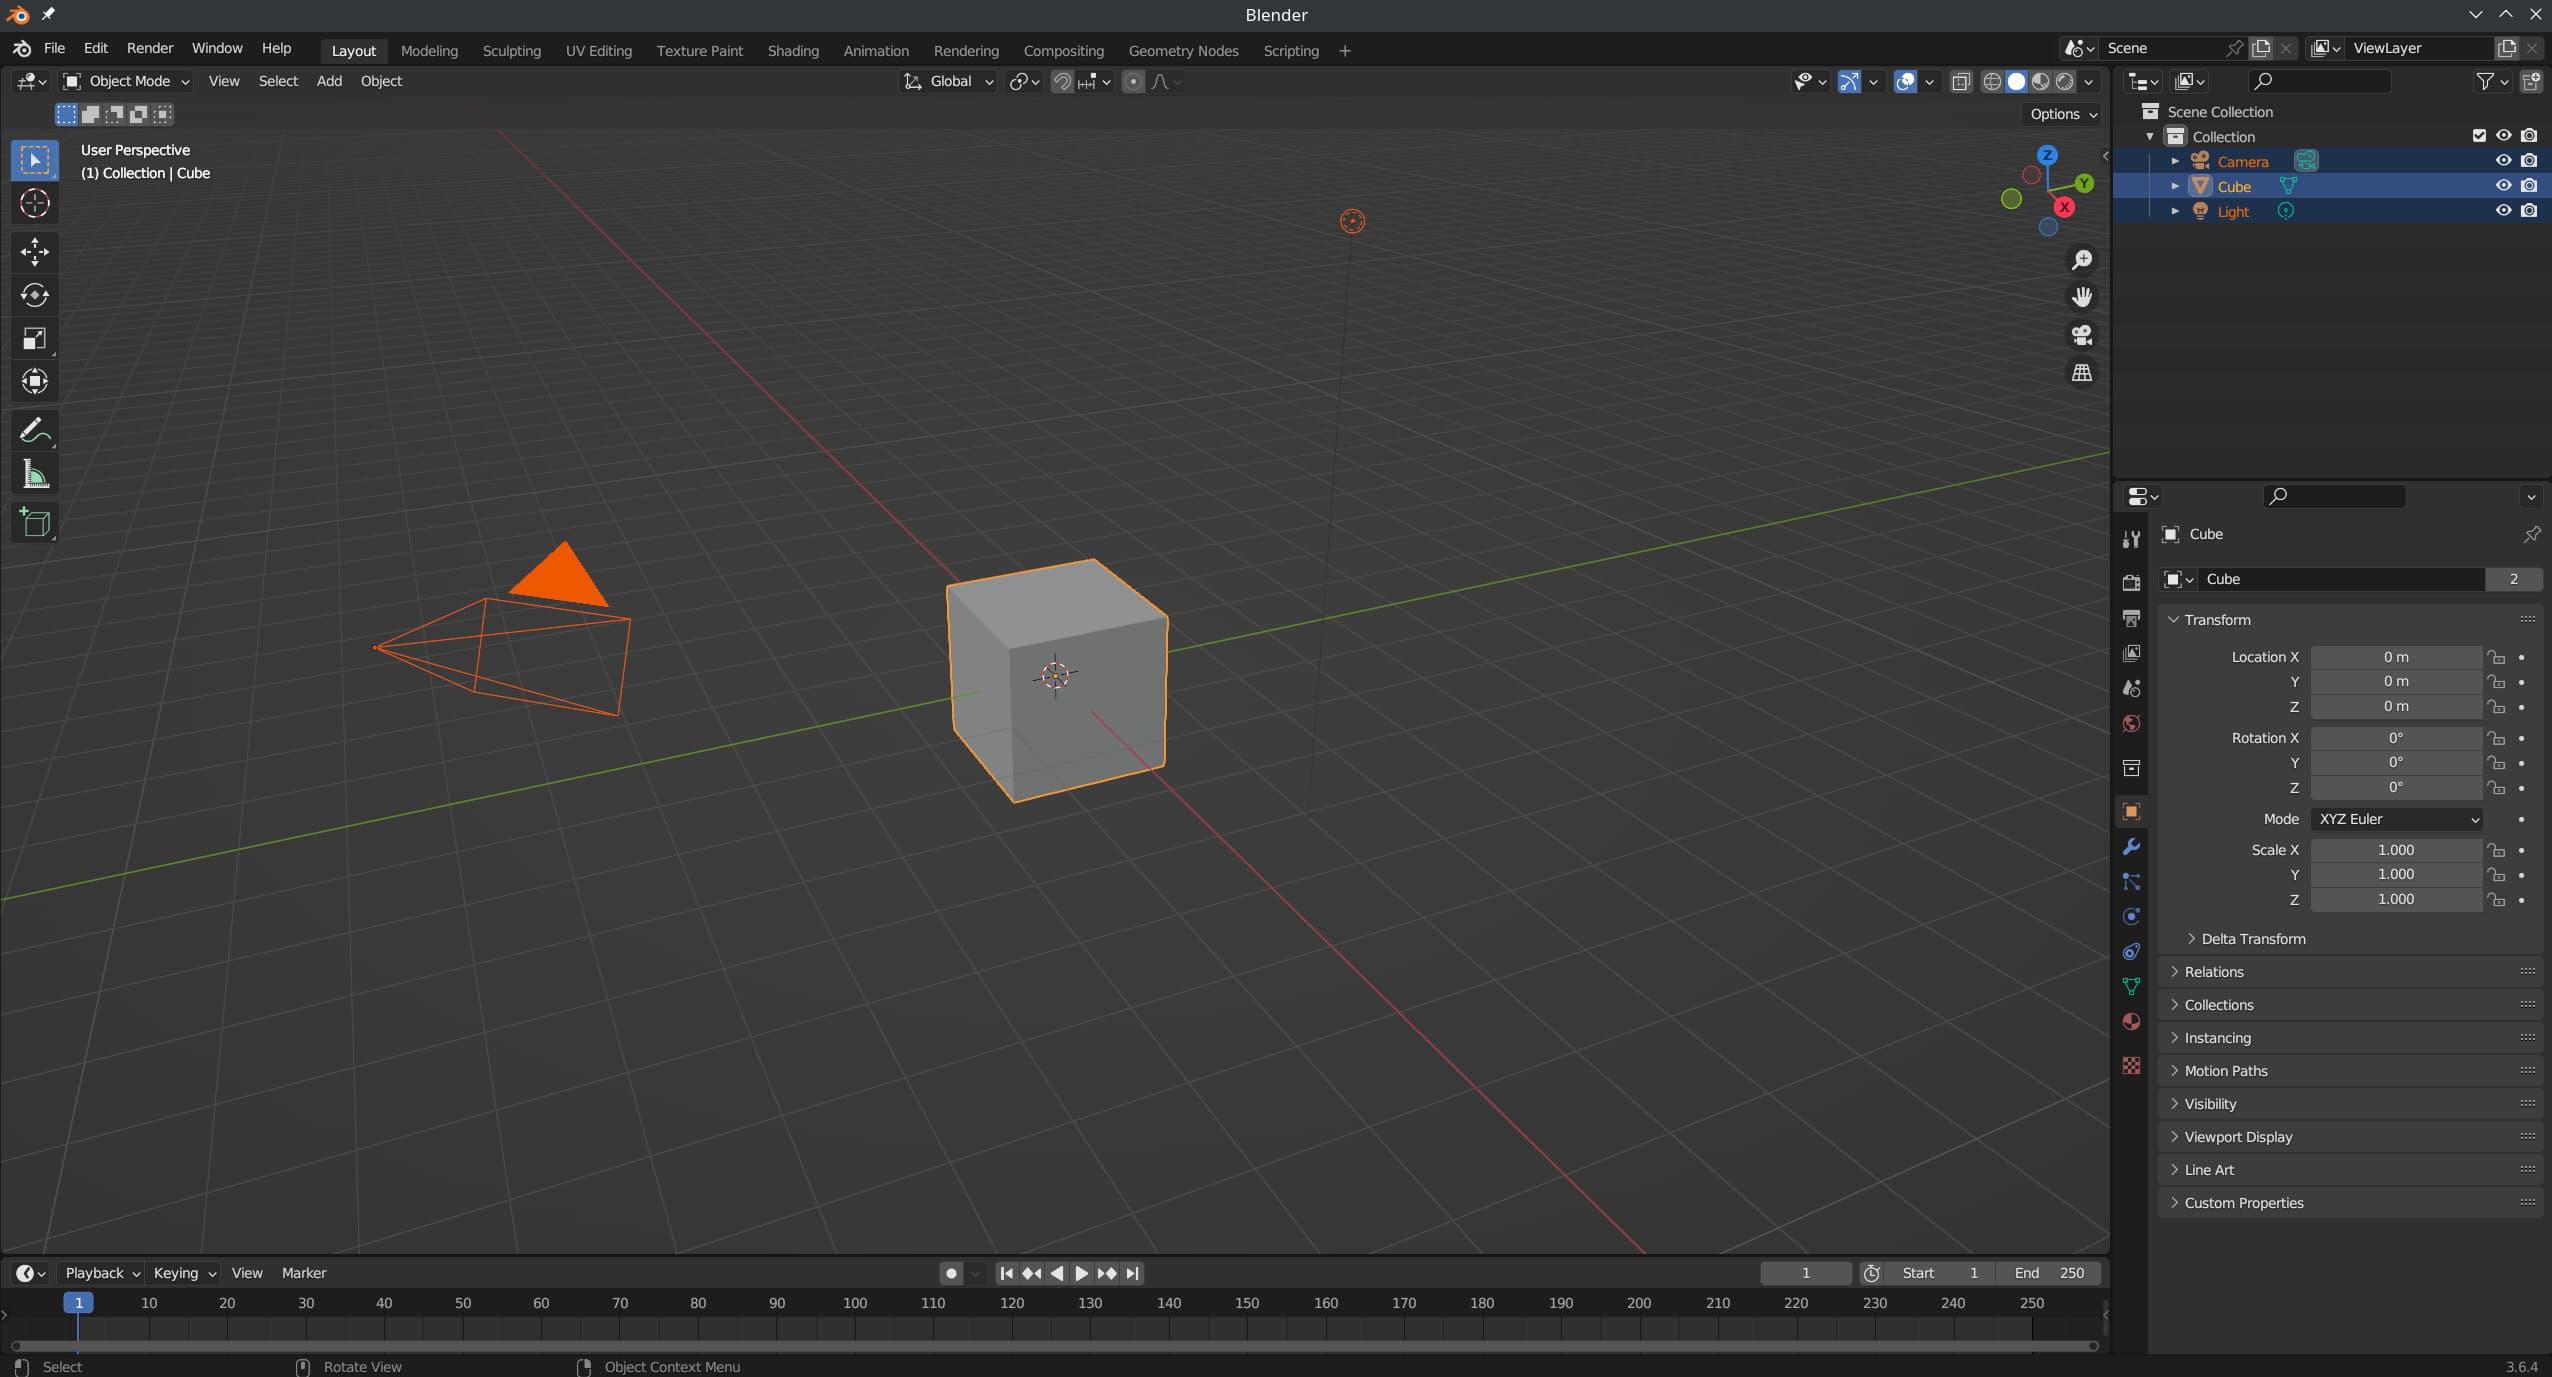
Note the orange highlights around the shapes in the editor pane
Press the DELETE key to remove these objects. Congratulations, if you’re new to Blender. You just completed the tried-and-true Blender ritual of deleting the default cube!
Anyway, there’s one more thing to delete. Click on the “Collection” in the top-right corner of the screen. Then press DELETE to get rid of it, too.
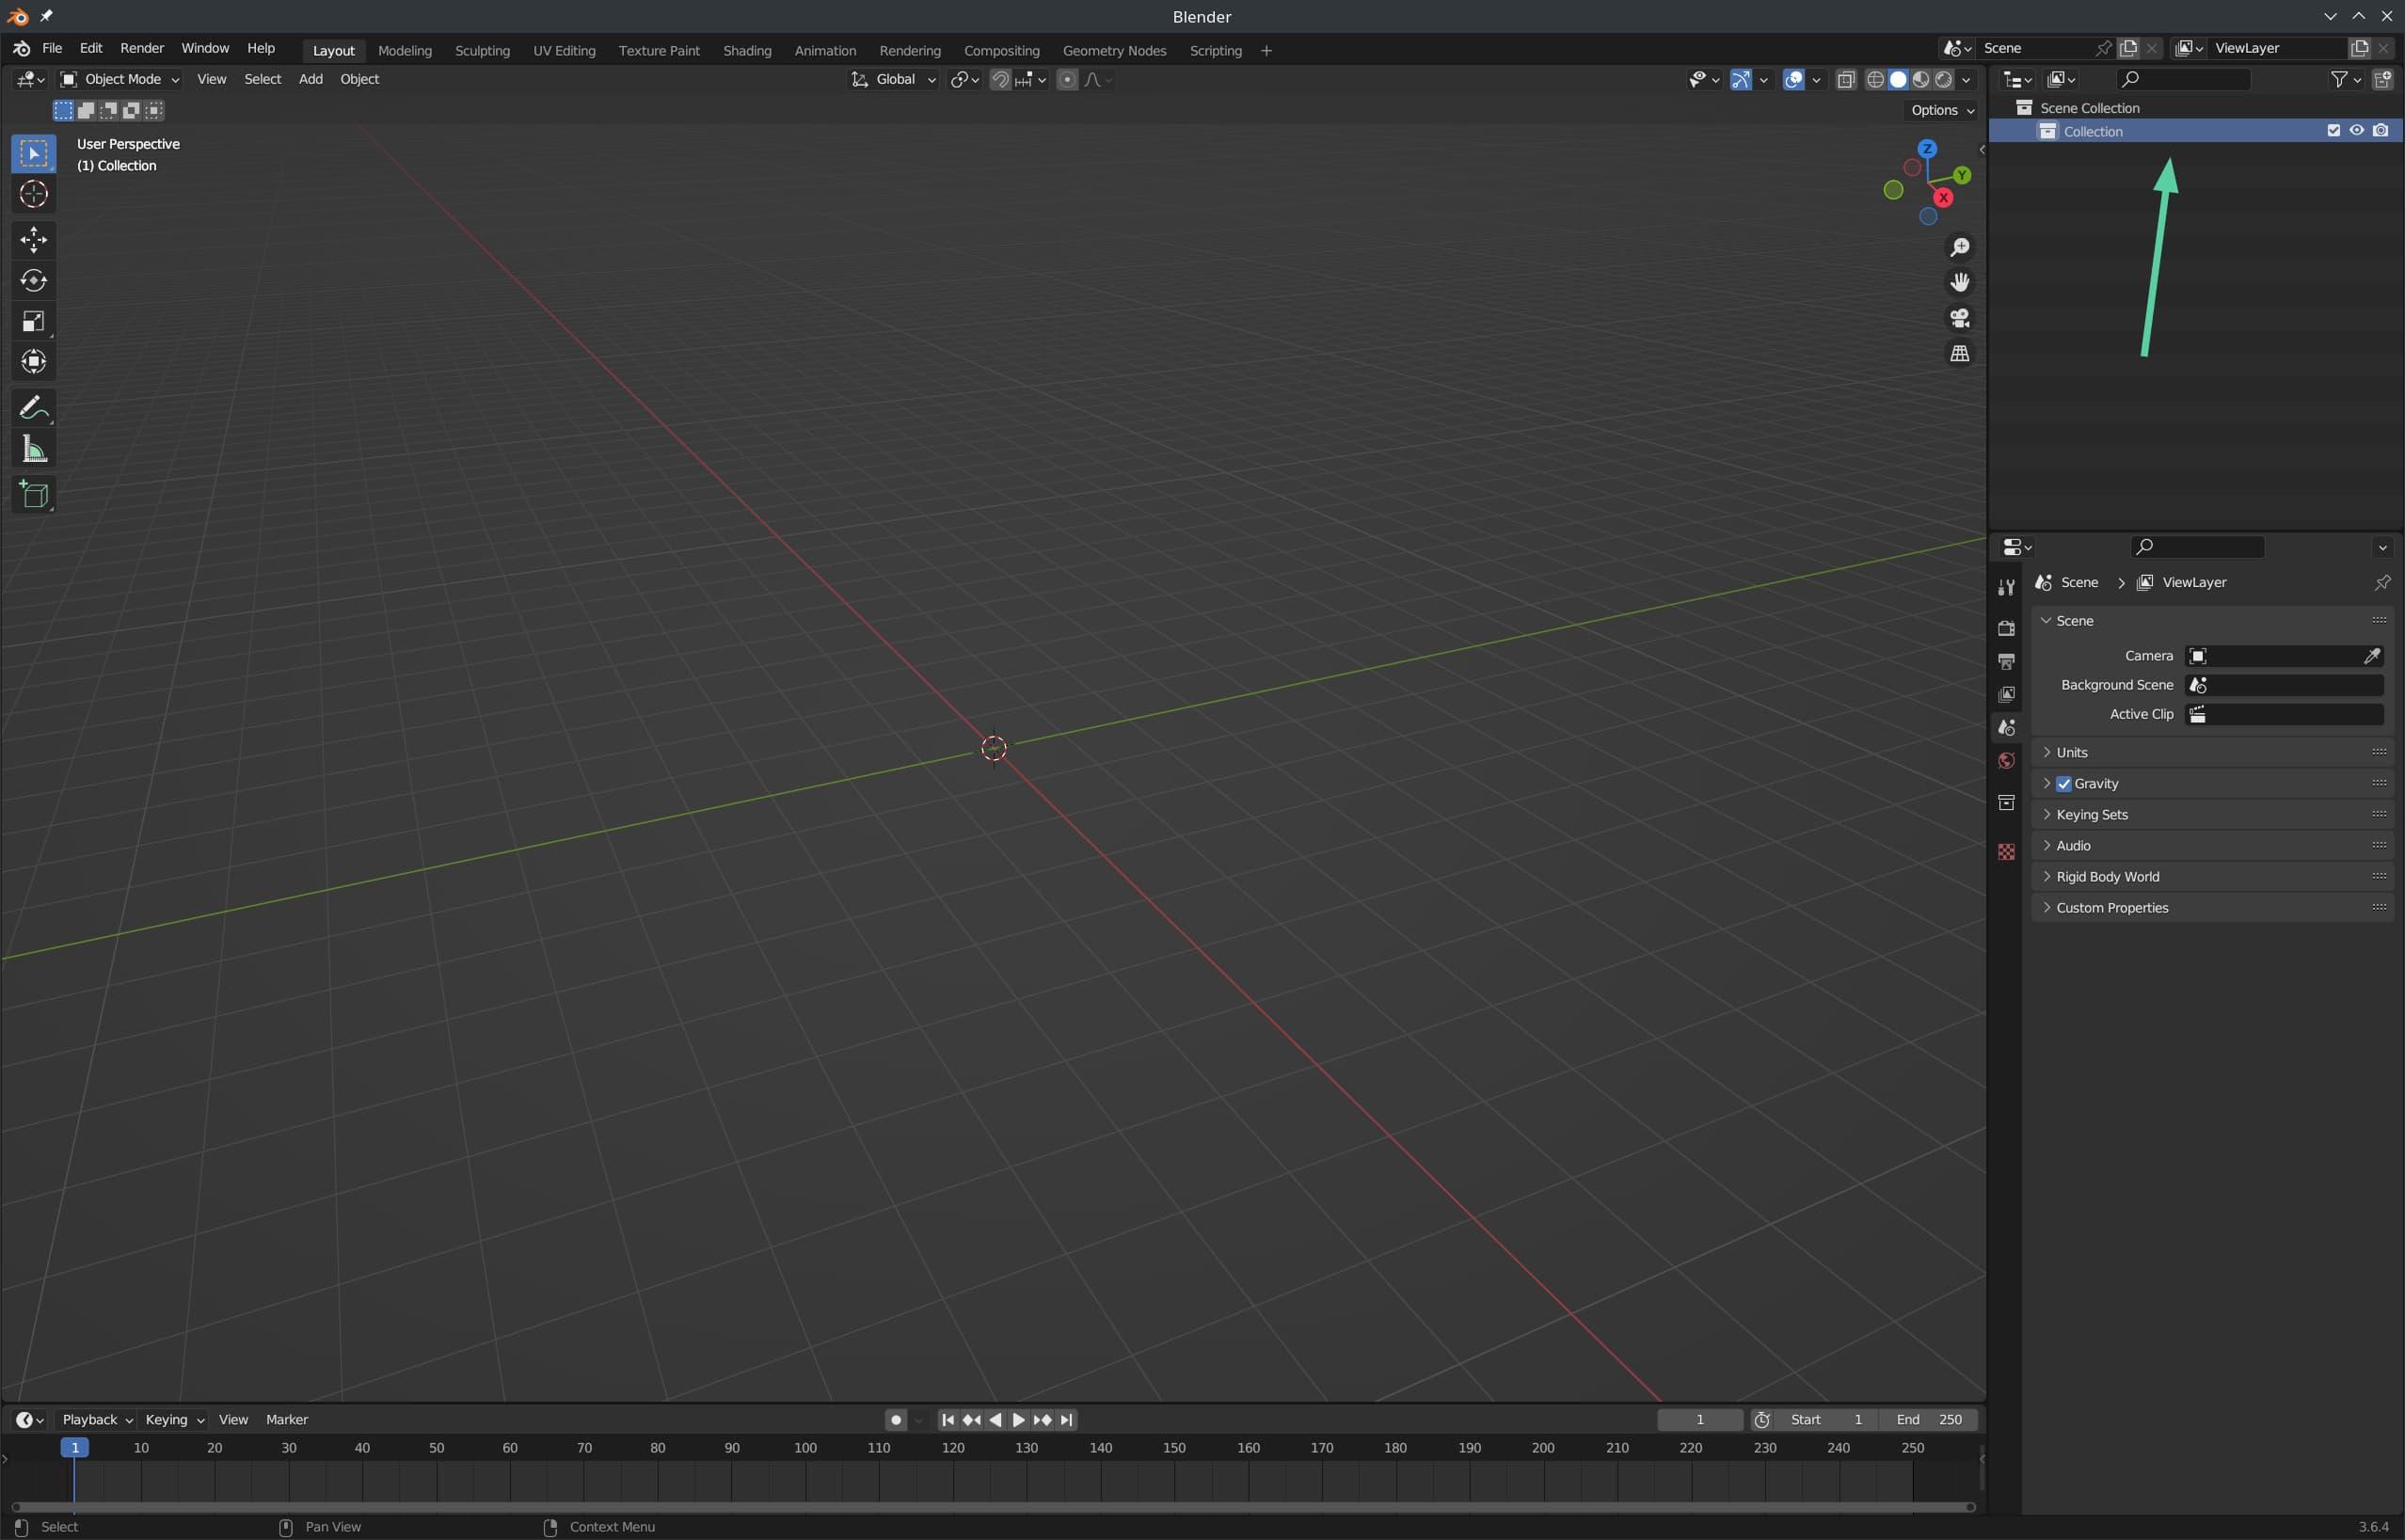
Click on the Collection in the top-right corner, and it will turn blue once it's selected. Then press DELETE on your keyboard
Now that the default stuff is out of the way, it’s time to add the Base Model from the OverScore Proxy set. Move your mouse to the top-left corner of the window this time, and click on “File”. From there, click on “Append…” in the context menu that opens downwards.
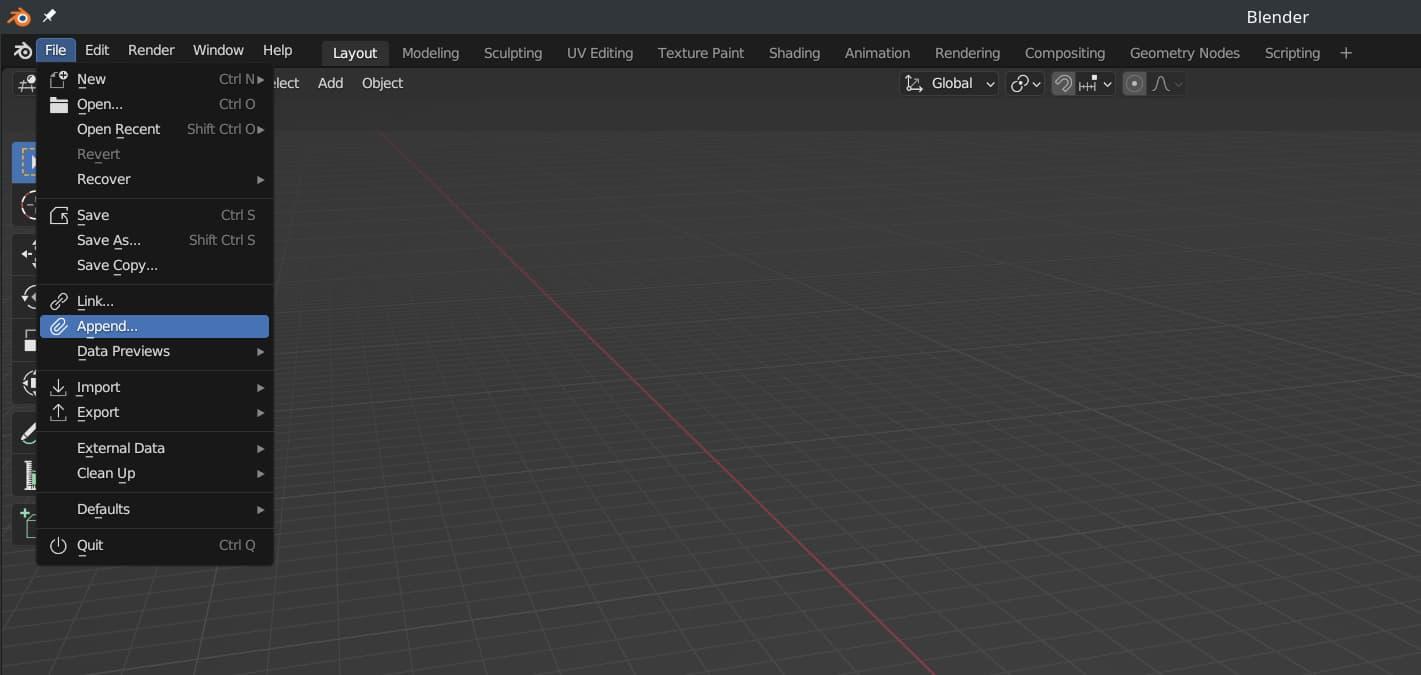
Click on "File", then "Append..."
After clicking on “Append…”, you’ll be presented with a filesystem dialog. Navigate to where you downloaded the OverScore Proxy .blend file, and double-click on it.
But once you double-click on the file, you’ll see what looks like a list of folders. This might seem strange, but you want to double-click on the “Object” folder.
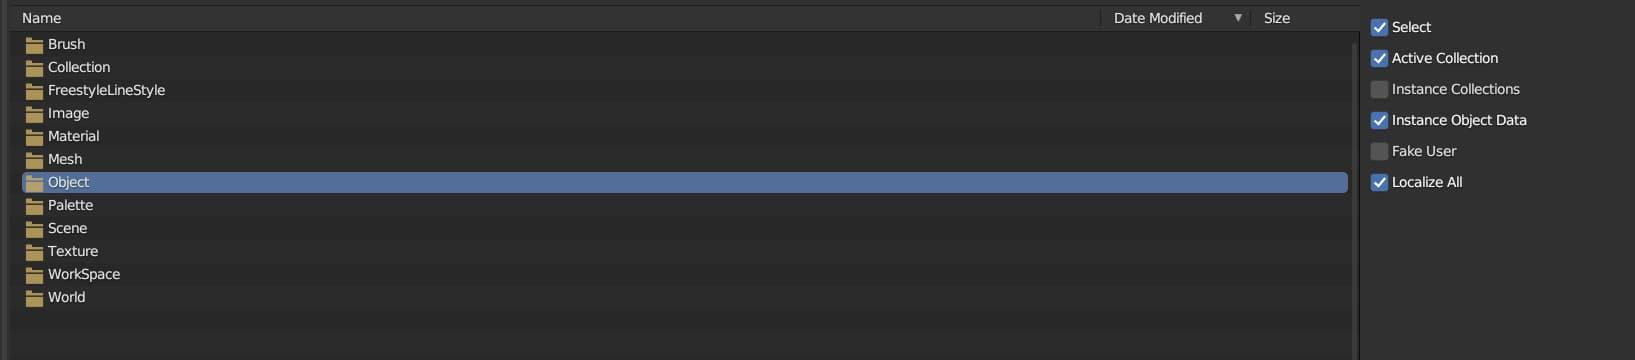
After double-clicking on the OverScore Proxy .blend file, double-click on the "Object" folder that comes up
You’ll then be presented with a big list of objects. You can use the searchbar in the top-right side of the window to look for a specific object. Double-click on “Base Model”.
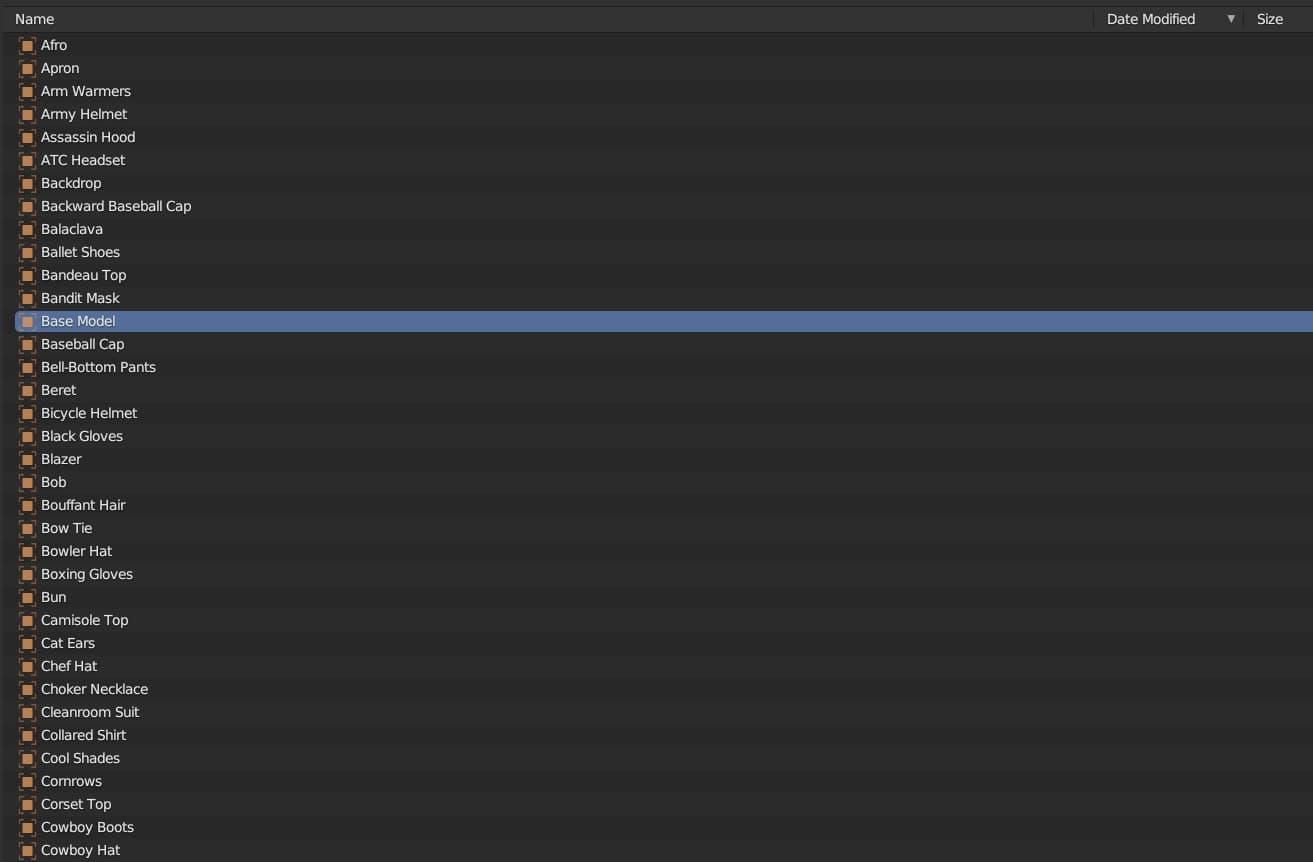
Double-click on the "Base Model" here
Great work! You’ve successfully imported the Base Model. Believe it or not, we’re already most of the way towards creating a rigged, animated 3D character.
Granted, it doesn’t look very impressive without clothing or hair. I could use the limited number of polygons as an excuse, but honestly I’m just not great at anatomy. On the plus side, at least the general proportions are pretty accurate, since I modelled them off a realistically-proportioned MakeHuman model.
Anyway, there will be time for clothing, hair, accessories, and customization later. For now, you’ll want to export the Base Model as an FBX file. Click on “File” in the top-left corner of the screen, then click on “Export” in the menu that pops up below it. Finally, click on “FBX (.fbx)” in the menu that pops out to the right.
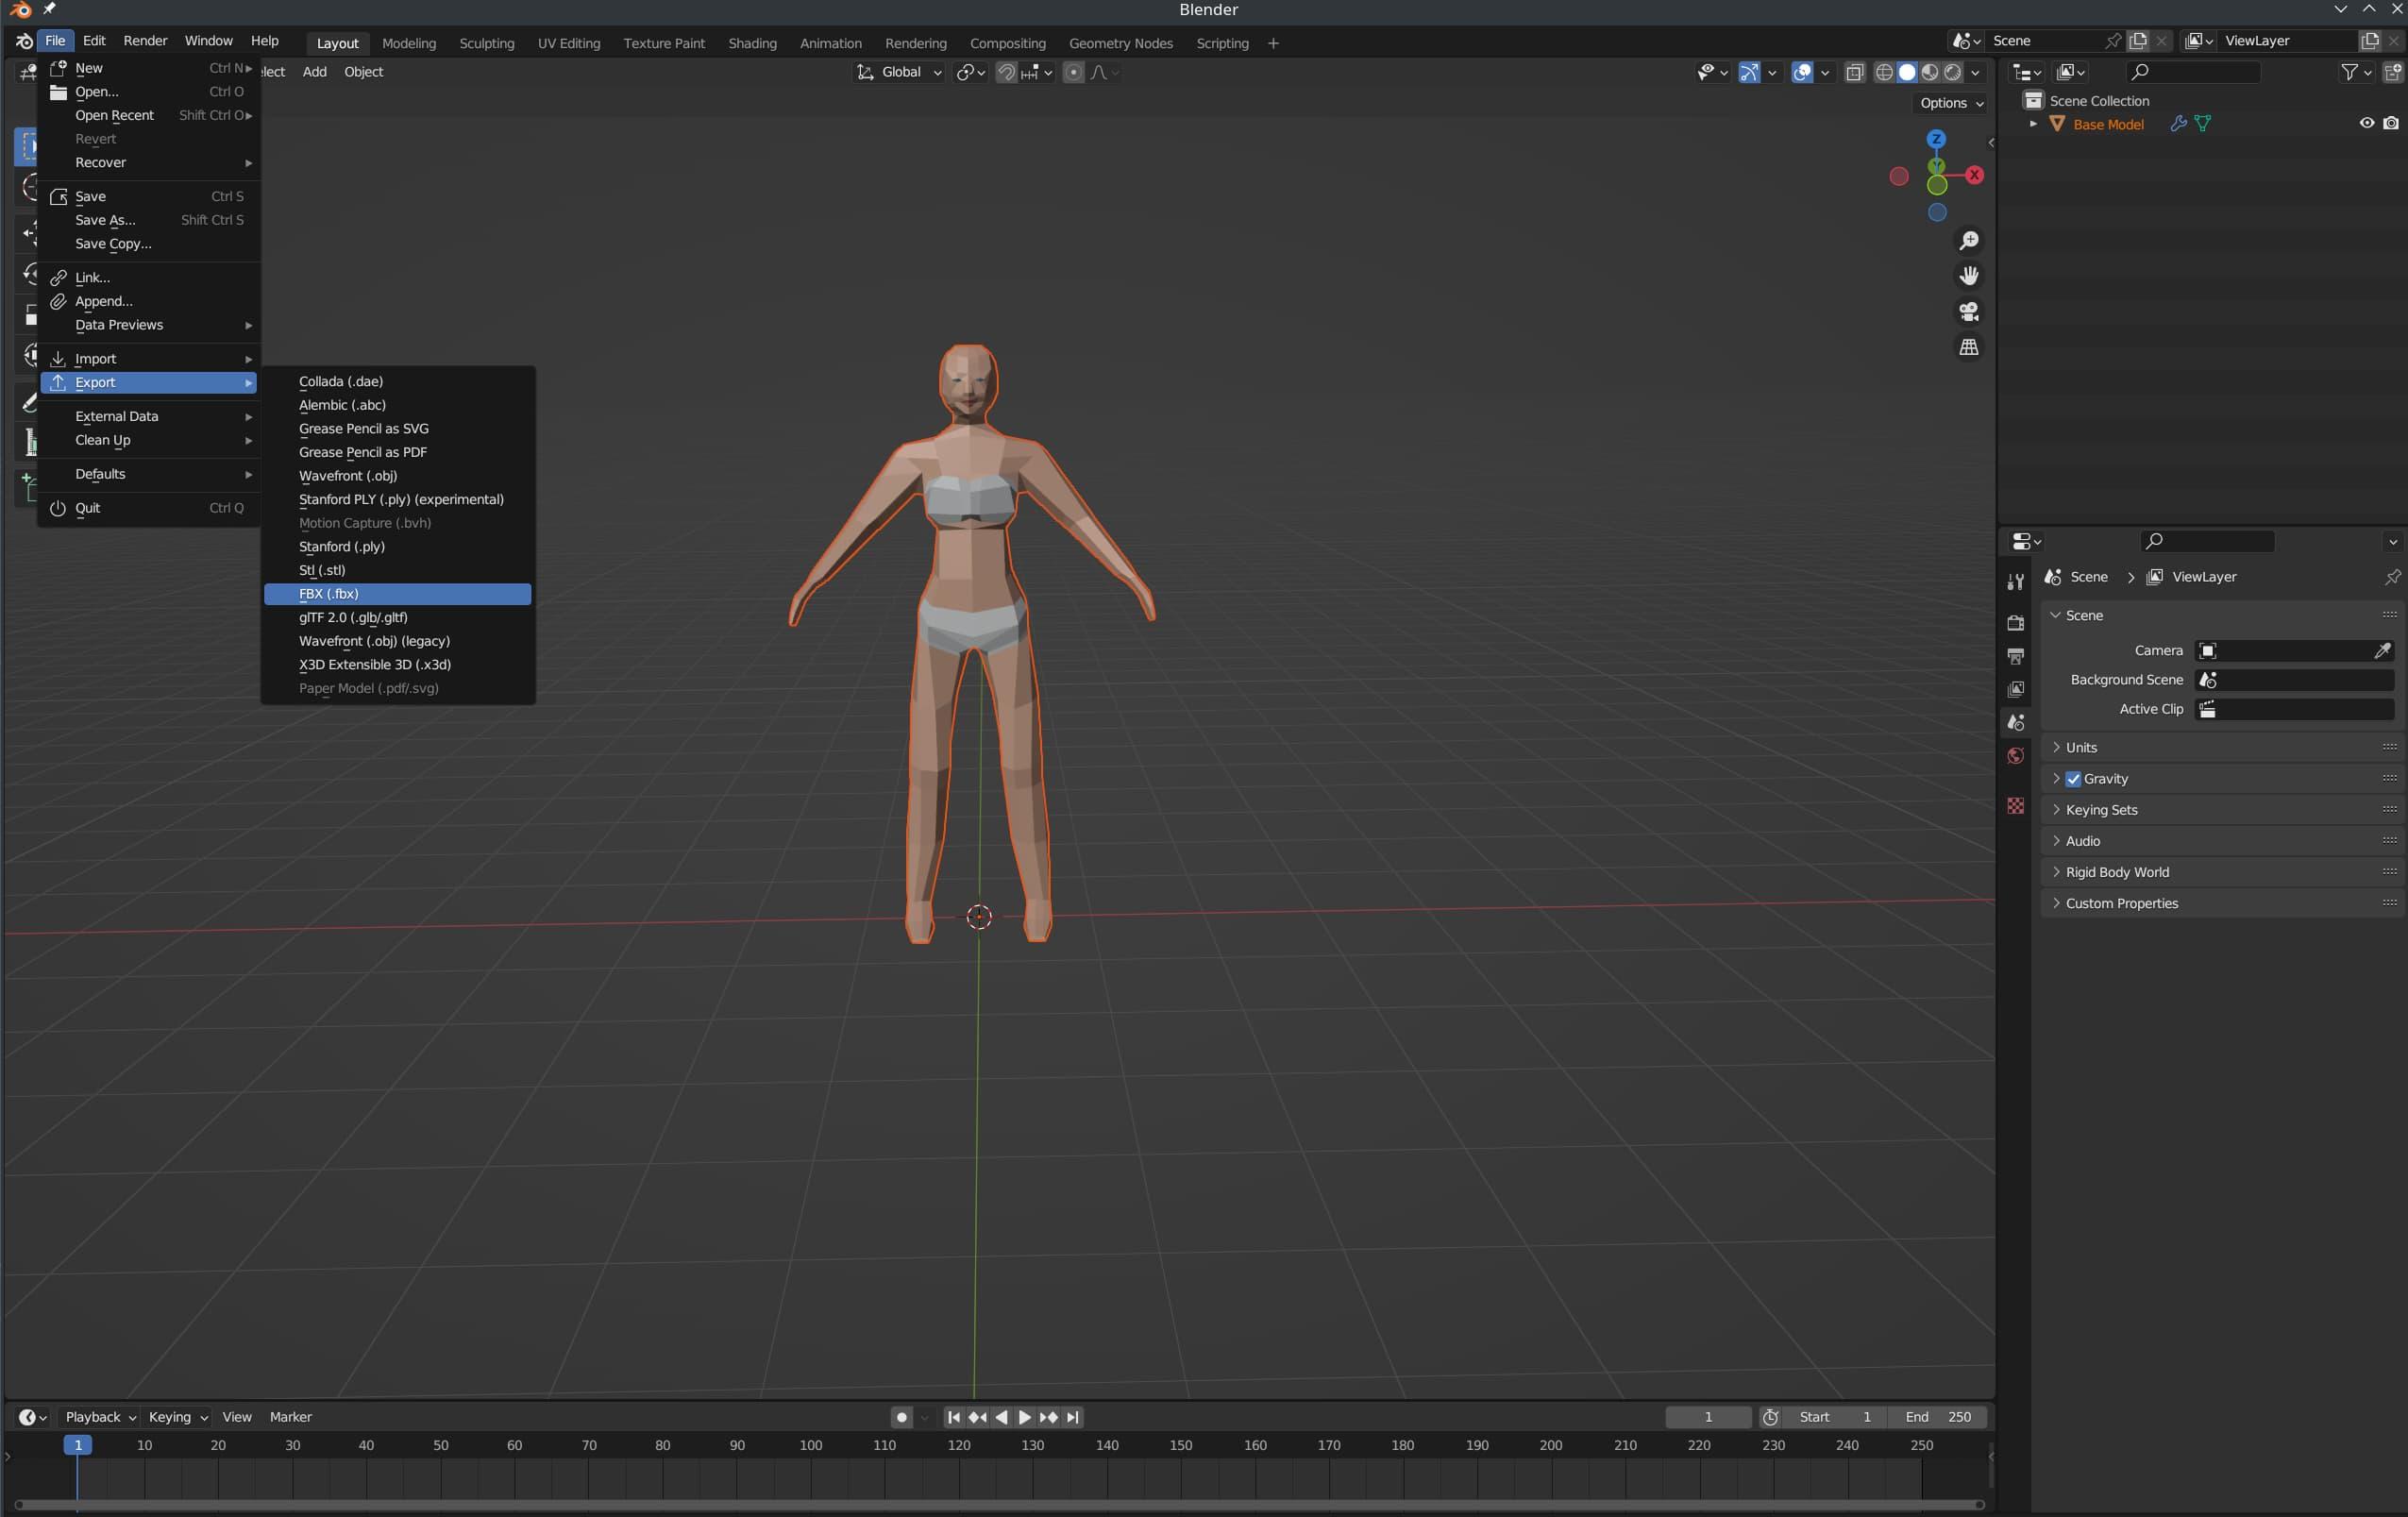
File > Export > FBX (.fbx)
In the window that pops up, choose a place to save your base model, choose a file name for it, and click “Export FBX”. Once you’ve exported your model, keep your Blender window open, and proceed to the next step.
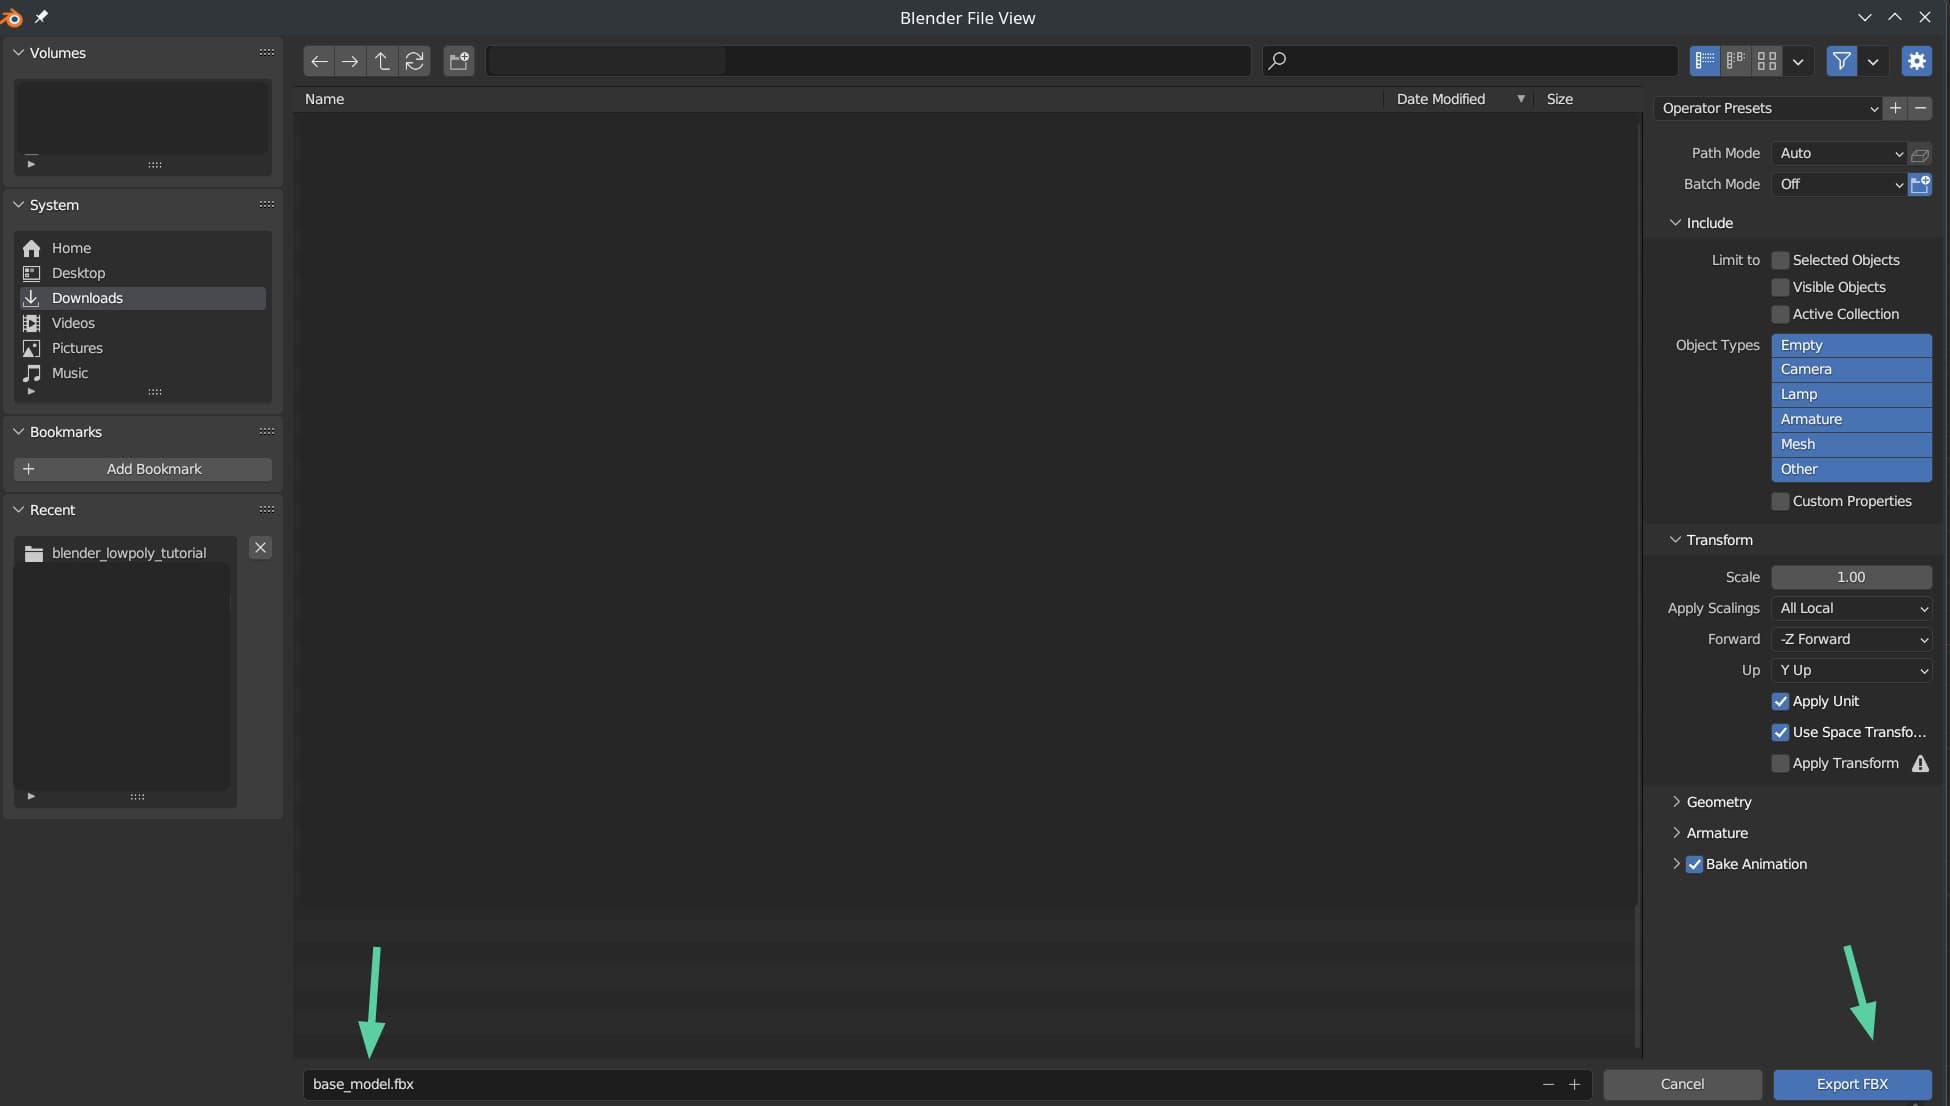
Choose a file name for your base model (could be anything), a folder to save it in, and press Export FBX in the bottom-right corner of the window
Now, it’s time to open up your web browser and head to https://www.mixamo.com.
You’ll unfortunately need to sign up for an Adobe ID, if you don’t already have one (ugh, I’d recommend using a secondary or burner email). Again, I loath having to recommend such proprietary cloud services, but I personally think this one is worth using. And I’m not the only one that thinks that. It’s very popular in 3D modelling, animation, and especially game development circles, for good reason.
Anyway, once you’re in, you’ll end up at a page similar to this. I highly recommend taking a look around, and trying out all the various features Mixamo has to offer. There are a crazy number of animations available, and a lot of diverse, freely-available characters.
But for the purposes of this blog post, you’re going to want to click on the “Upload Character” button on the right of the interface.
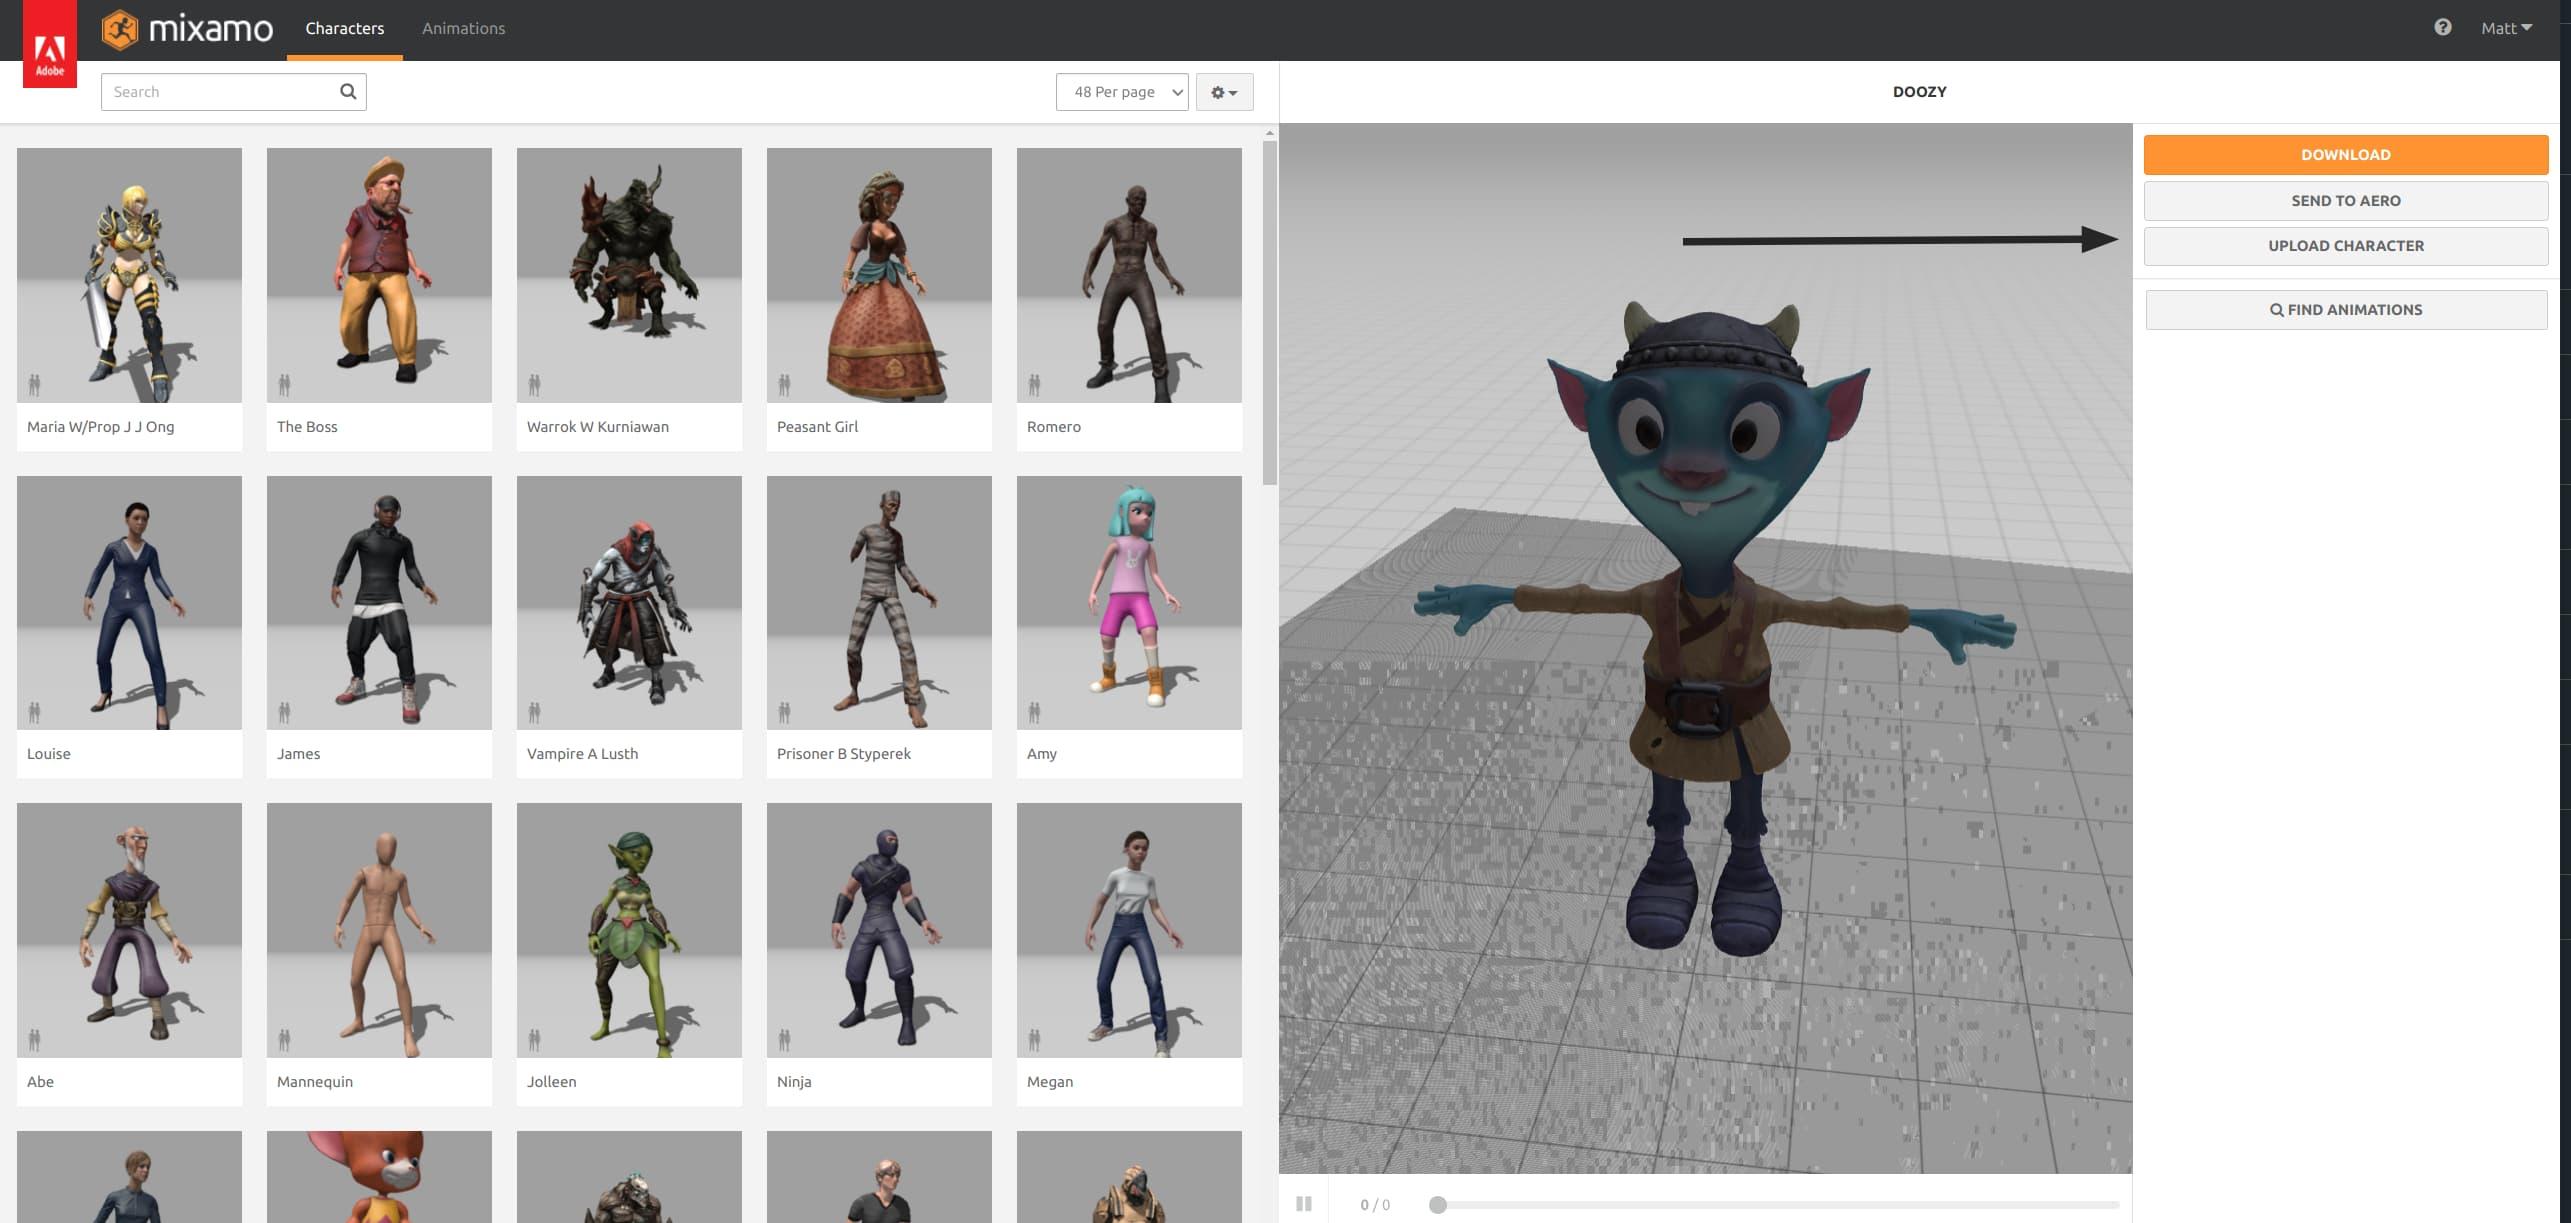
Click on Upload Character in the top-right of the Mixamo interface
Once the “Upload a Character” dialog pops up, click on “Select character file”. From there, a file dialog will open. Browse to find the FBX Base Model (not the .blend, but the FBX you just exported from Blender) and select it for upload.

Click on "Select character file", and select your exported FBX using the file dialog that pops up
Now it’s time to engage Mixamo’s auto-rigger. If you see something similar to this, with the base model in an “A pose”, click Next in the dialog.
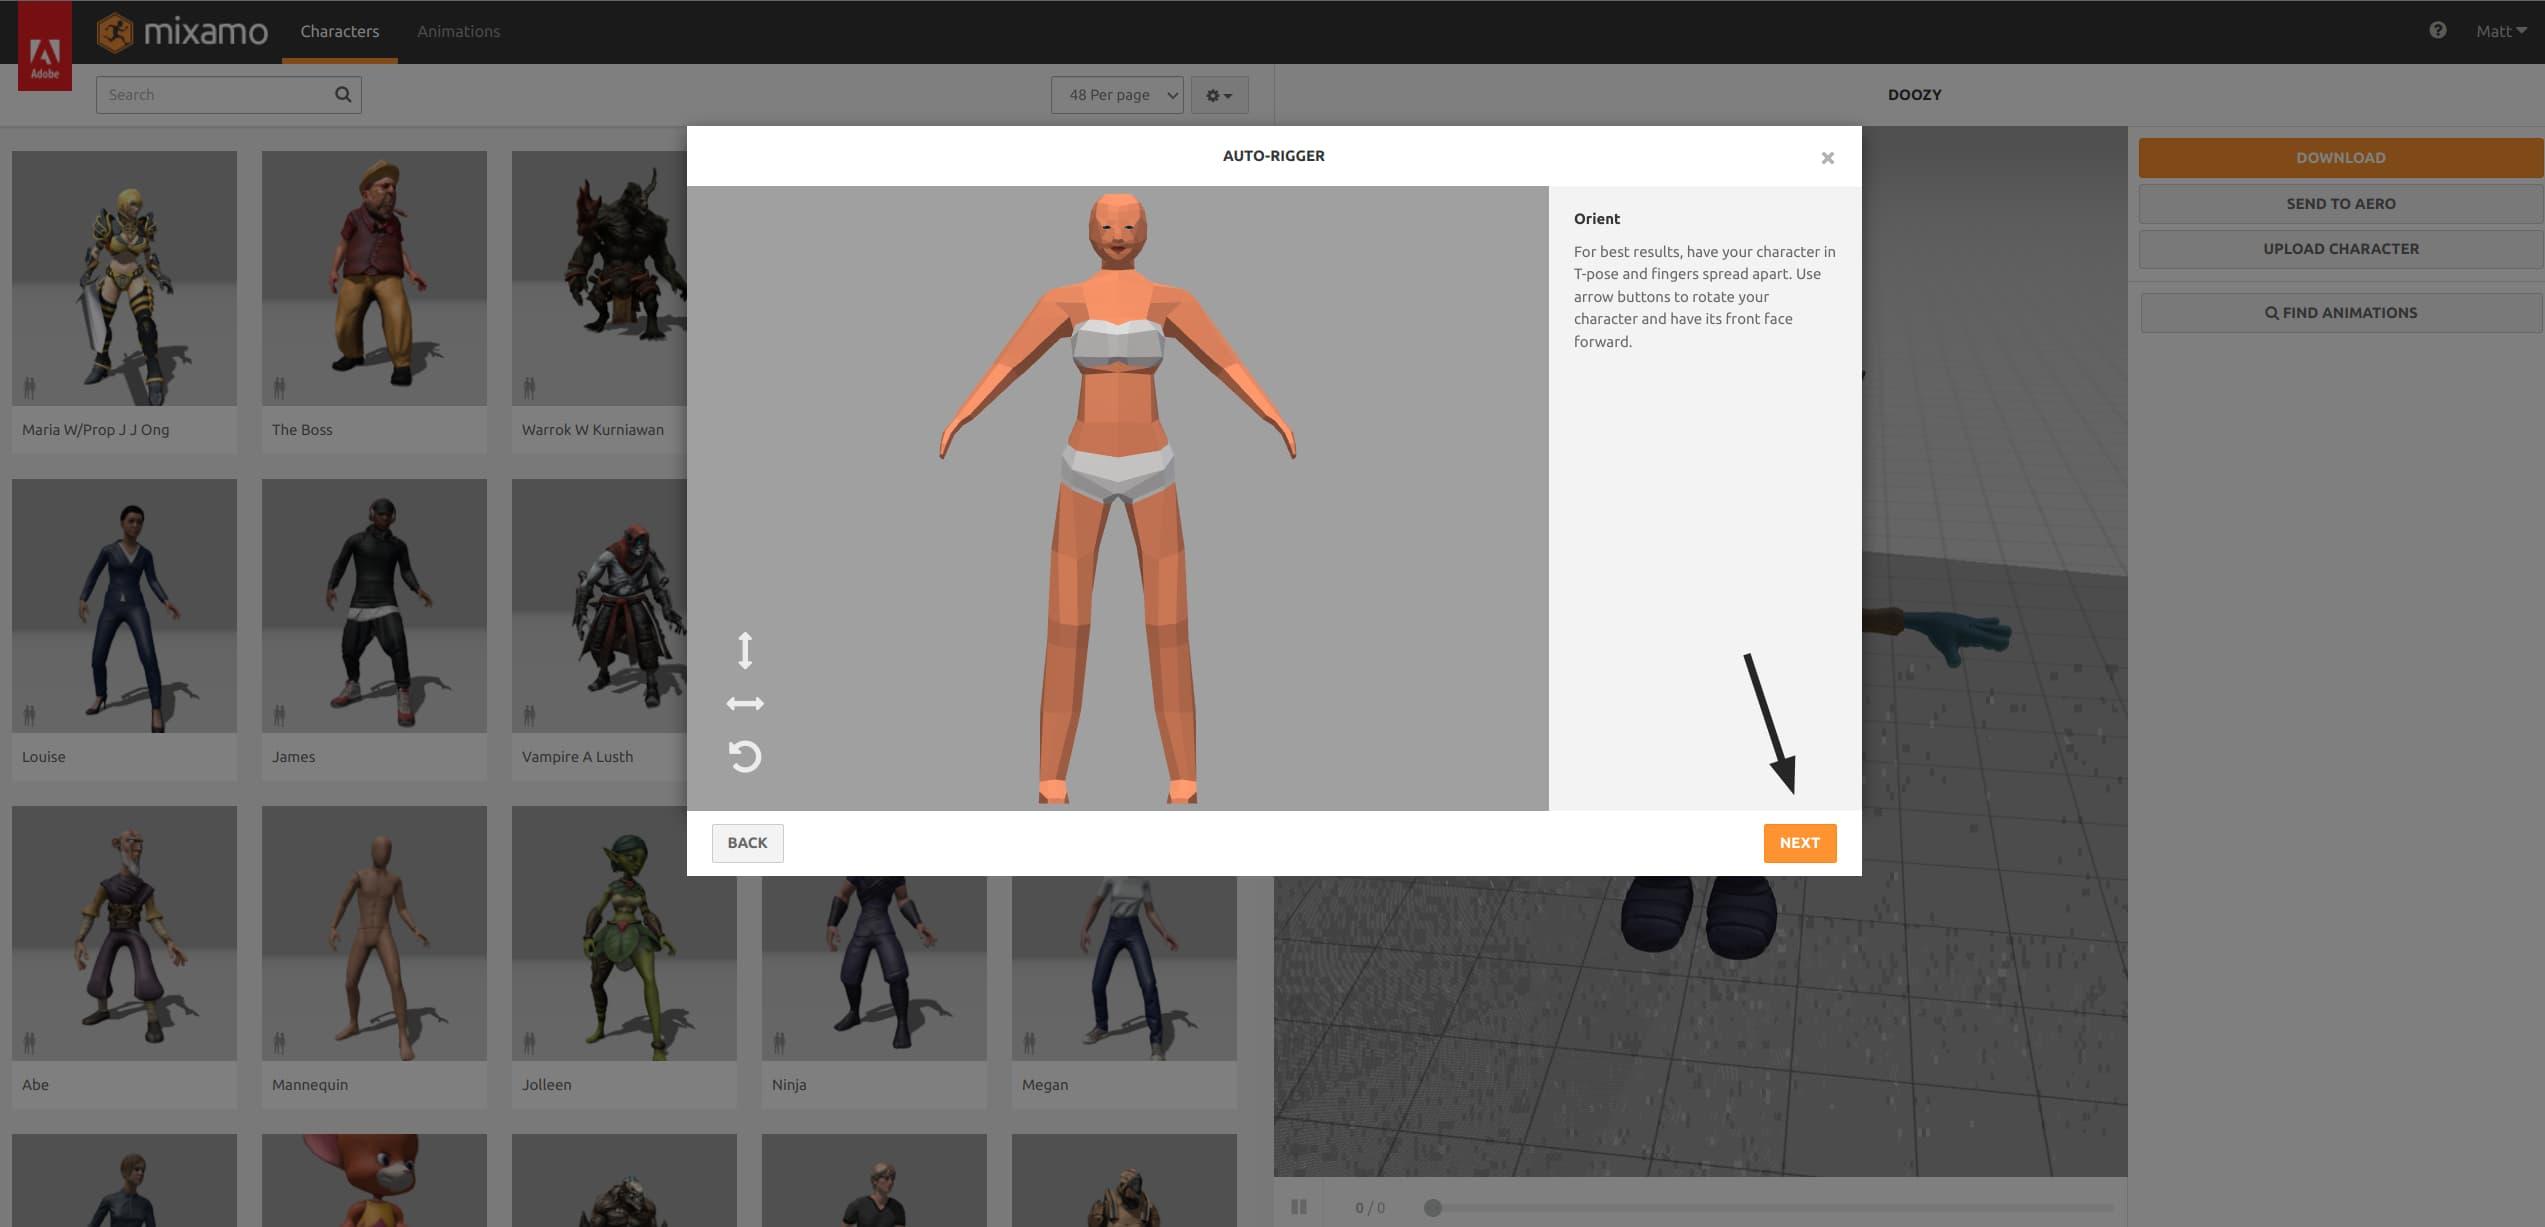
Click Next to continue
Here comes the part of the auto-rigging process, where you place “markers” for different body parts. For this model, you’ll want to select from the “Skeleton LOD” dropdown in the bottom center of the dialog. Select “No Fingers (25)” from the Skeleton LOD drop-down.
This is necessary, because this is a low-poly model without defined fingers. So we don’t need as many “bones” to represent the rig or armature for this character - as opposed to a more detailed, more realistic character model, for instance.
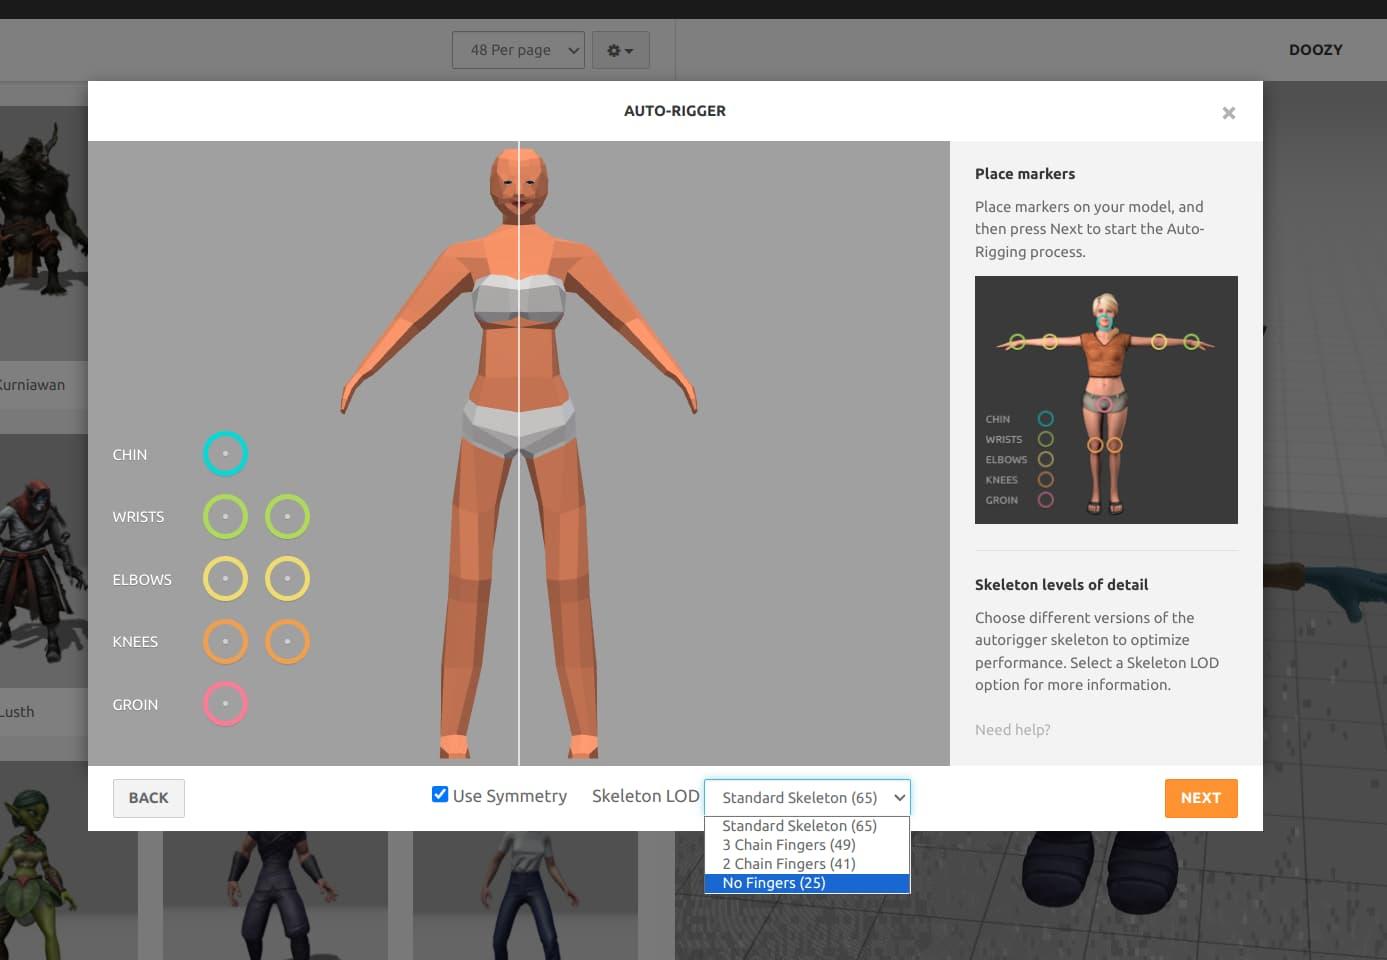
Select "No Fingers (25)" from the Skeleton LOD drop-down, and make sure "Use Symmetry" has a blue checkmark in it before proceeding.
At this point, you’ll want to drag the circles on the left part of the dialog over the areas of the body that they should represent. I personally don’t know how accurately you need to place these “rigging markers”. But try to line them up roughly where you believe areas like the neck, elbows, wrists, groin, and knees are. You will get a little helper pop-up in the top-right, that should help you be fairly precise in your positioning of these markers. And since symmetry is enabled, and this is a symmetrical model, you’ll only have to place each symmetrical point (like the elbows and wrists) once.
This is what my markers look like. Your mileage may vary, and again I don’t know how precise you need to be with something like this. But this worked for me.
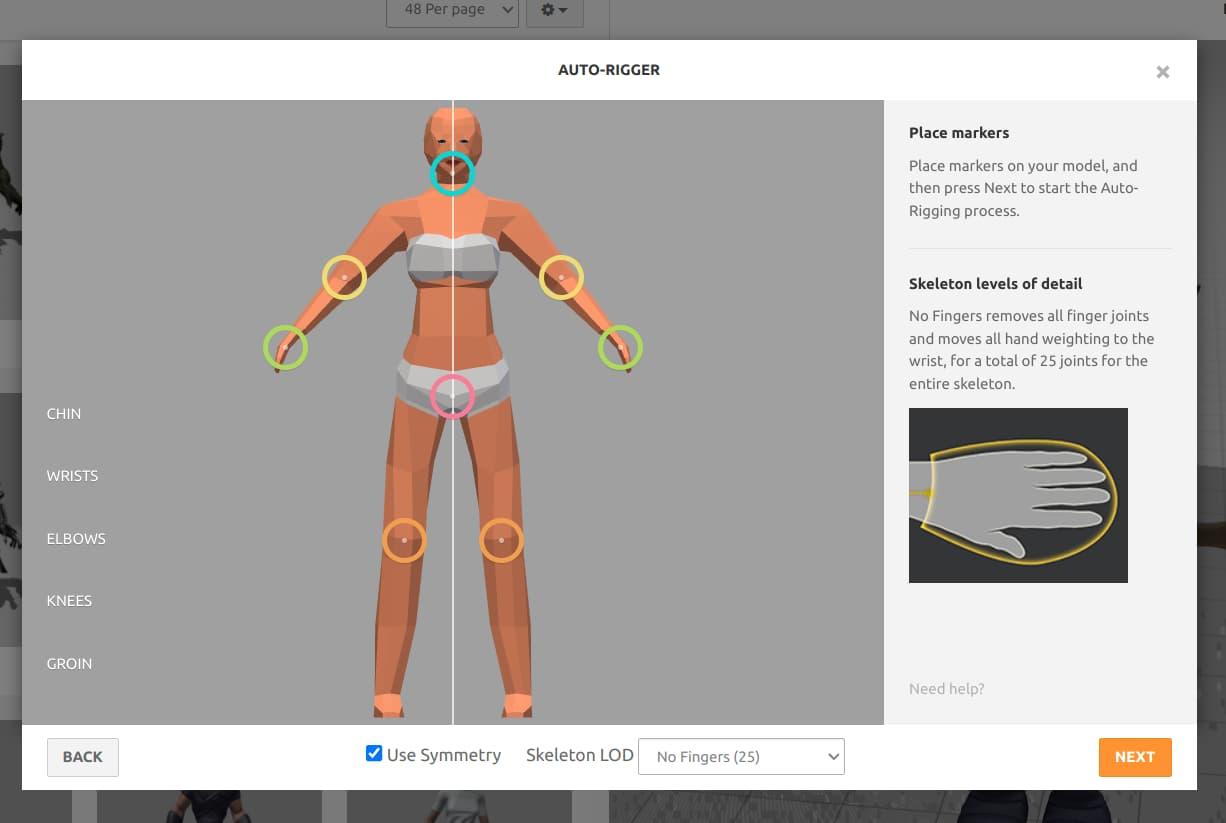
My Mixamo Markers
Once you’re satisfied with your markers (you can move them around after placing them, if you’d like to tweak their positions) click Next. Then, watch the model spin around as you wait for the auto-rigging process to complete. It shouldn’t take too long with a low-poly model like this.
Once the auto-rigger has finished, you should see the character making an animation like looking around. You can also use your mouse to navigate around in the 3D window, and see the character from different angles.
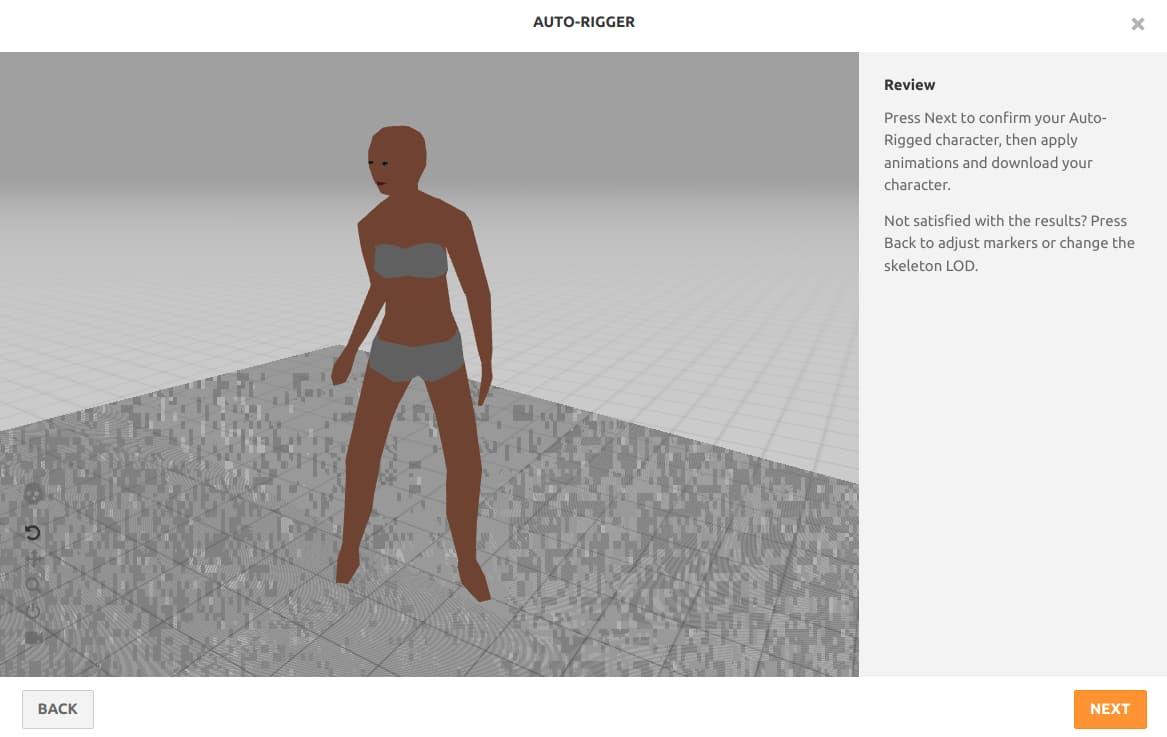
If you're satisfied with the result, click Next
You may then see the “Change Character” dialog. Which warns that “Your previous character will not be saved”. Click Next, unless you currently have an unsaved character open in Mixamo. In which case, close the pop-up window with the X button in the top-right. But if you’re ready to proceed, click Next.
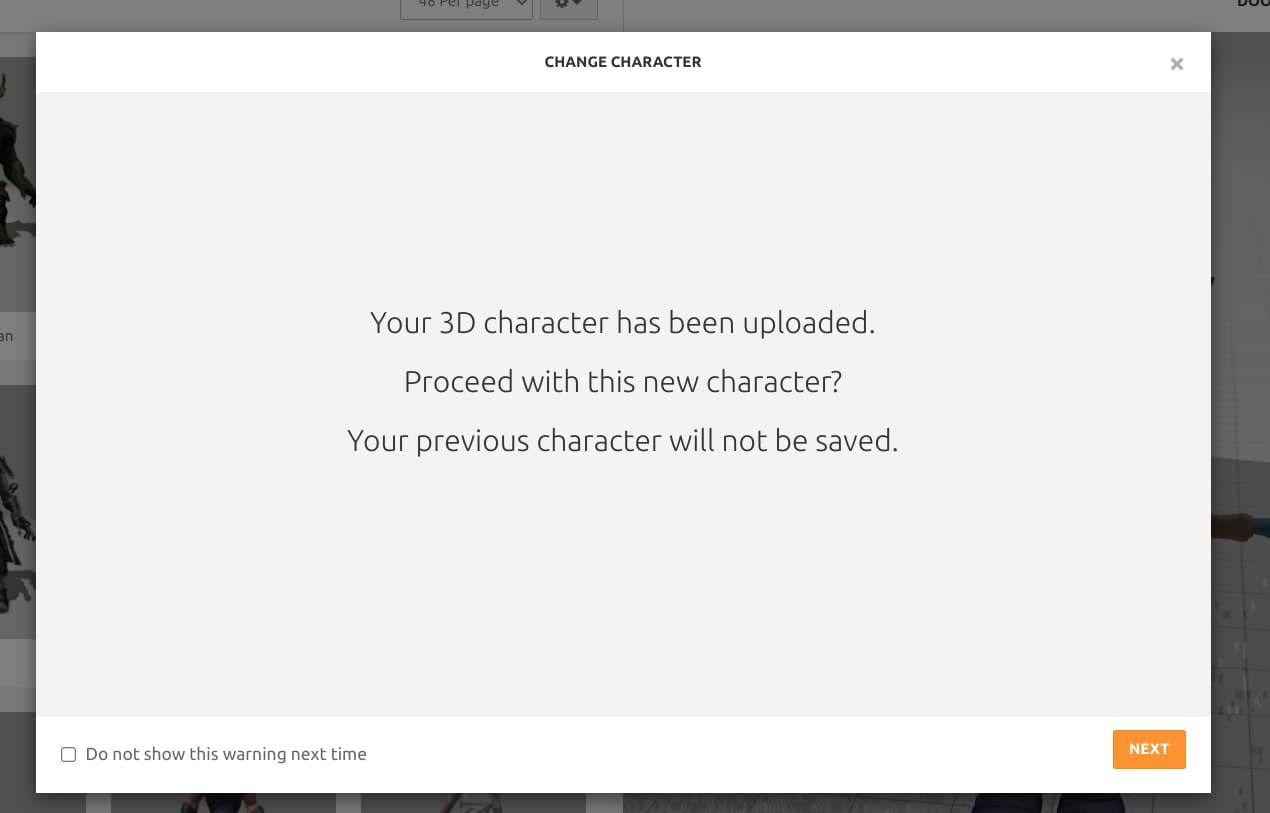
Click Next to continue, unless you have an unsaved character currently open in Mixamo that you would like to save, in which case close this dialog
Just like that, you now have an automatically-rigged low-poly 3D character! You can click on the “Animations” tab in the top-left of the Mixamo window, and select an animation you’d like to apply to the character. You can also use the searchbar to look for a specific animation. There are an enormous variety of animations, so definitely take your time to peruse the library, if you’re interested.
For the purposes of this blog post, I just want to get a simple walking animation working. So I’m going to choose a walk animation, and click on it to apply it to the character. You could choose whatever animation you want. Just be warned, that this is a low-poly character to which we will soon be applying clothing, hair, and accessories. So a very extreme or complicated animation may not end up working too well. There might be a better way of going about this, but this is the process that has worked very well for me so far.
Once you’ve chosen the animation you want to apply to the character, you can tweak it from the animation settings in the right of the window.
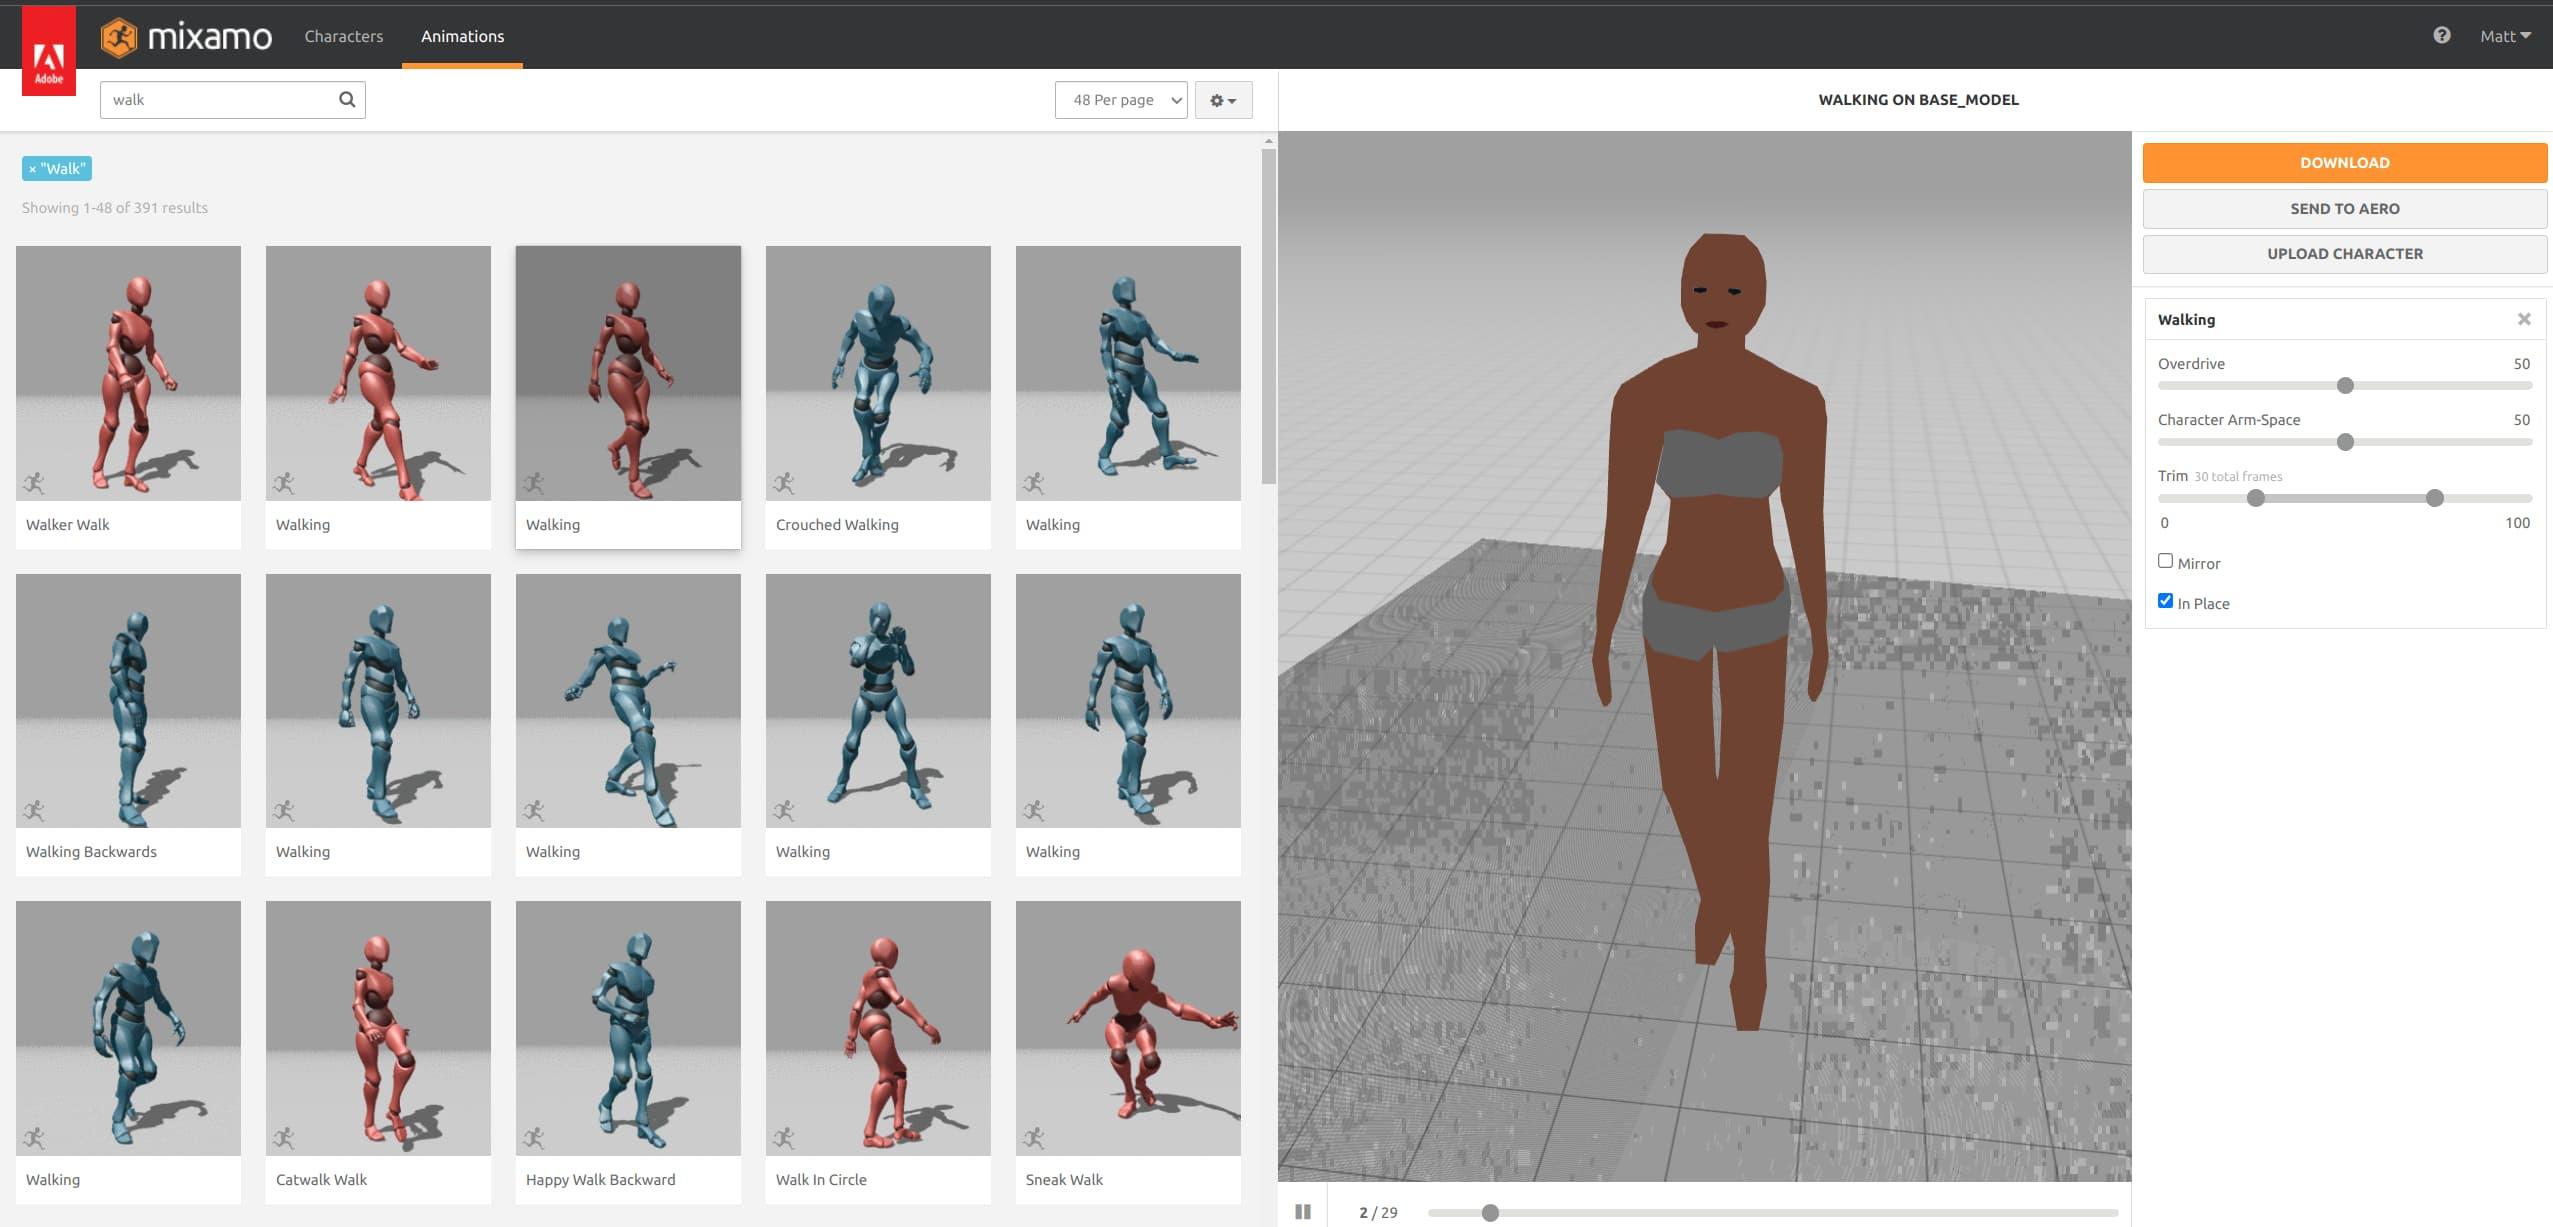
Find an animation, select it from the left side, and tweak the settings from the right side.
Some animations have an “In Place” setting, which I personally selected for this walking animation. I find this process works better with “In Place” animations, but it’s up to you.
Anyway, once you’ve selected an animation of your choice, click on the big orange “Download” button in the top-right of the Mixamo window. I don’t have a ton of experience with these settings, but the default download settings work for me. Click “Download” once the dialog pops up.
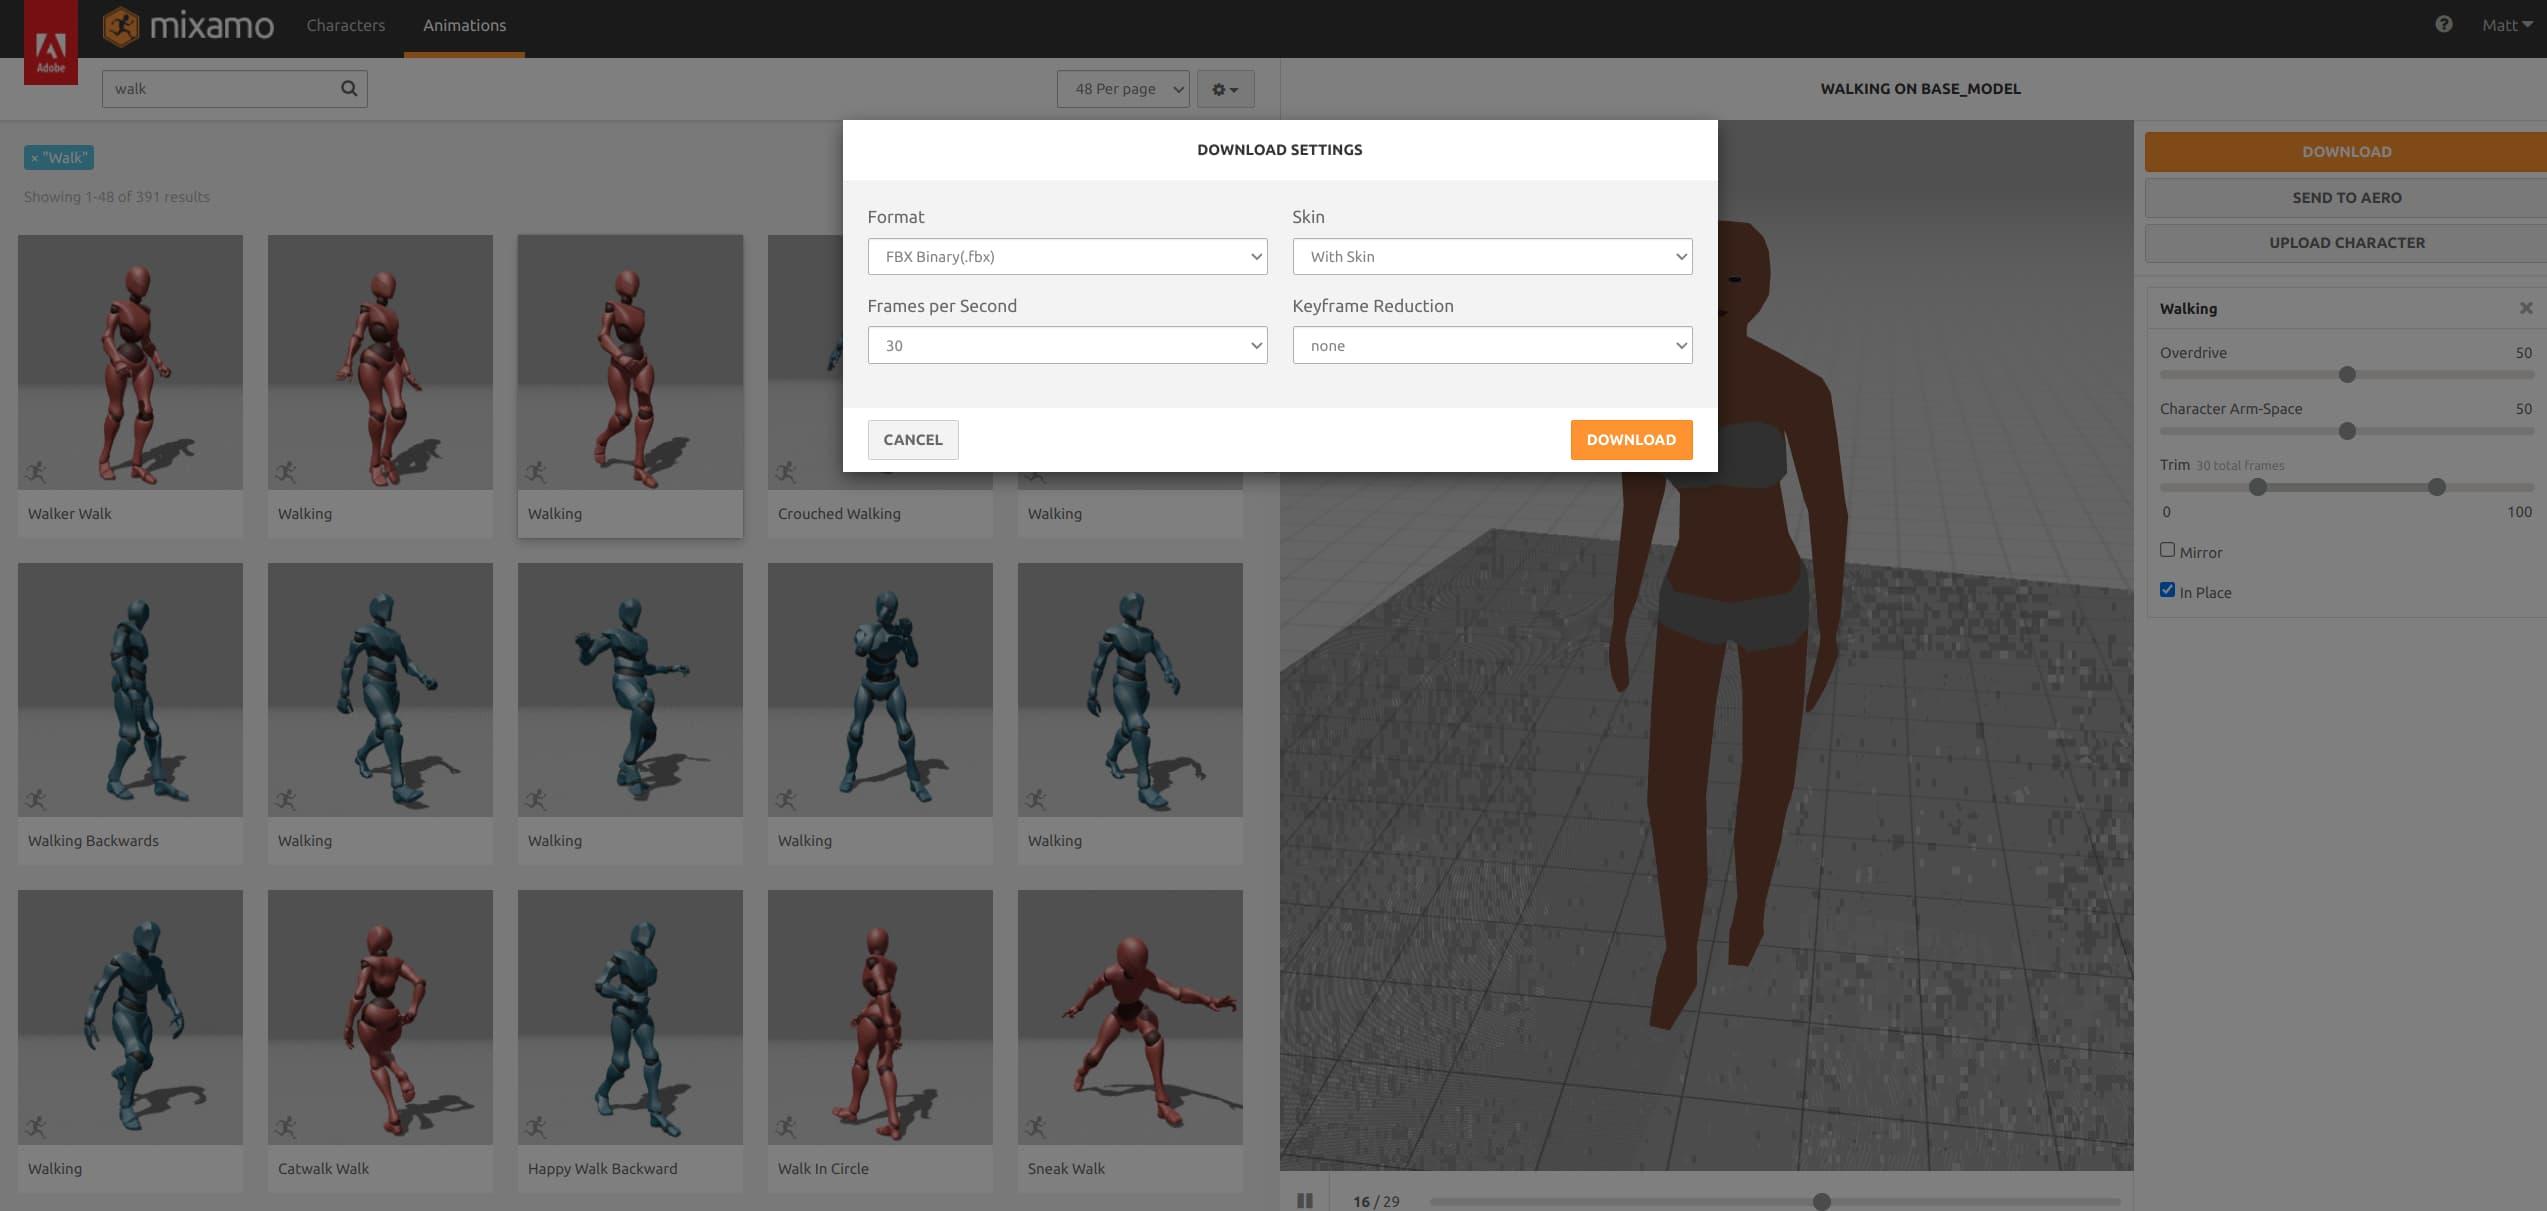
Click Download once you're satisfied with the download settings. The defaults should work fine in this situation
The FBX file will now download. Go back to Blender, click on “File > Import > FBX (.fbx)”. It’s a very similar process to last time, except now we’re choosing “Import” from the “File” menu, instead of “Export”.
From the dialog box that pops up, double-click on your newly-downloaded FBX file from Mixamo. And if you used the same Blender window you still had open from exporting the Base Model in the first place, you should see them on top of each other. This is normal, as weird as it looks.
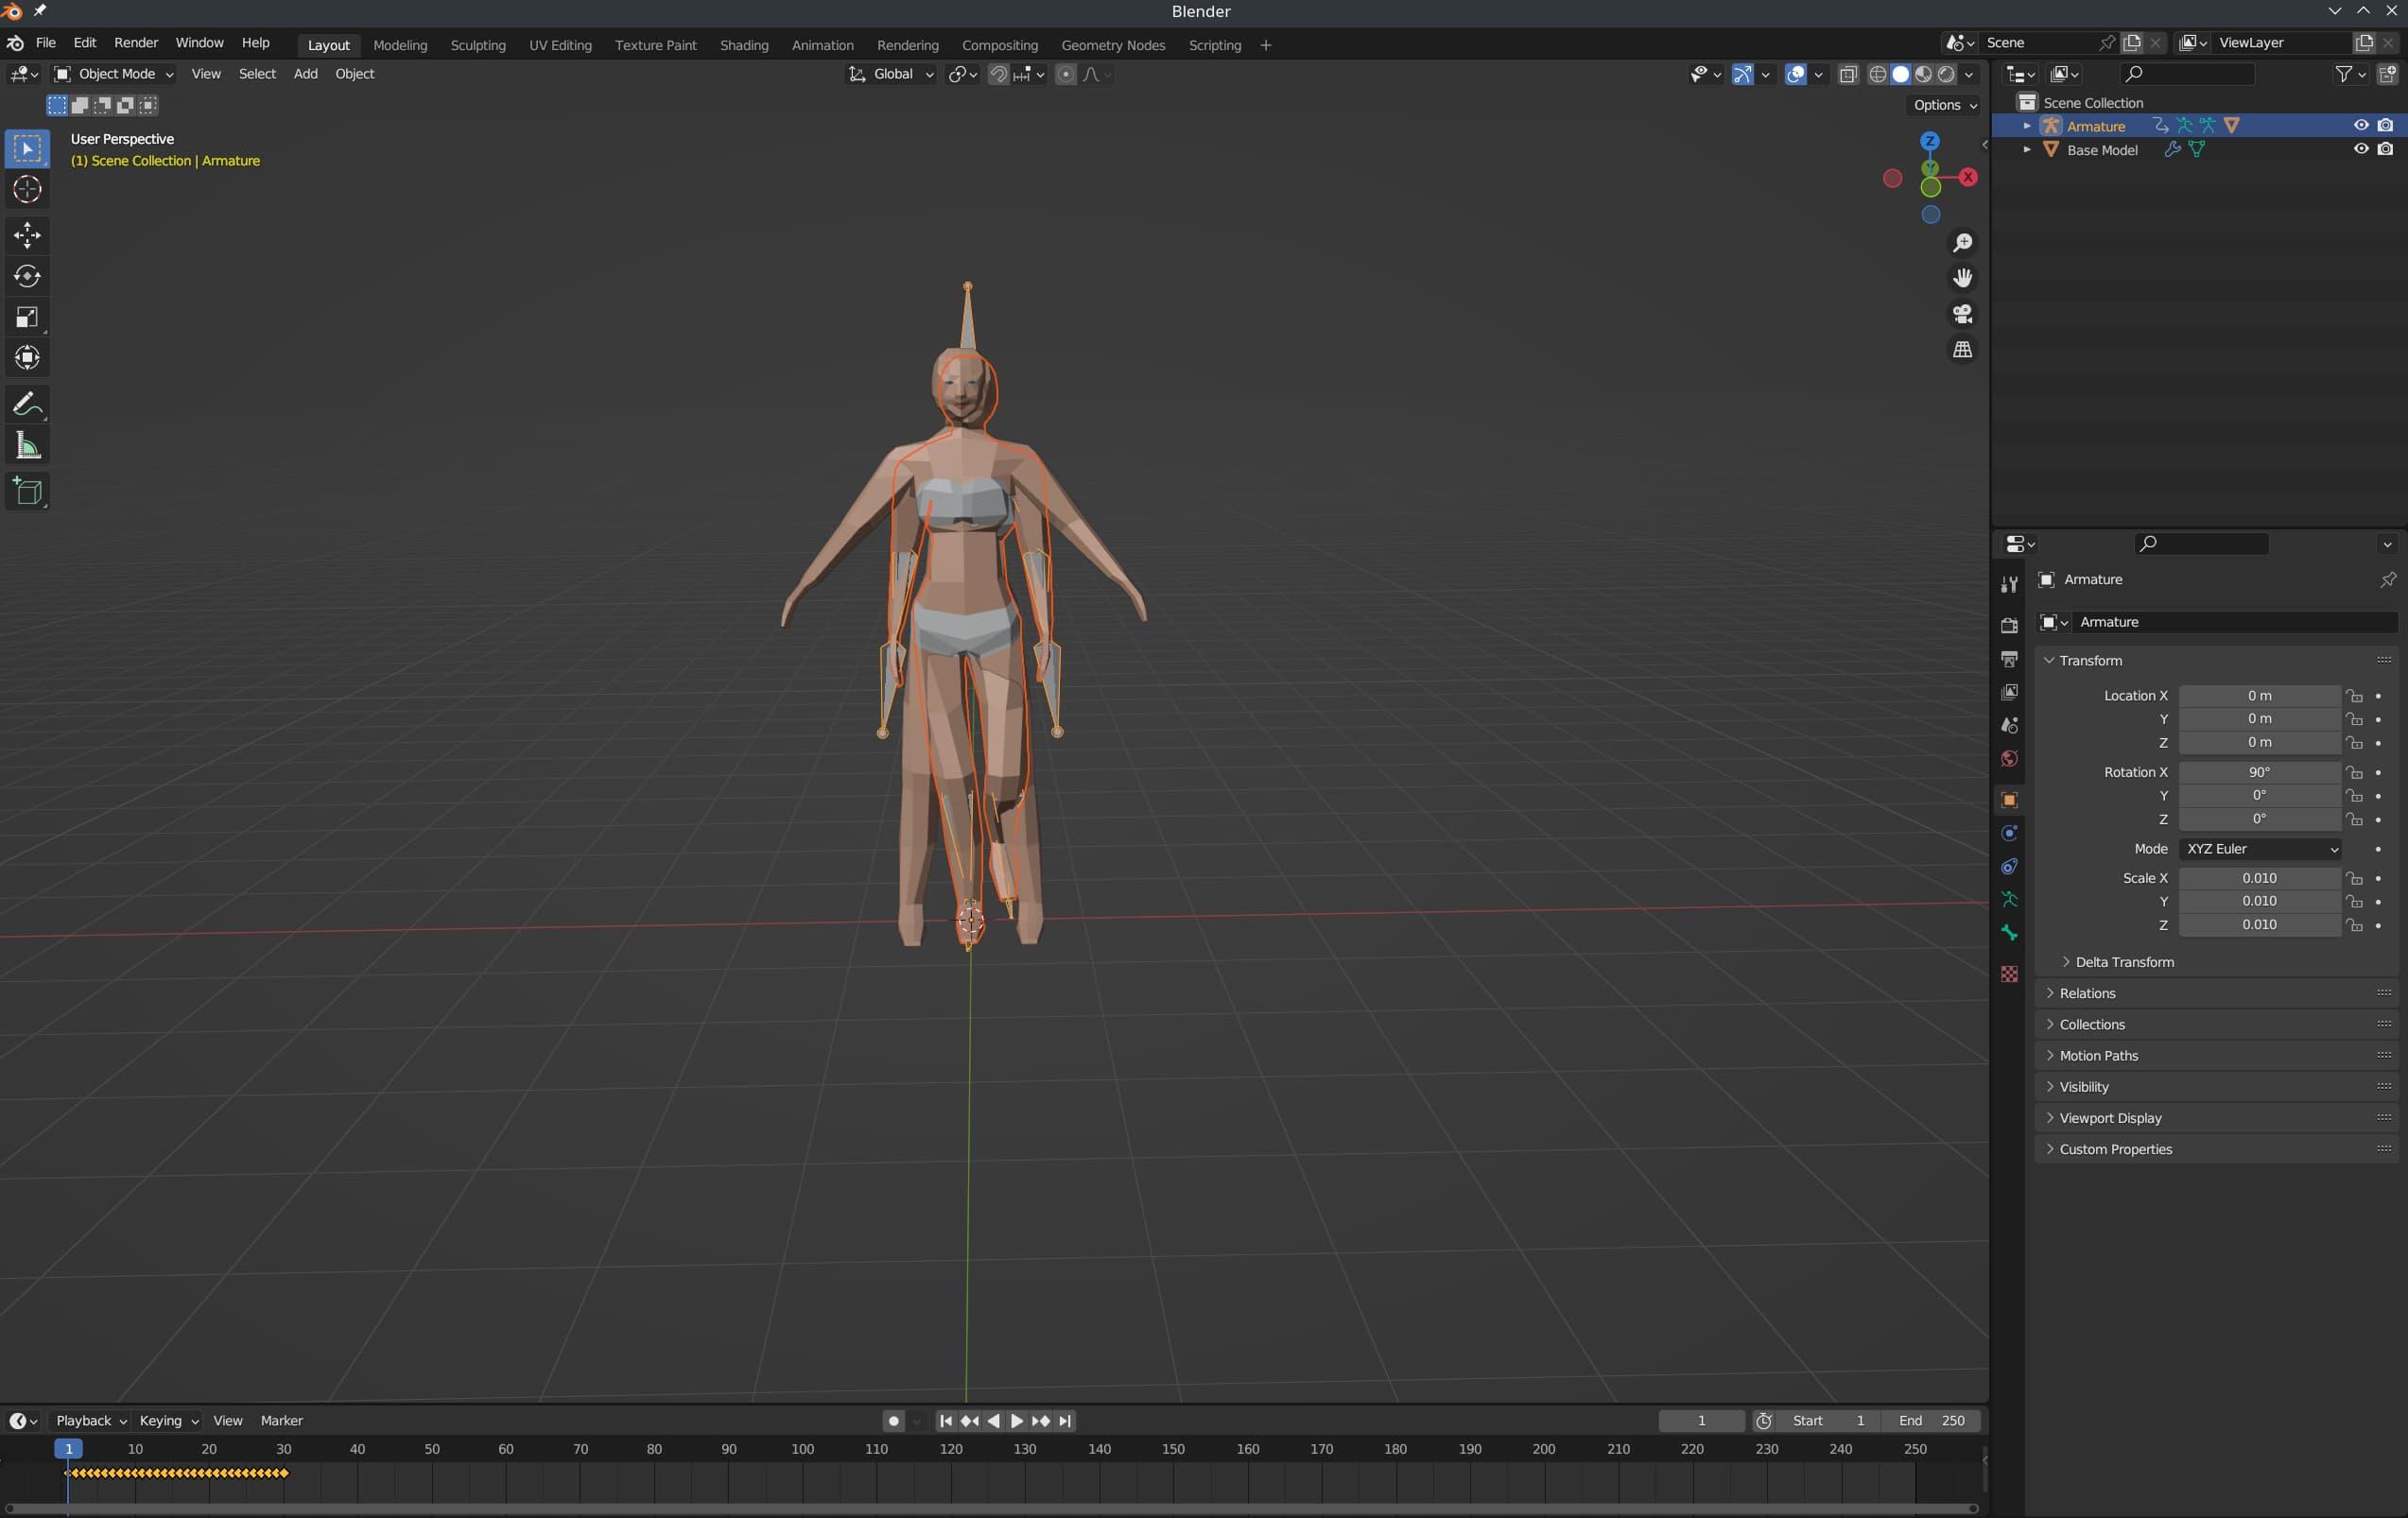
No, don't worry. This hasn't turned into a Blender body horror tutorial...
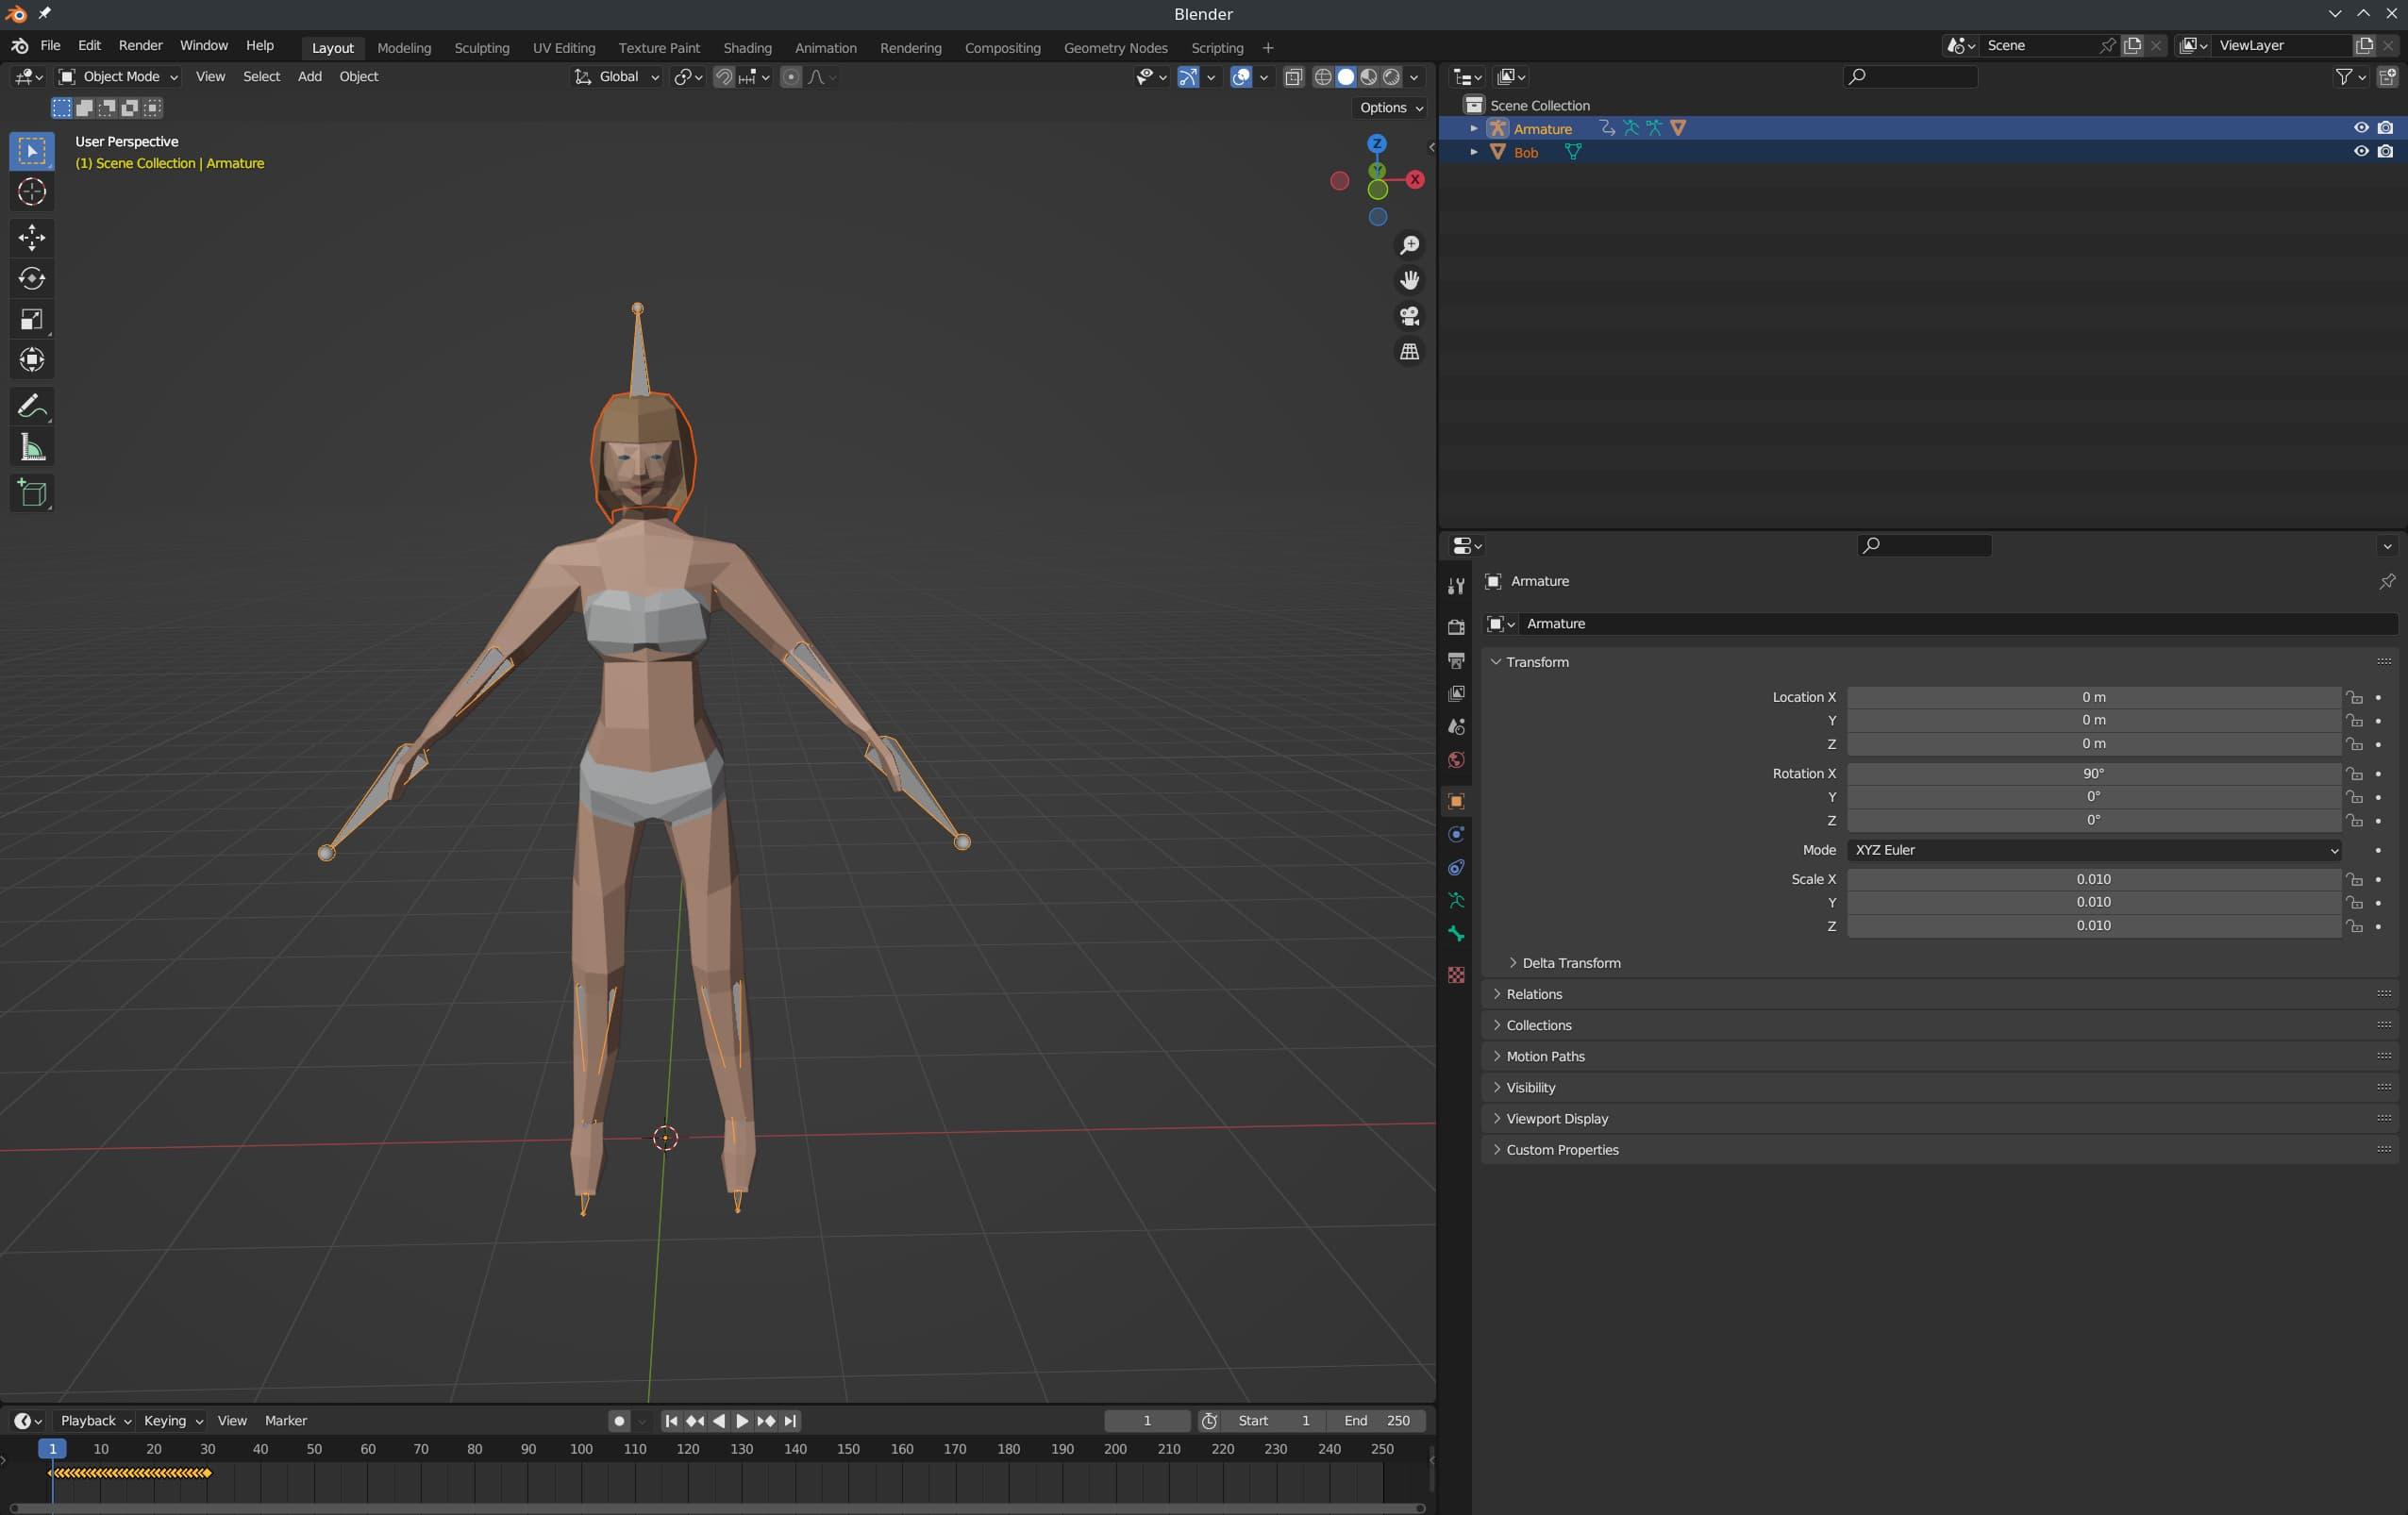
Now, you’ll want to click on the “Base Model” in the top-right corner of the Blender interface. Then hit DELETE on your keyboard, to get rid of it. You should then only see one thing in the top-right under “Scene Collection”. And it should be called “Armature”.
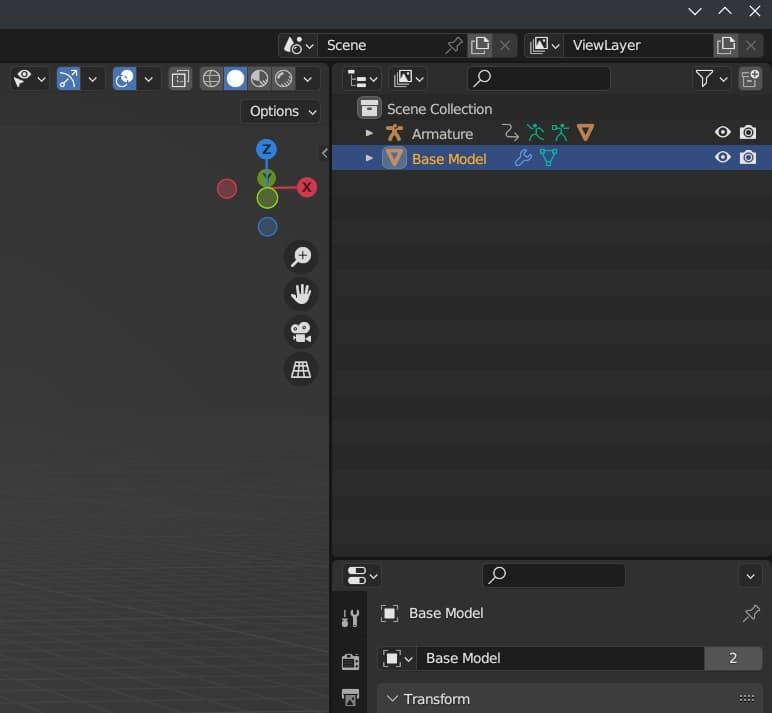
Click on "Base Model", then press DELETE on your keyboard. You should be left with just the "Armature"
OK, now we’re almost done. But I’d like to walk through the process of adding hair, clothing, and accessories to the newly-animated base model. I don’t want to get too deep into the Blender interface, so for this tutorial I won’t be covering how to customize attributes like the skin colour, eye colour, lip colour, hair colour, and clothing/accessory colours. Because that really deserves its own blog post. Which I most certainly plan on writing… Eventually…
Point is, I just want to walk through the process of adding some clothes and hair to this model. Then, I’ll demonstrate how to import it into the Godot game engine, and we can call it a day. Fair? OK, let’s proceed.
First, you’re going to want to go through the same process we did a while ago, to get the base model imported into Blender in the first place. But this time, we’re going to be selecting different objects.
So go back to “File > Append…” and select the OverScore Proxy .blend model, by double-clicking on it. Then, double-click on the “Object” folder, and you should once again be presented with the big list of available objects. Although if you didn’t close the Blender window, you’re probably already inside the “Object” folder of the .blend model, once you clicked “File > Append…”
You can use the searchbar in the top-right of the file pop-up to look for a particular item. You can view the full list of available items on OverScore Proxy’s OpenGameArt page, as well as seeing previews for each item. For now, I’m going to keep it simple, and import the “Bob” hairstyle. Feel free to select whatever hair, clothing, and accessories you want, though. The process will be pretty similar from this point on.
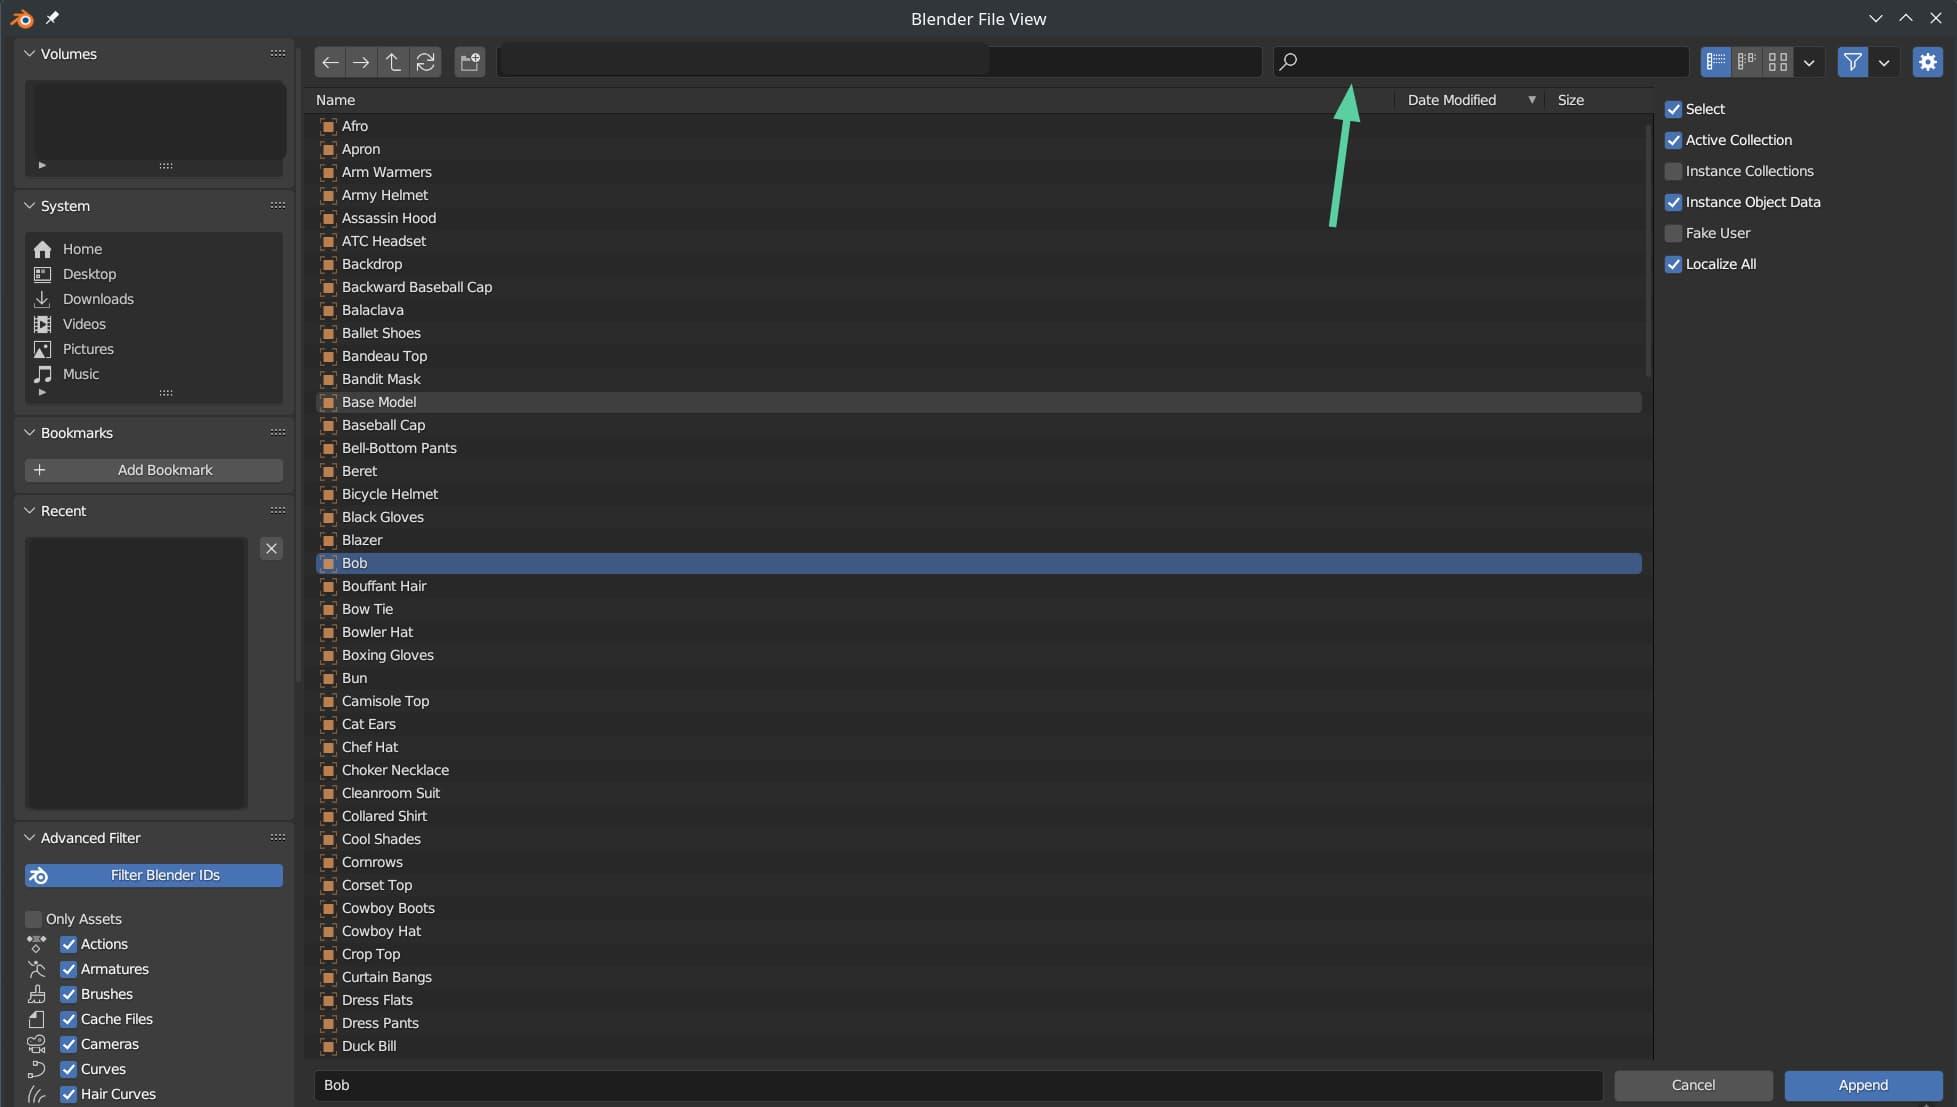
Use the searchbar if you need help finding a particular item. Double-click on the item you want to import
OK, the rest of this process gets a bit tricky, but I’ll try to explain it as simply as possible. The first step is to click on one of the bones of the armature. The grey triangular things poking out from the base model, especially around the head and hands. Click on it to select it. You should see the bones highlighted in orange, and the “Armature” should be highlighted in the top-right corner of the screen. Now, click on the small green icon that I can only describe as a running stickman. And you should see this set of options in the bottom-right of the Blender window.
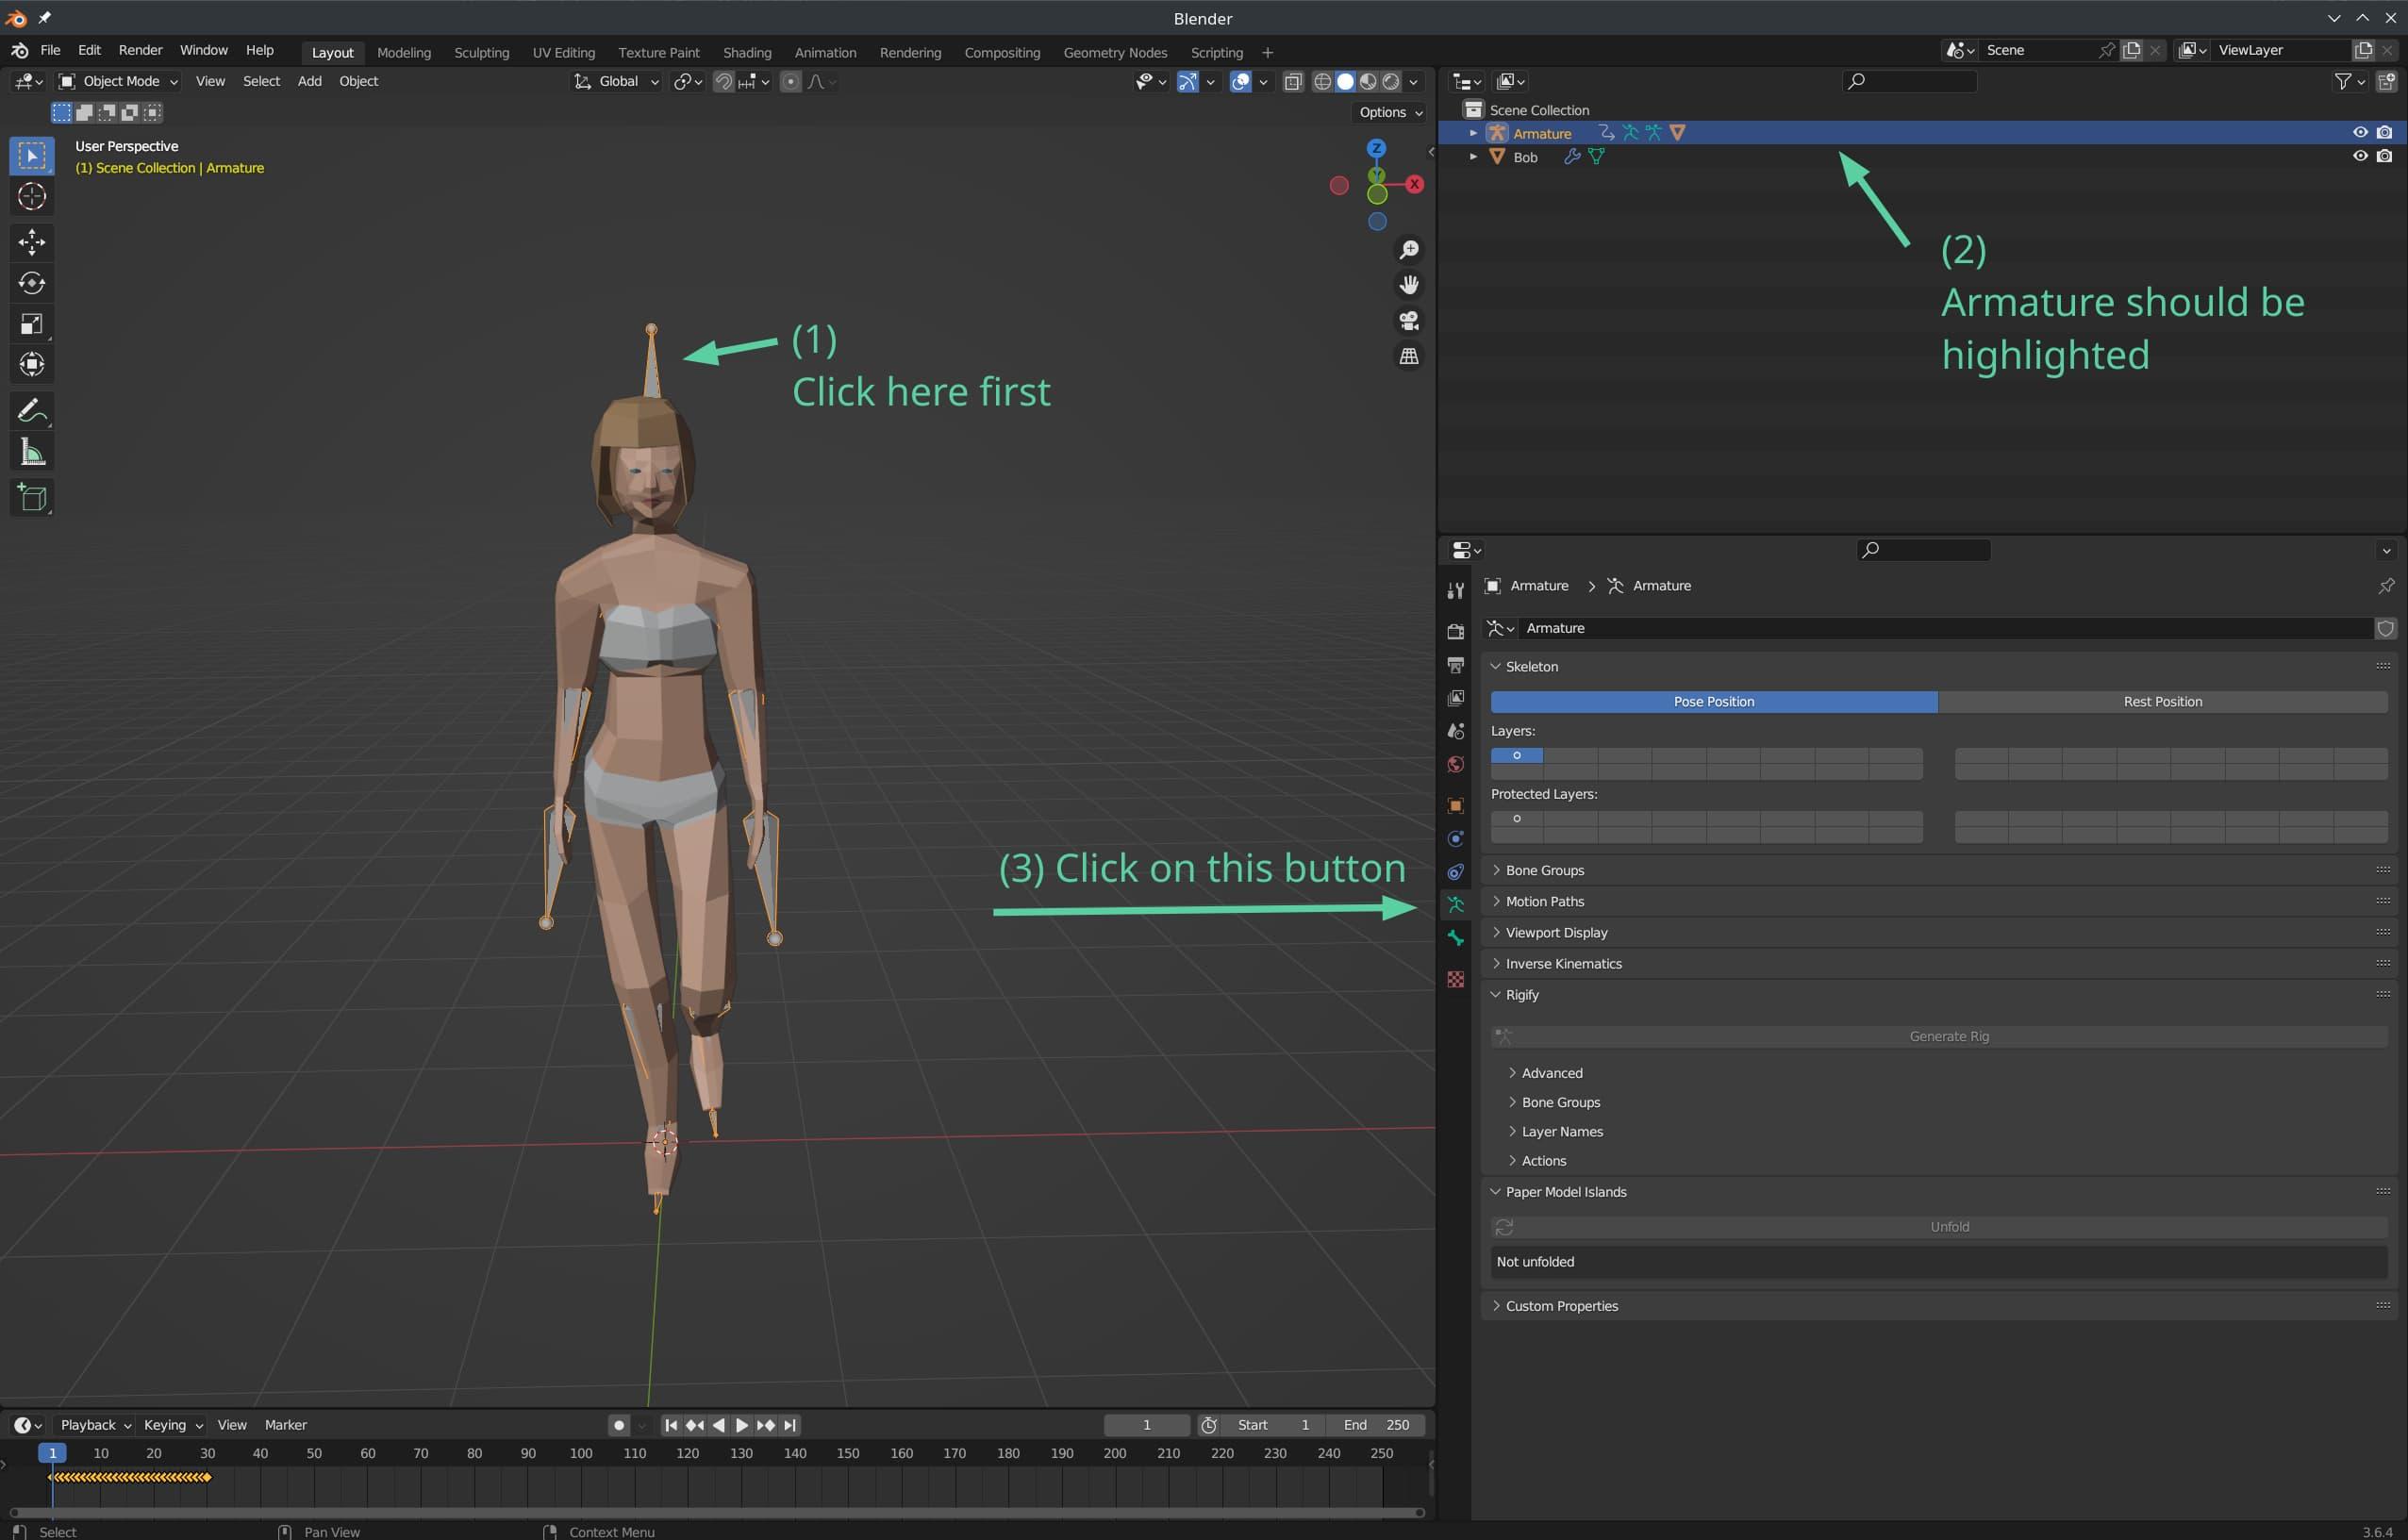
Your screen should look something like this if you're following along
Now, on the right side of the screen, probably near the middle, you’ll see some options for the Skeleton. You want to click on the “Rest Position” button, and it will be highlighted in blue once selected.
You’ll know when the rest position is active, because the character will go back to an “A pose”.
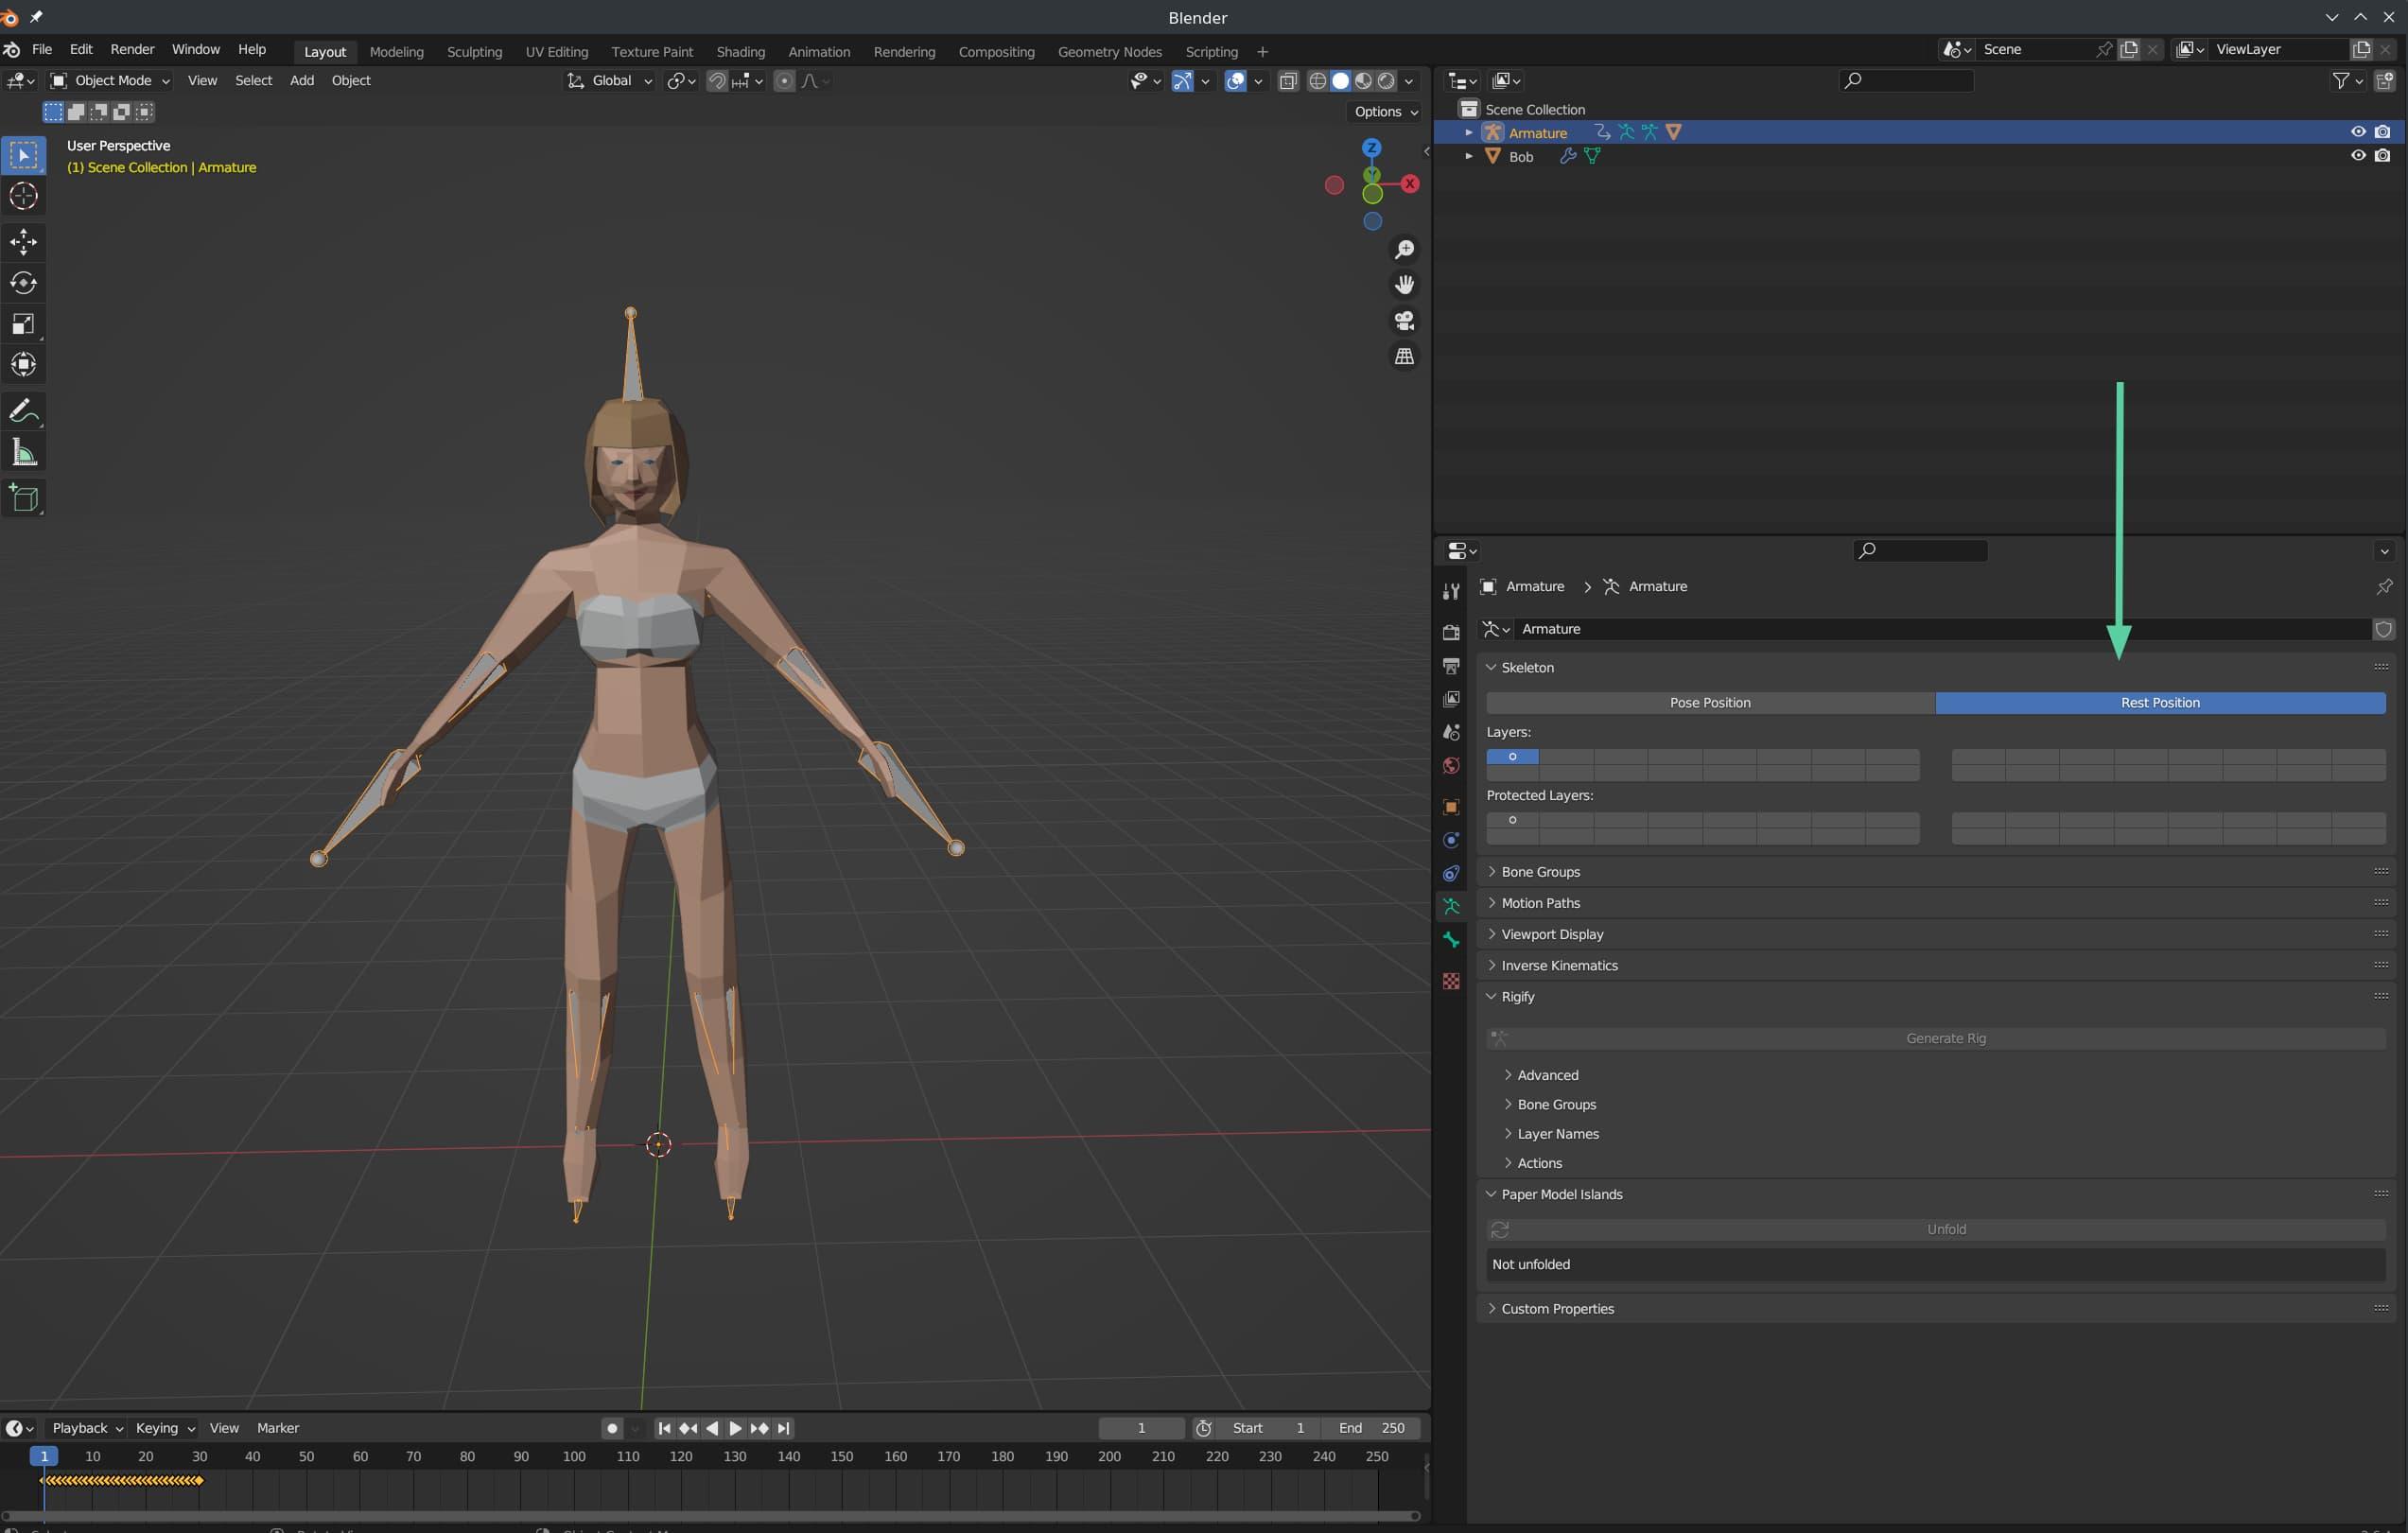
Click on the Rest Position button here
Now, select the item you would like to attach to the base model. Because if you don’t follow this process, any clothing or hair or accessories you import will just be floating there in space, and not feel like they are attached to the character.
Click on the item, in my case the “Bob” hair, and it should be highlighted in orange in the 3D view. The name of the item should be highlighted in blue on the right side of the screen.
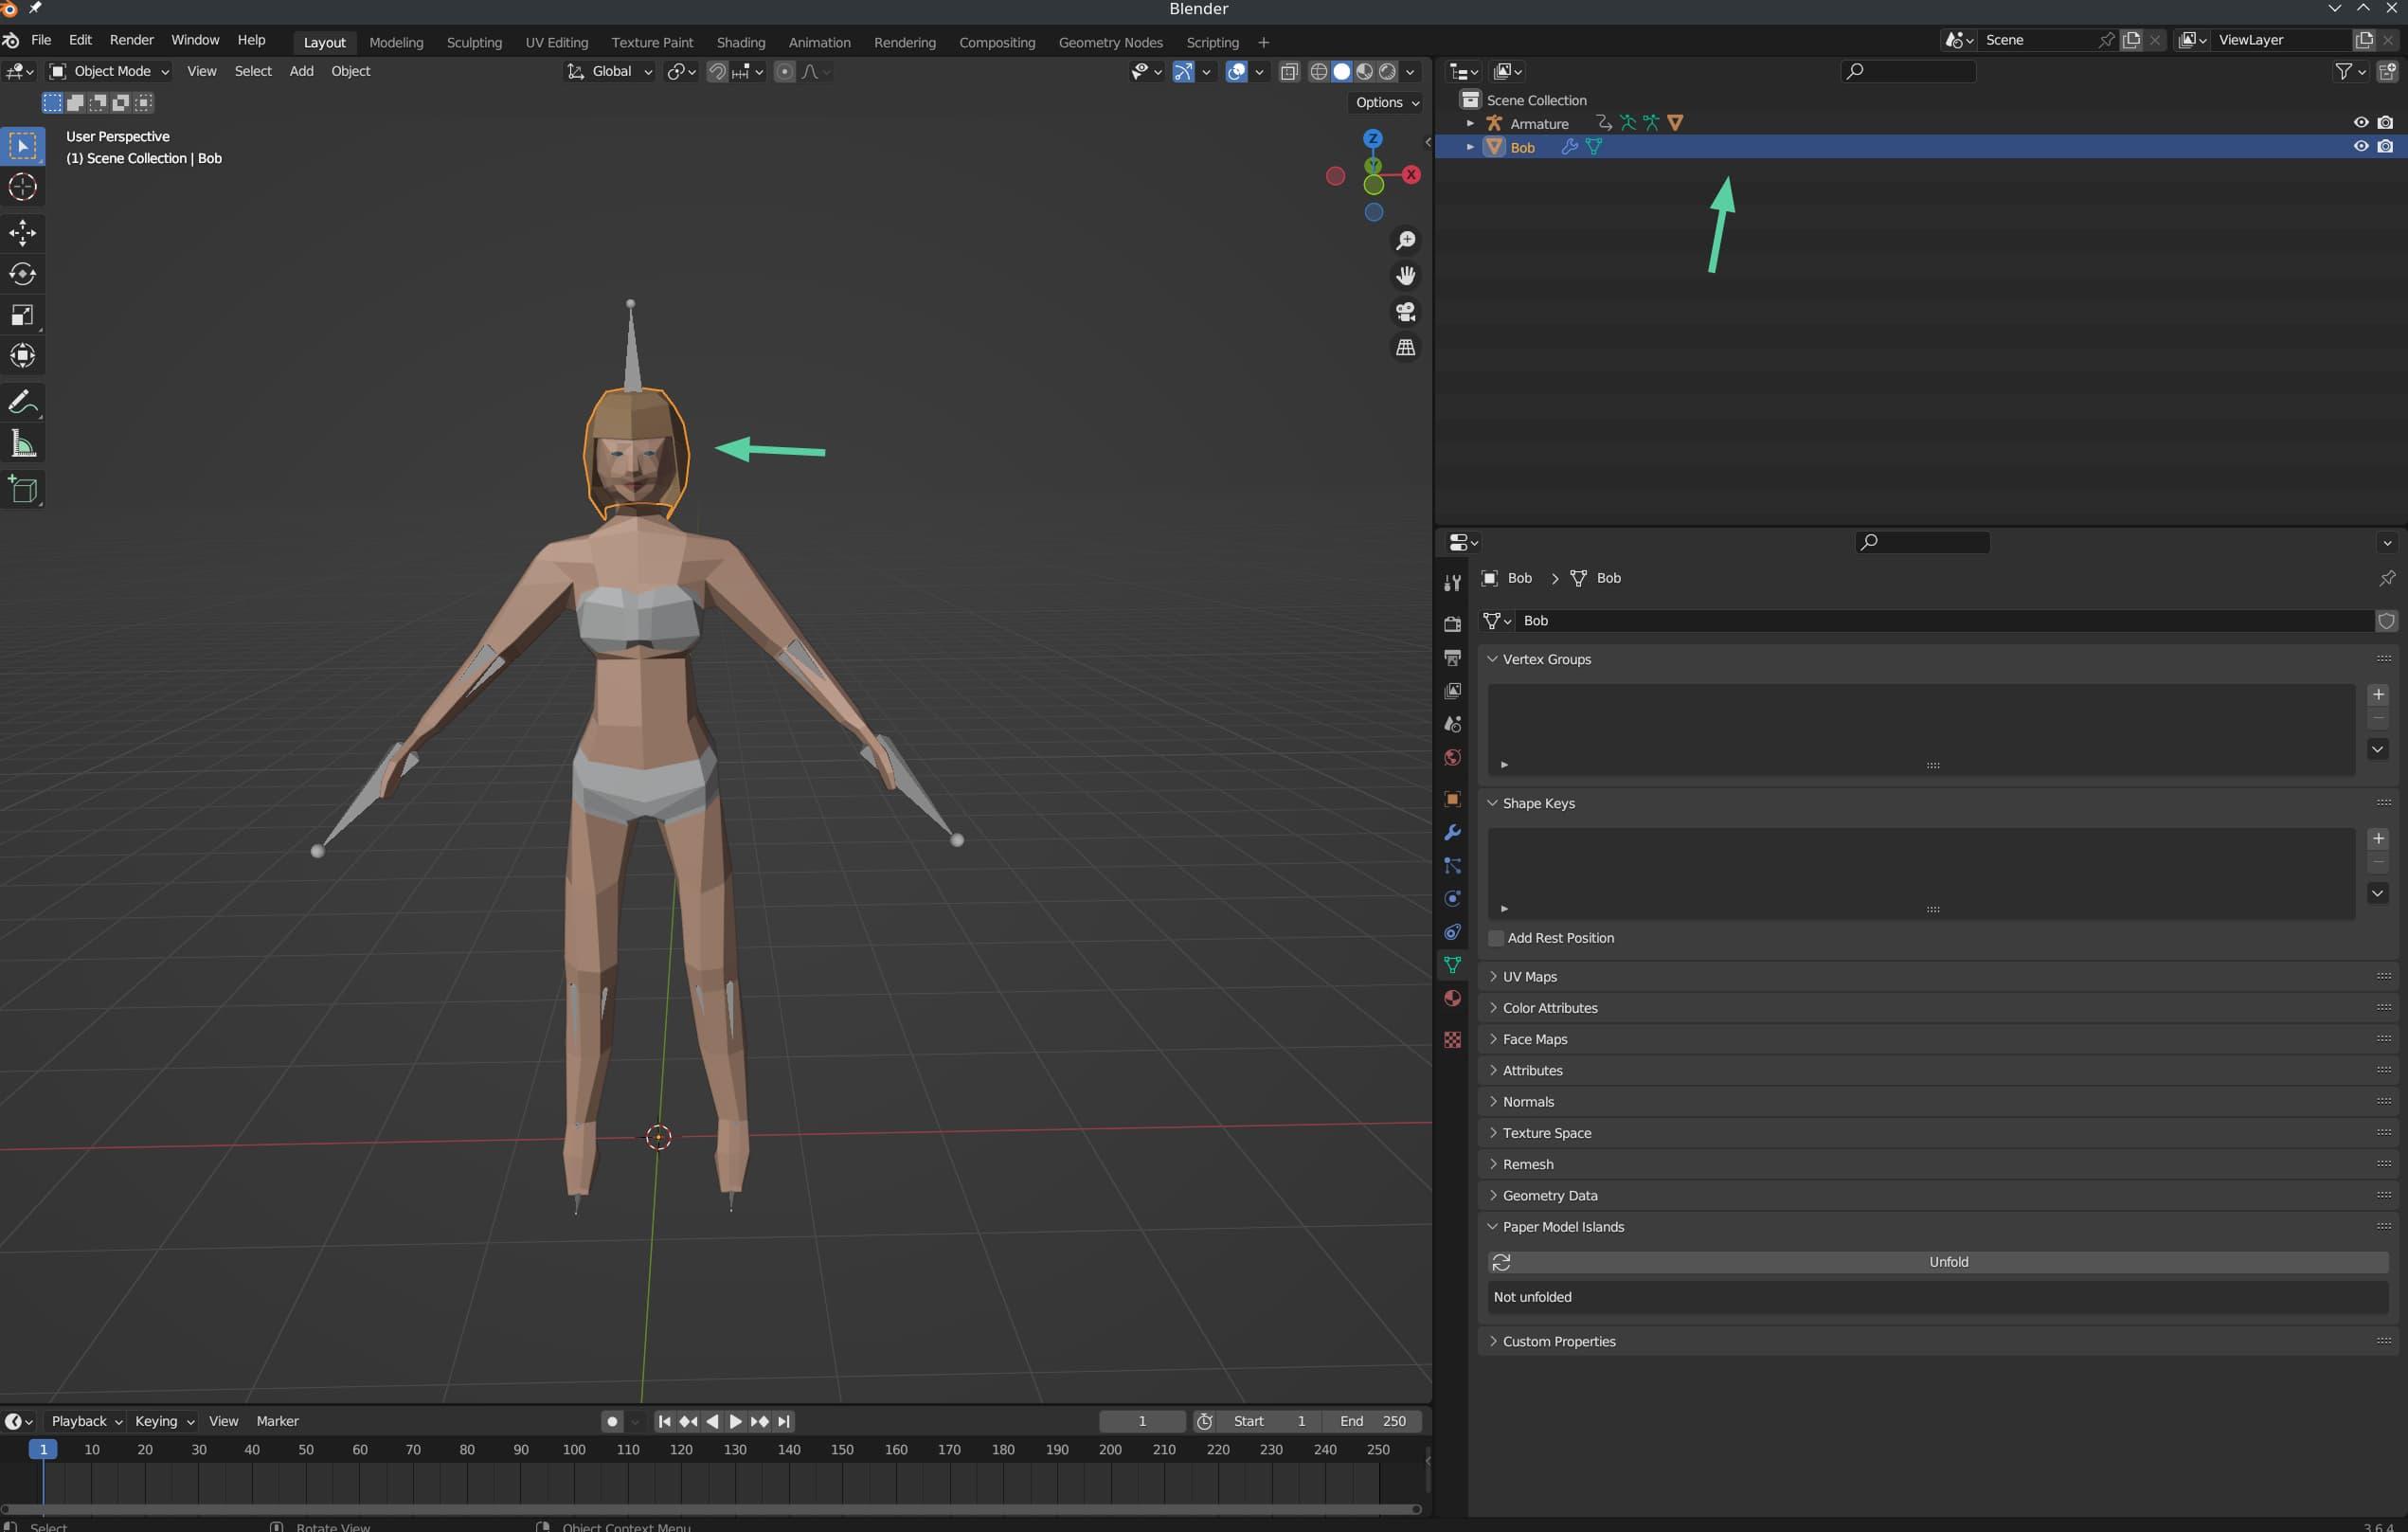
Click on the item, and it should be highlighted
Now, click on the little blue wrench icon on the right side of the screen. Close to where the little green stickman used to be. And you should see some modifiers on the item.
Now, follow closely, because this is where it can get tricky. You want to select the tiny drop-down near the right-hand side of the screen on the first modifier on the top. Then click “Apply” on the menu that pops up. You’ll want to repeat this process for whatever modifiers are active on the object at the time.
Make a note of this process, because it’s going to be identical for each item you want to attach to the model. Don’t worry, I’ve outlined the whole process further along in this post. But for each object you want to attach, you’ll want to ensure that its Modifiers tab is empty before proceeding. Most items have a Mirror and Solidify modifier. But some only have a Solidify modifier, and some have no modifiers. Either way, you’ll want to make sure the Modifiers tab is empty, for each object you want to import.
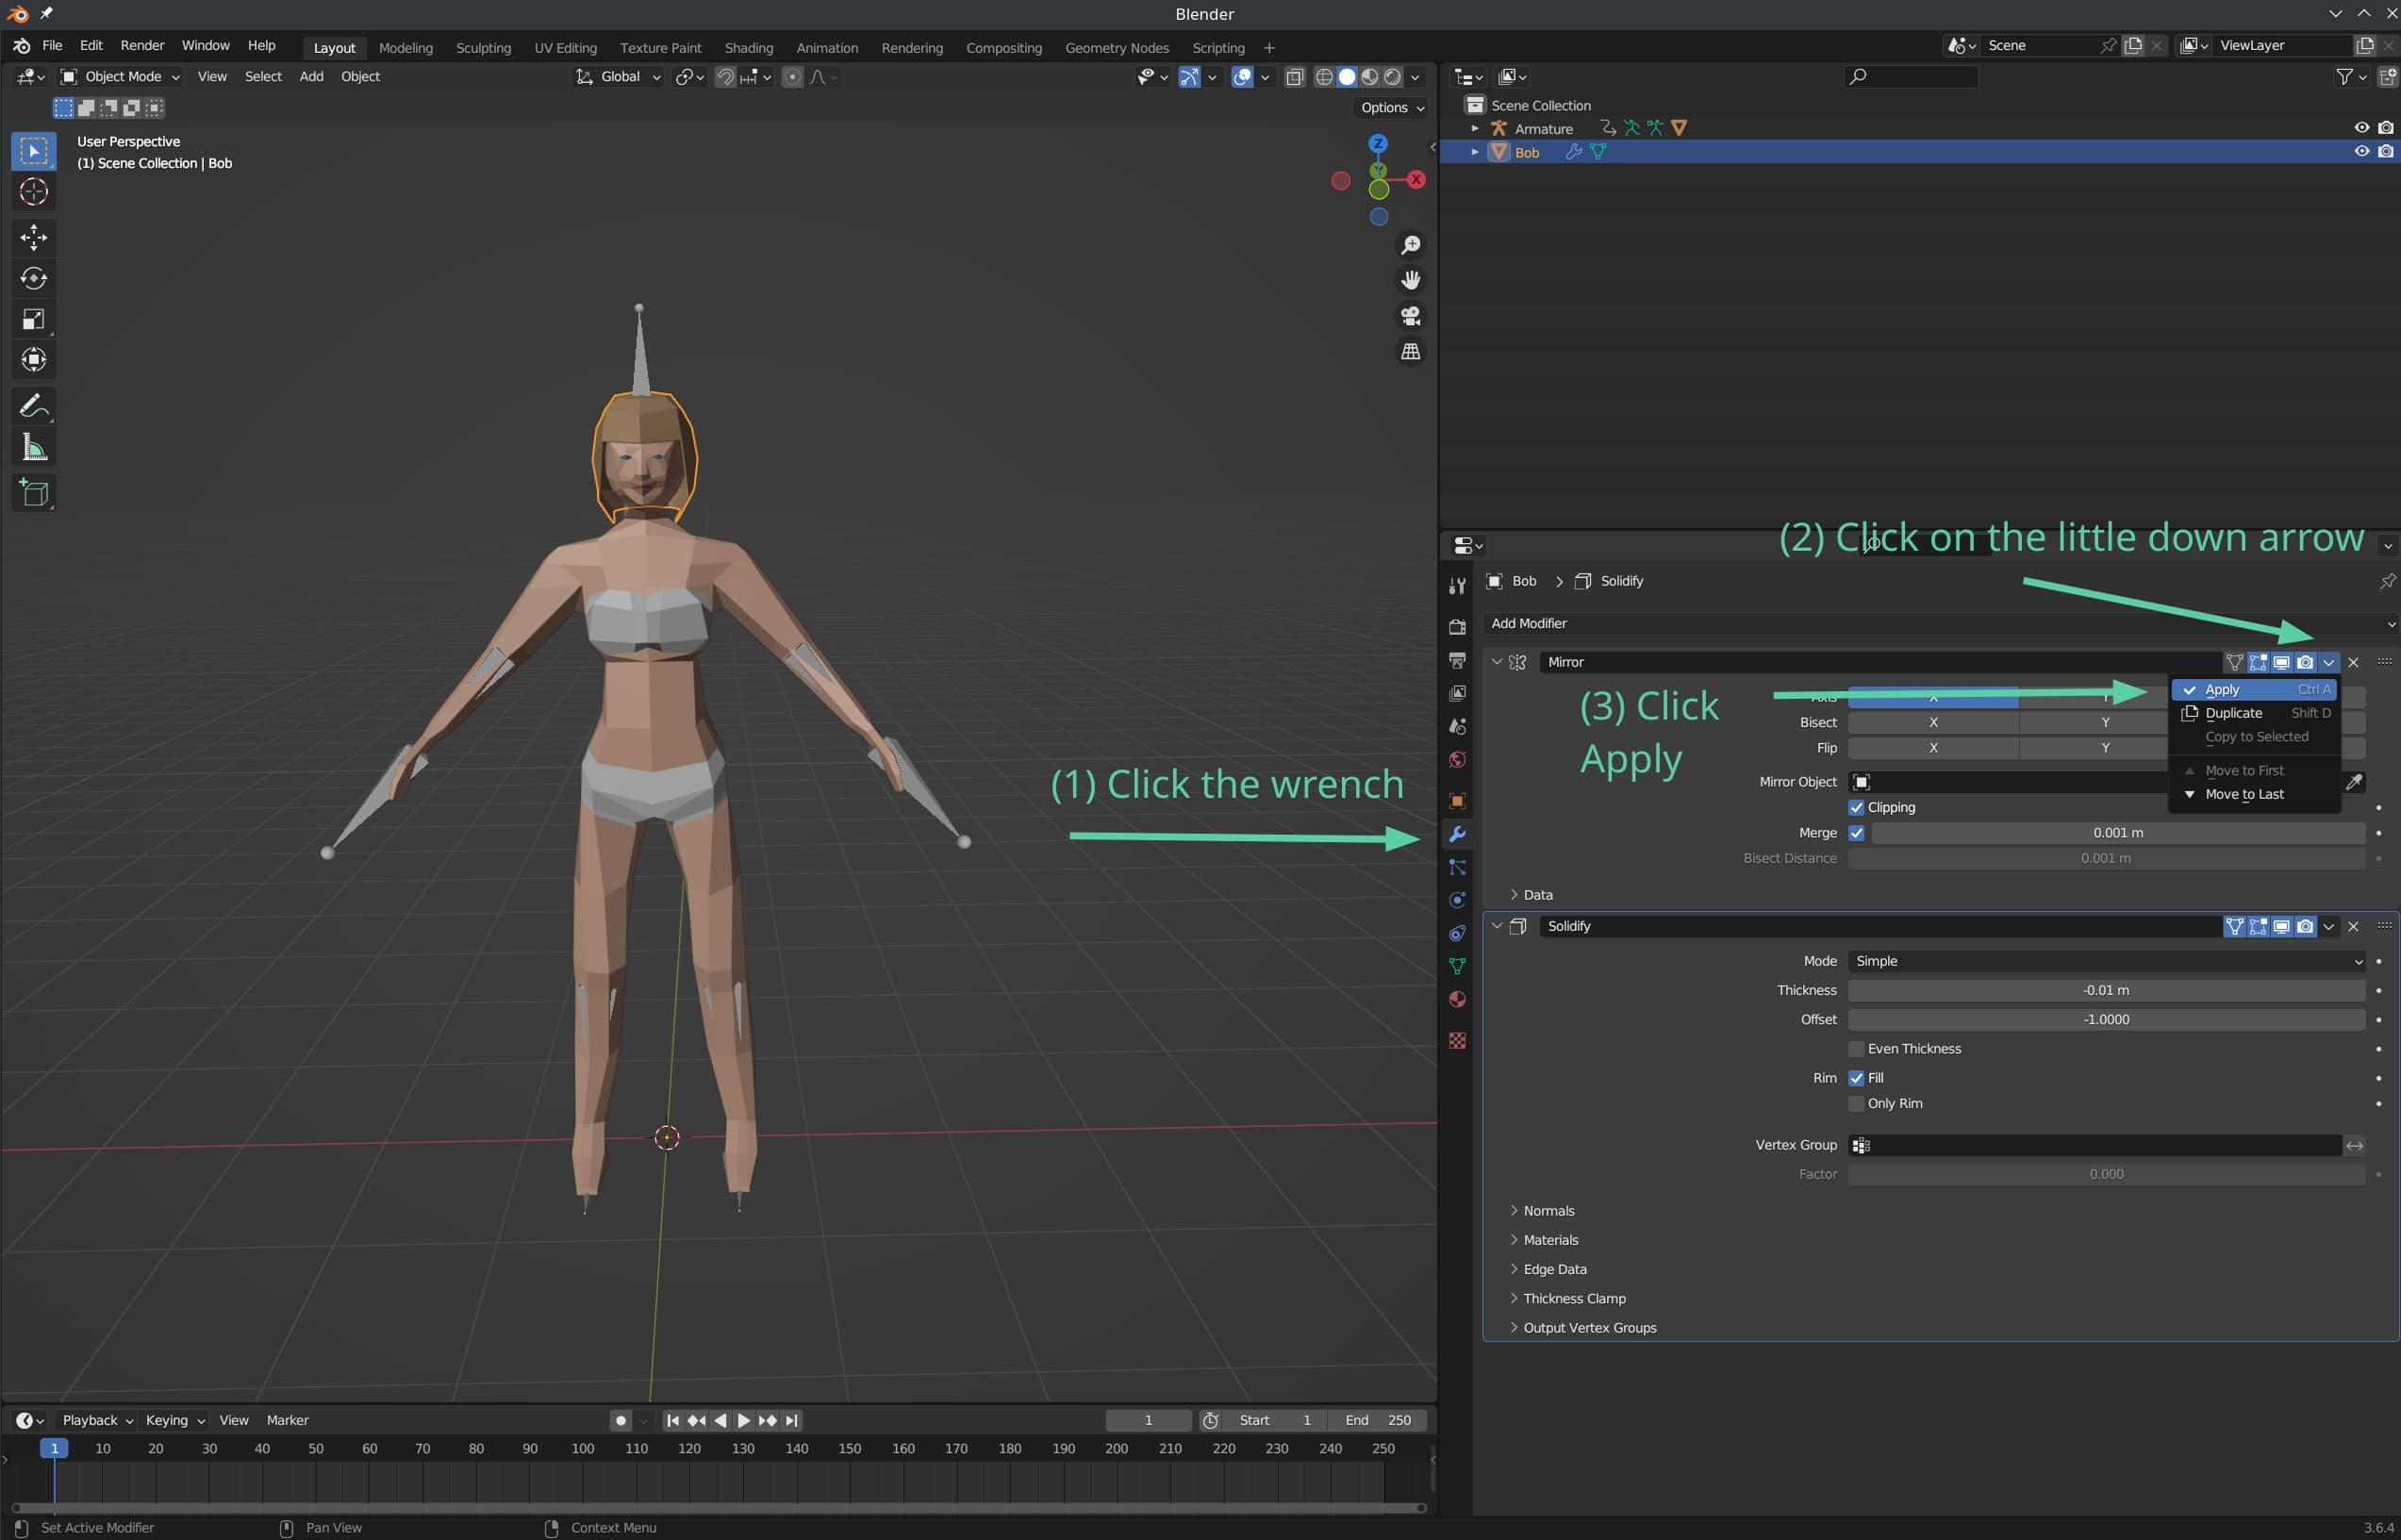
Apply each modifier on the object this way
Now, with the object still selected, hold SHIFT on your keyboard, and click on one of the bones of the armature. I prefer clicking on the one above the head or at the ends of the hands, as they are usually the easiest to click on.
You’ll know if you did it right when the object you previously selected is now highlighted in red, and the bones of the armature are now highlighted in yellow.
Shift-click on a bone of the armature, and you should see something like this
Now, hold down CTRL, and press P on your keyboard. You should see a dialog pop up. Click on the “With Empty Groups” option.
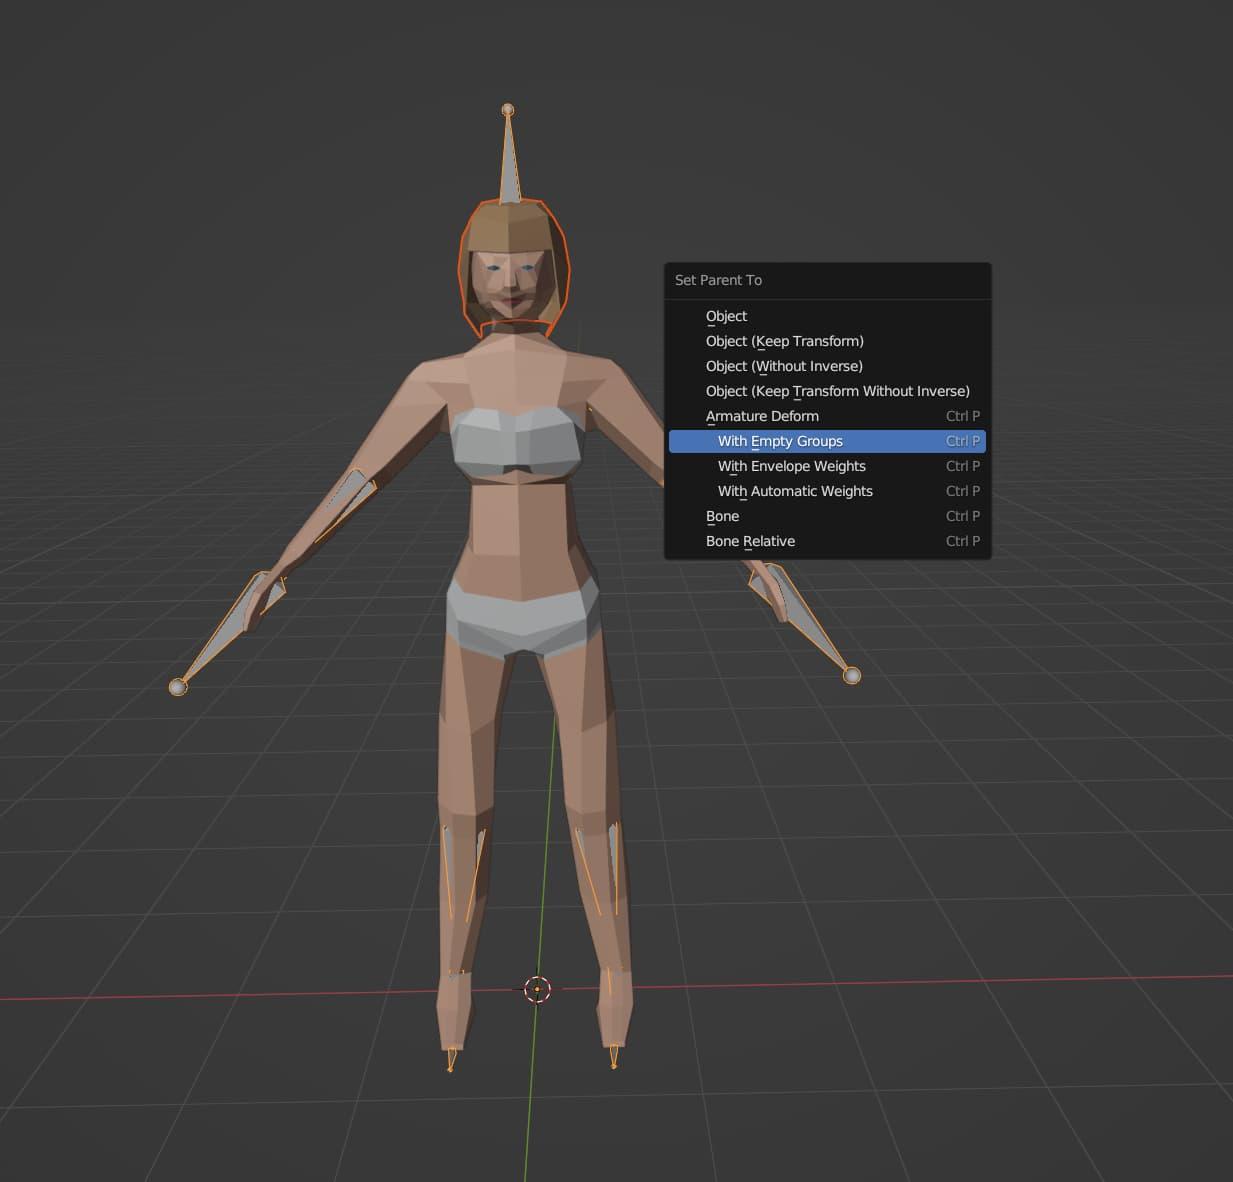
CTRL+P, select "With Empty Groups"
OK, almost done. I promise. Click on the object you want to attach again. In my case, the bob hairstyle.
Then go to the little blue wrench tab. You should see an “Armature” modifier present. Now, click on “Add Modifier” and select “Data Transfer” from the menu. You should then see a “DataTransfer” modifier pop up underneath the Armature modifier.
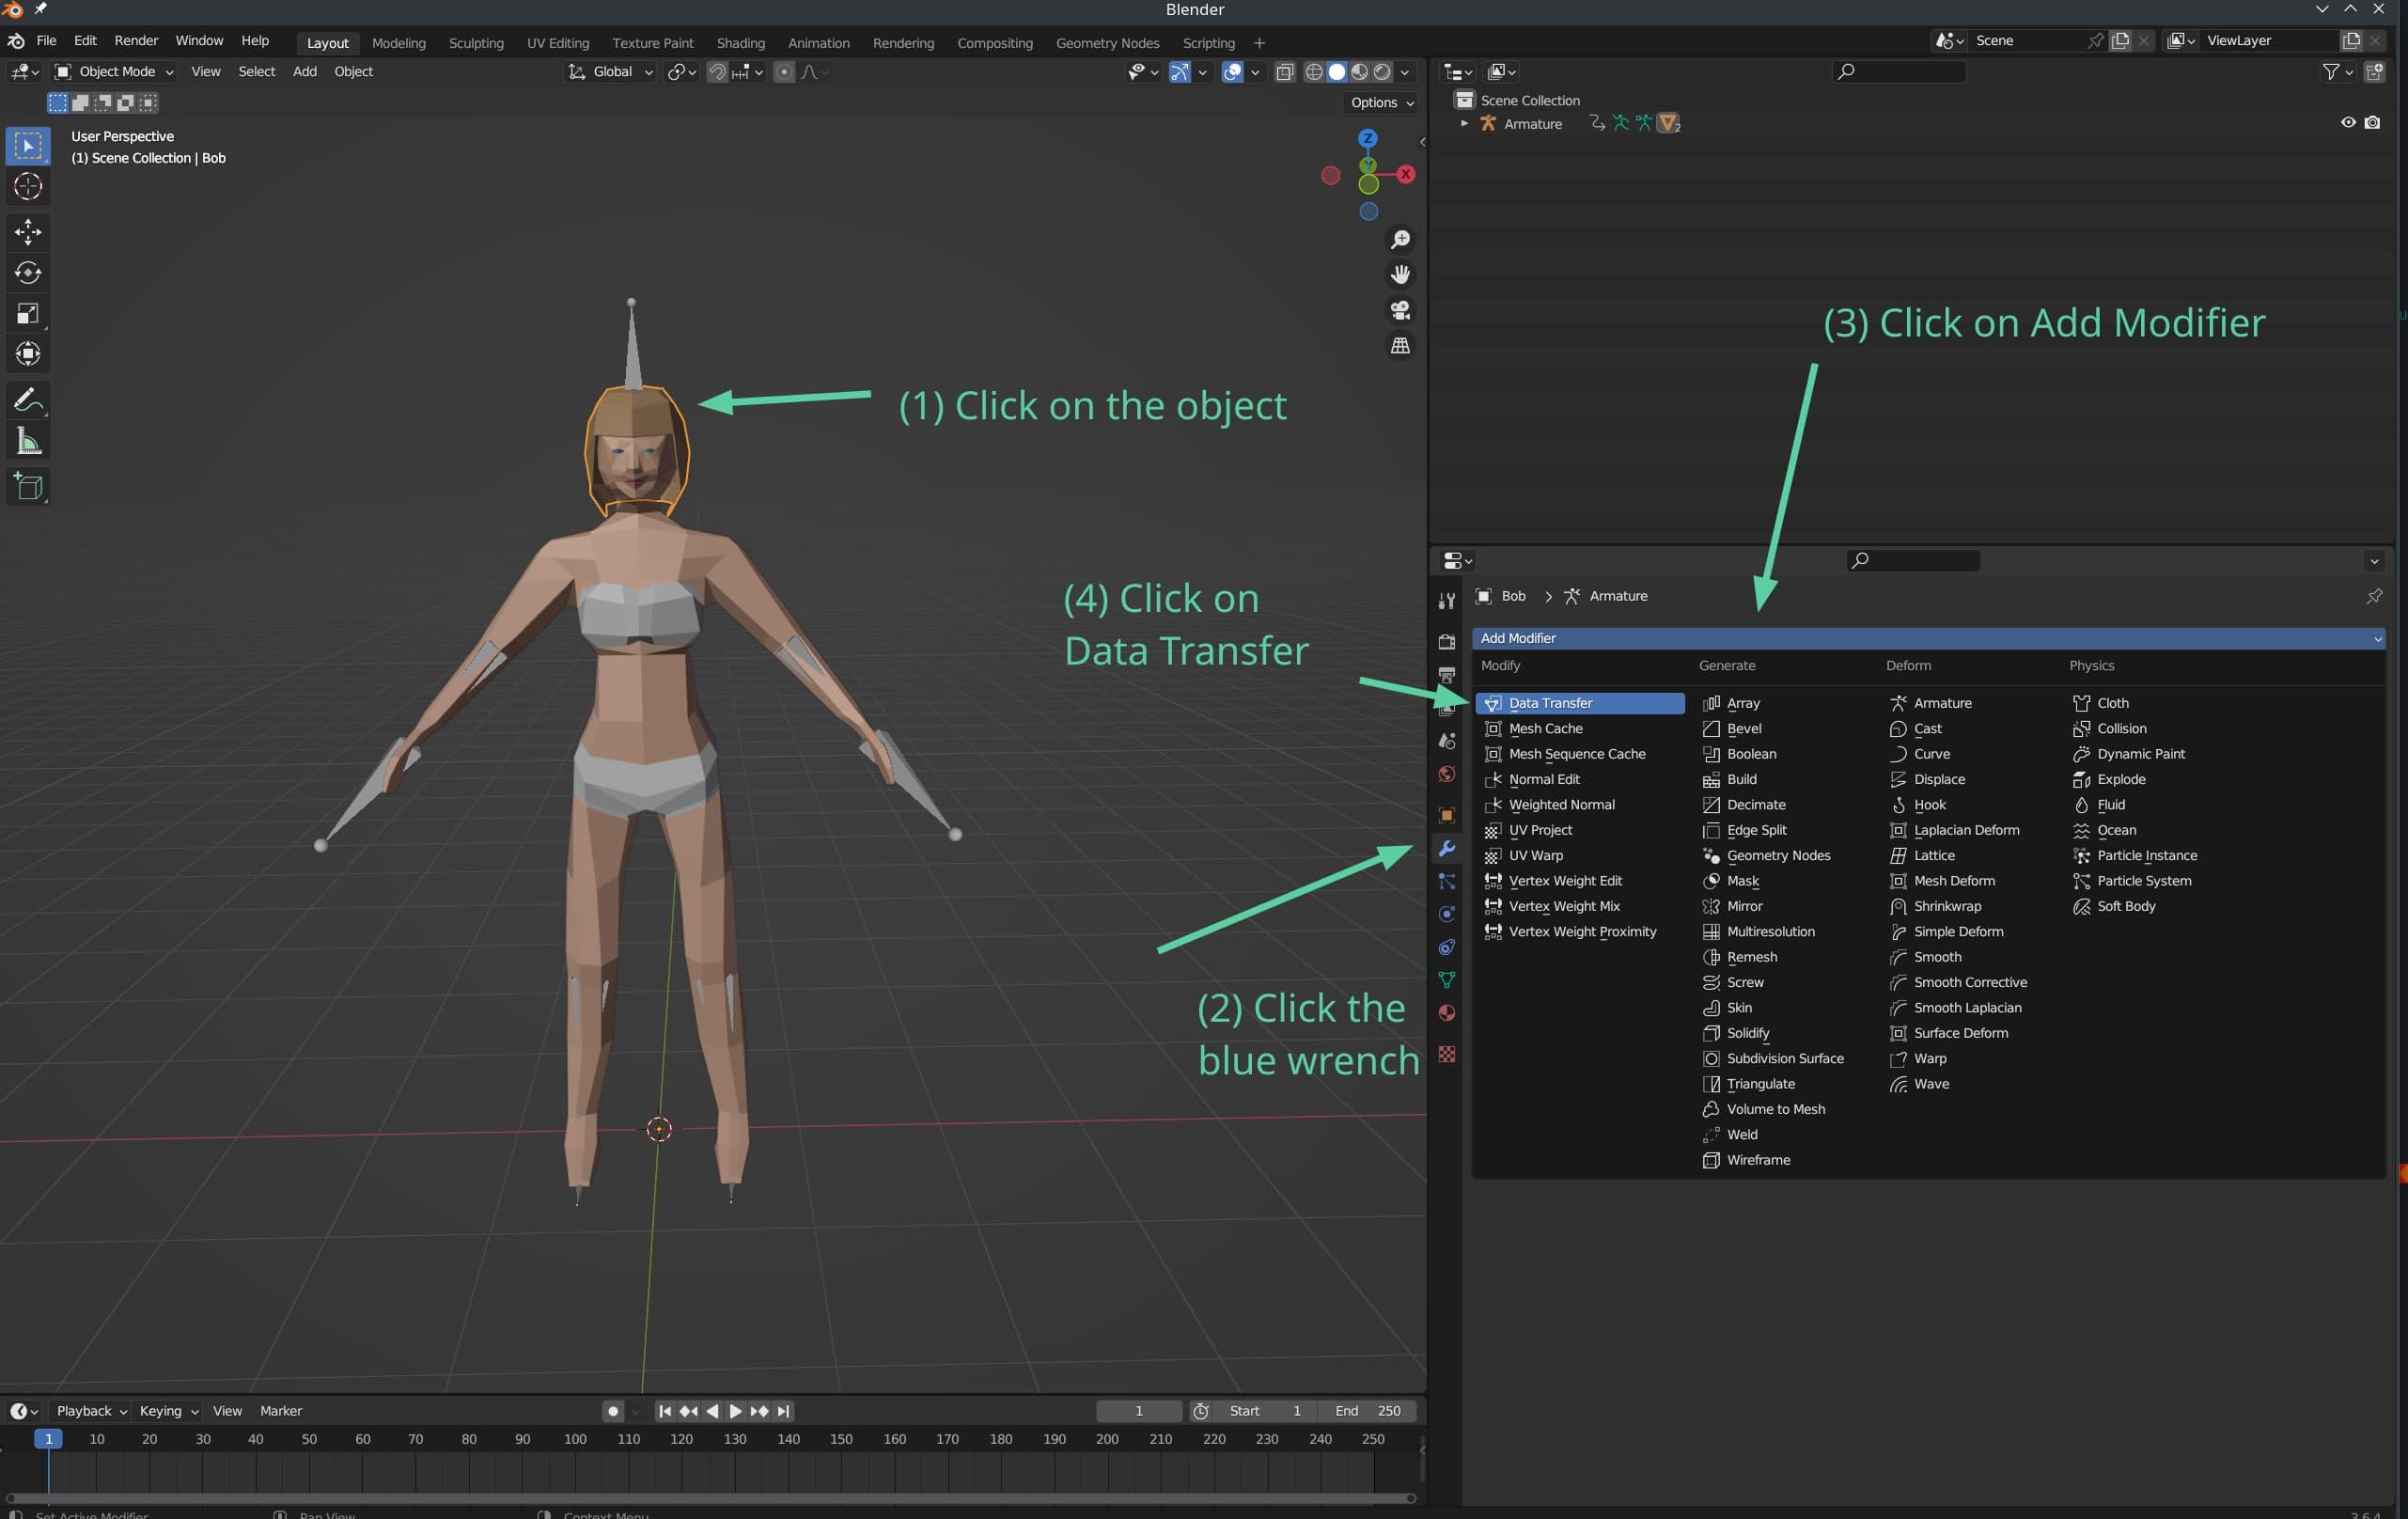
Click the object, Click the blue wrench, Click "Add Modifier", and Click "Data Transfer"
Now, select a “Source” for the DataTransfer modifier. Click on the “Source” box, and in this case it will probably be called “Base Model.001”. Click on that.
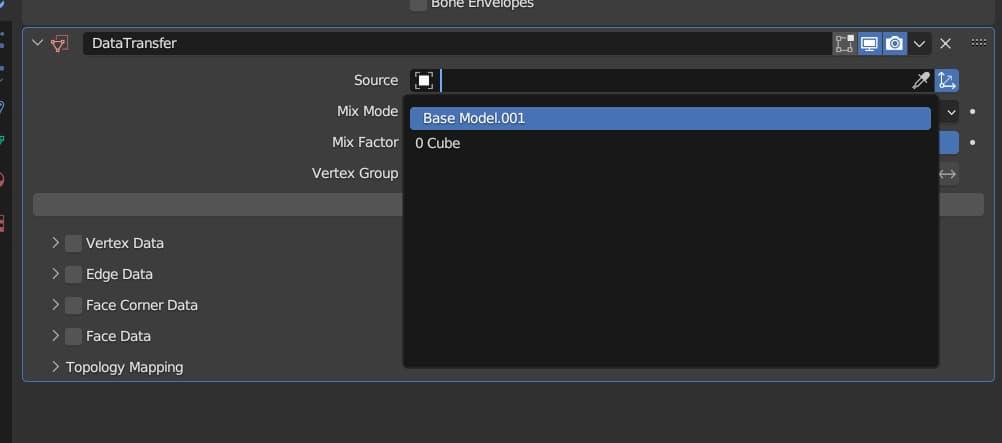
Click on the "Source" box of the DataTransfer modifier, and select "Base Model.001"
Now, click on the “Vertex Data” checkbox, inside the DataTransfer modifier. Then click on the drop-down just to the left of that checkbox, and click on the “Vertex Groups” button. It should be highlighted in blue.
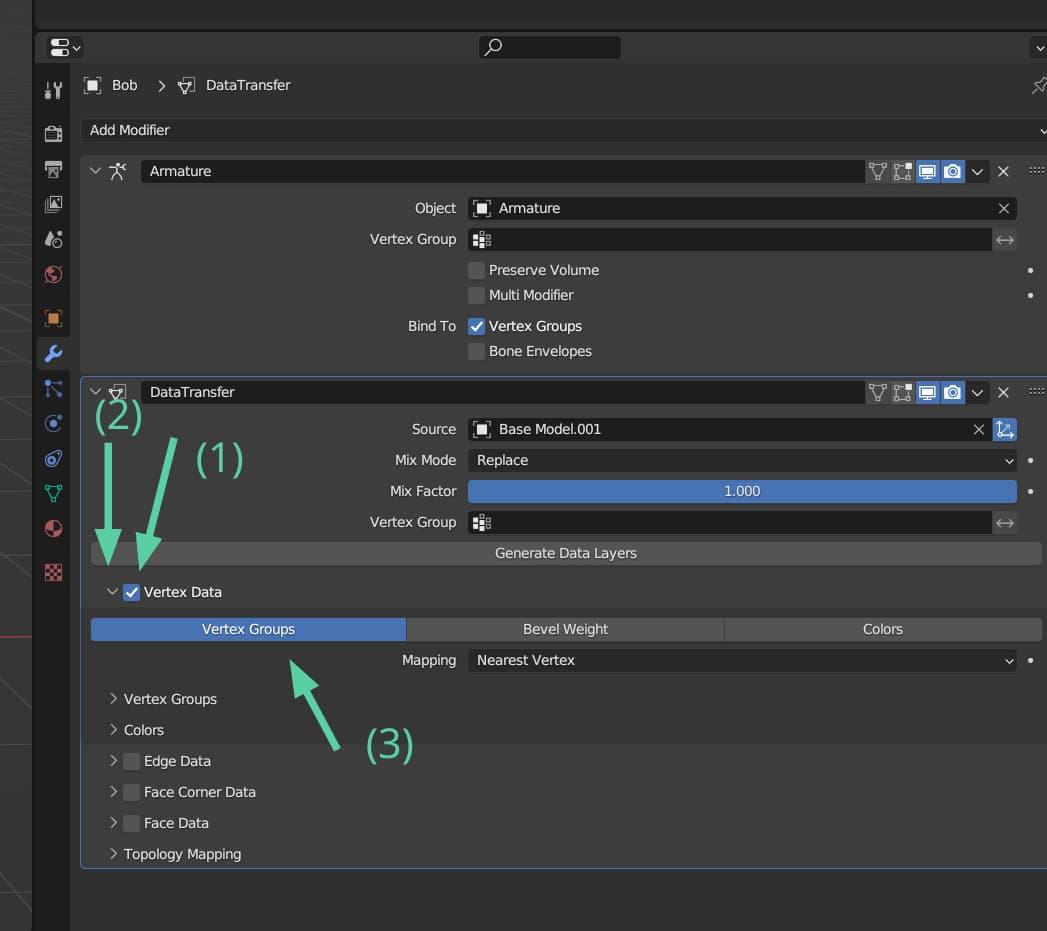
Click on the "Vertex Data" checkbox, then the arrow just to the left of the checkbox, then the Vertex Groups button
OK, I promise we’re almost through the tricky part. Apply the DataTransfer modifier, by clicking on the little black drop-down arrow on the top-right of the DataTransfer modifier. Then click Apply.
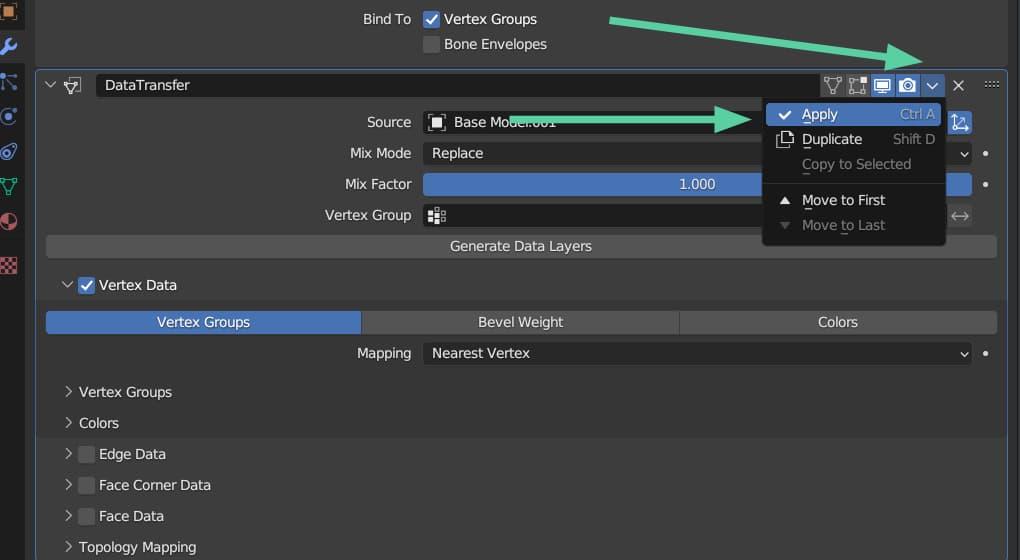
Click on the little drop-down arrow, then click Apply. The DataTransfer modifier should then disappear
It’s at this point you’ll probably want to save your model. I’d have mentioned saving earlier, but honestly up until this point there wasn’t much worth saving. Now like I said, the tricky part is done. You can save your model by pressing CTRL and S on your keyboard, or by going to “File > Save”. You can then give it a name, and put it where you want it.
Now, it’s time to repeat the process. Woah, woah, I know I promised an end to the trickiness. But trust me when I say it’s the exact same as what you just did. And I know Blender’s interface can be a lot to navigate. Especially for a beginner. (Although apparently it’s way easier than older versions of Blender were.) But sometimes you just have to find a way to get used to it. Doing repetitive steps like this can actually help you to build muscle memory of the process.
Anyway, I’m going to import some more items from the OverScore Proxy set. Namely, the “ATC Headset”, “Square Glasses”, “Short-Sleeve Sweatshirt”, “Leggings”, and “Dress Flats”. Feel free to import whatever items you want.
The process, may I remind you, is as follows. Feel free to refer back to the images above.
Import the object you want to attach
File > Append…
Open up the “Object” folder of the OverScore Proxy .blend file
Use the searchbar at the top-right of the import window to look for something you want to attach to the model
Double-click on the object you would like to import
Once the object has been imported, ensure that the Armature is in the “Rest Position”
Click on one of the bones of the Armature
Click on the little green stickman in the middle-right of the screen
Make sure the “Rest Position” button is highlighted
Apply all the current modifiers on the object
With the object you want to attach clicked on, click on the blue wrench
Apply a modifier by clicking on the little down arrow on the top-right of the modifier
Then click Apply on the menu that pops up
Repeat this process until the object you want to import has no active modifiers remaining in the list
Parent the object to the armature
With the object (the hair, item of clothing, etc.) still selected in the 3D view, hold SHIFT and click on a bone of the armature
The object should be highlighted in red, and the armature should be highlighted in yellow
Now hold CTRL on your keyboard, and hit P
Click on “With Empty Weights” from the menu that pops up
Apply a Data Transfer modifier to the object you want to attach
Click on the object again
Click on the blue wrench again
Click on “Add Modifier” and select the Data Transfer modifier
Select “Base Model.001” as the Source of the DataTransfer modifier
Click on the “Vertex Data” checkbox, then the arrow to the left of the checkbox, then the “Vertex Groups” button
Apply the DataTransfer modifier, by clicking on the little down arrow at the top-right of the modifier, and clicking Apply
I do wish this process could be simpler or more beginner-friendly. But it’s still a work-in-progress. I might be able to find ways to refine this process going forward. And hey, maybe this is your excuse to learn more about Blender. Which I would highly recommend, since it’s an awesome program.
But anyway, feel free to save your progress. Assuming you’ve followed this process carefully (and assuming I’ve documented it well enough) you should have all the clothing, hair, and accessories attached to your animated model. Congratulations!
One last thing: click on one of the bones of the Armature, go to the little green stickman, and select the “Pose Position” again. Your character should have adopted a pose from the animation. And ideally, all the clothes and hair should have moved along with the character.
You may notice some parts of the body clipping through the clothes. That’s… well that’s unavoidable given this current process, unfortunately. If you have some experience with Blender, it should be fairly easy to clean up that sort of thing. Just move a few vertices around. And certain items of clothing might be more or less susceptible to that clipping. It also depends on what sort of animation you’ve added to your character.
Now, I could go on and on about certain parts of this process, or other things you can do. But for now, I think I’ve written enough for one blog post. So let’s end it off by doing something (hopefully) fun, shall we?
OK, at this point I’d recommend downloading the Godot game engine if you don’t already have it installed on your computer. It’s great, and honestly very beginner friendly. Just like Blender, there are tons of great tutorials out there for getting started with Godot. You can also import characters you make via this process into other game engines.
But for now, I just want to cover getting the animated character into Godot, and watching the animation play out.
So, if you have Godot installed (I’m using version 4.1.2, but any version of Godot 4 should probably function similarly), open it up. You should see the prompt for a “New Project”. Hit it. In the dialog that pops up, give your project a name, and find a folder for it to go. Then click “Create & Edit”
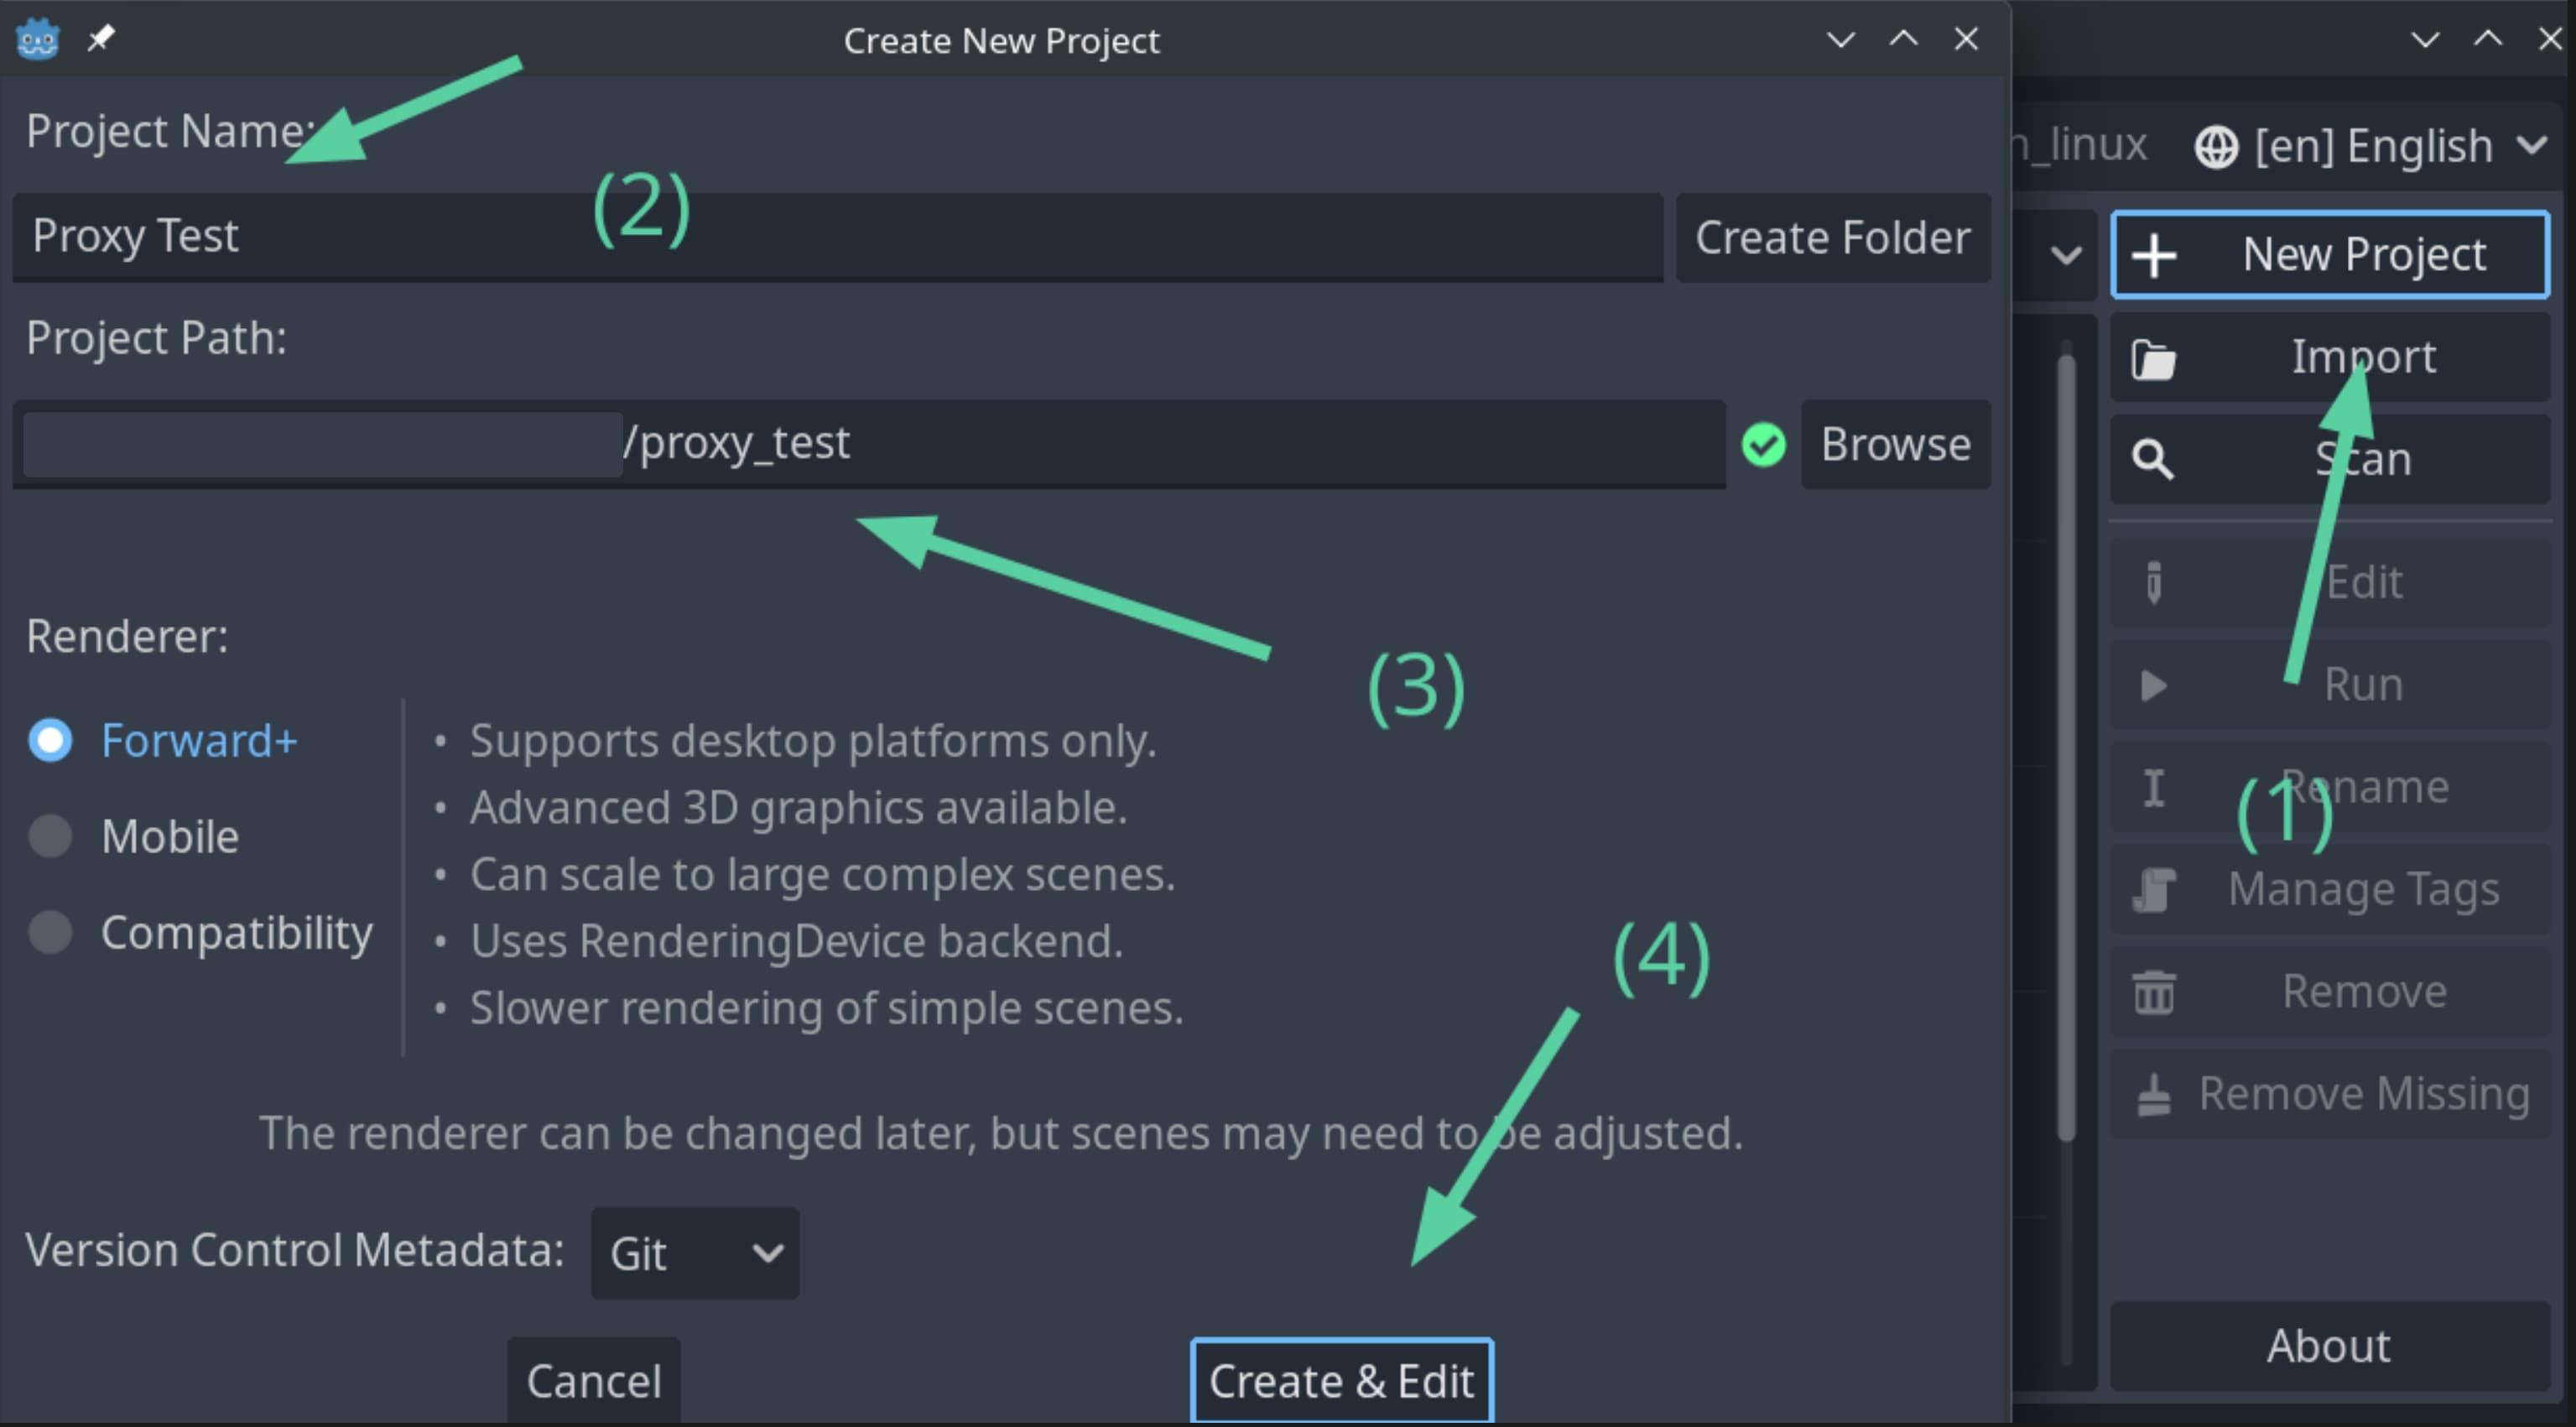
Creating a new Godot project
You should now be presented with the Godot game engine window. This isn’t a Godot tutorial, but I do want to show you something fun. So go back to Blender, and click on “File > Export > GLTF 2.0 (.glb/.gltf)”
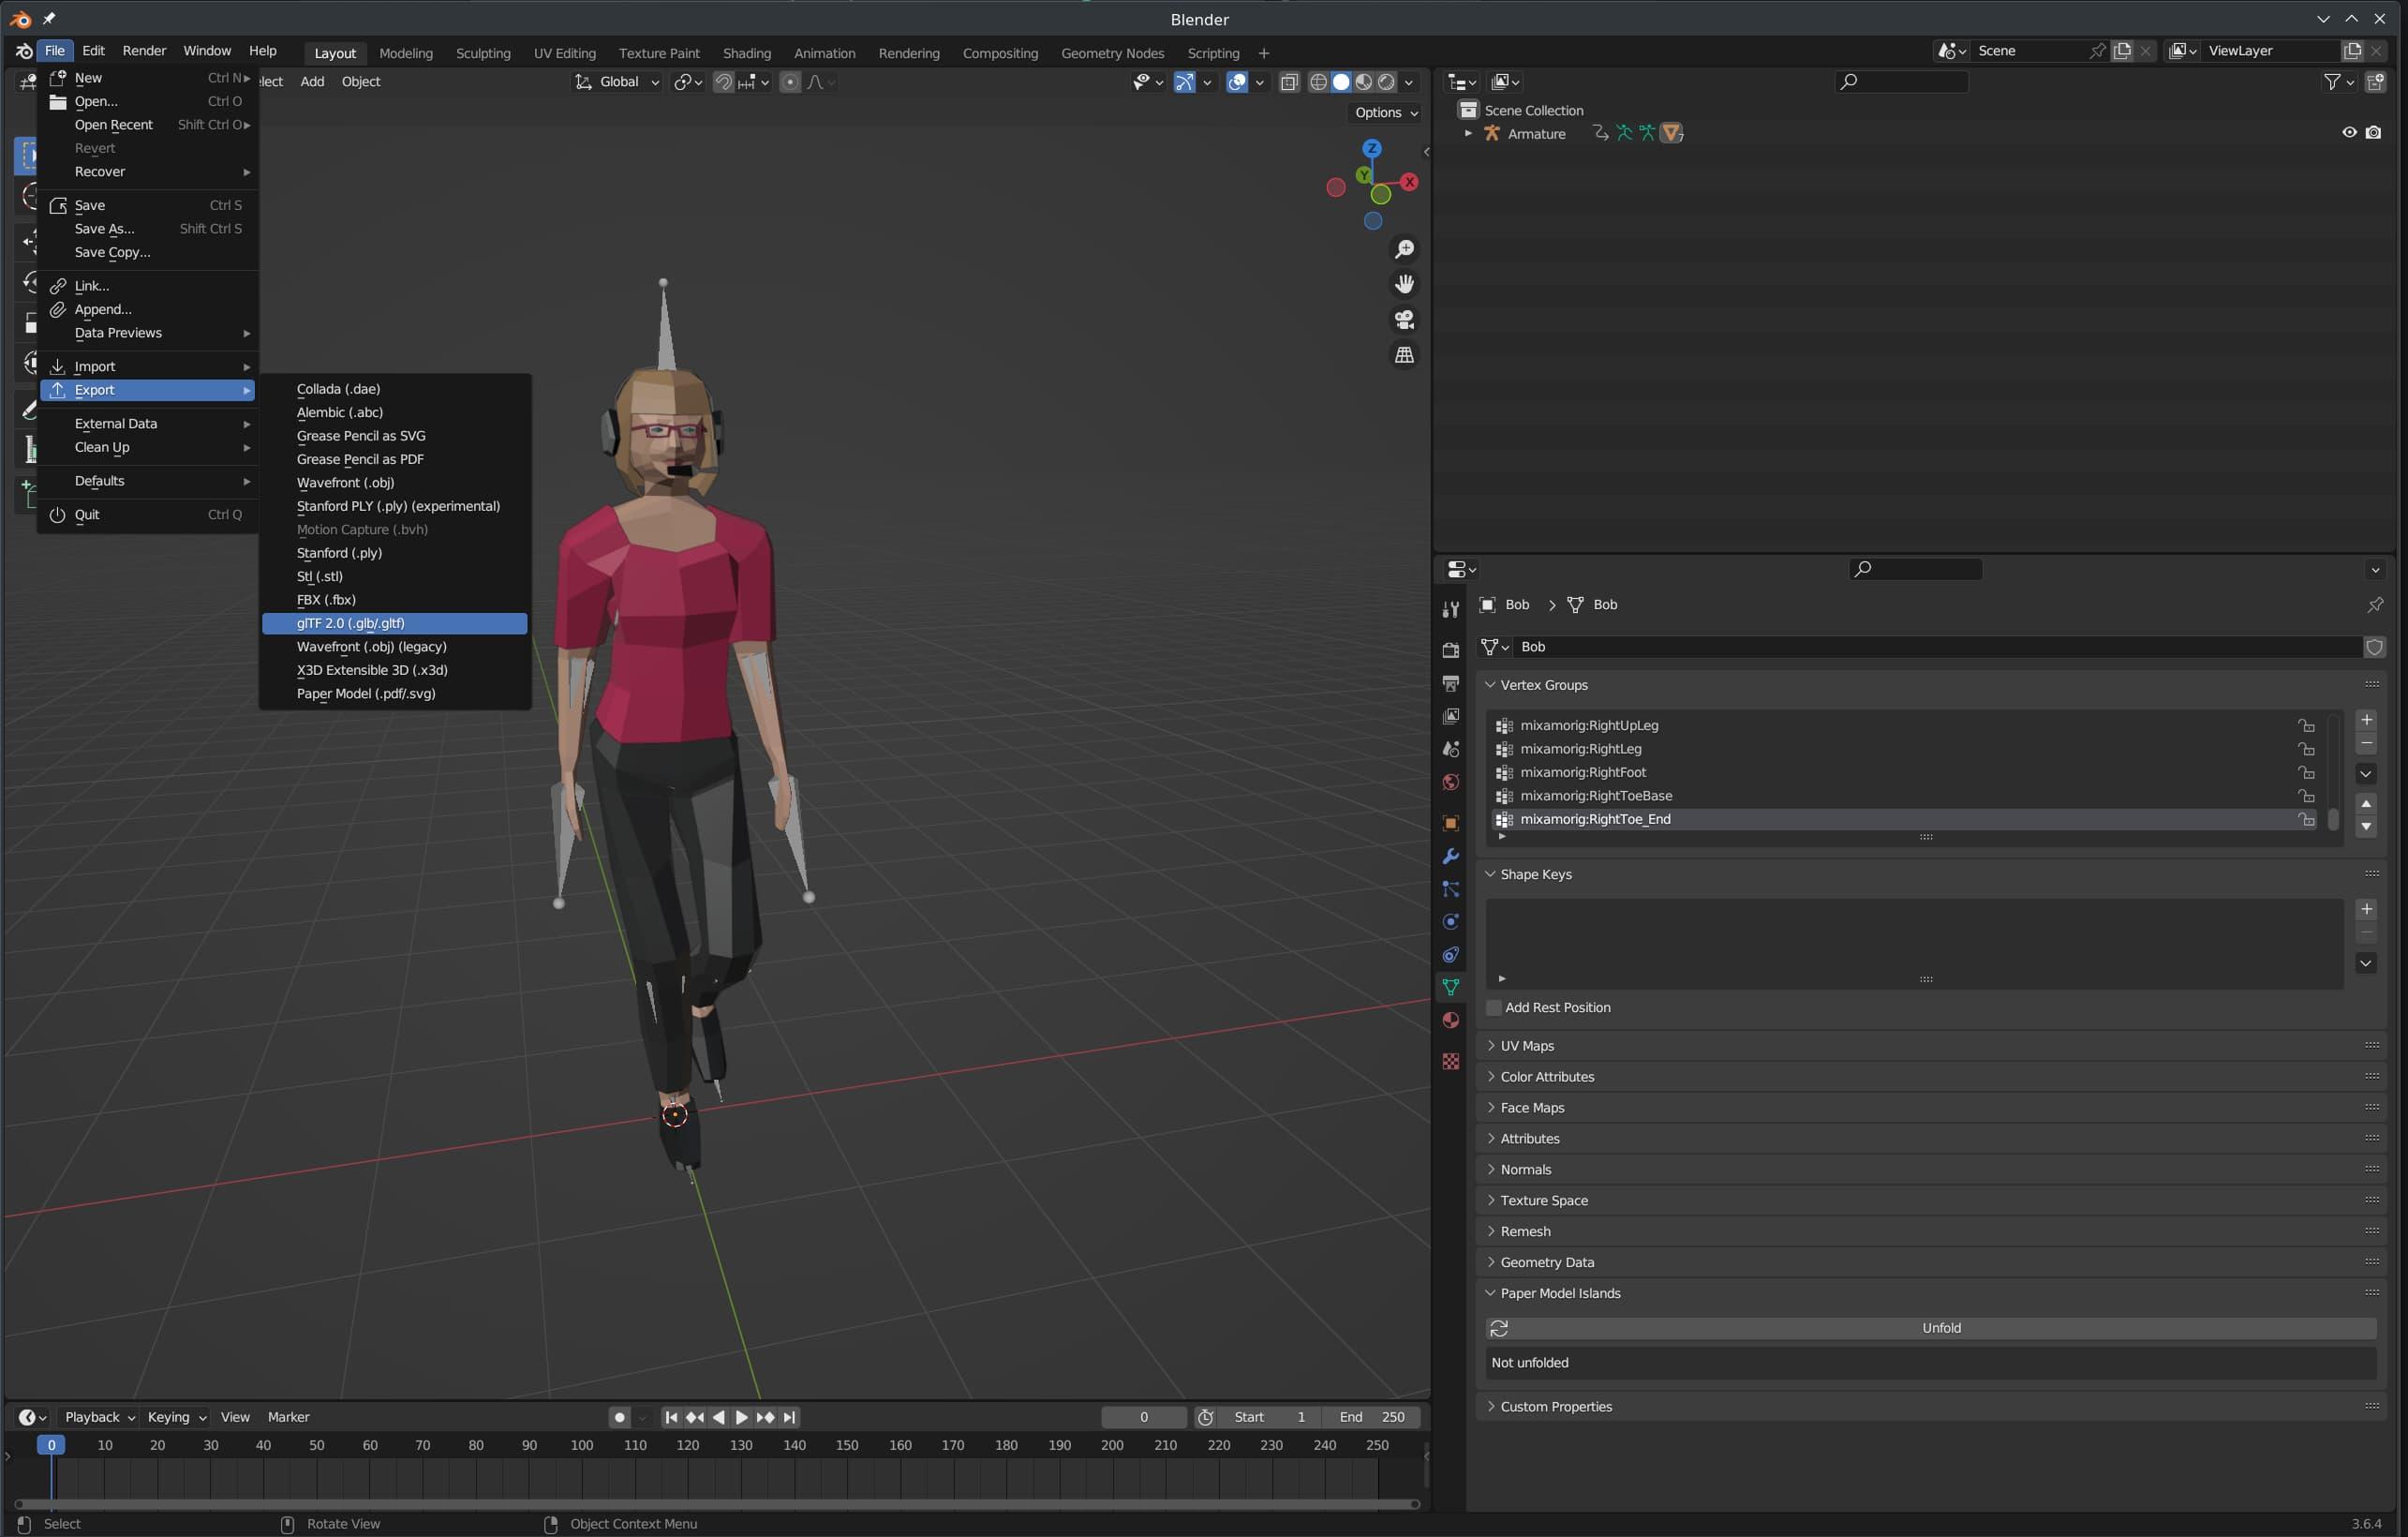
Export as a GLTF 2.0. Save it somewhere you'll remember it
Once you’ve exported your model as a GLTF, you’ll want to find the exported .glb file, and import it into your Godot project.
So open your file explorer, look for the exported .glb file, and move or copy it to the folder where your new Godot project is stored. Once you’ve done that, go back to Godot and you should see its filename appear in the bottom-left of the screen.
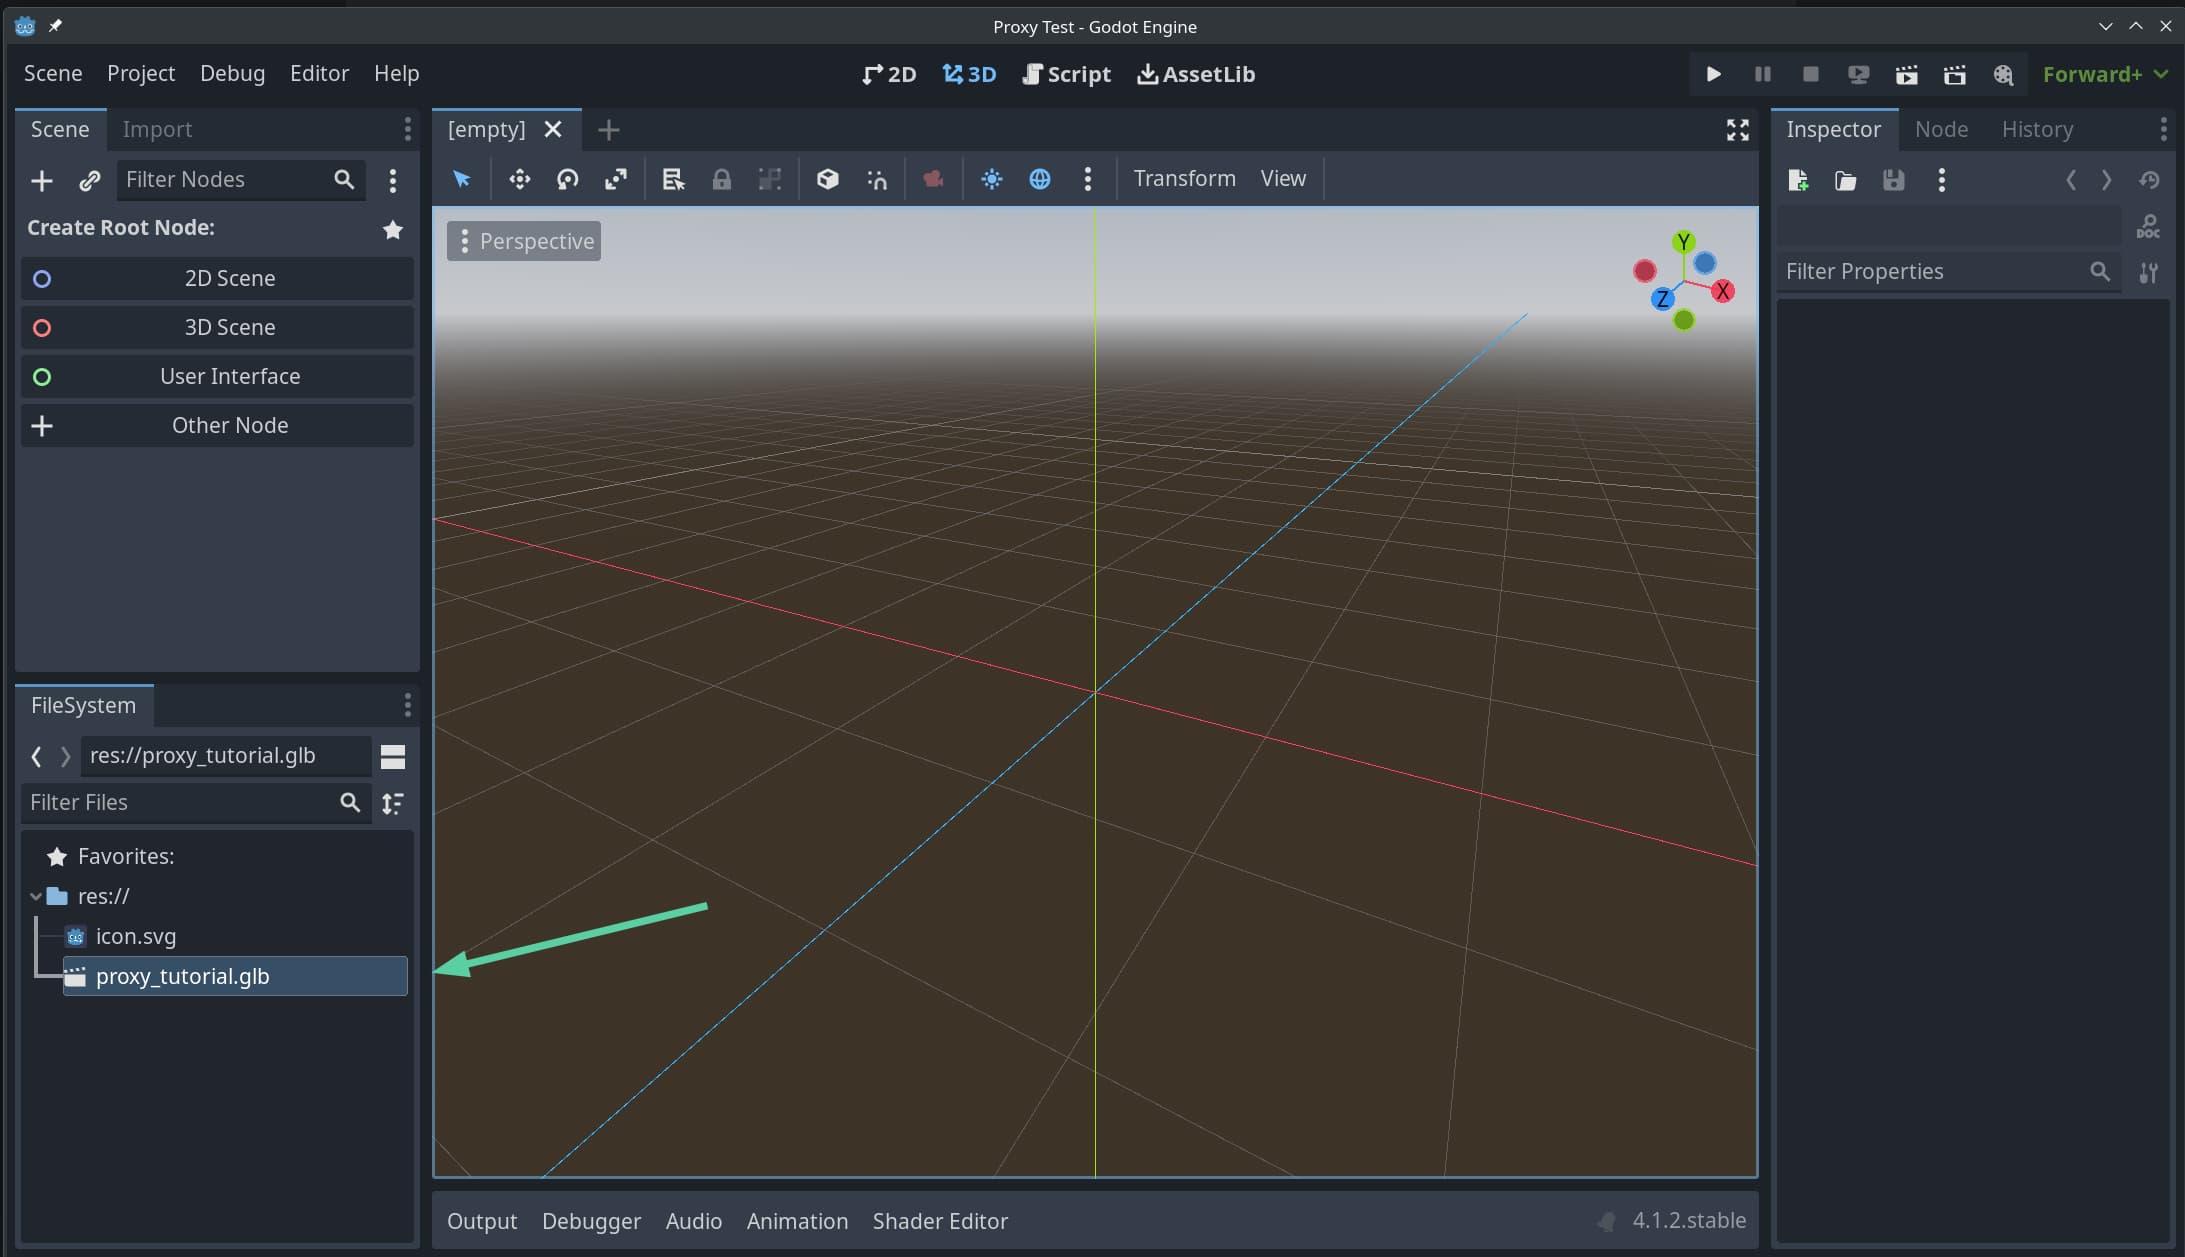
Your exported .glb file should appear in Godot, once you've moved it from where you saved it to the folder where your new Godot project is located
Now, right-click on your .glb’s file name in Godot, and click on “New Inherited Scene”. You should then see your 3D character show up in the 3D viewer. You may need to use your mouse to pan around and see the full character.

Right-click on the file, and click on New Inherited Scene
Next, hold CTRL and press S to save the scene. Click Save on the dialog that pops up.
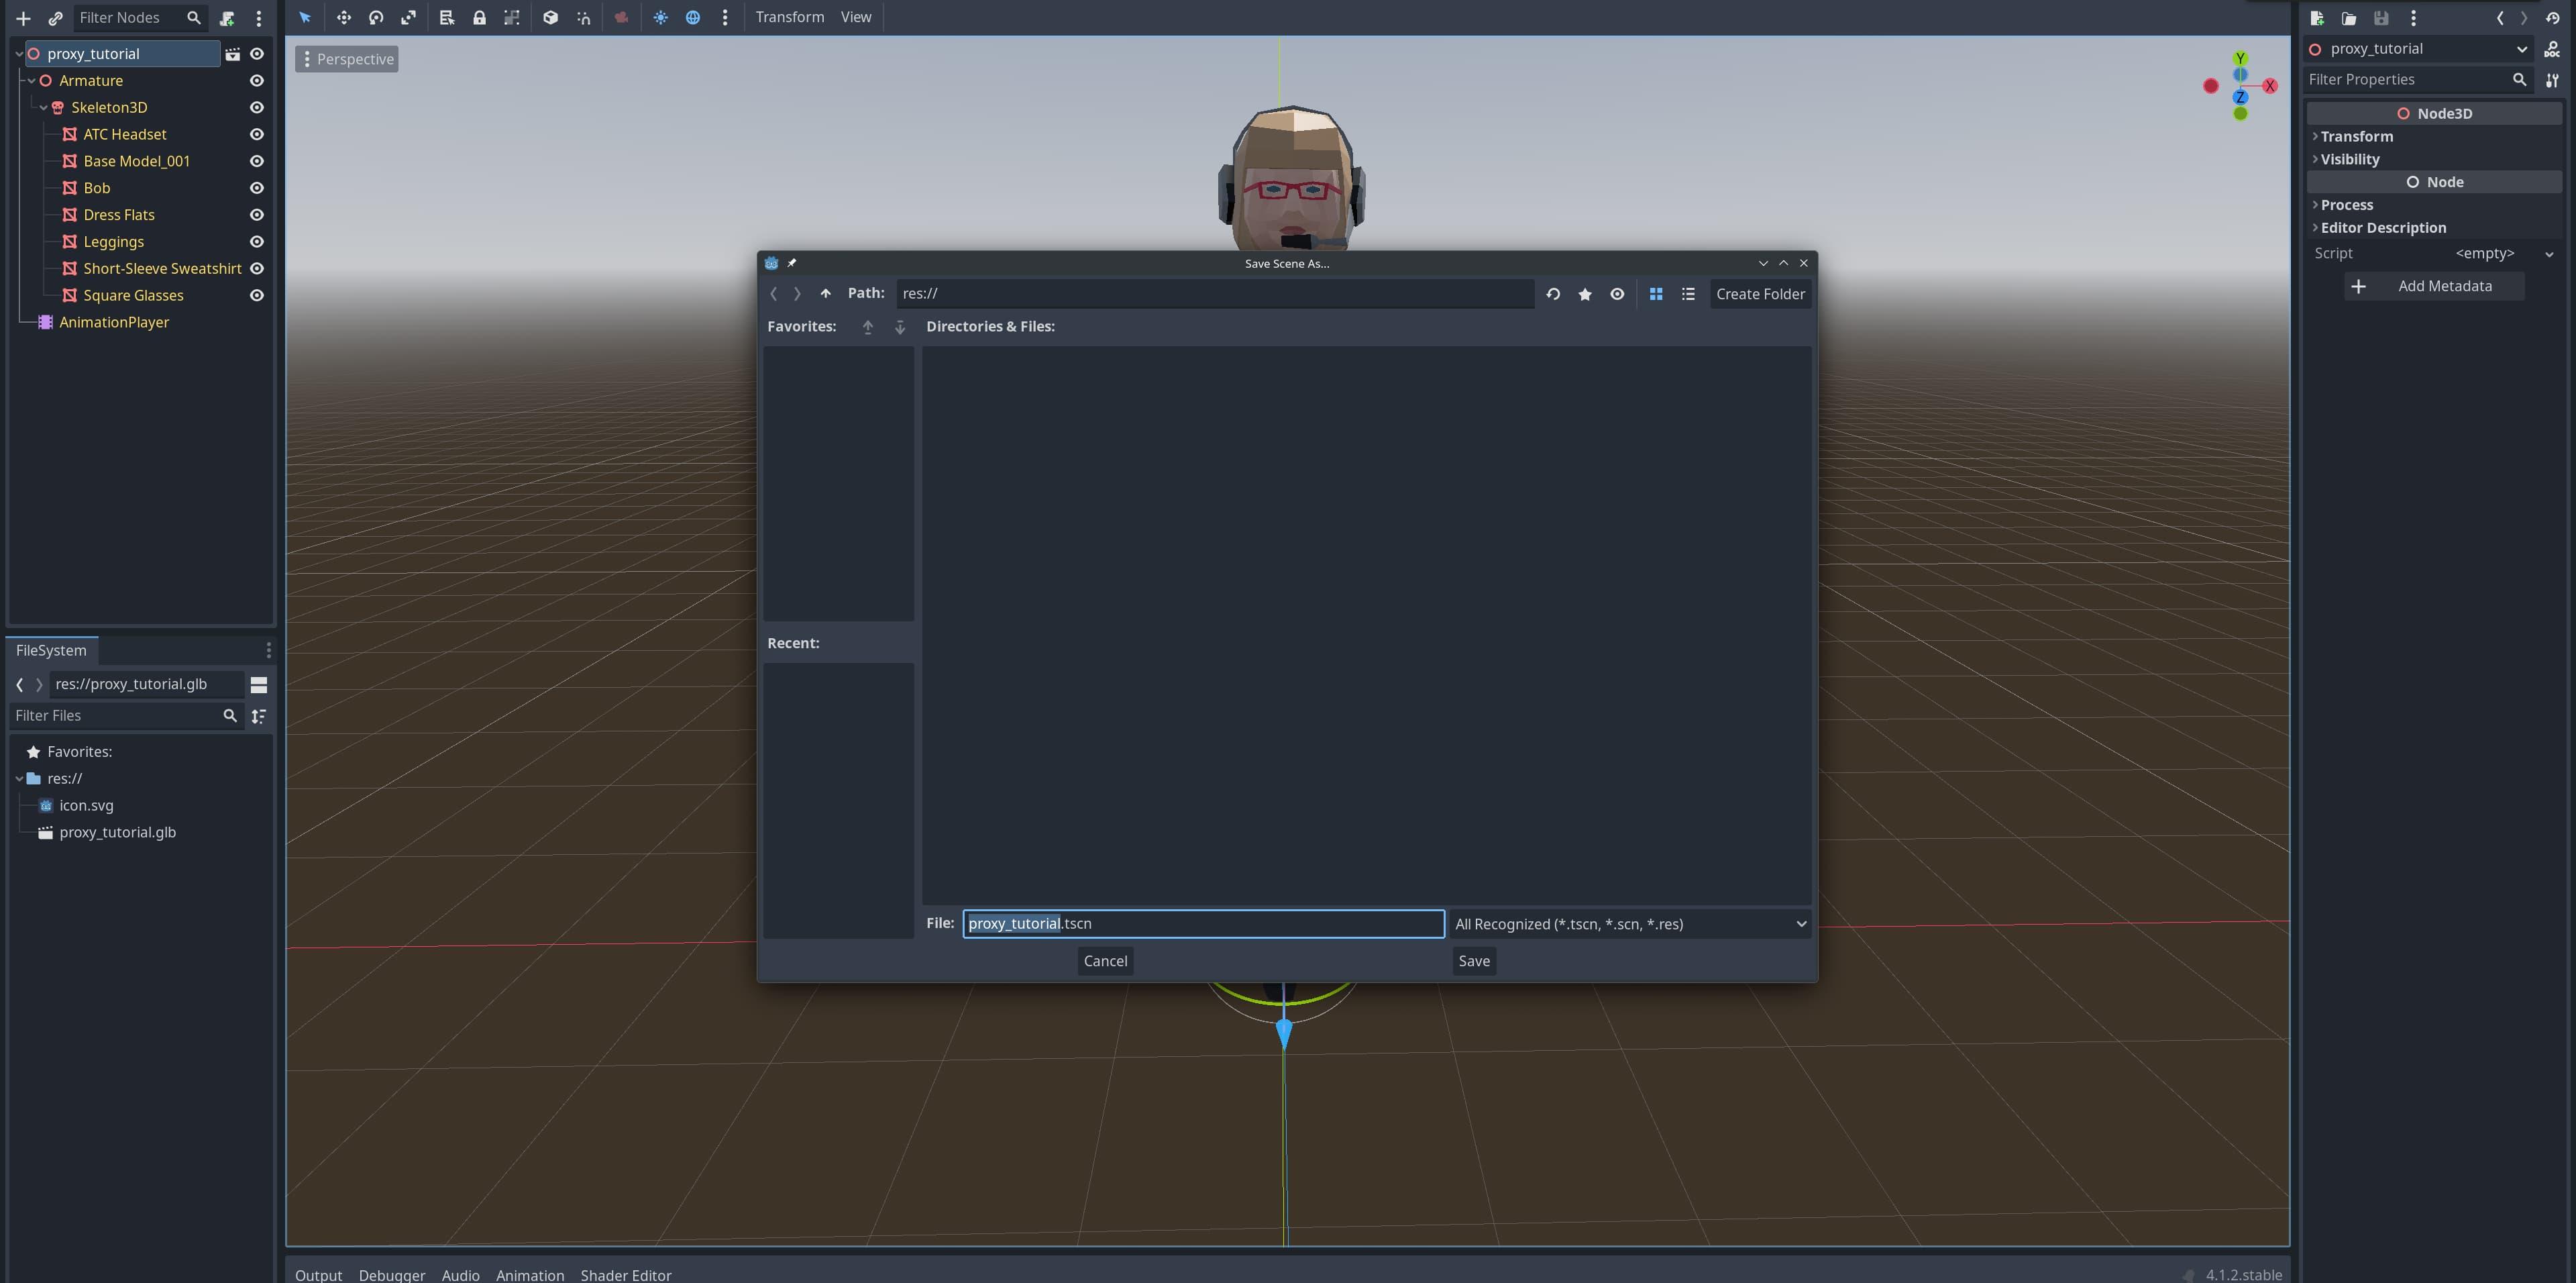
CTRL+S, then click on the Save button in the dialog that pops up
Next, right-click on the root node (the one at the very top) of your scene, on the top-left of the screen. From the window that pops up, click on “Clear Inheritance”.
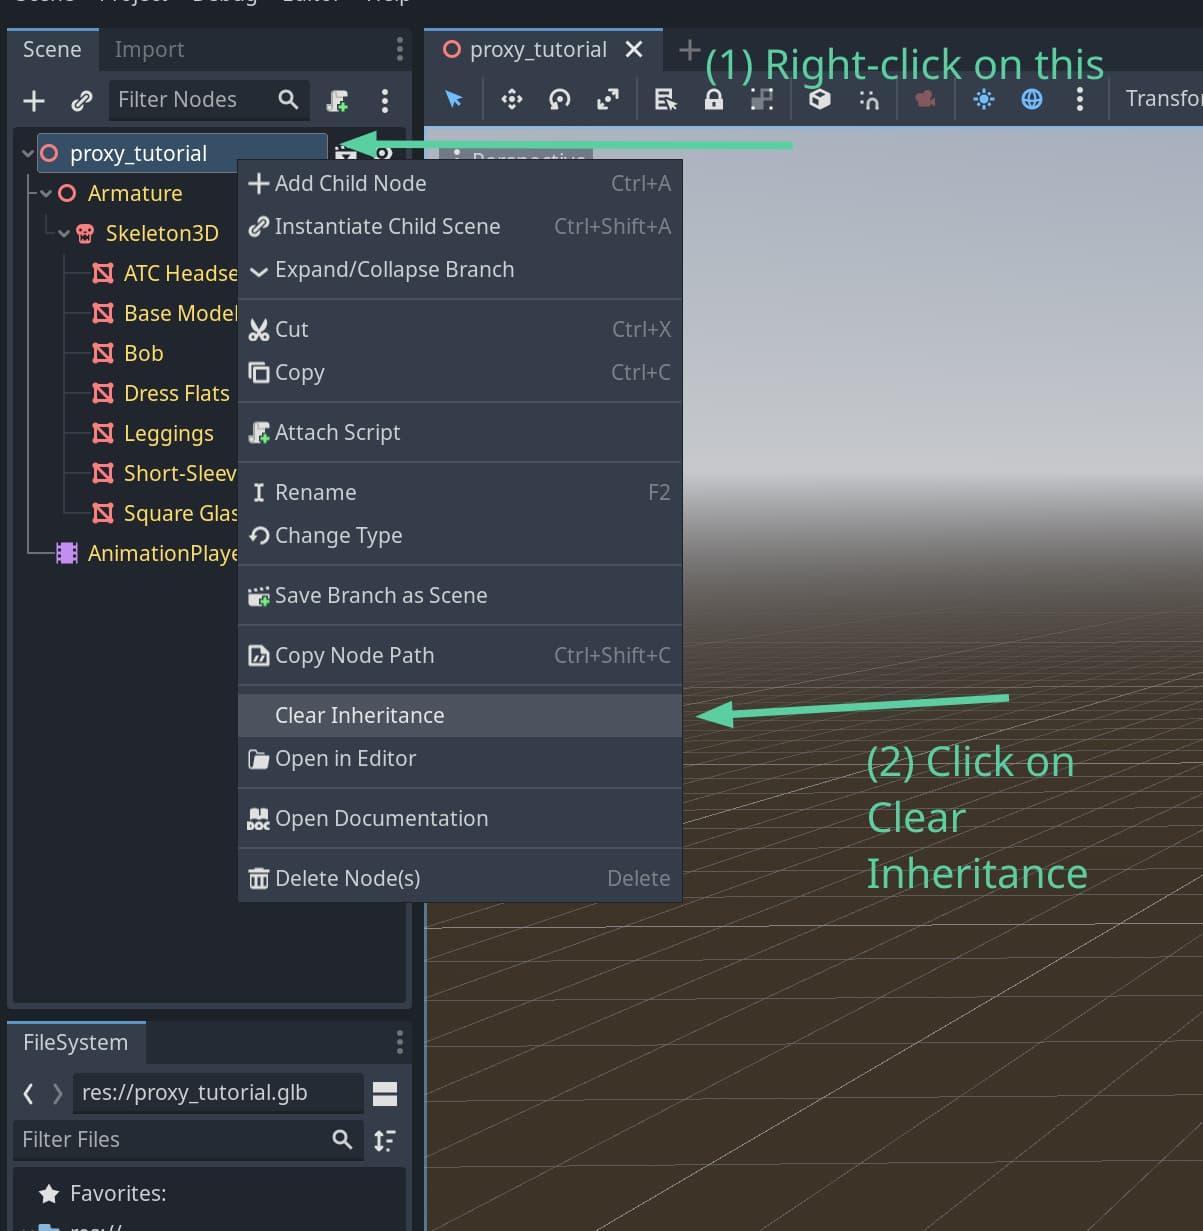
Right-click on the root node, and click on Clear Inheritance
Then, click the “Clear” button on the window that pops up. Then, hold CTRL and press S again to save the scene.
Finally, click on The “AnimationPlayer” in the left-hand panel, then click once on the loop icon in the bottom-right of the screen, until it turns blue.
Then click on the animation play button in the bottom-left of the screen. And your character should begin performing their animation in an infinite loop.
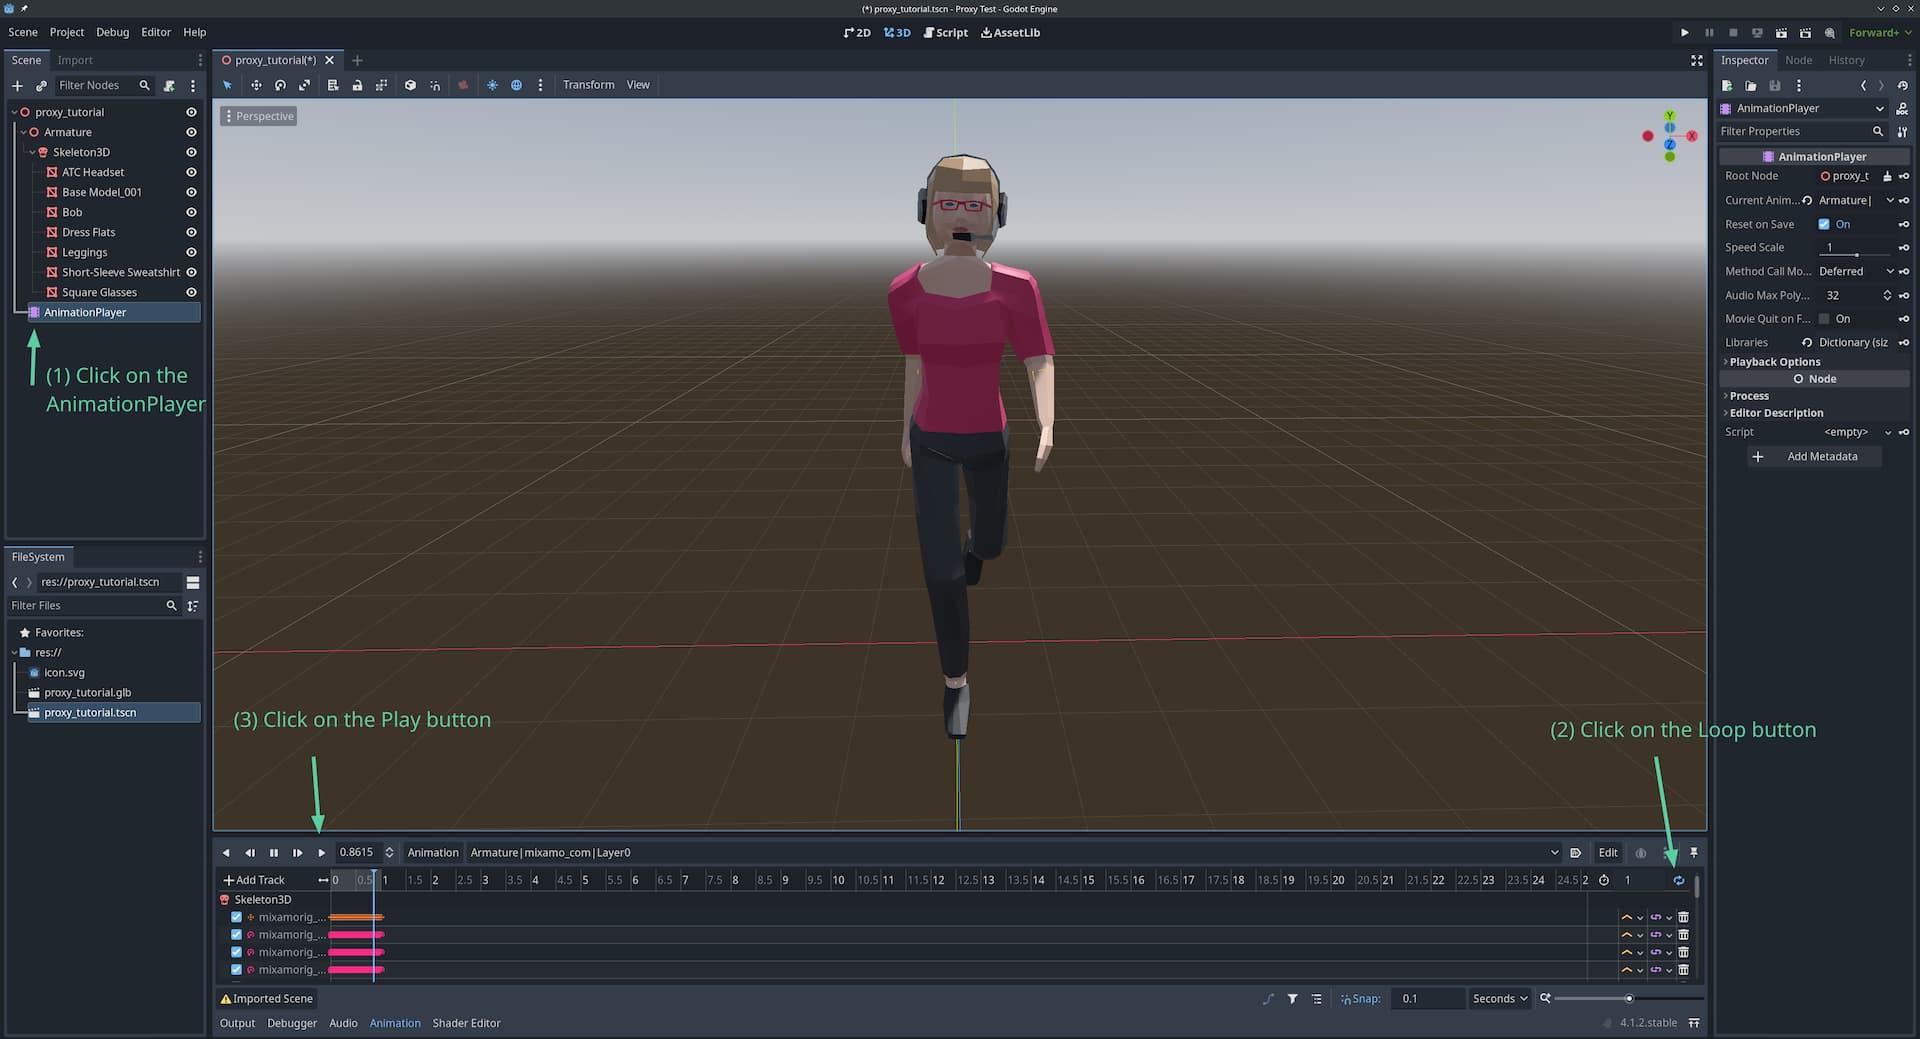
Ta-Da!
OK, that’s about it for now. I didn’t want to end this blog post on a cliffhanger, so hopefully it was rewarding to see the animated character in Godot. Of course, there’s much more that can be done with this workflow. But it’s a start, and hopefully I’ve somehow helped to eliminate some of the friction in this process.
If you thought it was really tricky, you’re not alone. I felt overwhelmed by… everything, really, when I first tried to get into Blender. But through the help of several great tutorials, and with a lot of practice and experimentation, I learned more. And I’ll continue to learn more. One day I might actually be good at this stuff XD.
Anyway, thanks so much for following along with this extensive blog post. Hopefully you learned something, or at the very least hopefully I got the gears turning in your head. Maybe you want to go and model your own 3D characters now. Maybe you want to come up with your own animations. Maybe you have a dream game idea that’s finally achievable with these tools. Whatever it is, I hope to have inspired you somehow.
As for me, I’ll continue to experiment in this space. And I’ll be back with more 3D modelling-related blog posts “Soon” (TM).
Until next time, thanks for reading. Now go out there and make something awesome!