Hacking Universal Remotes with JP1
Last Updated: 03/04/2023
A primer on the weird and wonderful JP1 project

Matthew Piercey

Have you ever looked at something and wondered, “Does that do what I think it does?” It happens to me pretty often. My mind is constantly trying to make sense of how things work - both how to use them, and how they were designed.
So when I came across what really looked like a programming port, inside the battery compartment of one of my universal remotes, my mind immediately jumped to “could that be used to re-program the remote?” The answer, as I would eventually find out, was yes. Yes it very much could be used that way.
This is a story of the ragtag determination of a group of tinkerers who’ve found a common obsession, of curious people putting that curiousity to good use, and of the Internet’s unquenchable desire to reverse engineer even the mundanest of devices. This is the story of my introduction to the incredible JP1 project, and how a bunch of forum posts let to me being able to use a remote control in ways the manufacturer never intended.
My first encounter with the an idea I later was able to associate with the JP1 project came when I opened the back of a universal remote, and realized there was something peculiar next to the battery compartment. Six little header pins, connected directly to the circuit board below. Now, I was (and still am) no expert on the design of electronics. But I knew a programming port when I saw one. These types of ports are common in hobbyist computer and microcontroller boards, like Arduino boards. There is generally a voltage pin, a ground pin, and some way to transfer data.
As I said, I’m no expert on such things, and there are many ways of doing it, but a common way to allow for data transfer on such a port is to have a “reset” pin, a “transmit” pin, and a “receive” pin. All together, you will often see:
VCC (voltage in)
GND (ground)
RTS or RST (reset)
TX (transmit)
RX (receive)
So that takes up five pins, leaving the sixth for… well, in this case nothing. It’s true, sometimes even the most complicated-looking of connectors have empty pins, for various reasons. Sometimes it’s just that it was easier to make a symmetrical connector, instead of one with only the bare minimum of pins.
But with this in mind, I think you can understand why I looked at my remote and thought of it what I did.

That's a programming port if I've ever seen one
Now, at the time, I didn’t think much more of it. To me, it made a lot of sense to have a programming port on a remote like that. In the factory, you could connect a newly-made remote to a machine that would program its motherboard with its firmware. Or maybe, you could use it as part of a testing procedure.
I thought it was likely that the factory would have disabled the functionality of this port somehow. Perhaps once the firmware was uploaded to the motherboard, it would no longer respond to commands from the programming port. And even if it still somehow worked, I knew I wasn’t the one to figure out what to do with it. But surely I wasn’t the first to notice something this obvious. Surely someone else bought one of these remotes, only to discover something interesting inside. I mean, in the hardware hacking world, an exposed programming port means a device is practically begging to be reverse-engineered.
But for whatever reasons, I didn’t decide to do any more research on it. To me, and this was a big reason at the time, the remote was working as I wanted it to work. So why bother trying to hack it, and more than likely breaking it? For a few years, that was my mindset.
Eventually, though, I got ahold of another one of these remotes. Well, a newer, stripped-down version that was made for Rogers, the Canadian telecom giant. And wouldn’t you know it, this one didn’t even bother to hide its programming port in its battery compartment. It was right out there in the open, at the very bottom of the remote. And it had, get this, five pins, the exact amount necessary for the type of programming port I was thinking of.
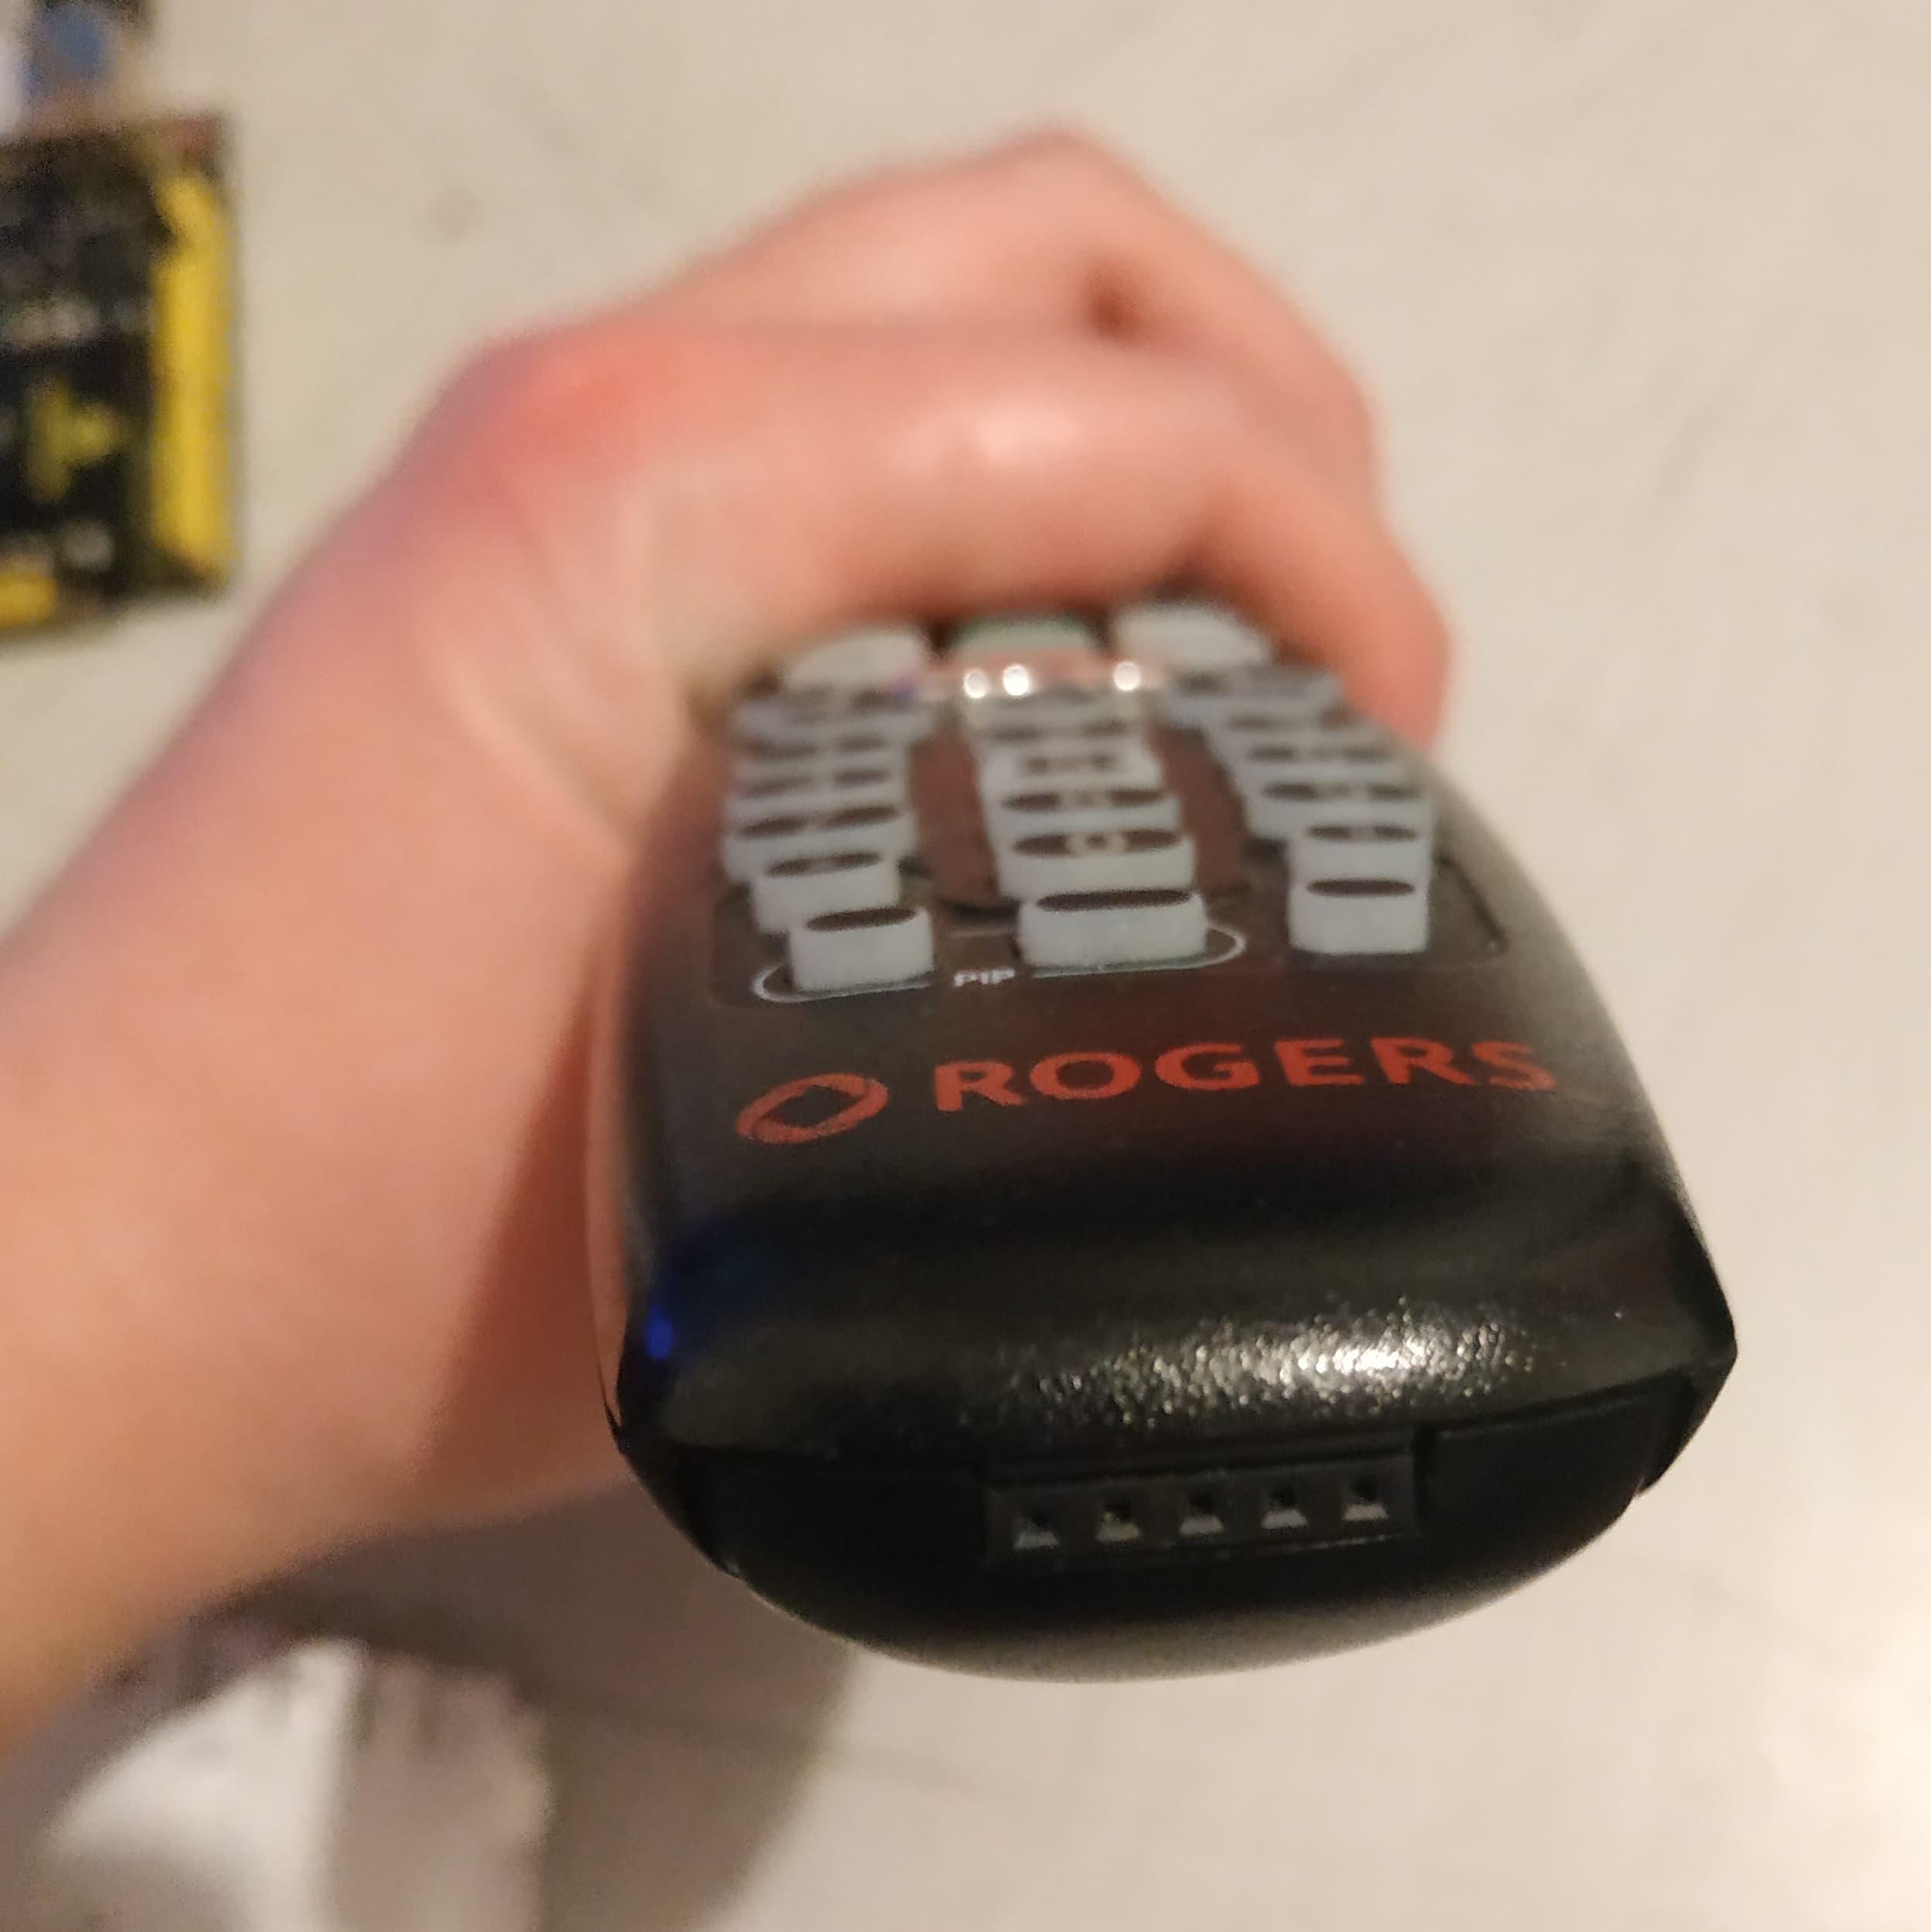
Gotta admit, they worked it into the design pretty well
Now, I would have chalked this up to an interesting coincidence, and moved on. That is, if the remote was of any use to me. But it was an almost universal remote, because it was set up to work with a specific type of Rogers cable box. And while the “TV”, “Audio”, and “DVD” settings could be changed, the “Cable” settings could not be changed.
So it wouldn’t work with my Bell box. Which honestly made it next to useless in my mind. Why bother using a remote that can’t control the device it would most often be used to control? Now the wheels were turning.
I noticed that both this new Rogers one, and my older “generic” remote were both manufactured by “UEI”. That was no coincidence. And that, along with the model numbers of both of my UEI remotes, was enough to crack this case wide open.
I stumbled upon the JP1 wiki, and down the rabbit hole I went.
I read that if I wanted to reprogram my remotes (and I did), I was going to have to find a specific type of cable for them. Namely, a cable with an FTDI FT232RL chip. Thanks to the JP1 wiki’s excellent guide on creating a JP1 cable, I was able to find a cable on eBay that looked like it would be compatible. It was a few bucks, so I decided I would order it and wait for it to arrive.
When it did finally arrive, it honestly sat on my desk for a few weeks. Because I guess I have something of a one-track mind, and I was working on some other side-project at the time, apparently. But one day, I decided to take it for a spin.
I started with my older remote, because the guide on the JP1 wiki specifically referenced a six-pin port that looked a lot similar to the one it had. So I wired it up, relying on the colour coding of the different little wires protruding from my programming cable.
But, wait a second, where were was the yellow wire the JP1 guide mentioned? Oh no, I did it again. My cable must have been subtlely incompatible or something. But after a bit of digging, I found a listing on icstation.com for a cable that looked just like mine. And it said that “There is a slight change of the cables color now. Original Blue changed to Pink. Original Yellow changed to Gray.” Phew, dodged that bullet. I mean it makes sense, I ordered from one of the suggested eBay vendors from the JP1 guide. Not that this kind of thing hasn’t happened to me before, or anything…
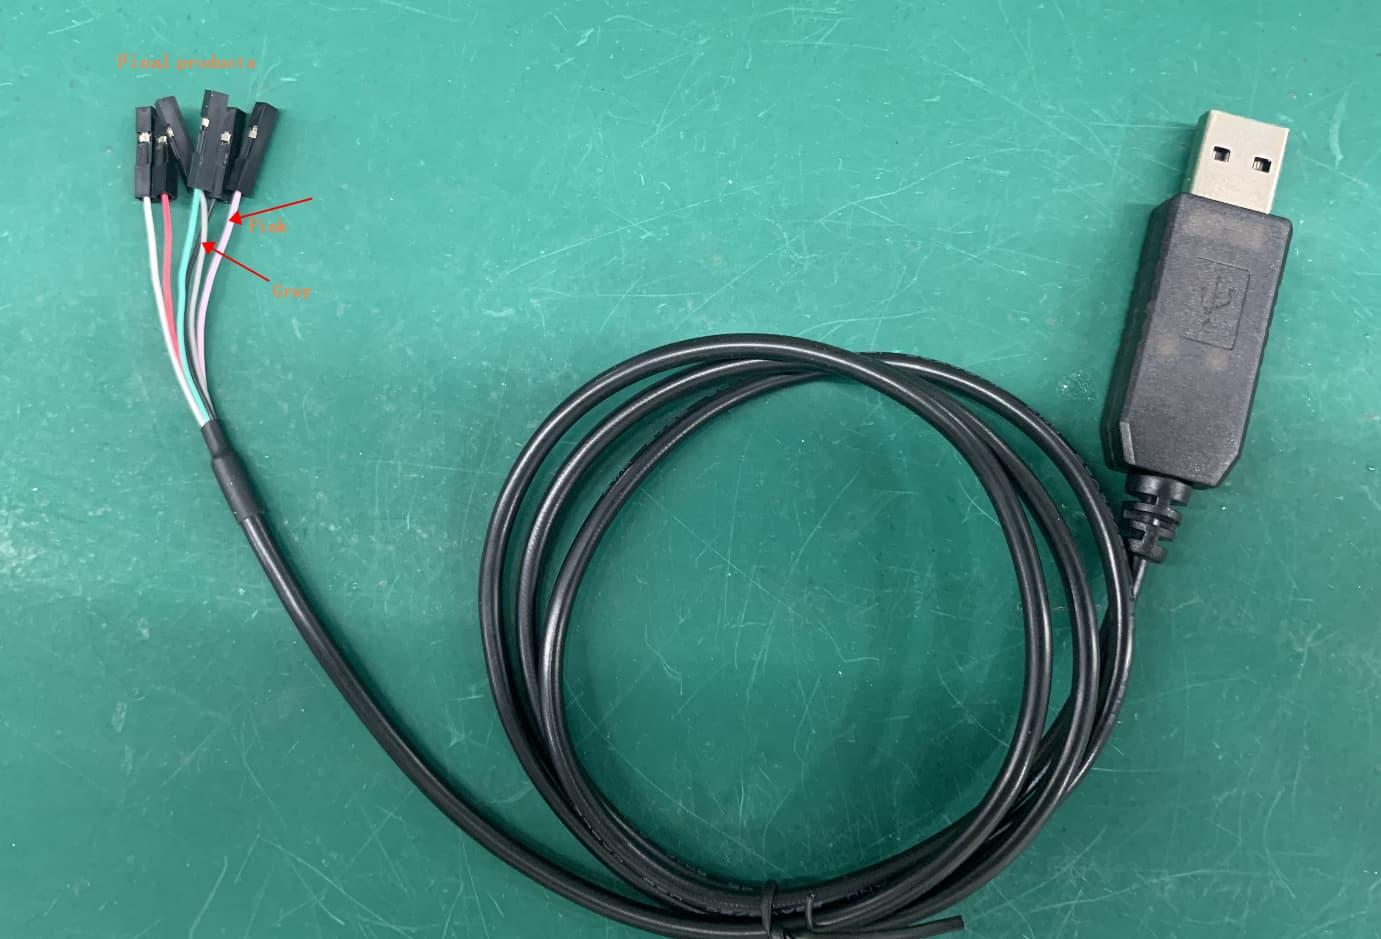
The picture of a similar cable I found on icstation.com
OK, so my cable was good. And I put every where in the right ports. OK, now what? Sure, now I can technically plug the remote into my computer via the USB port on my programming cable. But then what?
Thankfully, the JP1 wiki came in clutch again, introducing me to a piece of software known as Remote Master. Boy was I in for a wild ride. So I downloaded the latest version of Remote Master, installed it, plugged the remote into my computer, and… AND…
Nothing. Well, when I opened Remote Master (specifically RMIR v2.14.16), I tried doing Remote → Download from Remote. And it clearly seemed to detect my cable (which has a little FTDI interface chip hiding inside the USB connector) but I was getting an error that it wasn’t finding my remote.
I figured, well that’s my fault for trying to use some random software on Manjaro Linux. So I tried using it with macOS. Same error. Then Windows 11 (I hate Windows 11), and no dice. I was getting more than a bit frustrated at this point. I had tried the same setup on different devices. Was it my cable that was the problem? My remote? My sanity?
As it turns out, I misinterpreted a part of the JP1 wiki’s guide on connecting a remote to your computer. It said (in a specific scenario) to take the batteries out of the remote before attempting to connect it to a computer. But I eventually ran out of options and decided to put the batteries into my remote. Yeah, so, that worked. So much for all that. But here lies an important lesson - even if makes you end up kicking yourself later. Often a more scientific approach to troubleshooting is ideal, changing just one variable at a time and making a note of the results, if any. But sometimes you have to be willing to throw everything in your arsenal at a problem, come what may.
Either way, now that I was able to “Download from Remote”…
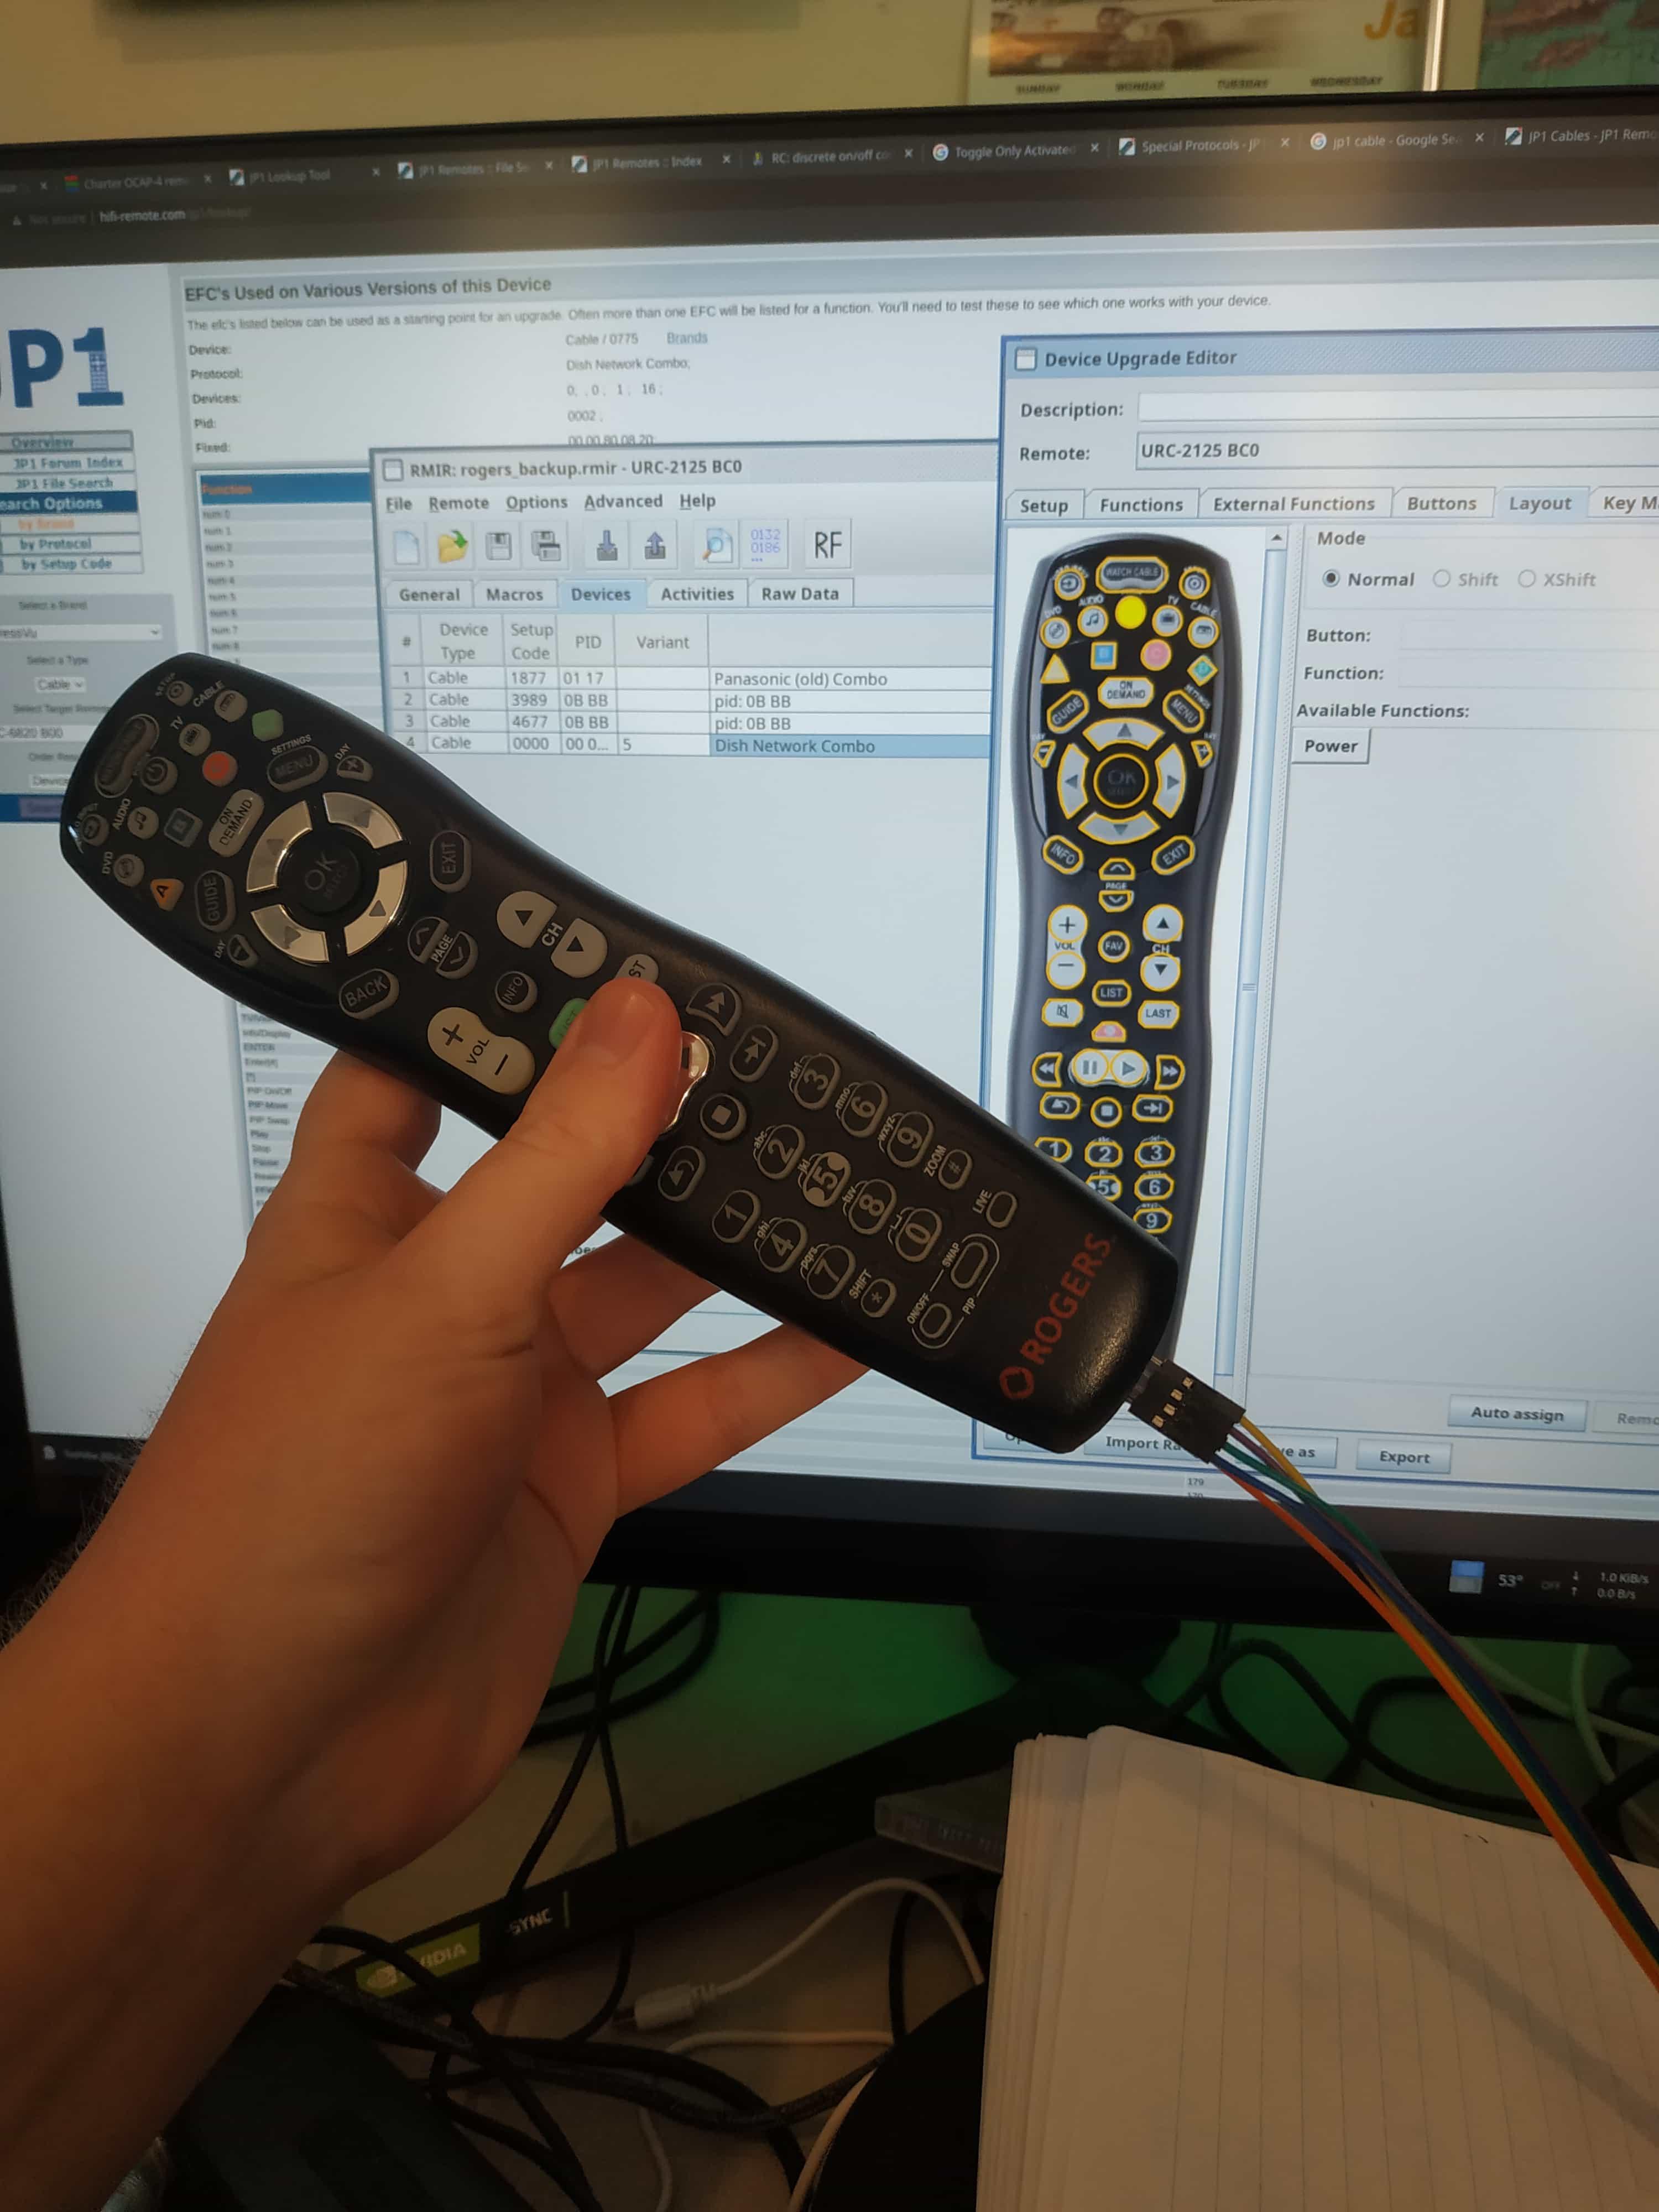
Now that I had my remote hooked up to my computer via my programming cable, and RMIR was recognizing it. I actually started with the older remote, since I wasn’t exactly sure if the Rogers one would cooperate or not. I had found a forum thread about the specific model, though.
But anyway, I was introduced to the… interesting interface of RMIR.
I smell Java
Granted, the weird scaling on my 4K monitor is somewhat doing RMIR dirty. It doesn’t actually look that small and inscrutable. But it’s not exactly what I’d call the peak of user-friendliness.
That being said, it’s still a major step up from the “old way” of doing things, which apparently involved a sprawling Excel spreadsheet. And hey, it’s free, so I’m not going to look a gift program in the mouth. Or something like that. Nevertheless, I’m not going to say it doesn’t take a bit of getting used to.
And this is the part of the post where I try to make a heady anecdote about the nature of software or something. But hear me out, I think I’m onto something. See, there’s a lot of software out there that was created by people who saw a problem - no matter how personal and seemingly-insignificant it may have seemed to others at the time - and wrote some code to make their own solution. Now sometimes, especially before the advent of the Internet, these pieces of personal software perform their duties in relative obscurity, fulfill their purpose, and are all but forgotten. But every now and then, one of these ideas blossoms into something truly special. And maybe, just maybe, a community of likeminded developers and users starts to form around it.
I think it goes without saying that the JP1 project (that found its name from “JP1” printed onto some remotes’ silkscreens) is one such endeavour. And, if you’ll allow me to say this about a ragtag group of TV remote hackers, it’s pretty inspirational and aspirational.
Anyway, back to the task at hand. My older remote was actually working quite well, but there was one thing I wanted to change about it. Specifically, though there wasn’t a dedicated button for that on the remote, I wanted a button to be able to change the picture size on my TV. But I figured while I was at it, I’d also add support for my Blu-Ray player. And I had been noticing something weird about the “Source” button, so I wanted to try to fix that, too.
It took some time, some cross-referencing of forum posts and wiki articles, and a bit of trial and error, but all three of those goals were achieved!
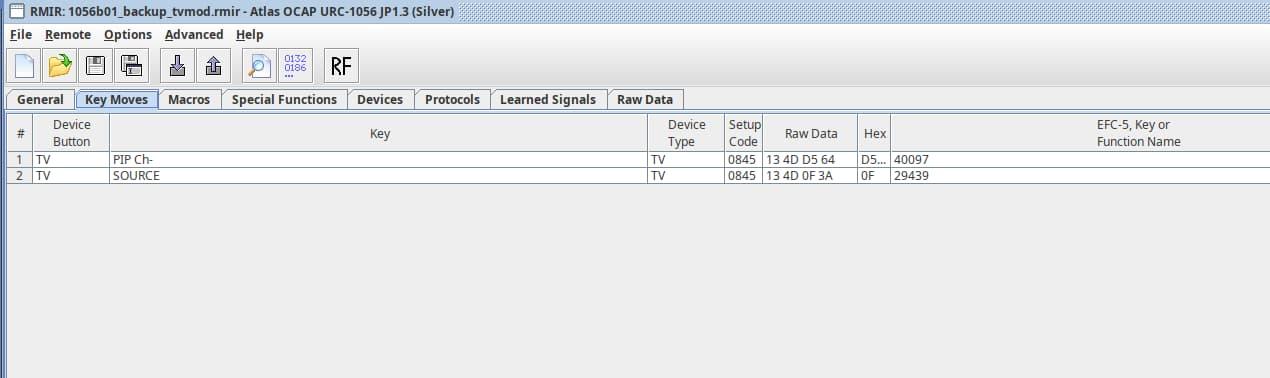
The "PIP Ch-" button was unused, so I found the code for "Picture Size" on a Toshiba TV, and mapped it to that
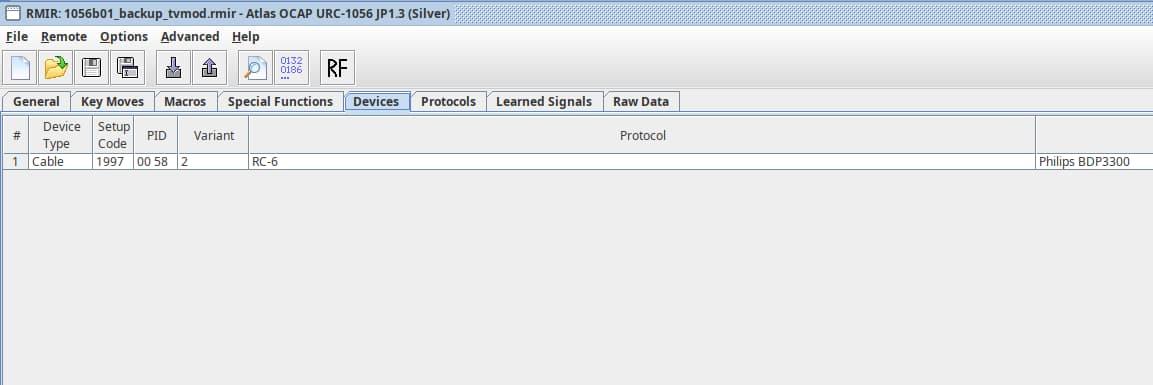
This was for setting up the remote to work with my Blu-Ray player
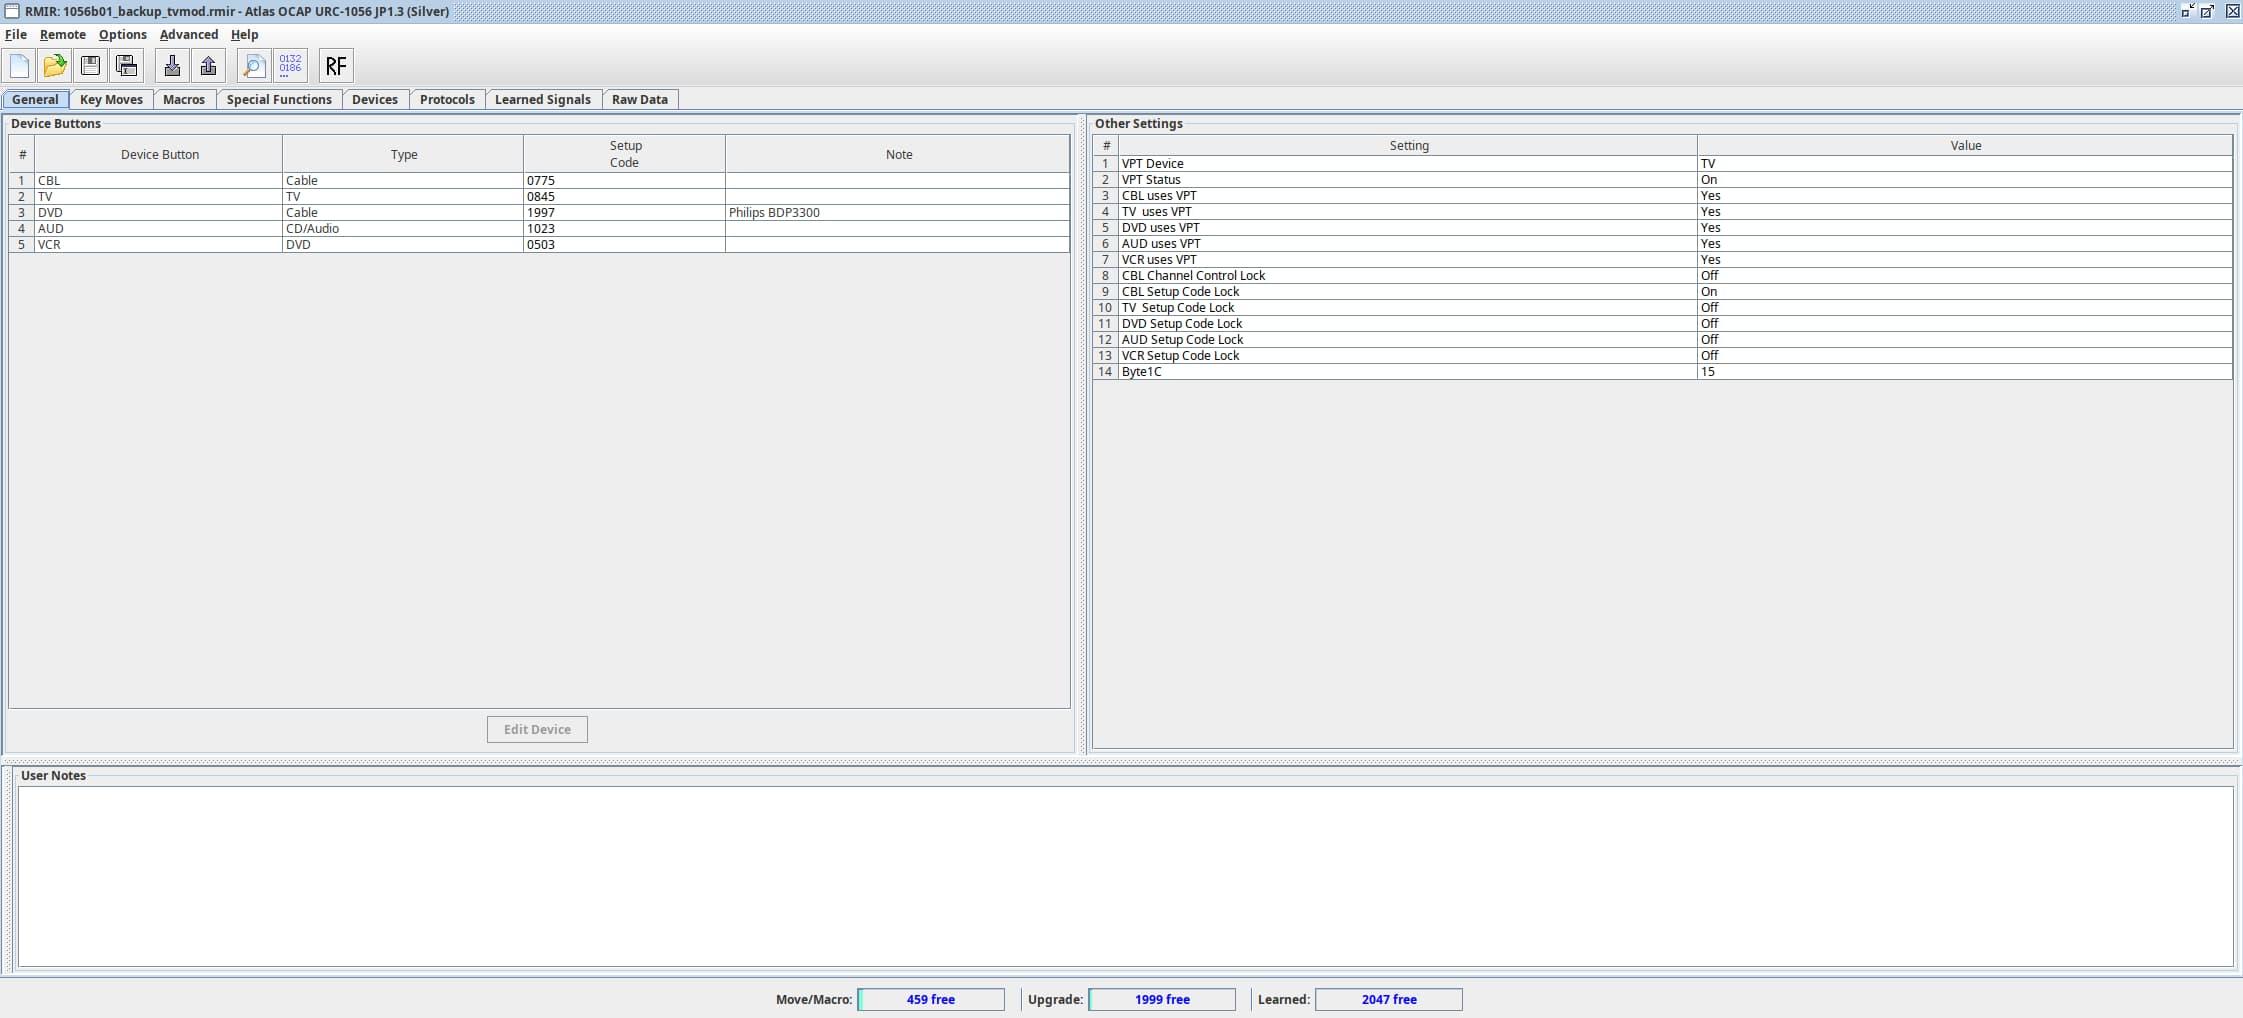
It may not look like much, but those clunky Java-based tables show the fruits of my labour, and meant I was able to upgrade my older JP1-compatible remote. I clicked on the “Upload to Remote” button, held my breath, watched the light on my programming cable flicker, and…
It worked! It was quite the journey to get to this point, but I felt satisfied that I had learned something, and had been able to apply that knowledge in a practical way. No more relying on pressing the “Menu” button and scrolling through several options to change the picture size on my TV. Just one click of the “PIP CH-” button (for reference, I chose it because it’s both unused and easy to find at the bottom-right of the remote) and the picture size menu popped right up. Long had I waited for that moment.
But I’m not even scratching the surface of what JP1 and Remote Master are capable of. Granted, this post isn’t really meant to be a tutorial or anything. So sorry if that’s what you were expecting. It’s definitely going to be a bit tricky, but if you really want to try this out for yourself, the right information is out there. If you’re willing to look, but hopefully now you know where to start.
But I was pretty sure this was going to work with my older remote, once I got set up with RMIR. And once I realized the batteries had to be in the remote in order for it to be recognized by the computer (there are apparently some you’re not supposed to keep the batteries in while connecting, but neither of mine were that kind of remote).
The time had come to begin my dark ritual. The goal: get a Rogers remote to work with a Bell set-top box. But first, I had to connect it to my computer. This proved more difficult than expected.
I honestly kinda forget what the exact pinout of the connector on the bottom of the remote was. Even in the hifi-remote forum post where I found people talking about getting this remote to work with JP1, there was a considerable amount of confusion about how to plug it in. Luckily, the pinout was such that you couldn’t easily plug it in backwards. But just because it wasn’t backwards didn’t mean you necessarily had the right pins. Actually, only four of the five pins were necessary. Guess the CTS line wasn’t included, and the 5V pin wasn’t required with the batteries in the remote - just transmit and receive (TX and RX), reset (RST), and GND (ground). At least I think that was the case. Again, this isn’t a tutorial and I’m not an expert on these things.
But the first step was eventually completed, after a considerable amount of trial, error, and forum lurking. I guess I could’ve made a post saying “hey thanks it worked” but those kinds of things generally aren’t my style. Because unless I have something to legitimately add to the conversation, I didn’t feel like posting anything. If there was a way to upvote or thumbs-up a post or thread, though, I definitely would have done that.
But if memory serves me, with the buttons facing me, from left to right it was something like this (with the remote batteries still in):
White (RX)
Green (TX)
Black (GND)
Grey (RST)
Anyway, after several attempts, I was in!

Halfway there. Well, technically this is a spoiler, but it makes for a good visual
The cool thing about the specific forum post I was reading, was that someone was trying to get the remote to work for the “Dish” network. That got me thinking, because the “Bell ExpressVu” satellite box I was trying to control has something to do with Dish. Not sure if Bell bought the rights to their tech, or if it was a joint venture or something. But either way, I anecdotally believed this was relevant.
Turns out, it was very relevant. In fact, it was the final piece in the puzzle! Using the “Dish Network Combo” protocol, I was able to set up my Bell box. I should mention that a “protocol” is a way of communicating with a given type of device, and Remote Master has tools that let you create and edit different protocols. Plus it comes with a lot of protocols that fellow Remote Master users have reverse-engineered and documented in the past.
But I would have been somewhat lost in all of this were it not for the excellent JP1 Device Lookup Tool website. Think of it like the little booklet that comes with a universal remote in website form, but more technical and specific, and for thousands of different devices and dozens of different remotes. A veritable wealth of knowledge for cross-referencing setup codes, protocols, and button mappings of various devices. And if you’re looking for a specific device, or if you didn’t have much luck with the lookup tool, you can always do a Google search for something like “Device Name JP1” and see what comes up. Chances are scarily good that someone may have already come up with a “Remote Master Device Upgrade“ file for it. These RMDU files can contain, among other things, the protocol of the device and its setup code, the list of different functions for a given device, and a way to map those functions to different buttons on the remote. And Remote Master has a very neat graphical interface - with an interactive picture of your remote - that lets you customize button mappings.
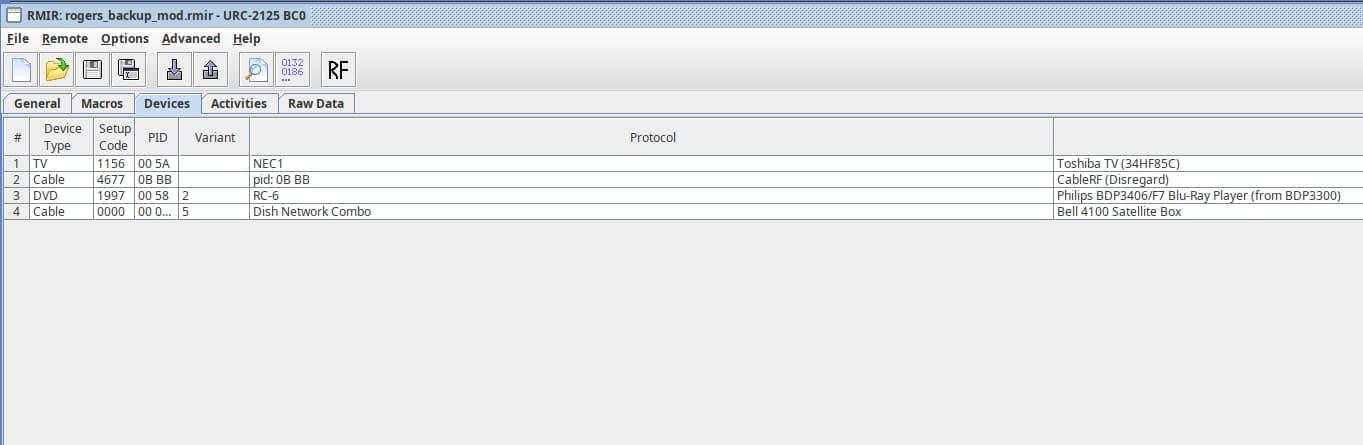
With the help of the JP1 Device Lookup Tool and an RMDU file I found for the Blu-Ray player, the ritual was almost complete
With nothing to lose, and a considerable amount of anticipation, I clicked the “Upload to Remote” button once more. For some reason, I then had to remove the batteries from the remote and put them back in after disconnecting it from my computer.
Then, I aimed the remote at my Bell box, and pressed the power button, awaiting its response to its prospective new master…
It turned off, and another press of the now-traitorous remote turned it back on!
Excited that the most heretical new feature of this remote was working, I tried to do everything I wanted the remote to do for me. Control the TV (including the picture size with, you guessed it, the bottom-right button that wasn’t being used for anything), the satellite box, and the Blu-Ray player. After a bout of testing, I was satisfied with a job well done.
Well, like I said, this wasn’t a tutorial or anything like that. And I wouldn’t say it’s a proper introduction to the JP1 project, or that it does that project justice. Nevertheless, I thought it was worth sharing. Because first of all, I learned quite a bit in the process of re-programming my two TV remotes. But arguably more importantly, this whole experience got me thinking.
I’m the type who can easily get pulled in to these types of rabbit holes. And let me tell you, there is a lot to the JP1 project to pull you in. It spans decades, with dozens of core team members and hundreds of contributors, spanning disciplines like engineering, hardware design, software development, data analysis, signal processing, and of course the documentation of it all. If you’re looking for a very niche but quite rewarding (and at least marginally useful) hobby, I might suggest testing these waters - but be warned, they’re deep. But for now at least, I’m content with getting as far as I did into it, and I don’t think I’ll be going any deeper, any time soon. Though it definitely helped me, and saved at least one remote from the e-waste bin.
Now, if you’ll indulge me, I’d like to end this article with a bit of a rant. Maybe it’s a bit over-the-top, maybe I’m crazy. But I’ve had these thoughts floating around in my head for quite a while, and this whole endeavour has, I believe, helped me formulate them into something approximating a coherent conclusion.
I’ll be honest, I like the Logitech Harmony series of universal remotes, and I was sad to see them discontinued. I was lucky enough to pick up a Harmony 300 at a thrift store a few years back (they were giving it away) and I definitely got some use out of it. Unfortunately, the volume buttons are starting to go on it, which are obviously pretty important.
But that’s neither here nor there, just an unfortunate consequence of the use of any remote. Point, is, I don’t want you to think I have no affinity for Logitech’s “walled garden” approach. Truth is, for whatever reasons, I have fond memories of walking up and down the electronics section at Walmart in the early 2010’s, and seeing all of the universal remotes. Yes, I’ve always been this weird, thank you. But the ones that always stuck out to me were Logitech’s. They were, well first of all expensive, but they were always trying to push the boundaries of what a remote control was, what it could do. In retrospect, it’s easy to look back on this era and laugh. But I gotta be honest, I really wish electronics manufacturers were still this bonkers creative.
The Logitech Harmony 890, but I'd forgive you for thinking it's a cell phone
But one thing Logitech really did right with their Harmony remotes (and is continuing to do right, for as long as they continue to support their software) is make their software a (relatively) user-friendly, one-stop shop for all your remote programming needs. Just plug your remote into your computer, download their software, hit a few buttons, and you should be good to go. While I’m an avid user of Linux and free software/open hardware in general, I’m not going to lie and say that that’s not appealing.
But here’s something to think about. Logitech discontinued its Harmony series, and yet JP1 lives on. Even with admittedly clunky software and a fairly high barrier to entry, JP1 remains popular enough to be a viable option, for numerous remotes and devices. JP1-compatible remotes are way easier (and cheaper) to find online, in thrift stores, or through salvaging, than anything Harmony-compatible. And while I’ll be the first to admit JP1 isn’t for everybody, and most would prefer the convenience, simplicity, and dare I say harmony of Logitech’s one-stop shop walled garden approach, there are always going to be people who would rather choose JP1.
The grassroots, non-manufacturer-sactioned reverse engineering project stands on its own. Without the aid of a corporation, or employees, or marketing, or a trendy website, or flashy software, or any of the things you’d think a project like this would need to function, let alone succeed - it stands. And truthfully, if it had any of those things, I don’t think it would work. Because this isn’t meant to have mass-market appeal. This is a self-aware project, driven by a bunch of people who knew exactly what they were signing up for, with an obvious purpose. Forgive me for waxing poetic, but there’s something really special about that.
In our culture of hyper-consumption, it’s a breath of fresh air to hear someone, anyone, saying that maybe we don’t always need what’s newest and flashiest. Maybe we don’t need to throw things out the second they might require any sort of repair, or are superseded by the latest products. Maybe we don’t need to just lie down and take it when we’re being inundated by commercial messaging and social trends!
Now, don’t get it twisted, I like new things too. I love my RTX 3080 Ti, my 27” 4K 144Hz monitor, and the rest of my incredibly overkill PC build. And my new Prusa i3 MK3S+ 3D printer was totally worth what I spent on it, hands down. And I (usually) really appreciate when my favourite pieces of software get a new major version with fixed bugs and enhanced features, or a graphical overhaul to make things look prettier.
But that’s just it, I can appreciate utility, real value. And to me, the mere fact that something is new doesn’t count for much. Because my new gaming PC (I mean, “workstation”) will never beat the authenticity of playing DooM, or LEGO LOCO, or Hotwheels Crash!, or Sim City 3000 on my turn-of-the-century Dell Optiplex GX1, or The Oregon Trail on my (Unitron) Apple ][+. And I wouldn’t have learned a fraction of what I now know about 3D printing, were it not for my needy old Wanhao Duplicator i3.
So I say, more power to them! More power to anyone willing to keep devices working long past their prime. To anyone able to circumvent the (sometimes downright stupid, inane, and self-destructively greedy) limitations imposed by manufacturers. To anyone passionate enough to repair, document, or reverse-engineer some piece of tech that, for whatever reasons, they care about.
And to that end, shame on the companies who profit off of such limitations. I’m not really talking about Logitech here. Honestly, as long as they keep the software to use their remotes working, they’re OK in my books. And I’m definitely not talking about UEI, the maker of most if not all “JP1 compatible” remotes. Because I get it, companies have to make money and protect their intellectual property, to a degree. And while UEI obviously doesn’t officially endorse the JP1 project, they seem to be quite far from renouncing it (at least from my limited understanding of the situation). No, I think you know who I’m referring to.
The Apple’s of the world, with their planned obsolescence and ridiculously-high walled gardens. The Amazon’s of the world, who directly benefit from a culture of consumerism and worker exploitation. The Tesla’s and John Deere’s of the world, with their preposterous, self-defeating hatred of the right to repair. The BMW’s of the world, locking built-in features behind software and subscriptions. The HP’s of the world, choosing to gouge for consumables like ink cartridges rather than dare price their products more profitably to begin with, or build them more reliably. And the list goes on, and on, and on. And yes, the Rogers’s of the world, over-relying on outsourced labour, with a board plagued by political infighting, and with leadership so far removed from the day-to-day, that they’ve clearly stopped caring a long time ago. To an extent, every sufficiently-large company is guilty of these types of offences. Personally, though, I don’t think there’s much of a solution. We just have to live above it.
Let it never be said of us, let it never be said of OverScore, that we were part of the problem. The hypocrites and virtue signallers will continue to decry plastic bags, straws, and internal combustion engines, and promote going paperless - all the while singing the praises of enormous pharmaceutical companies, buying the latest iPhones and cars only to replace them in a year or two, swooning over big tech, and considering Elon Musk the saviour of mankind. It’s sad, really. Because, at least in most of the Western world, we have it really good. But there are still some major, existential issues we as a society - as a species - are going to have to figure out, sooner rather than later. I’m not saying there aren’t.
And it only makes sense. It’s natural and in many ways comendable, to try to make a difference, and in some small way to be part of the solution. But I just can’t help but think that our society’s priorities are way out of whack. So pardon me, if I just feel the need to appreciate the determination, ingenuity, and unabashed geekiness of a group of people who reverse-engineer remote controls for fun, and share the results of their efforts with likeminded enthusiasts from all over the world.
Sorry if you weren’t expecting this kind of rant, on a blog post about hacking TV remotes, of all things. But this whole experience just struck a chord with me, and was way too compelling not to share. Anyway, I hope you got something out of it. This is Matthew Piercey, signing off. Until next time.
Long live JP1!